How to do a Test Spot and then buff out your car! Video Explanation by Mike Phillips

  • Thread starter Thread starter Mike Phillips
  • Start date Start date
M

Mike Phillips

Guest
How to do a Test Spot and then buff out your car! Video Explanation by Mike Phillips


This is my opinion is one of the best videos Yancy and I have ever made together and also one of the easiest to follow, understand and then implement the techniques video on the topic.


I coined the term Test Spot for this industry so I think I'm qualified to explain how do one as well as WHY to do one.


Test Spot - The story behind the story...


This is good too...

The two reasons WHY you should always do a Test Spot before buffing out any car


:)
 
Personal request...


I share the link to this article a LOT. If you're reading this and I've sent you the link to this article to help you learn how to machine polish - PLEASE join this forum.

This is where I PREFER to answer questions and help people. When I answer questions on this forum THOUSANDS of people will see the answers and information for YEARS.

When I answer questions in an EMAILL - only one set of eyeballs will ever see the information and that's simply NOT a good leverage of my typing time.

Make sense?

Chances are you found me by doing a Google search that led you to this forum where you FOUND information.

You didn't use Google to find an e-mail I replied to someone answering their questions. (think about it)


So please - consider joining this forum as this is where I MUCH prefer to interact with people. .


Click here to join the AutogeekOnline.net Car Detailing Discussion Forum


Thank you


:)
 
And be sure to read this,

How many pads do you need with an AIO or cleaner/wax?


One of the most common mistakes I see most people new to machine polishing make, be they enthusists or pros, is using to FEW pads for any paint correction step with a compound or polish or any paint correction step using an AIO or in other words, a one-step cleaner/wax.


More pads are better - Mike Phillips


:xyxthumbs:
 
More....


Be sure to read these two articles and do at least one of the things I show...

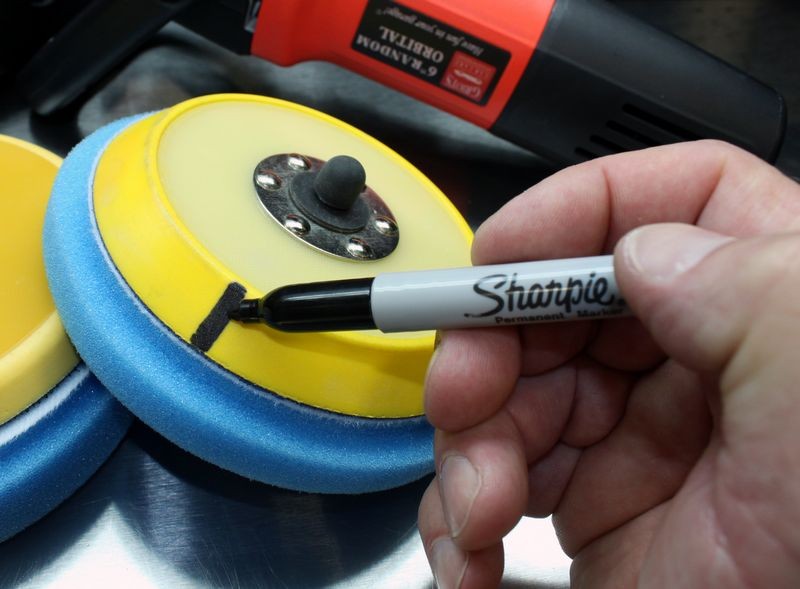
How to Monitor Pad Rotation? Mark Your Buffing Pads


Use a combination of Sharpie Markers, both Black and Silver and also touch-up paint can be used.

Mark-your-pads_001.JPG


Video: Mark your backing plate to make it easy to see pad rotation


MarkYourBackingPlate01.jpg


And here's my quote on this topic....


If the pad is not rotating on a free spinning random orbital polisher - you are not doing anything -Mike Phillips


Ha ha.... there used to be a couple of guys that would try to argue that a pad does not need to rotate in order to remove swirls and scratches, that oscillation was enough - but they've disappeared.

In reality, for any brand of free spinning random orbital polisher, if the pad is NOT rotating, then the oscillation isn't full or true oscillation but close to the pad simply vibrating against the paint. And while some people may try to argue that this vibration of a pad against the paint can and will ABRADE the paint - the abrading will be so minute that it will take you a million years to buff out one 16" by 16" area.


So from a practical point of view, and by this I mean, at some point I need to buff out the car, finish it, get my money, go home, take a shower, eat dinner and go to bed, from this practical point of view, having a pad ONLY oscillate or vibrate against paint with swirls, scratches, water spots and/or oxidation is a waste of time.

If you want to remove below surface paint defects in a sane manner and you're' going to use a free spinning random orbital polisher then the pad MUST rotate and oscillate. Anything else is just wasting time. And this is why I tell people to mark their backing plates or the sides of their buffing pads - so it's easy for your EYES to see what's happening at the surface level. Otherwise the action taking place at the pad-to-paint interface is just a blur.


:)
 
One more related article that EVERYONE should read and understand.


Abrasive Technology - THE most important factor when it comes to polishing paint

Anyone that's been to one of our classes, (car and boat), or read any of my articles concerning polishing paint, (or gel-coat), knows that I always stress the importance of using products that use great abrasive technology.

Why?

This picture tells the whole story.


watermark.php


Click the link below and READ and UNDERSTAND the simple idea it states.


Abrasive Technology - THE most important factor when it comes to polishing paint


You'll be miles ahead of most detailers simply by reading the above article and then thinking about it.


:)
 
Whenever you did the first test spot and didn't get the results you wanted how many section passes did you do with the compound when you came back to re do that section?
 
Whenever you did the first test spot and didn't get the results you wanted how many section passes did you do with the compound when you came back to re do that section?


Normally for me, if I'm not getting enough CUT from my first Test Spot - AFTER I do a second Test Spot on a new section of paint, I've probably dialed-in the pad and product to get the job done. This being true, then to RE-POLISH the original Test Spot would require LESS than 8 section passes of the new or second process I've dialed-in.

Think about it - if my second Test Spot - usually 8 section passes of the new pad and product combo FIXES an un-touched section of paint - because I've already done 8 section passes of the first process to the first Test Spot section of paint - it's not going to need the full 8 section passes of the new process because this section of paint has already been abraded.

But - off the top of my head I would say I still do 6-8 section passes just to ensure the defect level is to my satisfaction and to also not have to think about it to much and for the most part - move on.


:)
Ok, EXCELLENT!!!

Mike, you have no idea how thankful I am!
I've been needing this cleared up for a long time!

Sent from my SM-G975U using Autogeekonline mobile app
 
:bump:


The video in the first post walks you through how to use a Porter Cable polisher but the same techniques apply to any orbital polisher.


I also explain and SHOW in detail - how to do a TEST SPOT.

So important.


:)
 
Wow. I should have watched this before the last two Saturdays spent with my Griot's buffer. I'm only halfway in and will watch the rest, but I did not prime the orange pads. Otherwise I think I did a good job of ensuring I had good technique, but may not have the right product mix. I was using Mothers Compound and Finishing Polish, but it makes more sense to use the test spot method with three products available, as the swirl remover may be what I need. I was not happy with the results after two days of attempts - last weekend doing the entire car, and yesterday focusing on just the rear end and the hood. I may have improved the swirl marks a little but they're still visible, and there are other scratches that aren't coming out after multiple attempts of compound followed by finishing polish and orange/white pad combo respectively.


It's hard for me to get good pictures of the swirl marks and scratches even in sunlight with my cell phone camera but I'll give it another shot later today - photo below of the tailgate area which does clearly show a pretty rough rear bumper cover.

I did apply by hand, Mothers Reflections advanced wax, after doing all this, each time. But one thing I'm curious about; any spatter of compound or polish that occurs on areas of the car that are not painted, like rubber trim or wiper blades - what's the best way to get that out? It's pretty stubborn!

One more random question - after using a dedicated load in the washing machine of microfiber towels, mitts, and my foam pads, the orange pad in particular still had white residue on it - not a stain, I could actually feel the residue and see it on my hands. You had linked me to this thread a while back re: how to properly wash the foam pads but not seeing anything about that here:

Training Cars - For the September 2020 Detailing Class

Thank you, as always!

View attachment 75423
 
I did apply by hand, Mothers Reflections advanced wax, after doing all this, each time. But one thing I'm curious about; any spatter of compound or polish that occurs on areas of the car that are not painted, like rubber trim or wiper blades - what's the best way to get that out? It's pretty stubborn!

One more random question - after using a dedicated load in the washing machine of microfiber towels, mitts, and my foam pads, the orange pad in particular still had white residue on it - not a stain, I could actually feel the residue and see it on my hands. You had linked me to this thread a while back re: how to properly wash the foam pads but not seeing anything about that here:

Training Cars - For the September 2020 Detailing Class

Thank you, as always!

here's one thread on trim. ideally, you'd want to tape/cover things to prevent it. a few options to remove it - all purpose cleaner, dedicated wax remover/trim cleaner, an eraser.

Getting wax off trim

what did you use to wash the pad? maybe try soaking and washing by hand.
 
Thank you! I did not catch the name of the tape that Mike was using on the Chevelle in the Test Spot video, want to be careful not to just use what's laying around.

I just used regular laundry detergent to wash the pad. Is that a no-no? I know there are purpose specific detergents for pads but thought I saw on here that it's fine to use that for microfiber and pads. Happy to wash by hand as well; I imagine it's fine to squeeze it a bit to get excess product out. (I probably used too much product after watching the Test Spot video anyway.)

Use a scent free and dye free detergent. Tide Free and Gentle, Oxiclean Free, All Free, etc for microfibers. Not sure about the pads. I heard of people hand washing them with a small amount of Dawn, squeezing as much moisture out and then air drying them.


Sent from my iPhone using Autogeekonline mobile app
 
I'll consider myself lucky - I did use a "Oxiclean free" generic type of detergent as that's what we always use. Thank you!
 
Back
Top