'67 Mustang and the impossible water spots

dnoraker

New member
Joined
Apr 19, 2010
Messages
262
Reaction score
0
The owner wants it shines up the best I can do, knowing that the car has a lot of issues and he intends on a full restore in the next few years.

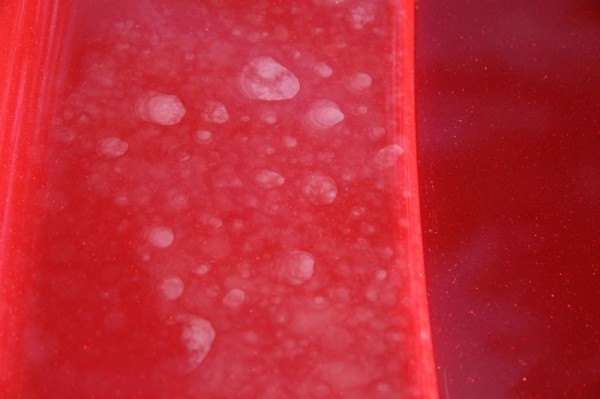
It has a ton of paint issues, many that I can't fix (deep scratches, gouges, edges burned through from previous buffings, touched-up and re-sprayed areas, etc.) It doesn't have much oxidation (except where previous detailers didn't work by hand around the taillights and such) but it seems to have some bad staining and water spots that take very aggressive means to remove.

I'm wondering specifically about the water spots, as I've never had a problem removing them. He said it was rained on and the spots showed up. Only heavy compounding or 2500 grit wet sanding remove them, but at the expense of a lot of paint, something this car does not have. Some areas are worse than others.

This is all single stage paint, though I think there are 2-3 layers in some areas. There are some thin spots where it looks like it has been burned through and there is a little darker shade of red underneath.

Is there some kind of chemical that could remove spots without removing paint? this car is headed for a restore in the next few years anyway, but I wanted to do what I can.

IMG_42311.JPG


IMG_42391.JPG


IMG_42361.JPG


IMG_42391.JPG


IMG_42421.JPG


:)
 
i had a water spot problem too and i used m105 with the new mf pads and it did it
 
Maybe try Megs #7 and a finishing pad on the PC. It may feed the paint with enough oil that it will release the deposits rather than you needing to mechanically remove them.
 
Sorry to hear about your Type III Water Spots but happy to have a thread with pictures to add to this article, which is just an article on the types... (no how to remove information)


3 - Types of Water Spots - Type I, Type II and Type III


Mike Phillips said:
Type III Water Spots
Type III Water Spots are spots that look faded or dull and are found primarily found on single stage paints after a water source lands on and then pools on the paint and is usually left to dwell on the surface for some measure of time before it evaporates or is wiped-off the surface.

Modern clear coat paints tend to be harder and impermeable, that is non-porous, so liquids don't penetrated easily and thus stain spots tend to be topical, that is only affect the very upper surface and are easier and safer to remove with a compound or polish.

Older single stage paints tend to be soft and permeable, or porous, it's common for liquids to penetrate into the paint and stain the paint below the surface. Removing stains out of single stage paints can be risky because in order to remove the stains you have to abrade the paint and if the stains penetrated deep then you risk removing too much in an effort to try to remove them completely.

TypeIIIWaterSpots.jpg


Maybe try Megs #7 and a finishing pad on the PC. It may feed the paint with enough oil that it will release the deposits rather than you needing to mechanically remove them.

Good idea especially if the goal is to use the least aggressive product to get the job done...


Here's what I wrote for removing Type II Water Spots in this how-to thread...

How to remove water spots by hand


Mike Phillips said:
How to remove Type III Water Spots Hand
Type III Water Spots are usually faded spots on single stage paints but can sometimes be milky looking spots on clear coat paint systems.

When it comes to removing Type II water Spots the limiting factor is how deep the spot penetrates into the actual film build of the top coat. You remove Type III Water Spots in the same manner you remove Type II Water Spots but if the fading or staining goes too deep you won’t be able to completely remove it safely.

To remove a Type III Water Spot by hand follow Step 4 above after first washing, drying and claying the vehicle.

On older single stage paints, because these types of paints are very porous can easily have a stain penetrate fairly deep into the paint and completely removing deep defects is always risky, so use caution.

For antique single stage paints, I always recommend pre-treating the paint with #7 Show Car Glaze to in essence put some oils back into the paint and thereby refreshing the paint and making it more workable or polishable. Plus the oils will help to restore rich color and counter the fading, whitening effect.


And here's Step 4 from the article on how to remove water spots by hand


Mike Phillips said:
Step 4 – Use a hand applied compound, polish or paint cleaner
After claying, if you still see marks in the paint where the water spots were previously, this is common and a sign that the water spots have actually etched the paint (to some level), and the way to remove these marks or impressions is to gentle abrade the paint with a compound, polish or paint cleaner.

Because these etchings are below the surface, clay will not remove them because detailing clay only remove contaminants bonded onto the top of the surface.

The way you remove below surface defects is you gently abrade the paint in an effort t level the surface. To remove below surface defect by hand you’ll need a clear coat safe compound, polish or paint cleaner. Some paint cleaners are non-abrasive in that they do not contain any ingredients with the intended purpose of physically abrading the surface. If the marks left behind in the paint are very shallow, sometimes a light paint cleaner, with the help of your applicator pad and a little passion behind the pad can remove faint marks. How hard or soft, the paint is will also a huge factor as to how easy or difficult it is to remove the water spot marks.

How to use a hand applied abrasive polish or paint cleaner by hand

  • Always work clean
  • Use a clean, soft foam applicator pad, I really like these,

    CCS Red Wax/Sealant Applicator Pads 2 Pack

    Because they are fairly thick so the spread out the pressure of your fingers better than thinner versions.

    (I like thinner versions for applying finishing waxes and sealants because then I'm not pushing hard so don't need the thickness).
  • Work on a cool surface in the shade
  • Work a small area at a time, about 8" to 10" squarish or so...
  • Use an "ample" amount of product, don't under-use and don't overuse to the point that you hyper-lubricate the surface but use enough to keep the surface lubricated throughout the process. I would use a teaspoon to a tablespoon of product, usually a tablespoon's amount to start with because your pad is dry when you start and some of the product is going to go into the pad, and after breaking in your pad then cut down to about a teaspoon's amount of product.
  • Hold your hand flat to the pad, not vertical, the idea is to not put pressure ONLY on your fingertips but over the face of your fingers to avoid Fingermarks
  • Spread the product out over the area you're going to work
  • Work the product for about a minute, don't work till the product is dry, but it should go from an opaque film to a clear film
  • Wipe off before residue dries
  • When you move on to a new area overlap a little into the previous area
Before going over an entire panel or an entire car, first do a "Test Spot" and make sure you're getting the results you want and hope for. If you can't make one small area look good with your choice of product, pad and "your technique" then you'll be glad you only worked on a small section to start with or to test and not went over the entire panel or car.

When working on clear coats by hand to actually "remove" defects, technique is just as important as your choice of product and pad, (pad = application material).

So do a Test Spot first.

Also, read the manufactures directions and follow them as the above is just a general guideline. The manufacture always knows their products best.


Product Options for removing light or shallow water spot marks

Usually the type of etching or mark left by a Type I Water Spot is very shallow so they are fairly easy to remove. So in keeping with the philosophy of,

"Use the least aggressive product to get the job done"


There are two groups below, the first group of products would be considered the least aggressive product to consider starting with, if the water spots are more serious than shallow, light, slight marks or impressions in the paint, then consider one of the more aggressive products in the Compound and Polish category.

Paint Cleaners at Autogeek.net
Pinnacle Paintwork Cleansing Lotion
Wolfgang Paintwork Polish Enhancer
3M Scratch Remover
Dodo Juice Lime Prime Lite Cleaner Glaze
Dodo Juice Lime Prime Pre-Wax Cleanser Polish
Duragloss PreCleaner
1Z Einszett Paint Polish
Four Star Ultimate PreWax Cleanser
Griot's Garage Fine Hand Polish
Liquid Glass Pre-Cleaner
Meguiars SCRATCH X 2.0
Meguiars SwirlX Swirl Remover
Mothers California Gold Pre-Wax Cleaner
Mothers California Gold Scratch Remover
P21S Gloss Enhancing Paintwork Cleanser
Poorboy's World Professional Polish
SONAX Premium Class Paint Cleaner
SONAX Paint Cleaner


Hand Applied Compounds and Polishes
Pinnacle Advanced Swirl Remover
Pinnacle Advanced Finishing Polish
Wolfgang Finishing Glaze
Menzerna Micro Polish PO 87MC
Menzerna Super Finish (Nano) PO 106 FA
Menzerna Intensive Polish PO 91E
Menzerna Polish PO85RD
Menzerna Final Finish PO85U
Meguiar’s Ultimate Compound
Meguiar’s Clear Coat Safe Rubbing Compound
Meguiar’s Clear Coat Safe Polishing Compound
Meguiar’s ScratchX
Meguiar’s SwirlX
Meguiar’s M105 Ultra-Cut Compound
Meguiars 205 Ultra Finishing Polish
Meguiar's M82 Swirl Free Polish
Meguair's M09 Swirl Remover 2.0
Meguiars M02 Fine Cut Cleaner
Meguiar's M80 Speed Glaze
3M Super Duty Rubbing Compound
3M Perfect-It ll Rubbing Compound Fine Cut
Poorboy's World SSR1 Light Abrasive Swirl Remover
Poorboy's World SSR2 Medium Abrasive Swirl Remover
Poorboy's World SSR 2.5 Medium Super Swirl Remover
Poorboy's World SSR 3 Heavy Duty Compound


Be careful...


:)
 
I tried the #7, but the spots didn't budge. I had to settle for removing them 50-100%, depending on how confident I felt that there was enough paint there. In the end, 2500 grit paper was the tool of choice where there was enough paint, and M105 by hand with a terry cloth in hard to reach places. With either, I was constantly checking to make sure I wasn't going too far.

The owner just picked it up and was more than thrilled. He never thought it would look this good. He had his friend with who runs a huge weekly car show in a nearby suburb and he was pretty floored at how good it looked. He had also considered buying the car at the same time as the owner and knows it well. He now wants me to bring fliers and business cards to hand out at the show tomorrow. I don't know that I was looking for this much work, but I think I'm going to get it whether I like it or not! :buffing:

I'll post the pictures in the Show N Shine....
 
Back
Top