Are These Headlights Salvageable?

jbnery6465

New member
Joined
Dec 30, 2009
Messages
70
Reaction score
0
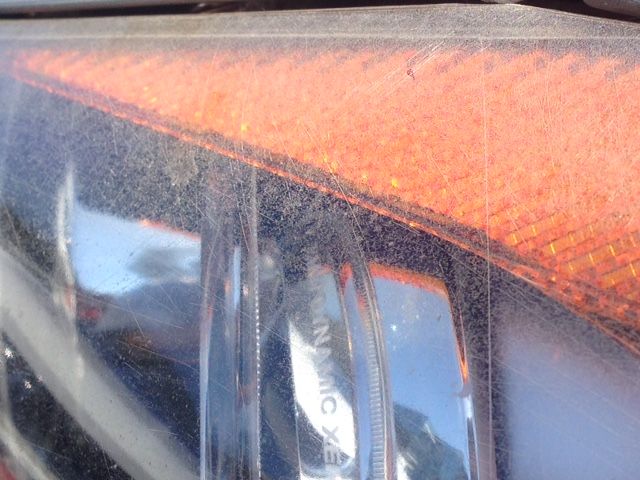
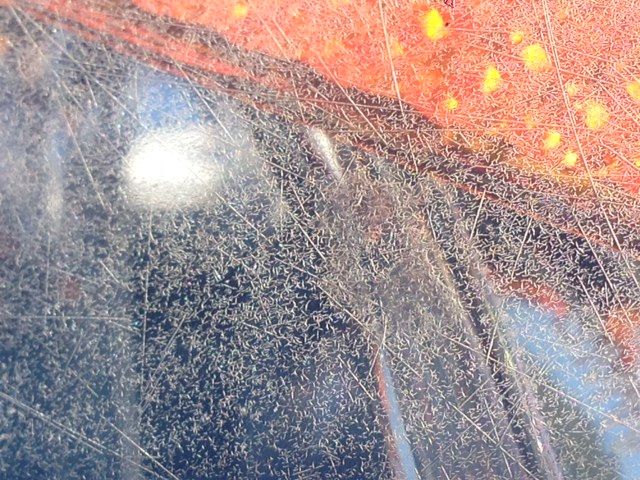
More than just being pitted, scratched, and starting to fade yellow...but it's those thousands of little 'worm-like' scratches/fissures. They're not deep enough to where I can feel them with my fingernail. Could've been there when I bought the car used but noticing it even more now since it's starting to yellow.

I'm leaning towards wet-sanding then polishing out with my PC7424 and Meguiars 105/205 combo. I've done the search and it's a 50/50 toss up between doing a manual wet-sand vs drill assisted wet-sand (like 3M Restoration Kit)

Question is...if I were to use the 3M kit with proper techniques, will I be able to restore these? By technique, I mean: medium pressure with 50% overlapping passes, start with coarse grit horizontally, then medium grit vertically, then fine grit horizontally. Compound, polish, then protect with sealant or film. (I have BF Crystal Seal on hand and would probably try using that before shelling out for film or permanent coating)

I would like to get feedback from anyone who's ever had headlights this bad. Or are those little fissures indicative of something totally different? Like the lens cover getting ready to shatter, lol. BTW, vehicle is a 2006 BMW 325i (E90).


TIA!

Headlight%201.jpg


Headlight%202.jpg
 
what the heck did they do! yeah the plastic has crazed.

imo you can vastly improve them, but i'm curious if there is damage on the inside too. those are so wrecked, it's hard to see!
 
I cannot for the life of me remember what grit came with the 3M package..

With those condition its in, me personally, I would start wet sanding 1000 (maybe even 800), 2500, 3000.

after 3000 grit I would hit it with Megs 105 then Megs 205 and finish off with Megs PlastX

that's just my 2 cents. Let us know what you do and take pics of the turnaround! Curious to see how these clean up if they do
 
You probably have to blend the worst damage with some 400 or 600 on a DA or by hand since they're not cloudy yet.
 
The 3M Kit comes with 500, 800, and 3000 grit. Luckily right now the damage is mainly towards the top end of the housing and doesn't effect the light output. But I definitely want to take care of it soon.

I don't have the 3.5 backing plate on my PC and the 5.5 might be too big. I'm assuming I can use a drill if I'm using the 3M Kit.
 
It's actually not that hard to wetsand by hand. The plastic is fairly soft and it's not a large surface. Just make sure sure you use a sanding block. I've wetsanded headlights with 800 grit up to 2000 grit, then followed with WG TSR using a PC and got excellent results. It took about 30 minutes per headlight.

These are pretty bad but I bet they can be saved. Show us before/after shots!
 
Yes, you can use a drill with the correct 3M kit.

I like hand sanding if they are in the car. I have more control that way and you can remove a lot quickly while moving the block slow with even pressure. If you pull them out and can secure the light to work on in a vice or something, then machine working "might" be easier. Most aren't to hard to remove, but not sure about BMW.

You might need to get more aggressive sanding to reduce your time spent trying to remove these. First you might want to clean first and hit with a polish or compound just see how bad, or deep the "fissures" go.

To me these cracks are a severe form of degradation that will only get worse, and the cracks will grow.

This light was really bad. There were a couple of big cracks that seemed like they went the whole way through. Light showed no moisture in it though.

image898.jpg


This after just compounding to see how bad it was

image899.jpg


This is after what seemed like a half hour of sanding with 320 wet.
image901.jpg


Sorry I do not have a finished picture at the moment. Partially because I lost daylight and did not complete what I wanted to do to them. Currently they look similar to the second picture with a little less cracks.
 
Bonus to the 3M kit is you get the fancy 3000grit, 3" medium cut foam pad, and 3" backing plate since you don't have one, but IMO the 3000 really isn't necessary and the 3" backing plate is kinda flimsy and has a non-removable foam interface pad. Foam interface is fine for sanding, but not needed/wanted for use with a foam pad. Maybe ok with thin microfiber disks?
 
Autogeek and your local retailers also have this 3M kit.

3M Scratch Removal System, 3M Scratch Remover Kit, scratch repair, remove scratches

Has the 3" drill bp and a heavier compound pad and a finer polishing pad than the headlight kit.

I did contact 3M for this information, their site is a PITA.

But there over the counter kit pads are rated in aggressiveness as so: this is a generalization comparison of the three

Black-fine-polishing
Orange-medium-polish/comp
Purple-heavy-compound
 
You probably have to blend the worst damage with some 400 or 600 on a DA or by hand since they're not cloudy yet.
That's a good idea.

It's actually not that hard to wetsand by hand. The plastic is fairly soft and it's not a large surface. Just make sure sure you use a sanding block. I've wetsanded headlights with 800 grit up to 2000 grit, then followed with WG TSR using a PC and got excellent results. It took about 30 minutes per headlight.

These are pretty bad but I bet they can be saved. Show us before/after shots!

Wetsanding is easy, I agree. I just worry about efficiency with the damage I have. I guess I'm approaching it the same way when correcting paint - compound by hand or compound by DA. Is there anything specific that hand-sanding can accomplish that machine-sanding cannot?

Bonus to the 3M kit is you get the fancy 3000grit, 3" medium cut foam pad, and 3" backing plate since you don't have one, but IMO the 3000 really isn't necessary and the 3" backing plate is kinda flimsy and has a non-removable foam interface pad. Foam interface is fine for sanding, but not needed/wanted for use with a foam pad. Maybe ok with thin microfiber disks?
So the question now is whether or not the flimsy backing plate that's included in the 3M kit is not as effective as sanding by hand with a sanding block given the damage I have.

Thanks for all the feedback!
 
Sometimes when headlights get to a certain place it is better to just replace them. After years of neglect and damage, some things are just plain ruined. I don't know what kind of car those are on, but you could probably find better headlights at a pick-n-pull type junk yard or see what aftermarket options there are. At least have that as an option in case your efforts at restoring them goes wrong and they can't be salvaged. Those look pretty far gone to me.
 
Sand, sand, sand and sand some more.
No compound will fix that.
Here''s my process. 500 and even 320 if need be, then 800, 1500, 2000, 3000, compound, polish, coat, done.
 
Sometimes when headlights get to a certain place it is better to just replace them. After years of neglect and damage, some things are just plain ruined. I don't know what kind of car those are on, but you could probably find better headlights at a pick-n-pull type junk yard or see what aftermarket options there are. At least have that as an option in case your efforts at restoring them goes wrong and they can't be salvaged. Those look pretty far gone to me.
Definitely last resort, lol! But it's only the top part that looks like that, in person it's not too noticeable unless you look really closely.


Sand, sand, sand and sand some more.
No compound will fix that.
Here''s my process. 500 and even 320 if need be, then 800, 1500, 2000, 3000, compound, polish, coat, done.
It's definitely a sanding job, haha. Do you have any preferences between sanding by hand vs machine (ie. 3M Headlight Restoration kit)? Pros and cons of each method?
 
Since you can't feel them with your fingernail, I really don't think they'll be that hard to remove. Start wetsanding with 400. Then 1000 and 2000. I'd suggest hand sanding for 400 because you'll want to take your time to see how it's going. You can switch to machine after that.
 
I would like to alter my former statement.


I like hand sanding if they are in the car as compared to aggressively sanding with a typical drill using a 3" backing plate. This is because the normal style drill is not really designed for this. You can easily apply to much pressure just because of how it's designed, and can also be hard to control "wobble". I have more control that way and you can remove a lot quickly while moving the block slow with even pressure.


IMO the 3000 really isn't necessary if you have a good compound and pad and the 3" backing plate is kinda flimsy. It's no wet noodle, but many other BPs are more stout. I don't know if the 3M kit one would stand up to extended abuse. I believe it just a compromise for what's needed in the kit. Not a "pro" product, but not "disposable" either and has a non-removable foam interface pad. Foam interface is fine for sanding, but not needed/wanted for use with a foam pad. Probably really not a problem for limited use, but I would think it would eventually blow apart from heavy use. I am also not sure if backing plate in the Scratch Removal Kit is the same as the on in the Headlight kit. Might not have the foam interface. Maybe ok with thin microfiber disks?
 
You can clean the lens and get them clear, but those tiny cracks are permanent. They're not on the surface of the lens and would require so much sanding that you'd damage the lens before ever reaching the depth of the cracks.
 
Good god, what happened?

I know these lights... I own the same car... Pre-lci BMW 3-Series sedan... But mine aren't nearly as bad ... But I also am starting to get nicks and haziness in the corners on mine.

Replacing might not be a cheap solution, if you have adaptive xenons, they are $1500ish for a set...sigh.

OP, if you are looking to replace... Checkout DEPO headlights... Might be more of a cost effective way to replace them.
 
I use a 3" bp on a G110 DA for the 500/800/1500
Hand for the 2000/3000
Machine for Compound/Polish
 
like most, I start with 400 wet, by hand w/ backing soponge (megs in auto paint sections of store) and I have gone 400. 600, 800 1000, 1500, 2000, 3000, and then some good compound and polish and the megs uv protect.

lights3.jpg
 
Back
Top