Mike Phillips
Active member
- Dec 5, 2022
- 51,004
- 6
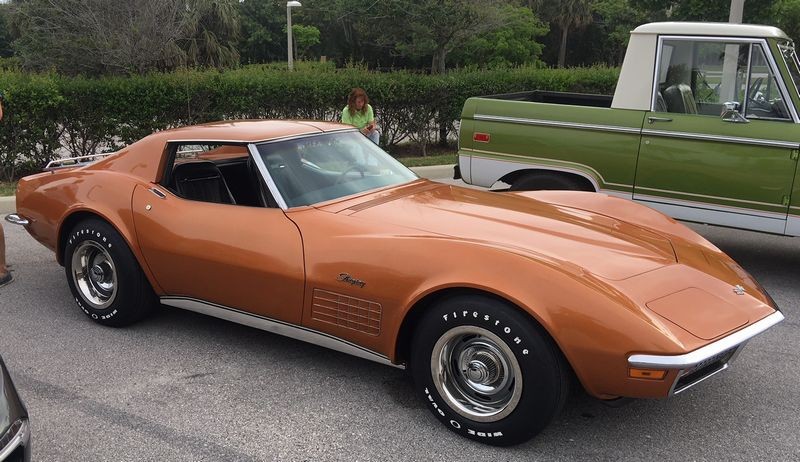
1971 Corvette Original Paint detailed by Mike Phillips
A few months ago I met the owner of this pristine, all original Corvette at our Cars & Coffee Show.
He told me he was the second owner and the original owner always garage-kept this car. He asked me if I saw any room for improvement to the paint?
It was cloudy outside and the sun was low, (cars and coffee shows are usually in the morning), I looked the paint over very closely and said "yes" I see room for improvement in both gloss and clarity. I also pointed out there were raised body lines where the paint had already been worn through and you could see black primer. There were also areas on the flat panels where the paint was so thin you could see black primer starting to show under the burnt orange paint.
Because the paint still had a pretty good shine, I told him the way to approach this car was using the old philosophy of,
"Use the least aggressive approach to get the job done"
In this case, I would recommend the Pinnacle Jeweling Wax. This product contains a light amount of abrasives for light abrading or cleaning of the surface and a Carnauba wax for protection. My other recommendation was to stick with foam "polishing" pads, NOT foam cutting pads. I know a lot of experts recommend using foam cutting pads or microfiber cutting pads but what they don't understand is that the pad itself is an abrasive and can haze the paint all by itself. So as a good rule of thumb, especially when working on softer paints and darker colors, the safe approach is to stick with foam "polishing" pads. In fact, I wrote a recent article on this topic here,
Good rule of thumb when using an AIO - stick with foam polishing pads by Mike Phillips
When detailing cars for money, the one thing you don't do when selling a one-step package, (that's when you use an AIO or cleaner/wax), is promise to remove all the swirls and scratches. If a customer wants all the swirls, scratches, water spots and oxidation removed then in most cases, the best way to approach this type of detail job and this customer's EXPECTATIONS is to either do a 2-step or 3-step paint correction process and of course charge accordingly. If a customer doesn't want to pay for the time, labor and materials required to do multiple-steps to their car that's perfectly okay, just educate them that maximum defect removal takes longer and thus costs more.
For this project, I kept it real simple...
Waterless wash - As a professional courtesy I don't use running water from a garden hose on classics, (restored or original) as it introduces water to places where rust can form. So I tend to use a waterless wash unless it's a class where I need to teach washing techniques and the car for the class is a classic, (restored or original).
Detailing Clay - I like Nano Skin Towels for heavily contaminated cars but when I want to be CAREFULL I use an ultra fine detailing clay like the Pinnacle Ultra Poly Detailing Clay and Pinnacle Clay Lube.
Pinnacle Jeweling Wax - This product will clean, polish and protect in one step. It works too good to be lumped into the same category of AIOs or Cleaner/Waxes so it's a Jeweling Wax.
Griot's Garage 6" Random Orbital Polisher with 5" Lake Country Backing Plate - Free Spinning 8mm orbit stroke length
Griot's Garage 3" Random Orbital Polisher with the Griot's factory 3" backing plate -Free Spinning 5mm orbit stroke length
RUPES 6" and 4" Yellow Foam Polishing Pads (Yeah I know, I'm co-mingling, but these are a very nice "polishing" pad, not to much cut and also not too soft)
Sorry no action pictures.... but here's what I have...
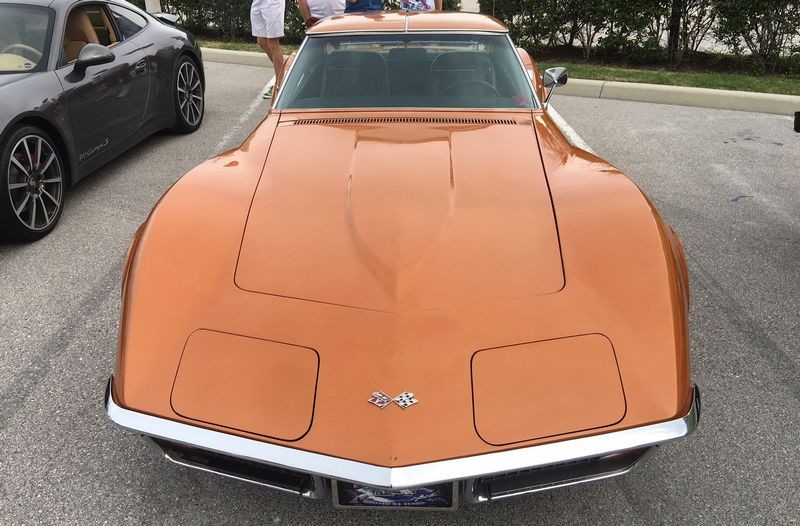
The owner removed the Corvette Crossed Racing Flag emblems off the front and back of the car. In my first how-to book, The Art of Detailing I explained in this book to have the OWNER remove trim and emblems because if they break, (and often times they do break), then you're not financially responsible for replacement. Plus as I explain in the book, most owners of cars like these are familiar with their cars and know and understand what's involved with removing trim and emblems.

In this pictures, don't look at the gas cap cover, look at the LIGHT reflecting off the paint and how muted or cloudy and dull the paint is in the reflection. This is oxidation and this is what I meant when I told the owner,
"yes" I see room for improvement in both gloss and clarity

Look at all the dirt, crud and TOGW that has built-up under the emblem over the last 47 years.

Gloss comes from smoothness
Again, I told the customer I thought there was room for both gloss and clarity. Gloss STARTS with a smooth surface. I know the average person looking at the Corvette in the parking lot at the cars and coffee car show probably thinks like this,
"Wow - that Corvette looks amazing"
But clay tells another story. If there's ANY contamination on the paint so that the paint won't pass the Baggie Test, then gloss is diminished. So the FIRST STEP in creating a glossy finish is getting the surface smooth.
Here you can see a film of light contamination over the face of the clay patty, not bad for the hideaway headlight covers...

But when I clayed the hood I picked up quite a bit more contamination for a garage-kept car....


After claying, I machine applied the Pinnacle Jeweling wax CAREFULLY so as not to make any of the thin areas of paint G-R-O-W as that's what happens when you buff on thin paint, the primer shows through more and more...
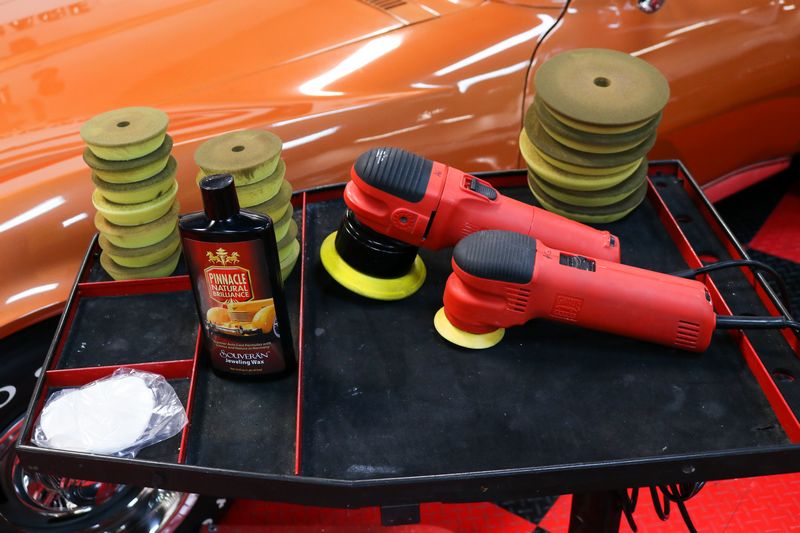
Here's the after shots, first take a L00K at how many pads I used to carefully and methodically machine buff the 47 year old super think single stage metallic paint.

I count,
13 - 4" pads
6 - 6" pads
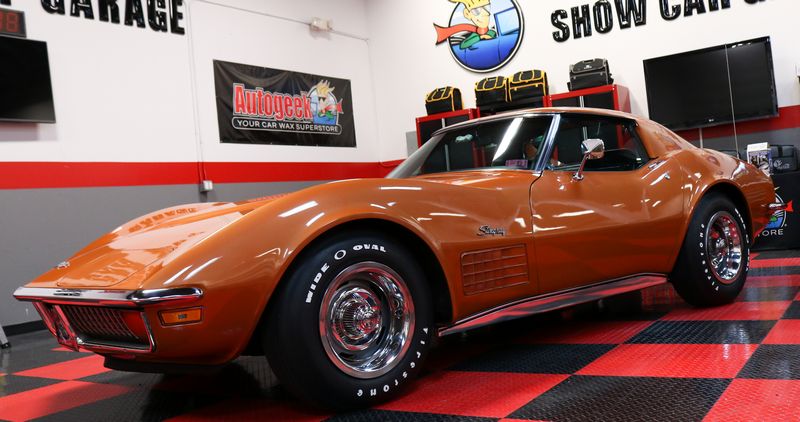
Here's the results....

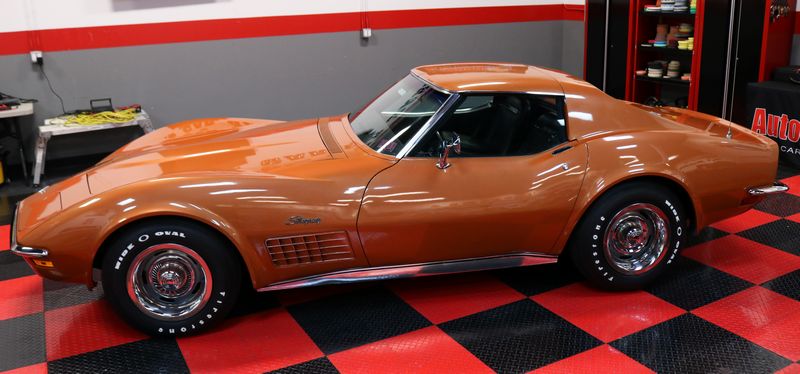


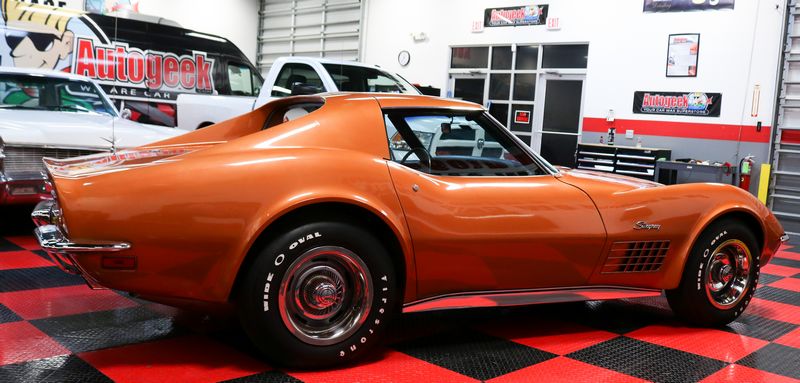
Not a bad looking old 2-door Chevy....
On Autogeek.com
Pinnacle Ultra Poly Detailing Clay - $19.99
Pinnacle Clay Lube - $17.99
Pinnacle Jeweling Wax - $45.99
Griot's Garage 6" Random Orbital Polisher - $149.99
5" Lake Country Backing Plate - $17.99
Griot's Garage 3" Random Orbital Polisher - $104.99
RUPES 6" Yellow Foam Polishing Pads - $12.99 each
RUPES 4" Yellow Foam Polishing Pads - $7.99 each
And of course.... LOTS of towels. I used the Gold Plus Jr. microfiber towels for this project.
Gold Plush Jr. Microfiber Towels - 12 Pack - $39.99
")
A few months ago I met the owner of this pristine, all original Corvette at our Cars & Coffee Show.
He told me he was the second owner and the original owner always garage-kept this car. He asked me if I saw any room for improvement to the paint?
It was cloudy outside and the sun was low, (cars and coffee shows are usually in the morning), I looked the paint over very closely and said "yes" I see room for improvement in both gloss and clarity. I also pointed out there were raised body lines where the paint had already been worn through and you could see black primer. There were also areas on the flat panels where the paint was so thin you could see black primer starting to show under the burnt orange paint.
Because the paint still had a pretty good shine, I told him the way to approach this car was using the old philosophy of,
"Use the least aggressive approach to get the job done"
In this case, I would recommend the Pinnacle Jeweling Wax. This product contains a light amount of abrasives for light abrading or cleaning of the surface and a Carnauba wax for protection. My other recommendation was to stick with foam "polishing" pads, NOT foam cutting pads. I know a lot of experts recommend using foam cutting pads or microfiber cutting pads but what they don't understand is that the pad itself is an abrasive and can haze the paint all by itself. So as a good rule of thumb, especially when working on softer paints and darker colors, the safe approach is to stick with foam "polishing" pads. In fact, I wrote a recent article on this topic here,
Good rule of thumb when using an AIO - stick with foam polishing pads by Mike Phillips
When detailing cars for money, the one thing you don't do when selling a one-step package, (that's when you use an AIO or cleaner/wax), is promise to remove all the swirls and scratches. If a customer wants all the swirls, scratches, water spots and oxidation removed then in most cases, the best way to approach this type of detail job and this customer's EXPECTATIONS is to either do a 2-step or 3-step paint correction process and of course charge accordingly. If a customer doesn't want to pay for the time, labor and materials required to do multiple-steps to their car that's perfectly okay, just educate them that maximum defect removal takes longer and thus costs more.
For this project, I kept it real simple...
Waterless wash - As a professional courtesy I don't use running water from a garden hose on classics, (restored or original) as it introduces water to places where rust can form. So I tend to use a waterless wash unless it's a class where I need to teach washing techniques and the car for the class is a classic, (restored or original).
Detailing Clay - I like Nano Skin Towels for heavily contaminated cars but when I want to be CAREFULL I use an ultra fine detailing clay like the Pinnacle Ultra Poly Detailing Clay and Pinnacle Clay Lube.
Pinnacle Jeweling Wax - This product will clean, polish and protect in one step. It works too good to be lumped into the same category of AIOs or Cleaner/Waxes so it's a Jeweling Wax.
Griot's Garage 6" Random Orbital Polisher with 5" Lake Country Backing Plate - Free Spinning 8mm orbit stroke length
Griot's Garage 3" Random Orbital Polisher with the Griot's factory 3" backing plate -Free Spinning 5mm orbit stroke length
RUPES 6" and 4" Yellow Foam Polishing Pads (Yeah I know, I'm co-mingling, but these are a very nice "polishing" pad, not to much cut and also not too soft)
Sorry no action pictures.... but here's what I have...
The owner removed the Corvette Crossed Racing Flag emblems off the front and back of the car. In my first how-to book, The Art of Detailing I explained in this book to have the OWNER remove trim and emblems because if they break, (and often times they do break), then you're not financially responsible for replacement. Plus as I explain in the book, most owners of cars like these are familiar with their cars and know and understand what's involved with removing trim and emblems.
In this pictures, don't look at the gas cap cover, look at the LIGHT reflecting off the paint and how muted or cloudy and dull the paint is in the reflection. This is oxidation and this is what I meant when I told the owner,
"yes" I see room for improvement in both gloss and clarity
Look at all the dirt, crud and TOGW that has built-up under the emblem over the last 47 years.
Gloss comes from smoothness
Again, I told the customer I thought there was room for both gloss and clarity. Gloss STARTS with a smooth surface. I know the average person looking at the Corvette in the parking lot at the cars and coffee car show probably thinks like this,
"Wow - that Corvette looks amazing"
But clay tells another story. If there's ANY contamination on the paint so that the paint won't pass the Baggie Test, then gloss is diminished. So the FIRST STEP in creating a glossy finish is getting the surface smooth.
Here you can see a film of light contamination over the face of the clay patty, not bad for the hideaway headlight covers...
But when I clayed the hood I picked up quite a bit more contamination for a garage-kept car....
After claying, I machine applied the Pinnacle Jeweling wax CAREFULLY so as not to make any of the thin areas of paint G-R-O-W as that's what happens when you buff on thin paint, the primer shows through more and more...
Here's the after shots, first take a L00K at how many pads I used to carefully and methodically machine buff the 47 year old super think single stage metallic paint.
I count,
13 - 4" pads
6 - 6" pads
Here's the results....
Not a bad looking old 2-door Chevy....
On Autogeek.com
Pinnacle Ultra Poly Detailing Clay - $19.99
Pinnacle Clay Lube - $17.99
Pinnacle Jeweling Wax - $45.99
Griot's Garage 6" Random Orbital Polisher - $149.99
5" Lake Country Backing Plate - $17.99
Griot's Garage 3" Random Orbital Polisher - $104.99
RUPES 6" Yellow Foam Polishing Pads - $12.99 each
RUPES 4" Yellow Foam Polishing Pads - $7.99 each
And of course.... LOTS of towels. I used the Gold Plus Jr. microfiber towels for this project.
Gold Plush Jr. Microfiber Towels - 12 Pack - $39.99