2002 SS Camaro Extreme Makeover! - Pictures & Comments

Joined
Dec 5, 2022
Messages
51,004
Reaction score
7
2002 SS Camaro Extreme Makeover! - Pictures & Comments


Product Showcase: Pinnacle Advanced Compound and Wolfgang Uber All-In-One
For this project we're going to remove the swirls and scratches using the new Pinnacle Advanced Compound and the finish using the Wolfgang Uber All-In-One.

watermark.php


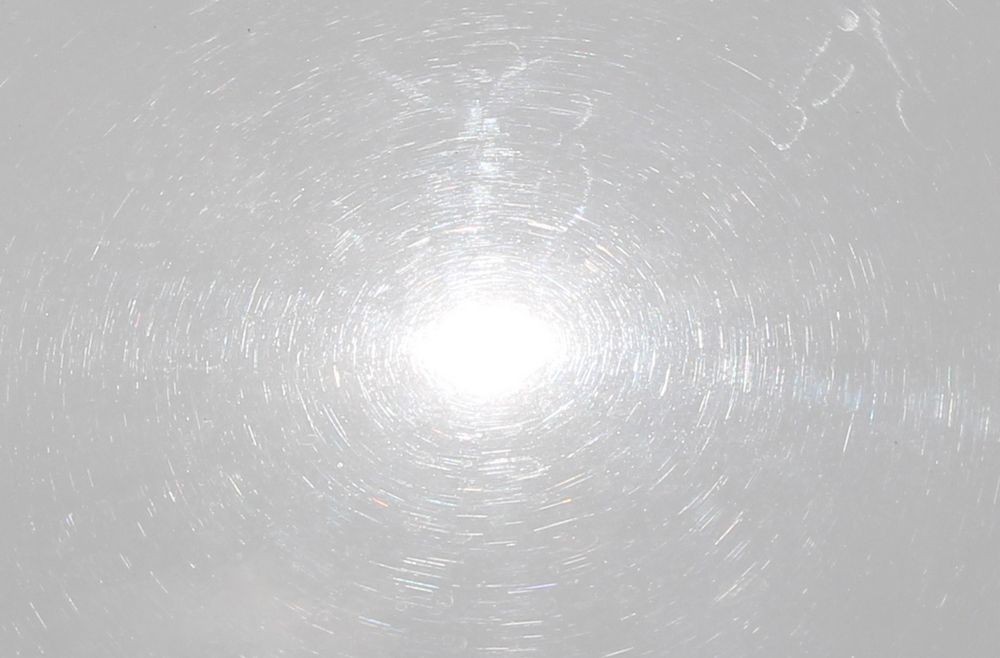
Here's some great examples of cobweb swirls, spiderweb swirls and scratches in a car's paint. Sometimes people ask how to inspect white and light colored paint and the fool-proof way is with bright, direct overhead sunlight.


Photography tip for discussion forums....
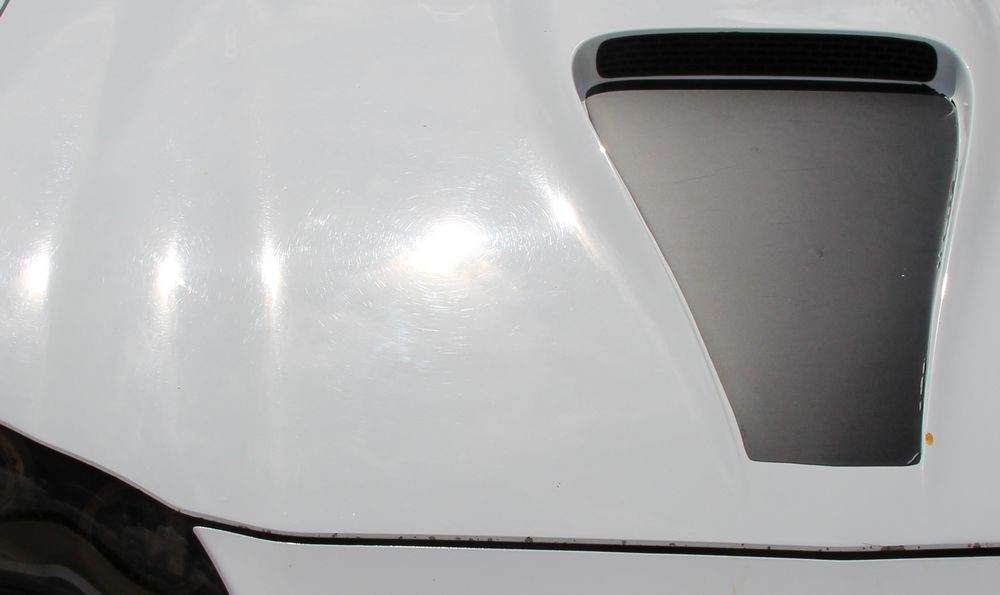
First frame-up your shot so your audience knows what the heck you're actually taking pictures of for your article. In this example it's a 2000 SS Camaro with a white basecoat/clearcoat paint finish.

watermark.php


Photography Tip - Use a reference point when cropping pictures
When cropping out the fluff, do it in a way to still include some type of reference point in the picture so your audience will know what section of the car you're showcasing.

In this example I showing the cobweb swirls, spiderweb swirls and scratches to the right side of the air scoop on the hood so I include enough detail so the audience can easily understand the location of the defects.

watermark.php


Photography Tip - Zoom in and take a close-up shot of the defects you what to share
After capturing the frame of reference shot, THEN zoom in and get the close-up shot. Without the frame of reference shots the close-ups don't has as much impact.

watermark.php


In the below pictures you'll see the shot framed-up and then I'll zoom in to highlight the defects.

watermark.php


watermark.php


watermark.php


watermark.php


watermark.php


watermark.php


The power in the after shot is in the before shot
Showing pictures of a beautifully detailed car is great. Lots of people do it. The intense impact is lacking however if you don't also show your starting point, that is the before shots.

The above pictures show cobweb swirls, spiderweb swirls and scratches as well as provide some tips on how to use your camera to capture accurate examples of defects in paint when writing an article to showcase your detailing talent.

If you're in business to make money, sharing your work via before and after pictures on a discussion forum, Facebook, Reddit, Instagram, your own website or blog is a great way to demonstrate to future potential customers that you can be trusted to do the job right when they hire you.

You can also separate yourself from all your competition that cannot or will not document their work using quality pictures.

Good photography skills can be just as powerful of a tool as the skills you possess to use a buffer so practice till you hone your skills and then share your work.

:Picture: :xyxthumbs:
 
The Aggressive Approach to Washing a Car


In my first and second editions of my how-to book I teach two ways to wash a car,

The Aggressive Approach - This is how you wash a neglected car before you're going to machine buff it.

The Gentle Approach - This is how you wash a car you or someone else has already buffed out.

You need to now the difference between the two approaches and when to use them. If you detail cars for money.... you need to educate your customer AFTER you've detailed their car to use the Gentle Approach so they don't undo your hard work and then blame you because swirls and scratches came back.


This Camaro is rough!
I don't think this Camaro has been properly washed and waxed for maybe 10 years or longer as it's pretty rough, not just rough looking but rough feeling to the touch.

So we're going to use the aggressive approach to wash and and also My Classic Car filmed this for their TV show to share with their audience some of the things you learn when you attend our Detailing Boot Camp Classes.

I also used this car as a Training Car for my last class because it's

A: Neglected
B: White


Chemical Decontamination - Removing Iron Particles in the Paint
And I always have a neglected white vehicle to demonstrate the importance of removing iron contamination with a product like Iron X.


Mechanical Decontamination - Removing Bonded Contaminants like Overspray Paint
I also show how to speed up production detailing by mechanically decontaminating the paint during the washing process using Nanoskin products.

One method does not replace the other method you need to do both if you're working on a neglected vehicle.


Without further ado, here's some pictures from the first day of the September 2014 Detailing Boot Camp Class.


Wheels & Tires First
My classes and books always teach to wash wheels and tires first, to find out why see page 15 of either The Art of Detailing or the second edition, The Complete Guide to a Show Car Shine


This is a lug nut cleaning brush

watermark.php


Simply place it over the lug nut and clean the lug nuts and the barrels at the same time...

watermark.php


This is a Wheel Woolie used for cleaning in hard to reach areas...

watermark.php


After washing the wheels and tires rinse well....

watermark.php


Start at the top and work your way down
After washing the wheels and tires first, next start at the top and work your way down. This is also explained in detail in my first two books.


Bleeding like a Stuck Pig
The first step for our aggressive approach is to chemically decontaminate the paint using Iron X. Here you can see the white paint on this Camaro bleeding like a stuck pig.

watermark.php


watermark.php


watermark.php


Use the Foam Gun to Foam the Car
Next we use the foam gun to slather the car's body panels with car wash foam.

watermark.php


watermark.php


watermark.php


Wash body panels and glass
Next we use Microfiber Chenille Wash Mitts to loosen surface dirt so it can be rinsed off.

Here you can see Richard, the Cameraman from My Classic Car capturing the car washing process.

watermark.php


Get her clean boys!

watermark.php


watermark.php


Rinse off all the loose dirt and soap suds
Next the Camaro was fully and thoroughly rinsed to remove all the loosened dirt off the car and out of all the cracks and crevices. This is IMPORTANT if you're going to machine buff a car.

watermark.php


Mechanically Decontaminate the Paint with Nanoskin Wash Mitts and Towels
Nanoskin Wash Mitts and Towels work great for removing bonded contaminants. They come in Fine and Medium Grade. One benefit is if you drop either on the ground you can simply rinse it off and continue using it. If you drop detailing clay you must throw it away.

It's important that you first wash and RINSE the car to remove all the loose dirt otherwise you risk instilling scratches. The point being you don't want to rub the polymerized rubber surface of the Nanoskin product over paint that still has dirt floating on it from the wash process so RINSE first - then use the Nanosking products to remove the bonded contaminants.

In this example we use the Foam Gun to foam the car and use the foam as our lubricant for the Nanoskin Wash Mitts and Towels.


watermark.php


watermark.php


watermark.php


Rinse a Second Time
Then rinse the car a second time to remove all the contaminants removed by the Nanoskin products.
(No pictures)


Dry the car
After all the washing and decontaminating is finished dry any standing water off the car to avoid water spots. Here the class is using the Guzzler Waffle Weave Drying Towels.

watermark.php


watermark.php


This car is clean. This car is chemically decontaminated. This car is mechanically decontaminated.

That's how you use the Aggressive Approach to wash a car.

This car is now ready to machine buff.


:)
 
Two Step Production Detailing for Severely Neglected Vehicle

With all the new technology available including tools, pads and products, it's now possible to tackle even the worst condition car in only two steps.

When we count "two steps" this means the steps we do to the paint besides the normal step of washing and decontaminating as these preliminary steps are normal for any process.

The first step will be to remove the swirls, scratches and water spots using a very aggressive but safe approach. This includes

Pinnacle Advanced Compound
Lake Country 7.5" Wool Cutting Pads
Flex PE14 Rotary Buffer


Here's Robert working on the front clip I did the Test Spot on the right hand side of the hood and overall you can already see the swirls have been removed and gloss and clarity have been restored in just the compounding step.

watermark.php


Here's Barry working the passenger side door....

watermark.php


Here's Frank working the rear of the car and that's Al wiping compound off the back....

watermark.php


New Guy!
Here's Walt working on the rear quarter panel. This was Walt's first time using a rotary buffer. Actually, this was Walt's first time using ANY machine! Until coming to Autogeek he had always worked by hand. Walt owns a black Cadillac and that's why he's here.... to learn how to take care of his black Caddy.

Nice work Walt!

watermark.php


Here's Den working the lower section of the driver's door....

watermark.php


And we work for Pizza! So time for a pizza break! Thanks Bob!

watermark.php


:)
 
Second Step - Removing Holograms and Sealing the Paint
Traditionally after compounding paint you would follow the compounding step with a dedicated polishing step and then seal the paint with a dedicated waxing step.

For this project we're doing both procedures in a single step by using the new Wolfgang Uber All-In-One. To take advantage of this products polishing ability we're applying it using the Flex 3401 with Lake Country White Hybrid Polishing pads.

This step is also covered in pages 45 to 50 in my new how-to book...

How to use the Flex XC3401 VRG Dual Action Orbital Polisher - Paperback Book


Here's Norm removing holograms and sealing the paint while at the same time maximizing gloss and shine and also leaving the paint sealed and protected.

watermark.php


Here's John removing the holograms and sealing the paint to the driver's door....

watermark.php


Here's Walt working the left side of the hood and Jim from Florida Sportsman Magazine working on the driver's side of the hood.

watermark.php


Out in the back is Antti working on the wing....

watermark.php


Jim finishing out the front driver's side fender....

watermark.php


:)
 
Outstanding work Gentlemen! That car came out incredible with just the two steps. The transformation is jaw dropping.

Nice in depth write up show casing what goes into these turnarounds Mike. Well done!
 
Nice work Mike on the write-up and pictures!

I really liked working with the new Pinnacle Advanced Compound, it had a long working time and no dusting that I noticed.

The WG Uber AIO appears to be a great product, easy to work with and smells good too...like green apples.

We knocked it out quick last night with everyone working together or maybe it was because we were all looking forward to the pizza :hungry:.
 
It was a cool experience for sure Mike. I was amazed how well the Uber All in One worked. Don't get me wrong. I do enjoy the 3 (4 if we clay bar) step process that is the show car detail, but cutting out a few steps and getting that kind of result was gratifying as well. It might actually be the best option for the guy like myself working out of his 95+ degree garage all by his lonesome without the help of his Autogeek detail pals.. ;>)
 
I sometimes take for granted how fortunate I am (we are) to be able to work on cars and learn all the best techniques and discover the best products to use because Autogeek is right in our backyard. It's also not just what you use on any particular night. With so many knowledgable/skilled people there you learn much more just by talking to others about different methods, etc.

I tend to get myself in trouble with all this info, but with two black cars what are you going to do! After taking to Frank, Mike, Nick and a few others, today I'm the proud owner of a Autogeek Foam Gun and a CR Spotless Water Filter system with the new DP Powerwash soap to use with them.

Maybe I should skip a Makeover or two (just not possible). Den
 
The team did a great job. This Camaro needed that TLC.
 
Den, I think you're really going to enjoy the CR Spotless. I'm really enjoying mine. I can now wash cars out in the hot FL sun without worrying about getting water spots. I don't have to rush to dry the car, I can take my time and clean up and let the sun dry most of the water off the car. The rest of the water remaining I dry off with the Master Blaster. Most of the time I don't even use a towel.
 
Not to sidetrack the thread but here's a video we made on the CR Spotless Water Filtration System....


[video=youtube_share;xnU2KdJIfrY"]CR Spotless Water Filtration System[/video]​


Yancy used time lapse photography to show how well it works....

:dblthumb2:
 
Amazing work to all who participated. I can't help but think when I look at these pics it reminds me of a well orchestrated team SWARMING like ants all with a common goal, simply outstanding!!!
 
I myself was quite impressed with the new products!
The new compound worked flawlessly, no dusting, long work time and left a great finish for the new Wolfgang Uber AIO to increase depth and clarity!
Way to go team AG!
 
Thank you and Autogeek.net, Mike, for another excellent lesson in strategic auto detailing. After analyzing the paint finish, you lay out a clear step-by-step plan to achieve the desired result in each specific case. Your knowledge of equipment, products and techniques always leads you (and your team) to the optimum result.

Jason's white 2002 SS Camaro was rough and required some heavy cutting, but it was a piece of cake (I mean pizza) compared to the 1942 Oldsmobile Business Coupe. Both new products, Pinnacle Advanced Compound and Wolfgang Uber All-in One, wiped off easily and left a very smooth finish. I was most impressed with the Uber All-in-One and preferred working with it compared to the Klasse All-in-One product that I have used on my two Alpine white Bimmers. Speaking of Bimmers, I would be most interested in checking out Jason's E30. I enjoyed working with the team on his Camaro and learned a lot on this two-step make-over. Amazing turn-around for this classic muscle car.

I totally agree with Den that we are fortunate to have access to you and your project car sessions at the Autogeek Show Car Garage. See you next time, Lord willing.
 
It was nice to work new products.
I really liked it, and flex rotary is also nice tool.
Wolfgang aio worked good. Car came out nice.
Thanks Mike and autogeek for another cool project and opportunity to test out new products.
 
Back
Top