2011 GM Zafira: Extreme Makeover + Pinnacle Black Label Coatings

Tato

New member
Joined
Nov 27, 2013
Messages
2,157
Reaction score
0
Dear Friends,

This week I had the pleasure to work on a 2011 GM Zafira. The car was on the very neglected side, but I could see it's potential during evaluation so I've accepted to execute the work.

Many moons passed, and the day finally arrived, now I kindly invite you to take a look at some pictures I got while performing this extensive work, :Picture:

Car arrived, on the dirty side
zaf11-1.png


presenting huge amount of grime and tar
zaf11-2.png


giving the paint a 'nice' dull aspect...
zaf11-3.png


Closer
zaf11-3a.png


There are places in a car I'm almost certain to remain untouched until a Detailer decides to take care of it,

or, during an emergency. Imagine having to switch a wheel before a meeting, in this condition:
zaf11-4.png


Using those tools:
zaf11-5.png


Placed in here...
zaf11-6.png


Well, nothing that a good brushing and Meguiar's #39 wouldn't solve...
zaf11-7.png


zaf11-8.png


Wheel cleaned with dedicated CG Wheel Cleaner, and tire scrubbed using the same Meguiar's #39
zaf11-9.png


Tools cleaned and organized
zaf11-10.png


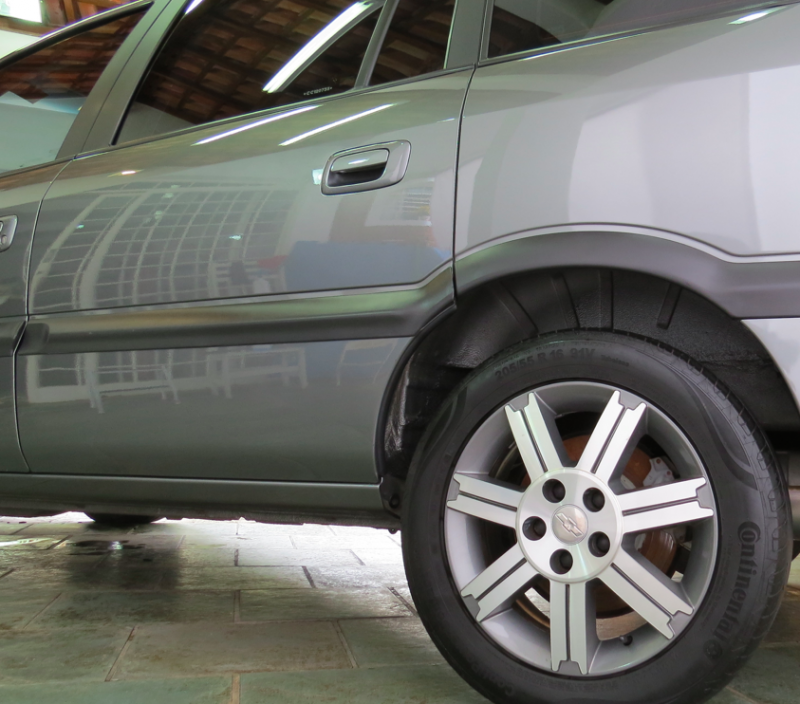
Spare wheel reinstalled after complete detailing
zaf11-11.png


Paint evaluation

The paint of this car was very swirled, scratched, contaminated, and in between tar, tree sap, bird droppings and bug residues, a very persistent overspray was present
zaf11-12.png


zaf11-13.png


Look at this hood!, severe scrubbed.
zaf11-14.png


This picture shows how contaminated the paint was:
zaf11-15.png


Close-up:
zaf11-16.png


Let's take a tour on the surroundings, using the two larger overspray dots as reference:
zaf11-17.png


Nowhere to run, this paint was definitively in bad shape
zaf11-19.png


Gross...
zaf11-21.png


Preparation

The car was meticulously cleaned, washed using a mixture of Meguiar's Hyper Wash + CG Bug Tar Wash, iron-x'd, tar-x'd, and finally clayed using both nanoskin mitts and conventional 3M purple aggressive clay bar (only way I was able to remove the embedded overspray).

After that, I've dialed a test spot using a light approach, in order to meet the paint I was going to work on.

Based on test results, I've stepped up to LC Orange Hybrid Cutting pads (6.5" and 5") + Menzerna FG400 and that was an one-step answer using my best interpretation of 'Smack's Technique'.

Even this way, the car was fully re-polished after all with SF4000 and white hybrid polishing pads to guarantee an even, fine, final finish.

Cutting Setup
zaf11-22a.png


Test-Spot Results:
zaf11-22b.png


Holograms were also present
zaf11-22c.png


But my polishing approach was being able to cut through every section, while leaving a great finish behind.
zaf11-22d.png


More on Details

Before:
zaf11-23.png


Afters:
zaf11-24.png


zaf11-25.png


Glasswork

I've worked Glass using CarPro Spotless, thoroughly clayed then polished with Pinnacle Black Label Surface Cleansing Polish. After all, it received 2 coats of PBL Glass Coating.

Before:
zaf11-26.png


After
zaf11-27.png


zaf11-28.png


Windshield visibility was severely affected:
zaf11-29a.png


Afters:
zaf11-29b.png


zaf11-30.png


Rearview Mirror:

Before
zaf11-30a.png


After:
zaf11-30b.png


Before:
zaf11-30c.png


After:
zaf11-30d.png


Engine 'Dry-Clean'
Using a combination of compressed air, brushes, waterless products, degreasers, vacuum cleaner and some other tools, polished under the hood by hand then coated. Plastics and Rubbers protected using 303 Aerospace Protectant.

Before:
zaf11-31.png


After:
zaf11-32.png


...been a bit Bugsy lately...

Before:
zaf11-33.png


Afters:
zaf11-34.png


zaf11-35.png
 
Font Grille

Before(s):


zaf11-37.png


After:
zaf11-38a.png


Before:
zaf11-39.png


After (Headlamps polished using Meguiar's PlastX and an HT Orange Polishing Pad):
zaf11-40.png


Hood section polished using orange pads + FG400
zaf11-41.png


Hood defect removal

zaf11-42a.png


Although the whole car was in bad shape, the scrubbed hood section was the worst looking part.

zaf11-42b.png


To illustrate what was being possible to do with FG400 + Orange Hybrid pad,

Before:
zaf11-43a.png


After:
zaf11-43b.png


It's noticeable the increase in clarity and swirl removal, however the deeper scratches remained. Not satisfied with the results and confident I could get even more improvement, I've decided to go after them.

Here are the results after a second cut:
zaf11-43c.png


We went from this:
zaf11-44a.png


:buffing::buffing::buffing:

To this:
zaf11-44b.png


It's noticeable all scratches went away, leaving behind only the actual dropping stain - true responsible for all that scrubbing:
zaf11-45.png


Looking carefully to the above picture, you should notice I've switched the Flex 3401 and foam pads for the Rupes 21 + MF pads for this section.

After the finishing step:
zaf11-46.png


Paint was now exhibiting some shine...
zaf11-47.png


Before:
zaf11-48a.png


After:
zaf11-48b.png


Elite Side

Before:
zaf11-49.png


Afters:
zaf11-50.png


zaf11-51.png


Before:
zaf11-52.png


Afters:
zaf11-53.png


zaf11-54.png


Taillamp
Surely worked!, Im the MAN

Before:
zaf11-55a.png


After:
zaf11-55b.png


INTERIOR

Not enough, the car was worked from top to bottom, right to left, front to back - and sure - inside and out.

Before:
zaf11-56.png


zaf11-57.png


After:
zaf11-58.png


Before:
zaf11-59a.png


Afters:
zaf11-59b.png


zaf11-59c.png


Before:
zaf11-59d.png


After:
zaf11-59e.png


Before:
zaf11-60a.png


During:

Interior was worked using vacuum, compressed air, steam cleaning, APCs dilute to desired needs, dedicated carpet cleaners, leather cleaners, and protectants, quality microfiber towels and brushes.

zaf11-60b.png


Small Fixes

I can't see something detaching without asking myself: 'Can I easily fix this?' If the answer is yes, I may promptly go for it...

Before:
zaf11-61a.png


After:
zaf11-61b.png


General view, after:
zaf11-62.png


Roof Upholstery, Before:
zaf11-63b.png


zaf11-64.png


zaf11-64b.png


Afters:
zaf11-65.png


zaf11-66.png


Ready to leave?
zaf11-66b.png


---The end---

This is the only after picture I have showing the full car, completely detailed and coated, just before customer arriving for pick up.

zaf11-67.png


However, if you've joined the above pieces together I'm almost sure this last one, (now), is enough!

Many other details couldn't be captured accordingly since I've worked on a true constraint and mostly alone on this one...

That said, if you could enjoy watching this piece of my work, I may consider all the effort worth it!!,


Feel free to leave a message if you have any comment, suggestions, critics, questions, I'd like to hear your opinion.

Thank you very much for watching,

Kind Regards.
 
Unbelievable! You are a true professional. I have never seen better!
 
Outstanding work on that Zafira you really brought life back into that paintwork
 
Unbelievable! You are a true professional. I have never seen better!

Thank you so much for kind words Gary, we owe everything we know and do to the AG / AGO community.

Outstanding work on that Zafira you really brought life back into that paintwork

Thank you James, glad you enjoyed!

Fantastic work and write up as always Rafael!!

Thanks, I appreciate your feedback. :dblthumb2:

Kind Regards.
 
Great work! Looks like the Flex's are working strong, did you notice much of a difference after using SF4000?
 
Wow! Simply Jaw dropping work Rafael! This is the most in depth write up and transformation I have seen you post. I bet the owner couldn't believe their eyes when they say this transformation.

Top notch pro grade write up! That's my boy!

I think its time to grab a PE14 now and equip it with the Hybrid wool pads for that added cut... The "Smack Technique" works wonders on this setup as well...
 
Extreme makeover :iagree:


top job as always. your passion flows in the details Rafael. :dblthumb2: :buffing: :props:


I've got a few questions. will pm you soon

take care

Zaid
 
Fantastic work Rafael!

Thanks mate!, appreciate your thoughts.

Great work! Looks like the Flex's are working strong, did you notice much of a difference after using SF4000?

Hi! Sure, Flex tools are definitively a workhorse.

Honestly, I've noticed very little to no difference after the SF4000 because the FG400 and Orange already finished LSP ready in this case.

However, I'm adapted not letting my eyes 'fool me', and I've used the SF4000 to refine even more the remaining RIDS - also to guarantee a perfect finish under any circumstance.

When using SF4000 with this finality, few passes are needed, you can cover larger areas at once, and use slightly faster arm speed - I'm always safe than sorry, if you know what I mean... even not noticing an immense difference with a naked eye, it was worth doing, absolutely.

Thank you for comments and hope I've answered your question. If not, please, feel free to ask again.


Wow! Simply Jaw dropping work Rafael! This is the most in depth write up and transformation I have seen you post. I bet the owner couldn't believe their eyes when they say this transformation.

Top notch pro grade write up! That's my boy!

I think its time to grab a PE14 now and equip it with the Hybrid wool pads for that added cut... The "Smack Technique" works wonders on this setup as well...

Thank you very much Mike!, I'm happy hearing from you. You know how much I lean towards a PE-14, but let's say I'm waiting for SEMA week and see what the near future will offer.

I'm very grateful for all your help, count on me as well.

Extreme makeover :iagree:


top job as always. your passion flows in the details Rafael. :dblthumb2: :buffing: :props:


I've got a few questions. will pm you soon

take care

Zaid


Thanks Zaid, appreciate your comments. You can feel free to ask your questions here, but please, do not hesitate shooting me a PM whenever needed. If I can help you out, I'll be there for you.

Kind Regards.
 
Beautiful job! Did the owner even recognize his own car?
One newb question, Why the switch from the Flex to the Rupes? As a hobbiest I'm using the Griots DA but was thinking of upgrading in the spring to something better. Undecided between the Flex and Rupes.
 
Beautiful job! Did the owner even recognize his own car?
One newb question, Why the switch from the Flex to the Rupes? As a hobbiest I'm using the Griots DA but was thinking of upgrading in the spring to something better. Undecided between the Flex and Rupes.

Thank you very much for your comment.

There's no such thing like 'Newb Question', in fact it's a very interesting question and I'll try my best to answer you properly - if not, please, let me know.

The main difference I see when correcting with Flex or Rupes is that with the Flex you may add firm, and even heavy pressure for the correction step.

When using the Rupes, pressure (if any) is just firm to maintain the pad flat, not 'heavy'.

That said, the main defects I was trying to remove on that part where located where the 'metal' would bend if too much pressure was added. Doing a lot of passes with heavy pressure where the metal tends to bending is not a way I feel comfortable working. The sum of surface heating + metal bending is not good 'in my book'.

I may do the same 'strategy' when working roofs with great tendency to bending (some cars have very thin roofs). The Rupes and MF just glides over the surface, and the heating is even lower.

Ok, if you got my reason, you should now be asking if Rupes corrected much easier with much less 'effort', why not use it for the entire car!?

Foam pads finishes better than MF pads. Forced Rotation of the Flex gets you with even tool action throughout virtually any panel design...

There's a lot of threads considering 'Rupes vs Flex', but sometime ago I've solved my dilema ordering both...

IMO, again, one tool will not substitute the other. Indeed, I may only exchange a Flex for Rupes if for a Rupes 21, a Rupes 15, a Rupes 12, and a Rupes Mini...

Got it?

Hope I could answer your question, if not, please, feel free to ask more.

Kind Regards.
 
Thanks for the explanation. Makes perfect sense! Now if I ordered the Flex for the heavy duty parts I'm assuming I could use my Griots DA for the more delicate parts in place of the Rupes?
 
Love your work. You made it look like its just rolled out of assembly line. One question, which LSPs did you use? Sealant and wax or just sealant?
 
Thanks for the explanation. Makes perfect sense! Now if I ordered the Flex for the heavy duty parts I'm assuming I could use my Griots DA for the more delicate parts in place of the Rupes?

You're welcome. The Griot's DA will be always worth having, even if you use Flex or Rupes. It can be outfitted with smaller plates like 2-3", and use very small pads. It also doubles as a sander..., and can work (Flex also can, but!) microfiber discs, specially the Meguiar's cutting and extra-cutting disc...

However, if you own a Flex and 4" plate as well (comes in LC changeable system), it's unlikely you'll grab the GG the much you're thinking about now.

I could still try again with the Flex instead of grabbing the Rupes, but having the tool at hand I feel like using it.

In fact, I was afraid another pass with the approach I was using with the Flex wouldn't be enough, that at the cost of using increased pressure and potential surface heating. If I ended up with a second compounding step with the Flex (using that much pressure for the first passes) and not removed the defects I was willing to, I'd feel much more concerned to do a tertiary step...

So, it was like an 'anticipation strategy', to avoid any 'if', I went to what I was sure would be the answer to remove the actual defects.

That's why, knowing my Rupes the way I know, I've grabbed it + the MF discs and it made short of that area. The Flex worked 98% of this car, but the 2% of the Rupes were as important.

We can never have enough tools to get the job done!

Kind Regards.

Love your work. You made it look like its just rolled out of assembly line. One question, which LSPs did you use? Sealant and wax or just sealant?

Thank you very much for comments!

My fault, the car was coated with Pinnacle Black Label Surface, Paint, Glass and wheel coatings, whetter they fitted. I've also applied 2 coats of each to guarantee full, even coverage.

Kind Regards.
 
Esse e o cara. Amazing work Tato. Your write up is the best of the best. Thank God detailers like you in Brazil take your time to document everything.

SuperB!

Thanks for sharing.
 
Amazing work as usual Tato. Have you followed up with any owners of cars you have coated regarding waterspotting? I am still having issues with waterspots on PBL coated cars I have done. I have put CarPro Spotless to good use this season since we are in the rainy season in Thailand right now. Even the cars I have applied PBL Synergy on top of the coating gets waterspots as well. Just wondering what kind of results you are getting in Brazil since we have similar weather.
 
Beautiful work and fantastic photo documentation.
 
Back
Top