Tato
New member
- Nov 27, 2013
- 2,157
- 0
Dear Friends.
This weekend I had the pleasure to work on a 2013 Kia Sportage in Black. The car is relatively new, however presented not only DISO defects and holograms, but also lots of swirls and scratches from improper washing technique afterwards.
Customer schedule a full (interior / exterior) car detail followed by Pinnacle Black Label coatings.
The polishing work was performed using the Flex 3401 polisher, 1st step using PF2500 on orange cutting pads, 2nd step using SF4000 on white polishing pads.
Although perfection couldn't be achieved, I worked my way into putting every effort towards the best finish I could achieve during that time.
Of course, I've enjoyed a lot working on this one, hope you enjoy the follow up.
Here we go!
Arrived:

Only ~6000km...

Let's start inspecting the overall condition of the car:


With little time walking around the car with my swirl finder light, I could find definitive signs of poor polishing work previously performed.

Together with the holograms, some signs of actual paint burns were also found

Not only swirls, but also stains from the elements

Everywhere

The holograms were very noticeable on this black metallic paint

Time to work!
Interior had dust, stains and general use marks, but nothing that deviates from normal use of a DD.

The interior work was meticulous done by my detailing partner

She's so careful and talented, it's a pleasure to watch her working.

After doing the interior, we washed the wheels

Then the entire car, panel by panel, detail by detail using different kind of brushes...

After washing, I reinspected the finish looking for more flaws
Please, DON'T use a rotary if you can't handle it...

Hazy signs of a poorly made job

WTH is this!? lol

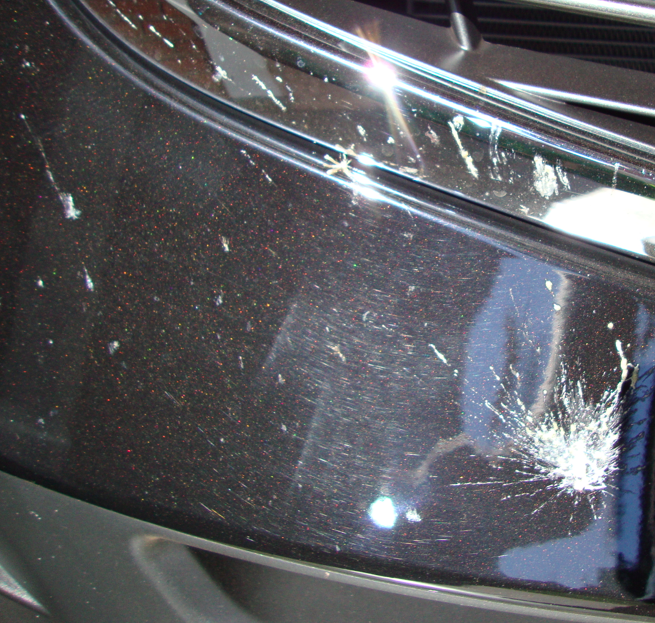
General aspect of paint was very bad. When not seeing holograms, swirls were evident. Here you can see both altogether.

To the polishing procedure:
Test spot was performed on the roof, using a white pad and SF4000. Ready to go up there.

This area was chosen because it contained many defects I was willing to remove.

Some polishing work: Smack's technique for Menzerna products, here you can see a few passes...

and the preliminary results after 2 hits of SF4000 on a white pad. That's when I decided to step up on product and pad for the 1st step, leaving my first option for further refinement.

After tackling the whole roof, I went after the A pillars. Product spread:

Product worked (notice change in consistency and transparent aspect)

I've worked the A Pillar through the rear side all at once, cleaning the pad on the fly in between every 2-3 section passes.

Removing residue is a breeze after proper working the product...

After every section I tend to inspect my results.

Here's a 'natural' 50/50 shot between panels. The upper part of the picture shows the start of the section polished within the A pillar approach.

Pillar inspection

Although orange and white pads in 4" were protagonists at this work, I also had the help of sorted hybrid pads in 5".

Vertical panel, inspecting results

Even though there were signs of paint burns, my gentle but effective approach was able to get rid of those nasty defects.
Before:

After:

Interior painted parts that presented ugly defects were taken care of. Before:

After hand polishing (MF applicator, FG400):

Trunk vertical lid, and Kia logo were all polished to near defect free finish:

This weekend I had the pleasure to work on a 2013 Kia Sportage in Black. The car is relatively new, however presented not only DISO defects and holograms, but also lots of swirls and scratches from improper washing technique afterwards.
Customer schedule a full (interior / exterior) car detail followed by Pinnacle Black Label coatings.
The polishing work was performed using the Flex 3401 polisher, 1st step using PF2500 on orange cutting pads, 2nd step using SF4000 on white polishing pads.
Although perfection couldn't be achieved, I worked my way into putting every effort towards the best finish I could achieve during that time.
Of course, I've enjoyed a lot working on this one, hope you enjoy the follow up.
Here we go!
Arrived:
Only ~6000km...
Let's start inspecting the overall condition of the car:
With little time walking around the car with my swirl finder light, I could find definitive signs of poor polishing work previously performed.
Together with the holograms, some signs of actual paint burns were also found
Not only swirls, but also stains from the elements
Everywhere
The holograms were very noticeable on this black metallic paint
Time to work!
Interior had dust, stains and general use marks, but nothing that deviates from normal use of a DD.
The interior work was meticulous done by my detailing partner
She's so careful and talented, it's a pleasure to watch her working.
After doing the interior, we washed the wheels
Then the entire car, panel by panel, detail by detail using different kind of brushes...
After washing, I reinspected the finish looking for more flaws
Please, DON'T use a rotary if you can't handle it...
Hazy signs of a poorly made job
WTH is this!? lol
General aspect of paint was very bad. When not seeing holograms, swirls were evident. Here you can see both altogether.
To the polishing procedure:
Test spot was performed on the roof, using a white pad and SF4000. Ready to go up there.
This area was chosen because it contained many defects I was willing to remove.
Some polishing work: Smack's technique for Menzerna products, here you can see a few passes...
and the preliminary results after 2 hits of SF4000 on a white pad. That's when I decided to step up on product and pad for the 1st step, leaving my first option for further refinement.
After tackling the whole roof, I went after the A pillars. Product spread:
Product worked (notice change in consistency and transparent aspect)
I've worked the A Pillar through the rear side all at once, cleaning the pad on the fly in between every 2-3 section passes.
Removing residue is a breeze after proper working the product...
After every section I tend to inspect my results.
Here's a 'natural' 50/50 shot between panels. The upper part of the picture shows the start of the section polished within the A pillar approach.
Pillar inspection
Although orange and white pads in 4" were protagonists at this work, I also had the help of sorted hybrid pads in 5".
Vertical panel, inspecting results
Even though there were signs of paint burns, my gentle but effective approach was able to get rid of those nasty defects.
Before:
After:
Interior painted parts that presented ugly defects were taken care of. Before:
After hand polishing (MF applicator, FG400):
Trunk vertical lid, and Kia logo were all polished to near defect free finish:


")


 rops:
rops:
 Look at it from 4' away and you'd never know. :dunno: Still better imo than solid black though.... (because it's a bc/cc and not single stage SOFT black).
 ")