So on body Joints, like Doors to Fenders... you just want to cover up the Gap, right ?
What happens to the Paint under the Tape ? I guess you want to use the thinnest Tape possible so that it just barely hangs on, yet is enough to stick.
Answered that question here in
post #9 as this question comes up all the time.
2008 Lexus IS 250 - Pinnacle Detail - August 14th, 2009
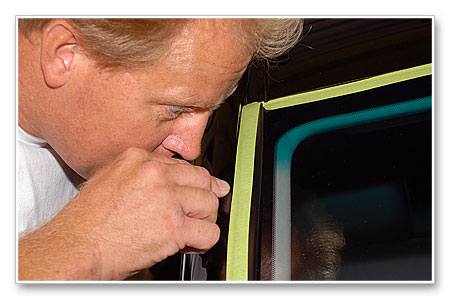
Here we've taped-off the rubber gasket between the glass and the window frame and I'm pointing to show that there's about an 1/8th of an inch of paint that's not going to get buffed with either of the two polishing steps. After the correction steps we'll remove the tape and carefully wax these areas for a uniform look that will match the polished areas next to the tape line. While not perfectionist detailing in some eyes, remember this is a daily driver, not a show car. You can invest more time and just run the tape down the rubber and get it close to the edge of the panel if you want or just overhang a little like I did here.
It's your choice based upon what you're trying to accomplish and how much time you want to invest.
NOTE: If you read what I wrote carefully, I addressed the issue of the paint under the tape not getting polished. And how AR or DO you want to get is up to you. If I were polishing out this car, a 1950 Studebaker Starlight Coupe I would tape off anything and everything that requires perfectionist style detailing.
When it comes to Daily Driver's however, there's usually this little tiny strip of paint that doesn't get the same attention as the rest of the panel. Again if you want to do perfectionist polishing on a Ford Taurus, go for it as it's your time and your car.
I like to
major on the majors and
minor on the minors, by this I mean the big picture is the car in total, not this little tiny strip of paint that runs along the edge of whatever it is you're taping off. Most people are going to stand back and look at the car, not get their nose right up next to the paint surrounding the window and look for swirls in a tiny little strip of paint adjacent to the window.
Everyone has to find a way that works best for them and I can be just as detail oriented as most and usually more than most but I don't practice perfectionist detailing to this kind of degree on a daily driver.
Find balance. If you're just starting out, major on the major panels and minor on the minor details until something like this comes along...
I posted this in 2005 but it shows getting pretty DO with the taping off and covering up, it's also not a daily driver but the former President of the San Diego Corvette Club's 1965 Corvette Stingray. A weekend or two later his car took first place at some huge Corvette show where the car was on display outside at the Plastic Fantastic All Corvette Show.
Over the years I have met hundreds of people that want to learn how to machine buff, one of the things I like to share with them is that there is a lot of difference between watching someone demonstrating how to use the rotary and working a small,
easy to buff section like an area on the hood, and taking a rotary buffer to the entire car.
It takes practice to get experience and to actually be good at it and it's this practice, as in buffing out
many cars in order to to have the upper body strength including back, shoulders, arms and hands to call buffing with a rotary buffer
just as easy as using a dual action polisher.
There is a tremendous amount of difference between demonstrating a small section on the hood of a car and buffing out the entire car.
For first timers, if it's you're own car you can always do a section at a time, for example the hood one Saturday, a fender the next Saturday, and so on...
Remember, depending on the quality you're trying to achieve, a super high quality rotary buff-out, (assuming the finish is in horrible condition to start with and needs compounding), means
- * Washing the car
* Claying the car and wiping off the residue
* Performing a test spot or two to dial in your system and make sure you system will work. (Alway test your product and process in a small area first to make sure you can made a small area look good before tackling the entire car.)
* Taping off the car if you're so inclined. (Often times because of the number of times you're going to run the buffer over the panels of the car the potential for excess splatter in all the body seam, trim crevices, moldings, etc., you'll find it fast to tape off a car really well instead of going back over the car at the very end and digging any excess splatter out of the cracks with a toothbrush. This in part depends on your personal idea of a quality buff job as some people don't care if they leave splatter in the cracks and crevices, and some guys are so good they don't splatter at all so they don't tape off, everything depends on you)
* Step 1 - Rotary buffer compounding - Then wipe off
* Step 2 - Rotary buffer light machine cleaning. Usually with a cleaner/polish - Then wipe off
* Step 3 - Optional Re-Polish entire car using a dual action polisher to insure all swirls are removed using the previously applied cleaner/polisher.
* Step 4 - Apply first coat of wax
* Step 5 - Optional Apply second coat of wax
* Step 6 - Remove tape and give car a final wipe. (Assuming you taped off any trim or body seams etc...
The point is, tackling an entire car with the rotary buffer and doing a super high quality job can take the entire day. In the above example, if you did all of the steps, you will have
wiped-off each panel 6 times, not including wiping off the water after washing the car), and with each step, you must focus more an more on doing your best to carefully wipe off any residue because after the second and third steps you will have, or should have removed all but the deepest scratches and you don't want to be putting any more back in as you wipe product off.
Remember, after the first two rotary buffer steps, there's a good chance you wont be as energetic as you were when your first started, that is you may be a little tired, yet you still have a long a number of steps to do.
If you're buffing out a car for a customer, you have to pretty much do it all in one day, I know a few guys the are able to spread one car out over two days and charge for both days.
If you're only working on your one car and you don't have to put the car back onto the street any time soon, you can take your time and finish the process at your leisure.
If you have to put the car back into service that day or the next day, then you can do a section at at time, performing the entire process to the section so that when you put the car back into service, the areas you have buffed are also polished and
waxed.
So it's somewhat true that a rotary buffer is just as safe and easy to use as a dual action polisher in the context of holding the tool and moving it over the panel, but in the context of tackling what I call a
complete, that is taking on a car that has a horrible finish and needs a multiple-step process performed starting with the compound process using a rotary buffer with the goal of producing a true show car finish, (I don't know what other full-time Professional Detailers call it), then I would say that the answer is
No, a rotary buffer is not as easy to use as a dual action polisher or even an orbital buffer.
It's a lot of work to take a diamond in the rough and turn it into a glistening gemstone starting with a rotary buffer.
Swirls throughout the finish of this 1963 black Corvette Stingray
After wiping down and claying and before taping off.
Extensively taped-off. At this stage the finish had been rotary buffed twice and then wiped down in preparation for final polishing with the dual action polisher.
End results
And then it's alway nice to have 30 plus Corvette owners on hand to inspect the result in bright sunlight the next day...
")