Car Detailing Classes - RUPES BigFoot Paint Polishing System

Joined
Dec 5, 2022
Messages
51,004
Reaction score
7
Car Detailing Classes - RUPES BigFoot Paint Polishing System


1969 GTO Judge - Show Car Makeover


At Autogeek's 3-day detailing class held 4 times a year here at Autogeek in Stuart, Florida one of the tools and paint polishing systems you'll get lots of hands-on training time with is the RUPES BigFoot Paint Polishing System.


This includes,

The RUPES long orbit stroke polishers including,

RUPES BigFoot 21 millimeter orbital polisher with RUPES 7" foam buffing pads

RUPES Bigfoot 15 millimeter orbital polisher with RUPES 6" foam buffing pads

RUPES Duetto 12 millimeter orbital polisher with RUPES 6" foam buffing pads


RUPES Mini 12 millimeter orbital polisher with RUPES 4" pads foam buffing pads

Rupes TA50 Mini Random Orbital Sander


As well as RUPES compounds and polishes,

RUPES Zephir Gloss Coarse Gel Compound

RUPES Quarz Gloss Medium Gel Compound

RUPES Keramik Gloss Fine Gel Polish

RUPES Diamond Ultra Fine Gel Polish


Just as important, besides getting to learn about the company, the tools and the system you get to practice, train and learn on really cool cars. For our July 2015 class, we brought in a very rare and collectible muscle car that was in dire need of help to remove the holograms.


Holograms = The specific scratch pattern inflicted into paint by the misuse of a rotary buffer


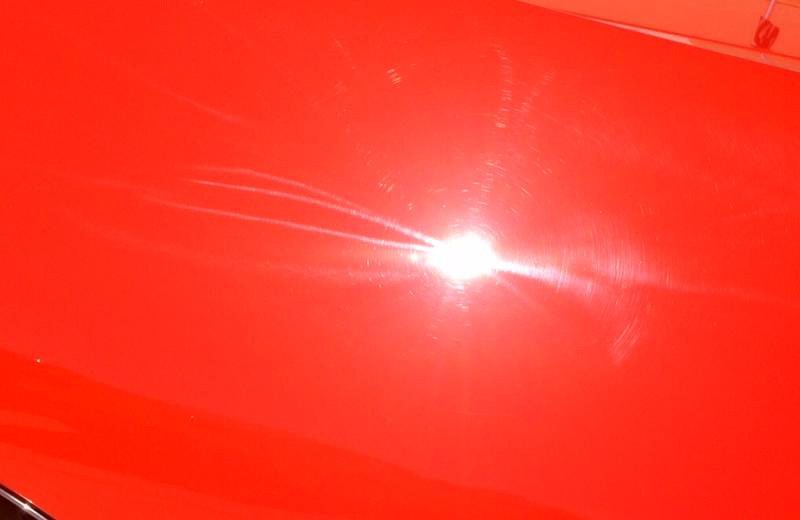
1969 GTO Judge with holograms

The LINES you seen in the swirl pictures below are called holograms. The entire car is filled with holograms from the misuse of a rotary buffer.
watermark.php


watermark.php


watermark.php


watermark.php


watermark.php


watermark.php


watermark.php


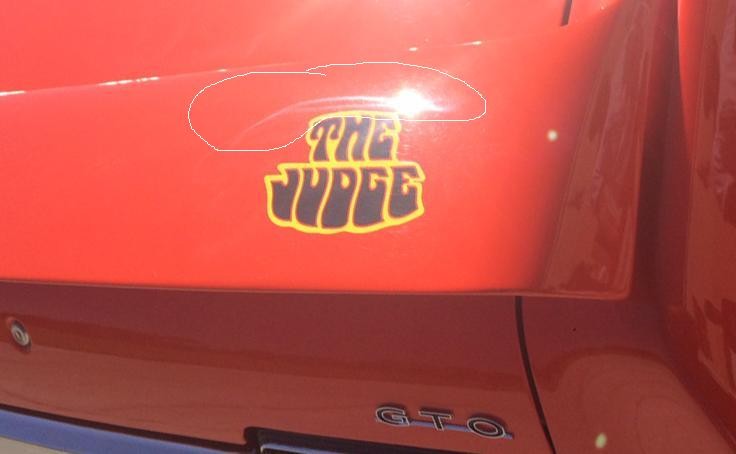
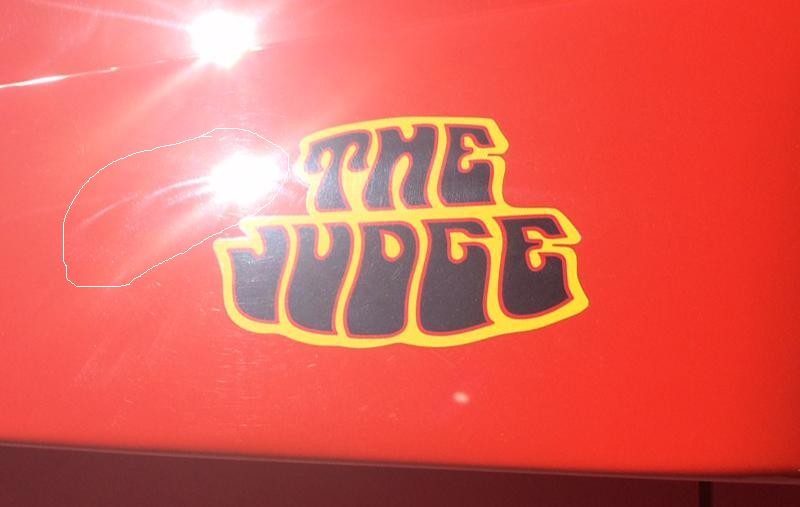
Besides the holograms throughout the finish these iconic and collectible muscle cars from the 1960's are famous for their psychedelic vinyl graphics, which provides yet another learning experience for the class as they learn how to carefully buff around the graphics.

A special treat however is seeing first hand how with a light touch and the RUPES ultra soft white foam finishing pads and the RUPES Diamond Ultra Fine Cut Gel Compound you can actually lightly buff over the graphics to clean and brighten them to look just as good as the paint.


:)
 
Step 1 - How to wash a muscle car

As a best practice, I teach and practice myself NEVER introducing running water to someone else's restored muscle car as there's no need to introduce a rust issue to restored vintage collectible and rare cars.

Just to note, at the time I'm writing this article this car is 46 years old and except for the black contaminants we discovered on the paint and the hologram swirls she looks pretty good. This class is going to take the paint on this car to its maximum potential.


Waterless Wash
When it comes to getting cars like these clean the class learns the correct techniques for using a waterless wash. A waterless wash when used correctly will remove the dirt and leave a scratch-free finish. In all our classes we go over the specific techniques for safely and correctly using a waterless wash like you see the class performing on the 1969 GTO Judge.


The class of July 2015 using DP Waterless Wash & Gloss plus they very plush Supreme 530 16 x 16 Microfiber Towels

watermark.php


:xyxthumbs:
 
Step 2 - How to correctly use detailing clay to remove bonded surface contaminants


You know all my life, I've always wondered how such cool cars like this killer 1969 GTO Judge can always have such abused and neglected paint?

Case in point, when we did the baggie test the paint felt like rough sandpaper? What the heck is that all about?

Regardless, it creates what's called a teaching moment. That is it teaches people that even though cars like this GTO are very cool cars in most cases the paint is in horrible condition and they desperately need a professional to undo the damage and restore the type of quality finish the car deserves. Instead of a professional detailer doing the work however our class is going to learn how to do professional quality work as a part of their experience here at Autogeek.

After a demonstration on how to correctly use detailing clay to safely remove all of the above surface bonded contaminants, the students are turned loose put into practice what they just learned.

To clay the paint on this GTO we're using the Pinnacle Ultra Fine Poly Clay and the Pinnacle Clay Lube and then wiping the residue off using the super soft Supreme 530 16 x 16 Microfiber Towels


watermark.php


watermark.php


watermark.php


watermark.php


watermark.php


watermark.php


Tech tip - The Baggie Test
To check your car's paint simply wash or wipe a section of paint clean, a horizontal panel works best like the hood, roof or trunk and then feel the paint using a sandwich baggie over your hand.

The thin film of plastic will dramatically increase your sense of touch and you may be very surprised to find out the paint on your car feels like sandpaper.

Article: The Baggie Test


:)
 
How to do a Test Spot

There are lots of important steps to perform when detailing a car. One of the most important steps is performing a Test Spot and using the results from the test to dial-in a process that works to create the results you're hoping for the first time.

The big picture idea being to dial-in a system that remove the defects and creates a factory new or show car finish. If your system works to your expectations then all you have to do is repeat the steps to the rest of the vehicle working section by section until you have buffed out the entire car.

If your system doesn't work, for example if the tool, pad and compounds and polishes you have chosen remove the major defects but leave micro-marring in the paint, then you certainly wouldn't want to have duplicated this approach to the entire car as it would have left micro-marring in the entire car.

So it's very important to start by doing a test spot and dialing in your process that meets your expectations.

For the paint on the GTO Judge our expectations are nothing short of a flawless show car finish.


How to do a test spot
First it helps to place a tape-line on the paint and then only buff on one side of the tape-line. This will make it very easy for your eyes to determine if your process is making the paint look better or worse when you wipe off the residue and compare the results of the side you buffed with the original condition of the paint on the other side of the tape line.


Use the least aggressive approach to get the job done
In most cases, and especially if you're new to the world of car detailing and specifically new to the world of machine compounding and polishing, it's a good idea to start out by testing a medium cut or fine cut polish and if this approach is not working fast enough or effective enough then you can do a second test spot using a more aggressive approach like testing a true compound.

For our test spot, since I already have years of experience we started right out with the RUPES coarse blue foam cutting pad and the RUPES Zephir Gloss Coarse Compound.

watermark.php


Inspecting the results from the test spot After
r buffing the section for 8 section passes I wiped off the residue and let the class inspect the results. The class was impressed and so was I so this combination of products will be used for the first step.

watermark.php


Tool Techniques
One bonus about attending a hands-on class is you get to see first hand various techniques for getting the maximum performance out of all the tools we go over in our classes. Case in point was how to hold the tool to maintain pad rotation on curved panels.

watermark.php


watermark.php


:)
 
Step 3 - The Compounding Step

Once we dialed-in and proved our system it was time for the class to get busy and put what they learned into practice.

As the students work on the car, Nick and I walk around and watch each student's techniques and if needed stop them and show them ways to improve their technique and then turn them loose again. There is very little sitting time in Autogeek's detailing classes as I know for a fact that people learn best by doing, not sitting.


watermark.php


watermark.php


watermark.php


watermark.php


watermark.php


watermark.php


watermark.php


watermark.php


Match the tool and the pad size to the panel to be buffed
That my friends is the RUPES Mini !2 being used to buff out the swirls and scratches on the Tachometer housing on the hood of this 1969 GTO Judge. RUPES isn't a tool it's a system of tools, pads and product to enable you to choose and use the perfect tool for the panel to be buffed.

watermark.php


This isn't work... this is fun!
watermark.php


:xyxthumbs:
 
Step 4 - The Polishing Step

After a thorough but careful compounding of the paint next the class switches over to the ultra soft RUPES white foam polishing pads and the RUPES Diamond Ultra Fine Cut Gel Compound to refine the results created by the compounding step and create that deep wet shine everyone loves. Especially on this bright orange 1969 GTO Judge!

watermark.php


watermark.php


watermark.php


watermark.php


watermark.php


watermark.php


watermark.php


watermark.php


watermark.php


watermark.php


watermark.php


:)
 
Step 5 - Machine Waxing


Of course you can apply carnauba waxes and synthetic paint sealants by hand but in my book...

The machine cannot be beat


PLUS the RUPES BigFoot 21 and BigFoot 15 with a fresh set of the ultra soft white finishing pads work great from machine applying wax.

Pinnacle Souveran Paste Wax
This is a true show car wax. By show car wax I mean it's a wax that will impart a deep, wet shine with dripping gloss and deep reflections. Of course the end results always start with the prep work but after the prep work you need a wax that will build on the results and take them to an even higher level.

In all our classes we go over all the ways to seal paint including using,

  • Paint coatings
  • One-step cleaner/waxes (they clean, polish and seal the paint in one step)
  • Synthetic liquid paint sealants
  • Synthetic paint sealants in wax form
  • Carnauba paste waxes
  • Carnauba liquid waxes
For this radical 1969 GTO Judge with it's iconic Hugger Orange paint, Pinnacle Souveran is definitely the way to go and when you see the after pictures I think you'll agree.


First we go over how to carefully remove a paste wax out of a plastic jar.

watermark.php


watermark.php


Wearing a microfiber glove, carefully and with an ever so gentle grip, swipe the hunk of wax across the face of the pad.

watermark.php


Our class is ready to go!

watermark.php


watermark.php


watermark.php


Machine waxing lays down a uniform even coat of wax that perfectly seals the paint and makes wipe-off a breeze.


:)
 
Last step... carefully removing the wax

Throughout our three day class I share and go over TONS of tips for every tool and product we use. It would be impossible to make a list of all the tips and techniques that are taught because they are shared as we work through each project.

One of the tips I show and share in our classes is how to carefully break open a coat of wax and then after making a shiny spot, how to creep out and remove the rest of the wax in a way that makes it easy on you and safe for the paint. It is also the most fun and rewarding part of any exterior detail process.


After sharing and showing the techniques the class is turned loose wearing microfiber gloves and using one of my favorite microfiber towels, the super soft deluxe green microfiber towel with rolled edges.


Time to carefully remove the wax.....

watermark.php


watermark.php


watermark.php


watermark.php


watermark.php


:D
 
Look out for wet paint!

watermark.php


watermark.php


watermark.php


watermark.php


watermark.php


watermark.php


watermark.php


watermark.php


watermark.php


Here's the class responsible for these amazing results!

watermark.php


Final thoughts....
I spoke with the owner today about his GTO. He said he puts the value on this car at near the $100,000.00 range.

I did a quick search on Hagerty.com and he's right on target.


1969 Pontiac GTO Judge Coupe 8-cyl. 400cid/370hp 4bbl Ram Air IV $103,057


Thank you Ray for trusting Autogeek with your beautiful 1969 GTO Judge. I'm confident my class will remember this car and this class forever.


Detailing Classes at Autogeek
Have you been thinking about attending a detailing class? I guarantee you will not only have the time of your life when you attend an Autogeek detailing class but you'll learn everything you want to know and everything you need to know to become an expert at this craft.


You still have to put in the time to gain experience, but this class will completely flatten out the learning curve and provide you with the strongest foundation upon which to build on in this industry. I guarantee it. I've been doing this as long and in most cases longer than anyone else in this industry and I take you and your commitment to attend one of these classes very seriously.


Don't take my word for it, read the testimonies from the people that have attended these classes over the years. Then clear your schedule and get signed up for the next class.

Autogeek's 3-day Detailing Boot Camp Class


dblthumb2.gif
 
That thing looks like a million bucks now. You guys did a great job. Just goes to show how proper technique paired with a long throw DA can yield the kind of correction results you would expect from a rotary.
 
Mike, quick question. Any reason you chose traditional clay over the Nanoskin products for that car? I know you really like the Nanoskin products, I thought that was what you usually used. Thanks
 
Mike, quick question. Any reason you chose traditional clay over the Nanoskin products for that car?

I know you really like the Nanoskin products, I thought that was what you usually used.

Thanks


Great question, thank you for asking.


This write-up is for just ONE of the cars we used for training purposes at our last 3-day detailing class.

The purpose of the class is to get all the tools and products into the hands of the students for hand-on training purposes. We did use Nanoskin towels, mitts and pads but we used on them on the other cars. Which car gets which tools and products is a decision I make as I obtain cars for the class.

By spreading out the multiple tools and products we cover in our classes over a wide variety of cars it makes for what I consider the optimum learning experience.

Below is the link to the write up for the last class. I usually create a write-up for the glass in full and then create separate dedicated threads for each tool set we cover.

Sad thing is I never have enough time to get all the pictures up for every tool set. For example, to date I have not been able to get to the pictures showing,

How we used Solution Finish to restore the plastic cladding on a neglected 2004 Chevy Avalanche. It came out incredible and the before and after pictures will show this.

  • How we did a full engine detail on a 2003 Chevy HD Truck.
  • How we did a cosmetic engine detail on a 2000 Corvette.
  • How we used the Dupray Hill Injection Steam Machine to clean the interior of the 2003 Chevy HD Truck as well as the MyTee Hot Water Extractors.


Plus a lot more... it's just doing pictures the right way is time consuming but when done the write way a picture tells a thousand words and because I upload all my pictures to the AGO gallery instead of places like Photobucket they NEVER disappear.


Here's the link to the full write-up for the class....

Pictures & Comments: July 2015 Detailing Boot Camp Class!

Here's just some of the cars used in that class....

watermark.php


watermark.php


Every class is different but the one thing they have in common are great people and cool cars.


:)
 
That thing looks like a million bucks now. You guys did a great job. Just goes to show how proper technique paired with a long throw DA can yield the kind of correction results you would expect from a rotary.


Thank you for taking the time to comment. :xyxthumbs:


This body style makes for a great training car for any new tool. Most of the body panels are flat and there's only a few thin panels but the RUPES Mini with the 4" pad easily knocked these panels out.

It's fun watching the class anytime they first start out with a new tool because you can see the apprehension in their eyes, especially when working on a show car like this GTO. Then as they become more comfortable with the tool, the pad and the product you can also watch and see their comfort level increase and that's when the magic happens.

The students in the class, after wiping the car down with a waterless wash, after claying and the demonstration, so after these three things, knocked this car out in under 2 hours. Compounded, polished, waxed, wax removed, windows cleaned and tires dressed.

Fun to watch as well as rewarding.


:dblthumb2:
 
Hi, great to see everyone in good shape doing such quality work!

I'm not following forums as I'd like to due time constraints, however I'm sure to take a look everyday or two,

Finding this thread was like a gift, I always learn 'A LOT' with you, Mike,

Thanks for the passion you carry in teaching people how to detail cars,


and Congrats everyone on results achieved,

Best Wishes, from Brazil.


Thank you sir for taking the time to read this write-up.


:dblthumb2:
 
Back
Top