Cut & Buff on 1966 Camero

Midnight1700

New member
Joined
Aug 14, 2010
Messages
275
Reaction score
0
I was asked yesterday about doing a complete "Cut & Buff" on a 1966 Camero. This car is still at the body shop but was painted a few months ago. Does anyone out there in AG Land have an idea as to how much time would be required to do this? And, what would the prefferred method be? They are looking for a "Show Quality" finish. The car does not have the engine installed and many of the body components are also off the car, so I only have very minimal masking to do. Any advise would be a great help. Thanks!
 
Sorry dude they never made a 1966 camaro if thats what you mean.
 
Opps! Typo. Too early in the morning. It's a 69'. Not enough coffee yet this morning.
 
Opps! Typo. Too early in the morning. It's a 69'. Not enough coffee yet this morning.

What a treat! The 1969 Camaro is my favorite year for the Camaro!

I do have a few questions for you.


  • Is it an after-market fabrication or restoration?
  • Single stage paint or color coat clear coat?
  • Have you ever buffed out a new paint job?
  • Do you know what the definition of a Show Quality finish?
  • Does the owner know what a Show Quality finish is or is he just throwing out words?
  • Can you post some photos?
 
It all depends if is an enamel, single stage urethane or base/clear urethane.
 
Dampsand it for sure...

Hand sanding to slow, to easy to instill tracers.

I just dampsanded a hood and buffed it out in preparation for our Wetsanding class this Sunday, its' going to be streamed live if you're signed up and I'm going to go over,

Hand sanding
Machine sanding by air DA and electric DA
Compounding with Rotary Buffer and Wool Pads
Polishing with Rotary Buffers and Foam Pads
Finish Polishing with both rotary and DA polishers

The chemicals we're going to showcase are Pinnacle, 3M, Optimum and Meguiar's.

It's a very thorough class but also condensed class as this is a ton of information to cover in a single day. When I taught these classes for Meguiar's I only had to show one chemical line, now I'm showing 4 chemical lines and 3-4 pad systems plus we'll be using all these tools,


  • Flex Rotary Buffers
  • 3M Rotary Buffer
  • Makita Rotary Buffer
  • DeWALT Rotary Buffer
  • Porter Cable 7424XP
  • Griot's Garage Random 6" Orbital Polisher
  • Meguiar's G110v2
  • 3M Orbital Sander
  • Defelsko Paint Thickness Gauge
  • Brinkmann Swirl Finder Light

That's a lot to cover starting with a Power Point Presentation as it's vital to get head knowledge before turning loose with sanding and buffing...


I charged $3000.00 to sand and buff the Joker truck and spent about 60 hours on it. Some of my friends say they would have spent more time on it but I think it came out pretty good for 60 hours. The next weekend it went on display at SEMA

The Joker Truck
I did the wetsand, cut and buff on this truck twice, it underwent a lot of changes and was re-cleared and one side of the Joker face was repainted.

SoloOnJoker006.jpg


BuffingJoker022.jpg


JokerDriversSideFinished002.jpg


Joker2After002.jpg


AbralonSystem016.jpg


Tell them $80.00 an hour and see what they say...

If they want show quality it's going to take time, the hardest or most risky things to do are sanding close to any raised body lines or edges.

I alway tape these areas off and show this in the below article,

Damp-Sanding Tools, Tips and Techniques by Mike Phillips


Here's some more articles on the general topic of wetsanding...

Wet-Sanding

New -
It's the person that does the wet-sanding, cutting and buffing that makes or breaks the paint job -Mike Phillips


Meguiar's 6" Unigrit Sanding and Finishing Discs

Wet-sanding, Color-sanding & Damp-sanding

Meguiar's New 3 Inch Professional Headlight & Spot Repair Kit

RIDS and Feathersanding - A Highly Specialized Technique by Mike Phillips

Wet-sanding - Fresh Paint vs Factory Paint

Basic Hand Sanding Techniques

The Rule of Thumb

Fight or Flight Method for Gaging Surface Temperature

New - Two Schools of Thought when Hand Sanding - Straight-lines or Crosshatch Pattern

The difference between 3M's Hookit and Hookit II Hook-N-Loop Interface Systems

List of Sanding Discs at Autogeek.net

If it has paint... it gets polished...

Removing Orange Peel & Sanding Marks with the Griot's ROP and the Wolfgang Twins

How long will a half sheet of wet/dry sandpaper last before it stops cutting and you need to replace it?

Can an air-powered DA Sander be used to polish paint?


If you want to do more work like this project then document it with good before, process and after pictures and create a write-up on our forum.


:)
 
What a treat! The 1969 Camaro is my favorite year for the Camaro!

I do have a few questions for you.


  • Is it an after-market fabrication or restoration?
  • Single stage paint or color coat clear coat?
  • Have you ever buffed out a new paint job?
  • Do you know what the definition of a Show Quality finish?
  • Does the owner know what a Show Quality finish is or is he just throwing out words?
  • Can you post some photos?

  • Is it an after-market fabrication or restoration? It's a complete restoration
  • Single stage paint or color coat clear coat? 3 Coats of clear
  • Have you ever buffed out a new paint job? YES!,
  • Do you know what the definition of a Show Quality finish? YES!
  • Does the owner know what a Show Quality finish is or is he just throwing out words? For what I understand, this is his 4th restoration project. I'm assuming he does...
  • Can you post some photos? The car is at the bodyshop now. I may be able to get some pics this weekend when I get started on it..
 
If you want to do more work like this project then document it with good before, process and after pictures and create a write-up on our forum.


:)

Thanks Mike for all the information! I have recently completed a 31 Ford Roadster that was completely Cut and Buffed to show quality. This job included all the paint surfaces, Interior, Undercarrage, Engine cleaned and chrome polished. It took us 50 hours to complete. I have a number of pictures, before and some after shots. I'll see if I can get it all together this weekend and put it here on the forum.
 
  • Is it an after-market fabrication or restoration? It's a complete restoration
  • Single stage paint or color coat clear coat? 3 Coats of clear
  • Have you ever buffed out a new paint job? YES!,
  • Do you know what the definition of a Show Quality finish? YES!
  • Does the owner know what a Show Quality finish is or is he just throwing out words? For what I understand, this is his 4th restoration project. I'm assuming he does...
  • Can you post some photos? The car is at the bodyshop now. I may be able to get some pics this weekend when I get started on it..

This is a great way to start the job!

Mike's given some invaluable information above for reference reading before you get started just in case...:props:

I can't wait to see the photos.......large ones please so I can save it for my desktop! :dblthumb2:
 
Mike,
So this sunday it will be streamed live? Like I can log on and watch it? I really want to watch you and everyone machine sand. I really want to learn how to do that...
 
Most people consider show car quality to mean removing all the of the Orange Peel and somewhere on the forum I've posted something about what's involved with removing orange peel all the way up to edges.

If that's part of his expectations then here's the deal, it can be done, but it's time consuming because you have to be so careful so as not to burn through an edge.

Taping off edges before sanding like shown here by Barry Theal,

Drop it like it's hot!


Or myself in the Dampsanding article is vital for the machine sanding portion and the majority of any hand sanding.

You can get the Meguiar's 3" Sanding Kit and this give you more control because the surface area is so much smaller that you can better sand closer to edges. Whatever you cannot get by machine you can sand by hand.

Meguiar's New 3 Inch Professional Headlight & Spot Repair Kit


Then to remove the sanding marks, remove as much as you can by machine and then remove the rest by hand. M105 or UC works really well for this...

So if you're willing to break the The Rule of Thumb and you can get paid for the extra time it takes to work carefully around edges and raised body lines... then go for it!


Mike Phillips said:
The Rule of Thumb

Copyright ©PBMA - AutogeekOnline.net® All Rights Reserved


First, here's a tip when it comes to sanding paint by hand or machine...

Don't sand where you cannot safely machine compound.


The reason for this is because if you sand right up to an edge or up to a raised body line, it's difficult to run a buffing pad up to the end of your sanding marks and not buff on top of the body line or edge and risk burning through the topcoat.

Even if you're extremely careful it's all to easy to accidentally run the pad onto the edge and it only takes a few seconds to generate enough heat and abrasive sanding or cutting action to eat through the paint on a high point and expose the color coat, primer or even sheet metal underneath.

Remember paint will tend to be thinner on high points as wet paint, (when being sprayed), will flow off a little more than paint sprayed onto a flat panel.

So a good practice is to only sand where you can safely machine compound or another way of saying this is to not sand where you cannot safely machine compound.


The Rule of Thumb
The rule of thumb I use is with my thumb, mostly because I always have it with me.
biggrin.gif


I use the distance from the tip of my thumb to the end of my thumbnail, which I just measured and it's about 3/4 of an inch and that's about how far away I stay from edges and raised body lines when I sand by hand or machine.

Actually a 1/2" is a pretty good rule of thumb the bigger idea is to not sand paint where you cannot safely buff with a wool pad, a cutting compound with a rotary buffer.

This is a technique I teach in our wet-sanding classes to give students a simple method or a simple guideline they can use to know just how far to sand when sanding near a hard body line or the edge of a panel. This is a simple technique that works for me but feel free to come up with your own method.


--> Here's the part I was talking about previously, that is about show car detailing <--


Show Car and Perfectionist Sanding and Polishing
For those of you wanting to do perfectionist sanding and polishing, first make sure you're getting paid well because you can sand right up to an edge but removing your sanding marks has to be done carefully and this means it will require you to invest more time into the project.​

How to sand right up to an edge and remove your sanding marks by hand
There is a fix for the issue of sanding right next to an edge or a raised body line and that's by carefully sanding and then using Meguiar's M105 Ultra Compound by hand to remove your sanding marks. Another way to remove sanding marks next to an edge or to a raised body line is to use Spot Repair Pads on a rotary buffer using a technique I call Edging.

Because M105 is aggressive, (rated at being able to remove #1200 Grit Sanding Marks on fresh paint), and recommended for use by hand, you can easily remove sanding marks by hand if you're willing to put a little passion behind the pad.

There are a lot of compounds that can be applied by hand to remove sanding marks, but it's the ability of the super micro abrasive technology, (SMAT), used in M105 that gives it both its' cutting ability and the ability to polish out clear and glossy that makes M105 Ultra Compound a good choice for carefully rubbing out sanding marks right up to an edge or a raised body line by hand.

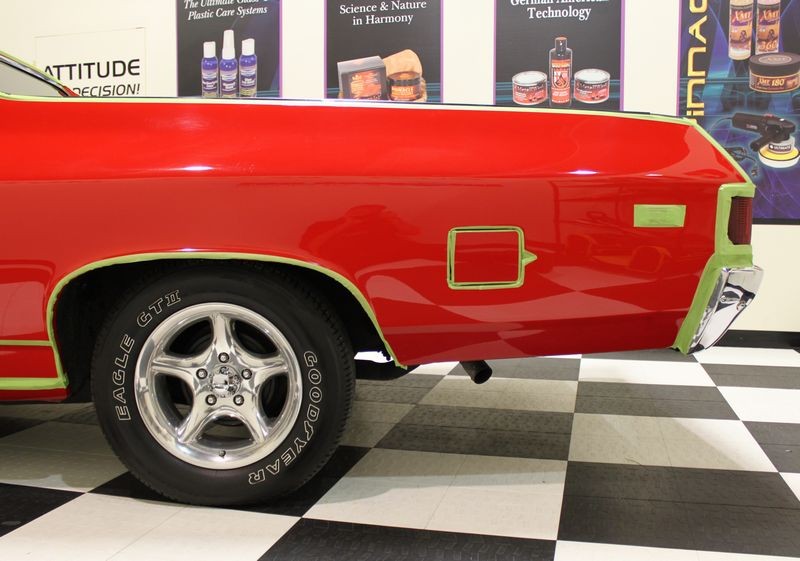
Note: The blue line you see in the pictures below is vinyl tape applied over the top of a body lines on the hood of this 1969 El Camino to make it easier to see and protect them. You can also do this with the edges of a panel.


RemvovingSandingMarksbyHand01.jpg


RemvovingSandingMarksbyHand02.jpg


In the picture examples above, the raised body lines running down the hood can be hard to see once you start sanding a panel as you'll have paint slurry all over the panel thus camouflaging the raised body line. Like this, note how it's harder to see where the tape lines are with paint slurry on the panel...

UnigritDampSanding002.jpg


If you don't know exactly where the raised body lines are, it's all to easy to accidentally run your sanding disk, (by machine), or sanding paper, (by hand), over the raised portion of the body line and remove way too much paint way too quickly.

While you might not sand through the clear layer on the body line if you accidentally sand on top of it, remember you still will have to compound and polish the paint and compounding and polishing will also remove some paint; so the risk of sanding or burning through the paint on a raised body line is great.


Here's a tip...
Take a moment to mark any raised body lines with some thin painter's tape and avoid a costly and time-consuming mistake.

You can also tape-off any edges to protect them and to make them clearly visible while you're sanding.

redelcamino_023.jpg


smile.gif
 
Mike,
So this sunday it will be streamed live? Like I can log on and watch it? I really want to watch you and everyone machine sand. I really want to learn how to do that...

There's a thread around here somewhere where Nick posted the opportunity...

Not sure if the opportunity is still available...


Kind someone find the thread? I have to get back out to the studio...


I was a little surprised after all these years of people asking for a Roadshow Class in their hometown that more people didn't sign-up?


:confused:
 
I have read that article last year before we did the 31 Roadster. Great advice!

We have followed the Rule of Thumb "Almost" all the time. In some cases, we had to push it a little to get things done.


Thanks again!


:xyxthumbs:
 
I have read that article last year before we did the 31 Roadster. Great advice!

We have followed the Rule of Thumb "Almost" all the time. In some cases, we had to push it a little to get things done.

Thanks again!


Good to hear... I don't always read posts like yours where something I've written has helped someone else to accomplish their goal...


:dblthumb2:
 
... I don't always read posts like yours where something I've written has helped someone else to accomplish their goal...

Some of us have more modest and less specific goals. You should know that every time I touch a car... even for a simple wash... something you've written somewhere has become part of my technique. After it's internalized I may not be able to point at it and say "Yep, I picked that up from Mike"... but it's still there!

Your experience and guidance affects more people than you could ever imagine. :dblthumb2:

TL
I can truthfully speak the same words. If I ever need reference about stuff detailing related, I go to the "Mike Phillips Library" first and rarely need to look any further. You rock M.P.
 
Back
Top