Mike Phillips
Active member
- Dec 5, 2022
- 51,004
- 6
DA Polisher Trouble Shooting Guide
When you're first starting out machine polishing and learning to use a DA Polisher it's common to have questions about your results and your results are directly tied to your technique.
Here's a list of the most common problems,
Here's a list of the solutions in matching order,
1. Trying to work too large of an area at one time.
Shrink the size of your work area down. You can't tackle to large of an area at one time. The average size work area should be around 20" by 20". Most generic recommendations say to work an area 2' by 2' but for the correction step, that's too large. You have to do some experimenting, (called a Test Spot), to find out how easy or how hard the defects are coming out of your car's paint system and then adjust your work area to the results of your Test Spot. The harder the paint the smaller the area you want to work.
2. Moving the polisher too fast over the surface.
For removing defects out of the paint you want to use what we call a Slow Arm Speed. It's easy and actually natural for most people new to machine polishing to move the polisher quickly over the paint but that's the wrong technique. One reason I think people move the polisher too quickly over the paint is because they hear the sound of the motor spinning fast and this has psychological effect which causes them to match their arm movement to the perceived fast speed of the polisher's motor.
Another reason people move the polisher too quickly over the paint is because they think like this,
"If I move the polisher quickly, I'll get done faster"
But it doesn't work that way. Anytime you're trying to remove swirls, scratches, water spots or oxidation using a DA Polisher you need to move the polisher s-l-o-w-l-y over the paint.
3. Using too low of speed setting for removing swirls.
When first starting out many people are scared of burning or swirling their paint, so they take the safe route of running the polisher at too low of a speed setting but this won't work. The action of the polisher is already g-e-n-t-l-e, you need the speed and specifically the pad oscillating and rotating over the paint as well as the combination of time, (slow arm speed), together with the abrasives, the pad aggressiveness, and the downward pressure to remove small particles of paint which is how your remove below surface defects like swirls or scratches.
Removing below surface defects is a leveling process where you need the abrasives to take little bites out of the paint and to get the abrasives to take these little bites with a tool that uses a Free Floating Spindle Bearing Assembly you need all of the above factors working for you including a high speed setting.
4. Using too little downward pressure on the head of the polisher.
For the same reason as stated in #3, people are scared, or perhaps a better word is apprehensive, to apply too much downward pressure to the polisher and the result of too little pressure is no paint is removed thus no swirls are removed.
5. Using too much downward pressure on the head of the polisher so the pad quits rotating.
If you push too hard you will slow down the rotating movement of the pad and the abrasives won't be effectively worked against the paint. You need to apply firm pressure to engage the abrasives against the paint but no so much that the pad is barely rotating. This is where it's a good idea to use a permanent black marker to make a mark on the back of your backing plate so your eyes can easily see if the pad is rotating or not and this will help you to adjust your downward pressure accordingly.
Correct technique means finding a balance of applying enough downward pressure to remove defects but not too much downward pressure as to stop the rotating movement of the pad.
This balance is affected by a lot of factors like the lubricity of the product you're using, some compounds and polishes provide more lubrication than others and this makes it easier to maintain pad rotation under pressure.
Another factor that can affect pad rotation are raised body lines, edges and curved surfaces as anytime you have uneven pressure on just a portion of the face of the pad it can slow or stop pad rotation. This is where experience comes into play and experience comes from time spent behind the polisher.
6. Not holding the polisher in a way to keep the pad flat while working your compound or polish.
Applying pressure in such a way as to put too much pressure to one edge of the pad will cause it to stop rotating and thus decrease abrading ability.
7. Using too much product or using too little product.
Too much product hyper-lubricates the surface and the result is that abrasives won't effectively bite into the paint but instead will tend to skim over the surface. Overusing product will also accelerate pad saturation as well increase the potential for slinging splatter onto adjacent panels.
Too little product will means too little lubrication and this can interfere with pad rotation.
Again there needs to be a balance between too much product and too little product and finding this balance comes from reading articles like this one, watching videos an most important, going out into the garage and putting in time behind the polisher and as you're buffing with specific product and pad combinations, pay attention to pad rotation.
8. Not cleaning the pad often enough.
Most people simply don't clean their pad often enough to maximize the effectiveness of their DA Polisher. Anytime you're abrading the paint you have two things building up on the face of your buffing pad,
As these to things build up on the face of the pad they become gummy and this has a negative affect on pad rotating plus makes wiping the leftover residue on the paint more difficult. To maintain good pad rotation you want to clean your pad often and always wipe-off any leftover product residue off the paint after working a section. Never add fresh product to your pad and work a section that still has leftover product residue on it.
Pad Cleaning Articles
Why it's important to clean your pads often...
How to clean your foam pad on the fly
How to use the Grit Guard Universal Pad Washer

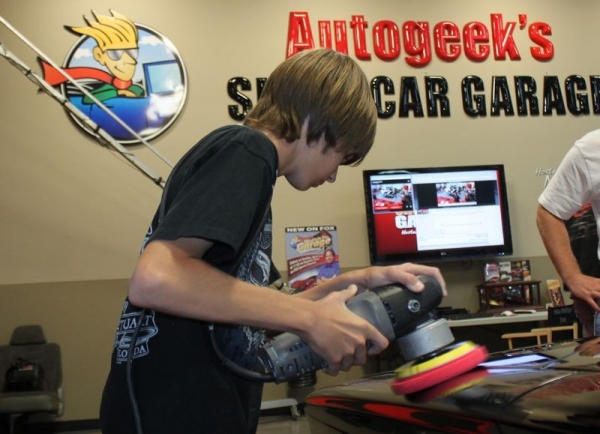
Tyler, age 15 removing swirls using a Porter Cable 7424XP Dual Action Polisher


When you're first starting out machine polishing and learning to use a DA Polisher it's common to have questions about your results and your results are directly tied to your technique.
Here's a list of the most common problems,
1. Trying to work too large of an area at one time.
2. Moving the polisher too fast over the surface.
3. Using too low of speed setting for removing swirls.
4. Using too little downward pressure on the head of the polisher.
5. Using too much downward pressure on the head of the polisher so the pad quits rotating.
6. Not holding the polisher in a way to keep the pad flat while working your compound or polish.
7. Using too much product or using too little product.
8. Not cleaning the pad often enough.
Here's a list of the solutions in matching order,
1. Trying to work too large of an area at one time.
Shrink the size of your work area down. You can't tackle to large of an area at one time. The average size work area should be around 20" by 20". Most generic recommendations say to work an area 2' by 2' but for the correction step, that's too large. You have to do some experimenting, (called a Test Spot), to find out how easy or how hard the defects are coming out of your car's paint system and then adjust your work area to the results of your Test Spot. The harder the paint the smaller the area you want to work.
2. Moving the polisher too fast over the surface.
For removing defects out of the paint you want to use what we call a Slow Arm Speed. It's easy and actually natural for most people new to machine polishing to move the polisher quickly over the paint but that's the wrong technique. One reason I think people move the polisher too quickly over the paint is because they hear the sound of the motor spinning fast and this has psychological effect which causes them to match their arm movement to the perceived fast speed of the polisher's motor.
Another reason people move the polisher too quickly over the paint is because they think like this,
"If I move the polisher quickly, I'll get done faster"
But it doesn't work that way. Anytime you're trying to remove swirls, scratches, water spots or oxidation using a DA Polisher you need to move the polisher s-l-o-w-l-y over the paint.
3. Using too low of speed setting for removing swirls.
When first starting out many people are scared of burning or swirling their paint, so they take the safe route of running the polisher at too low of a speed setting but this won't work. The action of the polisher is already g-e-n-t-l-e, you need the speed and specifically the pad oscillating and rotating over the paint as well as the combination of time, (slow arm speed), together with the abrasives, the pad aggressiveness, and the downward pressure to remove small particles of paint which is how your remove below surface defects like swirls or scratches.
Removing below surface defects is a leveling process where you need the abrasives to take little bites out of the paint and to get the abrasives to take these little bites with a tool that uses a Free Floating Spindle Bearing Assembly you need all of the above factors working for you including a high speed setting.
4. Using too little downward pressure on the head of the polisher.
For the same reason as stated in #3, people are scared, or perhaps a better word is apprehensive, to apply too much downward pressure to the polisher and the result of too little pressure is no paint is removed thus no swirls are removed.
5. Using too much downward pressure on the head of the polisher so the pad quits rotating.
If you push too hard you will slow down the rotating movement of the pad and the abrasives won't be effectively worked against the paint. You need to apply firm pressure to engage the abrasives against the paint but no so much that the pad is barely rotating. This is where it's a good idea to use a permanent black marker to make a mark on the back of your backing plate so your eyes can easily see if the pad is rotating or not and this will help you to adjust your downward pressure accordingly.
Correct technique means finding a balance of applying enough downward pressure to remove defects but not too much downward pressure as to stop the rotating movement of the pad.
This balance is affected by a lot of factors like the lubricity of the product you're using, some compounds and polishes provide more lubrication than others and this makes it easier to maintain pad rotation under pressure.
Another factor that can affect pad rotation are raised body lines, edges and curved surfaces as anytime you have uneven pressure on just a portion of the face of the pad it can slow or stop pad rotation. This is where experience comes into play and experience comes from time spent behind the polisher.
6. Not holding the polisher in a way to keep the pad flat while working your compound or polish.
Applying pressure in such a way as to put too much pressure to one edge of the pad will cause it to stop rotating and thus decrease abrading ability.
7. Using too much product or using too little product.
Too much product hyper-lubricates the surface and the result is that abrasives won't effectively bite into the paint but instead will tend to skim over the surface. Overusing product will also accelerate pad saturation as well increase the potential for slinging splatter onto adjacent panels.
Too little product will means too little lubrication and this can interfere with pad rotation.
Again there needs to be a balance between too much product and too little product and finding this balance comes from reading articles like this one, watching videos an most important, going out into the garage and putting in time behind the polisher and as you're buffing with specific product and pad combinations, pay attention to pad rotation.
8. Not cleaning the pad often enough.
Most people simply don't clean their pad often enough to maximize the effectiveness of their DA Polisher. Anytime you're abrading the paint you have two things building up on the face of your buffing pad,
- Removed paint
- Spent product
As these to things build up on the face of the pad they become gummy and this has a negative affect on pad rotating plus makes wiping the leftover residue on the paint more difficult. To maintain good pad rotation you want to clean your pad often and always wipe-off any leftover product residue off the paint after working a section. Never add fresh product to your pad and work a section that still has leftover product residue on it.
Pad Cleaning Articles
Why it's important to clean your pads often...
How to clean your foam pad on the fly
How to use the Grit Guard Universal Pad Washer
Tyler, age 15 machine applying a paste wax using a Porter Cable 7424XP Dual Action Polisher
