Nick McKees37
McKee's 37 Product Support
- Jan 6, 2011
- 7,265
- 0
DYI - Foam Cannon HP Tune-Up
The Foam Cannon HP and Detailer's Xtreme Foam Formula Shampoo is a winning combination, like apple pie and vanilla ice cream. If you have a pressure washer and haven't picked up a Foam Cannon HP, you don't know what you're missing. The Foam Cannon HP is an essential tool for quick, safe, swirl free washing. With the use of high pressure water and a highly concentrated shampoo, you have the ability to completely cover your entire vehicle in mounds of thick, luxurious suds, which is essential for swirl free washing.

With the Foam Cannon HP, proper care and maintenance is necessary for the tool to work properly and perform flawlessly. Just like any other tool, if not maintained properly, it will not perform as expected. The Foam Cannon HP is practically maintenance free, and the only part that needs replacing every now and then is the pressed strainer, which helps with foam output. If your Foam Cannon doesn't perform like the day it was new, the pressed strainer needs to be replaced. In this guide, I will clearly explain how to disassemble the Foam Cannon to replace the pressed strainer.
Disassembly of the Foam Cannon HP is very easy and requires only basic hand tools. An adjustable wrench, a small pair of channel locks, and a mini screw driver is all takes to get the job done.

Here is what the Foam Cannon HP looks like when it's not attached to its tank. It's a fairly simple design and shouldn't intimidate those who are mechanically inclined. The Foam Cannon itself is made up of 24 separate parts, but for this demonstration it's not necessary to complete strip it down to every nut and bolt. Work smart, not hard.

To get things started, you need to remove the parallel pin from the nozzle knob. To do this, simply punch the pin out using a mini screwdriver. Once it's exposed, grab a hold of it with a pair of channel locks and remove it completely. Do not lose this piece!


The parallel pin allows the nozzle knob to be removed exposing the injector housing. Here is what the unit looks like after removing the parallel pin and nozzle knob.

To ensure the included brass male nipple connector isn't damaged in the process, remove it too. It comes finger tight from the factory, so it should unscrew easily.

The next step is to remove the adjustment knob. This is connects to the piston holder, which also needs to be removed. Be extremely careful not to damage the threads while removing the piston holder.


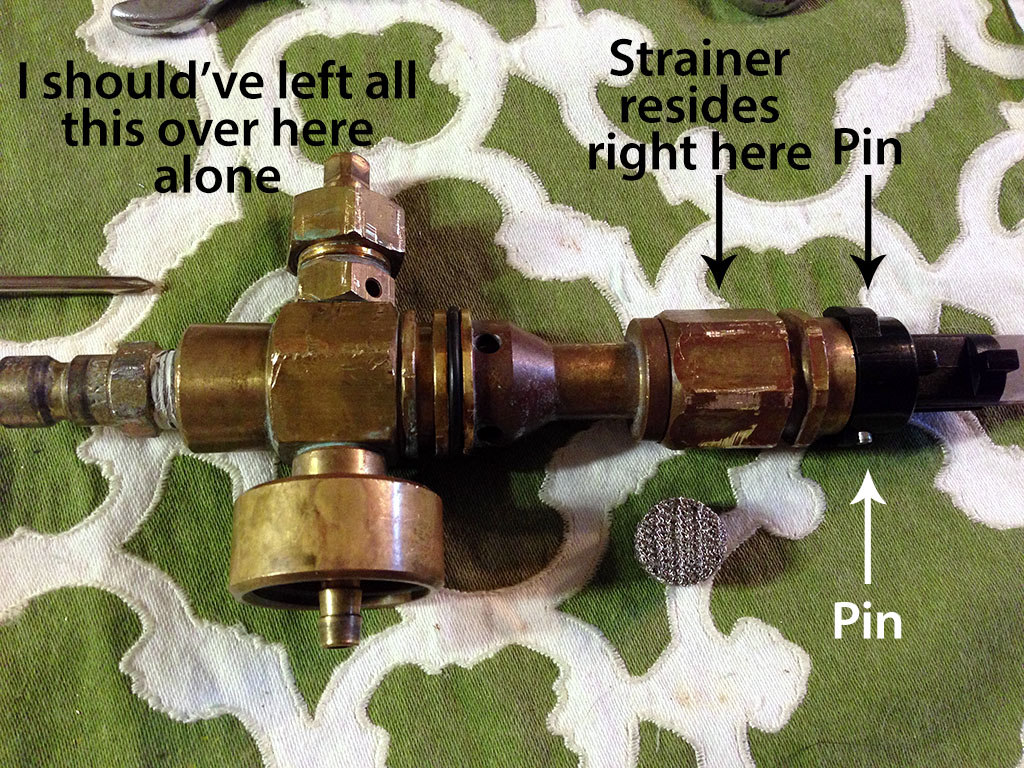
Here is a break down of how the unit looks with the adjustment knob and piston holder assembly removed.

The next step is to remove injector housing. The pressed strainer is located inside the injector housing. The easiest way to do this is with two hands, using an adjustable wrench and a pair of channel locks. Hold the unit with your left hand (adjustable wrench) and loosen the injector housing with your right hand (channel locks). This may take a little muscle.


Almost there! Now that you've removed the injector housing, insert the mini screwdriver in the hole and press lightly. This will loosen the pressed strainer and it should pop right out.


This is the pressed strainer. If your Foam Cannon HP is lacking foam output compared to when new or relatively new, this is the part that needs to be replaced. To ensure a long life of the pressed strainer, run water through the Foam Cannon HP after each use to completely clean out the soap and any mineral deposits left in the injector housing.

Installation is the reversal of removal. Be sure to thoroughly inspect all fittings prior to tightening them down. If any of the teflon tape became loose or damaged in the removal process, replace it to prevent leaks from occuring.
Now you're ready to once again enjoy mounds of rich, luxurious suds for safe, swirl free washing with the Foam Cannon HP!

Autogeek Foam Cannon HP
Foam Cannon HP Pressed Strainer 3-Pack
The Foam Cannon HP and Detailer's Xtreme Foam Formula Shampoo is a winning combination, like apple pie and vanilla ice cream. If you have a pressure washer and haven't picked up a Foam Cannon HP, you don't know what you're missing. The Foam Cannon HP is an essential tool for quick, safe, swirl free washing. With the use of high pressure water and a highly concentrated shampoo, you have the ability to completely cover your entire vehicle in mounds of thick, luxurious suds, which is essential for swirl free washing.
With the Foam Cannon HP, proper care and maintenance is necessary for the tool to work properly and perform flawlessly. Just like any other tool, if not maintained properly, it will not perform as expected. The Foam Cannon HP is practically maintenance free, and the only part that needs replacing every now and then is the pressed strainer, which helps with foam output. If your Foam Cannon doesn't perform like the day it was new, the pressed strainer needs to be replaced. In this guide, I will clearly explain how to disassemble the Foam Cannon to replace the pressed strainer.
Disassembly of the Foam Cannon HP is very easy and requires only basic hand tools. An adjustable wrench, a small pair of channel locks, and a mini screw driver is all takes to get the job done.
Here is what the Foam Cannon HP looks like when it's not attached to its tank. It's a fairly simple design and shouldn't intimidate those who are mechanically inclined. The Foam Cannon itself is made up of 24 separate parts, but for this demonstration it's not necessary to complete strip it down to every nut and bolt. Work smart, not hard.
To get things started, you need to remove the parallel pin from the nozzle knob. To do this, simply punch the pin out using a mini screwdriver. Once it's exposed, grab a hold of it with a pair of channel locks and remove it completely. Do not lose this piece!
The parallel pin allows the nozzle knob to be removed exposing the injector housing. Here is what the unit looks like after removing the parallel pin and nozzle knob.
To ensure the included brass male nipple connector isn't damaged in the process, remove it too. It comes finger tight from the factory, so it should unscrew easily.
The next step is to remove the adjustment knob. This is connects to the piston holder, which also needs to be removed. Be extremely careful not to damage the threads while removing the piston holder.
Here is a break down of how the unit looks with the adjustment knob and piston holder assembly removed.
The next step is to remove injector housing. The pressed strainer is located inside the injector housing. The easiest way to do this is with two hands, using an adjustable wrench and a pair of channel locks. Hold the unit with your left hand (adjustable wrench) and loosen the injector housing with your right hand (channel locks). This may take a little muscle.
Almost there! Now that you've removed the injector housing, insert the mini screwdriver in the hole and press lightly. This will loosen the pressed strainer and it should pop right out.
This is the pressed strainer. If your Foam Cannon HP is lacking foam output compared to when new or relatively new, this is the part that needs to be replaced. To ensure a long life of the pressed strainer, run water through the Foam Cannon HP after each use to completely clean out the soap and any mineral deposits left in the injector housing.
Installation is the reversal of removal. Be sure to thoroughly inspect all fittings prior to tightening them down. If any of the teflon tape became loose or damaged in the removal process, replace it to prevent leaks from occuring.
Now you're ready to once again enjoy mounds of rich, luxurious suds for safe, swirl free washing with the Foam Cannon HP!
Autogeek Foam Cannon HP
Foam Cannon HP Pressed Strainer 3-Pack