Help please- Milky, Hazy, Streaks/Splotches in red paint.

pworm14

New member
Joined
Jul 6, 2010
Messages
4
Reaction score
0
Long time lurker here and pretty much a newbie to the buffing/polishing game. I’m hoping you guys can help me with a little problem. A friend of mine just picked up a red ’65 mustang that he’s fixing up for his kid. According to a receipt that he got with the car, the paint on the car is Chroma One Urethane, no clear coat, and is about 12 yrs old. The car has sat outside (here in AZ) without much care taken to keep it looking good so quite a bit of oxidation to deal with.

Anyhow, the problem that we’re having is hazy, whitish, milky, streaks/splotches seem to appear in the paint after cleaning/polishing with a 7424XP, LC flat pads, and Meg’s products. Here’s the weird part. It takes approx 45 to 60 minutes after cleaning before these streaks/splotches start showing up. It’s driving me crazy because right after cleaning an area it looks spectacular. Then after awhile it starts to get hazy/splotchy in some areas.

Here’s a rundown on the process we have used so far. All the pads used are LC 5.5 inch flat pads. So far we have only done the rear quarters, rear panel/roll pan, deck lid, and roof.

Yellow pad – Megs Ultimate Compound – Speed 5/6 - Do each area twice (Melted my backing plate a little L).
Yellow pad – Megs Step 1 cleaner – Speed 5/6 - Do each area once
Orange pad – Megs Step 1 cleaner – Speed 5/6 - Do each area twice
Orange pad – Megs Step 2 polish - Speed 5/6 - Do each area twice – Have not done this yet.
Black pad – Megs #7 Mirror Glaze - Speed 4 - Do each area twice - Have not done this yet.
Wax - Have not done this yet.

Any help/suggestions are greatly appreciated.
 
Since this is your first post to our fourm...

Welcome to Autogeek Online! :welcome:


The first thing to have done would have been a Test Spot to just one area and see if you can fix just one area before tackling the entire car.

The goal is to dial in a system prove to work so when you tackle the entire car you are successful and don't waste any time, pads or products.

Sounds like it's too late for this approach...

There's a term I coined years ago after restoring lots of antique and single stage paint and here it is,

Unstable


There comes a point when paint becomes unstable and this usually shows up as you being able to restore the appearance and color of the paint but after either

Time
Exposure to the sun
Washing

And any combination of the above, the appearance or color of the paint returns to the condition it was in before you started.

If the problem you are seeing is specific to only isolated areas then here's what I would try and this is also what I would have done FIRST before ever ABRADING the 12 year old single stage paint, in fact I wrote an article about it for people that "want" to do everything they can to preserve a finish instead of repaint a car.


The Secret to Removing Oxidation and Restoring a Show Car Finish to Antique Single Stage Paints


The step with the #7 you haven't done is the first step I would have done...

This is key...
Saturation Application --> The First Application

This is a mostly unknown technique and that is to let the first application penetrate and soak into the paint for up to 24 hours before wiping the product off. The idea being to really apply the product wet and work it in really well and the walk away.

The idea is to allow the heavy concentration of oils to penetrate and seep into the paint for maximum saturation before removing the product and continuing with the process. In this case I finished applying the first application of #7 around 9:00 pm and then left the #7 to soak in until the next day. I started wiping the product off then next morning right about 10:00am.

Some will argue if this works or not buy my experience is that with a porous single stage paint it does in fact help. One thing for sure it can't hurt.

Paper Test for Capillary Action
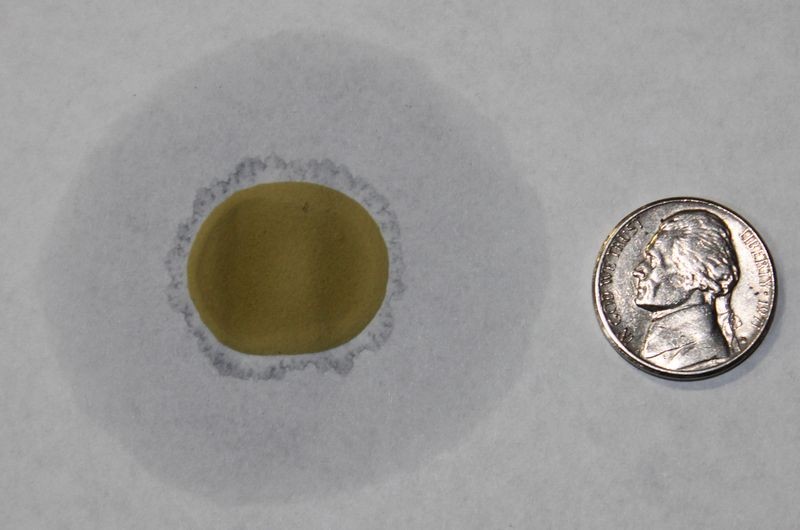
If you place a few drops of #7 onto a piece of paper and then monitor it over a few days you will see the oils in the #7 migrate or seep away from the actual drop of product. It does this through capillary action and the same thing can work to your car's paints' advantage if it's a single stage lacquer or enamel paint.

I placed a few drops about the size of a nickel on a piece of standard printer paper around 3:00pm.

7CapillaryAction01.jpg


The next day I took these pictures at approximately 10:00am, (19 hours later), note how the oils in the drops of #7 have migrated outward via capillary action.

7CapillaryAction02.jpg


Feeder Oils penetrate or feed the paint
This same effect can take place in a single stage paint but not only will the oils travel horizontally, they will also travel vertically, that they will penetrate downward "into" your car's paint and this is where the term feeder oils comes from as the oils penetrate into or feed the paint. The result is they will condition the paint restoring some level of workability as compared to just working on old dry paint, and they will also bring out the full richness of color, something that will showcase the beauty of your car's paint.


Read the article, and then try to fix just one small area that has the fading or spots starting with the #7 and tell us what happens. Chances are very good that the paint has become unstable and is now past the point of no return.


:)
 
Thanks for the warm welcome Mike…..

I didn’t mention it in my initial post but we did do a 2x2 test area on the deck lid the night before. When we went to continue the next afternoon it still looked great so off we went. It wasn’t until later that the cloudiness started showing, and then only in certain areas.

I just read through single stage article and will give it a shot. We’ll really juice up one of the problem areas with #7, let it sit overnight, and see what happens. Even though that should have been the first step, hopefully it will clear up again and stay that way. If it works on the test area we’ll go ahead and slather it on the whole car.

The front quarters, doors, and hood are still untouched so it will be interesting to see if there will be a difference between those areas and the parts that we have already done (i.e. will the areas already done inhibit the penetration of the #7. Will the untouched areas have the same cloudiness problems). I’ll post back once we have tried it out.

Thanks again.
 
Thanks for the warm welcome Mike…..

I didn’t mention it in my initial post but we did do a 2x2 test area on the deck lid the night before. When we went to continue the next afternoon it still looked great so off we went.
Good man!

It wasn’t until later that the cloudiness started showing, and then only in certain areas.

Sometimes, for cases like you describe but usually with older lacquer or enamel paints I've learned the valuable lesson of doing the test spot then put the car back into it's normal use for a couple of weeks and wait and see what happens. This is extremely important if the damage is caused by the sun and if the car is going back int to full sun as a way of life.

I just read through single stage article and will give it a shot. We’ll really juice up one of the problem areas with #7, let it sit overnight, and see what happens. Even though that should have been the first step, hopefully it will clear up again and stay that way. If it works on the test area we’ll go ahead and slather it on the whole car.

Good idea. Just do the test area and then seal the pant with a coat of wax or sealant and then put the car out into the sun for at least a few days and see what happens.

Take my word for it, been there and done this before and once a paint becomes unstable, nothing you pour out of any bottle or scoop out of a can is going to fix it unless the paint is a mile thick and you can abrade it till next Sunday to eventually uncover a stable base of pigmented paint to work with.


Usually the problem you describe happens to paint that is exposed over time to direct sun and these would be the horizontal panels. It's possible for it to happen to vertical panels but usually what you'll find with vertical panels is a layer of oxidation which can be removed and the underlying paint can then be restored. If not then the problem might be related to age specifically, or age specifically + sun or a paint issue to start with, as in inferior product to start with and thus the reasons for the problem... lack of quality in the beginning with the material.

The front quarters, doors, and hood are still untouched so it will be interesting to see if there will be a difference between those areas and the parts that we have already done (i.e. will the areas already done inhibit the penetration of the #7. Will the untouched areas have the same cloudiness problems). I’ll post back once we have tried it out.

Thanks again.

Like I always tell my son...

"You don't know what you can do until you try"


Same applies to this kind of work on old paint. Urethanes are a less permeable paint than old fashioned lacquers and enamels but in most cases they are more permeable than any type of modern clear coat paint.

It's pretty easy to see if the oil is penetrating, simply apply some, work in like you wold skin lotion to dry skin and then wipe the surface really well with microfiber.

Since we all now Microfiber towels are superior at removing polishing and waxing residues off a smooth surface then if you wipe the surface thoroughly with a clean, high quality microfiber towel and the paint remains "darkened", that's a pretty good indicator that the polishing oils have penetrated "into" the paint at least to some level.


I did this test years ago when some people wanted to argue over this topic and after posting my pictures they all went a way.


:)
 
It's pretty easy to see if the oil is penetrating, simply apply some, work in like you wold skin lotion to dry skin and then wipe the surface really well with microfiber.

:)

Since I'm inherently lazy and not even close to being a pro detailer (just like my own cars to look nice) any chance I can get away with using my PC to do this? Maybe a speed of 3 or 4 with a white pad?

I know shortcuts aren’t the way to go, but we’re not looking for perfection. Just trying to make the thing look presentable and going for that “far away” look, if you know what I mean.
 
Since I'm inherently lazy and not even close to being a pro detailer (just like my own cars to look nice) any chance I can get away with using my PC to do this? Maybe a speed of 3 or 4 with a white pad?


If you mean, massaging the #7 into the paint then "yes", use a polishing pad on the speed 4.0 to 5.0, it will feel kind of sluggish as it's a pretty oily compared to most products similar to it...

My article was addressing real antique paint, not modern old paint even though I understand the similarities. In the case of real antique paint, something lacquer or enamel on an original car, both of which will be 30 years or older, then the "owner" is usually looking for the least evasive method of revitalizing their antique paint and for them hand application is the first choice due to safety and increased control over the process.


:)
 
Roger that Mike. I really appreciate the assist and will let you know how it goes.

Thanks much.
 
Back
Top