How do I remove Pigtails?

Mister B

New member
Joined
Jun 16, 2009
Messages
594
Reaction score
0
How do I remove Pigtails ?

Last night I was Using XMT 360 with the 5.5” Tangerine LC Hydro-Tech pad and G100 to wax my truck and as I was polishing the side of the bed I noticed some pigtails in the area I had just gone over. Luckily I noticed it and stopped. It’s probably a 12” long section. The only thing I can figure is that when I was waxing the lower portion of the bed side I may have gone under the lower portion of the bed side a little too far with the pad and inadvertently picked up a piece of dirt on the pad.

Once I stopped, I changed to a clean pad and went over the same area again with the XMT 360. That did not make any difference. I then checked and I could feel the pigtails edges with my fingernail, which I know is not good. So I figured I would try the most aggressive combination that I currently have. I made a couple passes with Meguiar’s Ultimate Compound and the 5.5” LC Hydro-Tech Cyan Cutting pad and my G100 on speed 5 with moderate pressure. That combo cleared up the swirls in the paint nicely, however it does not look like it even put a dent in those pigtails. I wasn't surprised.

Mike (or any of the pros), do you have any suggestions for trying to get these pigtails out? I tried taking a picture of them last night, but I have inadequate lighting in the garage and I just could not capture them. You guys know what pigtails look like. The fact that I can feel the edges on those pigtails with my fingernail, I have a feeling I am out of luck with the products I currently have. :(

Any suggestions would be appreciated?

Thanks
 
Re: Removing Pigtails

Ugh...

Pigtails and Tracers, never any fun to remove.

The only way to remove them is to level the paint so hopefully they're not too deep.

This just drives home the point as to how important it is to work clean all the time in all aspects of the job. Luckily you caught it before going to far.

Do you have a rotary buffer or access to one? Using a rotary buffer with a wool pad is a very aggressive option but might do the trick. If that doesn't work then sanding is an option but the last option.

Sometimes, working out imperfections by hand works better than with a PC because of the forcer you can exert of a small area. For example, try the UC with a piece of terry cloth and see if you can remove them and if you can then make a few cover passes with the PC to remove any toweling marks you inflict.

This is factory paint correct?

:)
 
Re: Removing Pigtails

No, unfortunately I do not have a rotary buffer and I do not know anyone that does.

Yes it is the factory red paint on my 2004 F150 shown in my Avatar.
 
Re: Removing Pigtails

Sometimes, working out imperfections by hand works better than with a PC because of the forcer you can exert of a small area. For example, try the UC with a piece of terry cloth and see if you can remove them and if you can then make a few cover passes with the PC to remove any toweling marks you inflict.

I'll have to give the terry cloth/Ultimate Compound hand application method a try. Unfortunately they do feel a little deep. I'm not sure even hand application to a small spot will even put a dent in them, but I'll have to give it a try.
 
Re: Removing Pigtails

If it does come down to maybe trying to feather sand a tiny spot just to test it out, do you have any tips and recommendations for technique, type of sanding paper and which grit to use? This is definitely the last option I want to try though.
 
Re: Removing Pigtails

The fact that I do not have access to a rotary buffer, would the $39.99 Harbor freight rotary with the correct products be an option?
 
Re: Removing Pigtails

Just to throw in a bit of info Mister B, adrock on the forum here has had quite a bit of success with his Chicago brand rotary. It's the same concept as a more expensive model, just probably doesn't have the longevity.

Whichever way you go, and I'm sure you already know this, practice on something other than your truck with the rotary or the wet sanding.

Are there any other detailers in your area? You may run across someone who is willing to help you learn the process. If not, there are some pretty good videos of Mike wetsanding and rotary buffing.
 
Re: Removing Pigtails

Whichever way you go, and I'm sure you already know this, practice on something other than your truck with the rotary or the wet sanding.

Are there any other detailers in your area? You may run across someone who is willing to help you learn the process. If not, there are some pretty good videos of Mike wetsanding and rotary buffing.

Yea, I definitely would not want to practice on my truck for the first time with the rotary. I don't need to mess up that nice red paint any more than I already did with the pig tails. :D

No there are not any good detailers around here that I know of.

I'll probably just try it by hand for now and maybe a little bit more with the G100 and see where I get. If that does not get me anywhere I guess I will have to look into the rotary at some point, unless anyone else has any suggestions.

I tried to get pictures of the pigtails again today, but I just can not capture them. The red is just so nice and shiny they don't show up. Plus I'm not a photographer. :)
 
Re: Removing Pigtails

As per your suggestion Mike (as well as Tim Lingors) I went out in to the garage tonight and tried the Ultimate Compound with a terry cloth by hand. After 3 passes over a small 2" to 3" area it did improve the lighter pigtails, but not so much on the deeper ones, which the majority of them are deeper. I can feel them with my fingernail. I think I may just end up going over the rest of them by hand and then making a pass over them with the DA to get what I can out and then calling it good for now. I think they may just be too deep and I do not want to create myself more problems just trying to fix some pigtails that no one but myself will probably ever see anyway.

Thanks Mike.
 
Re: Removing Pigtails

I'm working on a how-to article for wet-sanding factory paint and removing the sanding marks using a DA style polisher. (Griot's Garage ROP).

Should be done tomorrow. It's not a procedure that should be entered into lightly but if your careful it can be done. I had phenomenal results in the AG garage tonight.

WetSandingExperiment1001.jpg


Hang tight till tomorrow...

Of course this dilemma was accidental but see why I'm always posting...

Work clean


:)
 
Re: Removing Pigtails

Cyber-skipped over to MOL and read Tim's recommendation to try Feathersanding and I was going to get to that with my new sanding article but since it's not finished yet and there's a lot of photos to process here's an article on the topic.


RIDS and Feathersanding - A Highly Specialized Technique by Mike Phillips


And yes, in some cases Feathersanding is the safest approach to removing fine, or shallow, isolated below surface defects.

If you don't have any, pick up a sheet or two of Nikken #2500 and #3000 here,

Meguiars Unigrit Sand Papers 6 Pack Kit - Your Choice!


Then following the method laid-out in the above article, carefully sand and feather-out the pigtails and then simply remove your sanding marks.

Simple Simon :xyxthumbs:


:)
 
Re: Removing Pigtails

Thanks Mike,

I just read thorough your article. I remember reading portions of that over on MOL several years ago. Good article.

I know you have not finished your new wet sanding article yet (still looking forward to reading it), but what pads and product would you recommend to me for removing the sanding marks with my G100 after using the 2500 & 3000 unigrit paper?

I know I will probably have to pick several things up, but below is what I currently have as far as pads and polishes and compounds.

I currently have the following pads:

Megs 6.5" yellow polishing pads
Megs 6.5" tan finishing pads
LC 5.5" CCS orange pads
LC 5.5" CCS white Pads
LC 5.5" Tangerine Hydro Tech pads
LC 5.5" Cyan Hydro-Tech pads

Compounds and cleaner polishes I currently have:

Megs Ultimate Compound
Megs M83
Megs M80
XMT Carnauba Finishing Glaze
 
Re: Removing Pigtails

With the G100 the challenge will be to keep the pad rotating and you can do this by applying less pressure and investing more time into the removal process.

Stick with your 5.5 CCS Orange Cutting Pad and the M105

I was using the Yellow CCS 4" cutting pad with WG TSR 3.0 and it easily decimated the #3000 Grit Sanding Marks on a GM factory clear coat.

Working on the article right now should have it done before 5:00pm today.


You need to upgrade to a more powerful dual action polisher, wait till after SEMA and see if Meguiar's introduces a more powerful model, if not take a serious look at the Griot's Garage ROP this thing is more powerful than most people know but still safe.


:)
 
Re: Removing Pigtails

would u guys happen to have a picture of pigtails?

I've never heard the term before. I'm guessing it's a trail of some sort that occurs when the pad has picked up dirt?
 
Re: Removing Pigtails

I tried taking pictures of mine, but I was unable to capture them with my camera. I think they might be as hard to photograph as they are to remove. :D

They basically look like a continuously spiraling scratch or curly pigs tail (hence the name pigtail). The spiral shape of the scratch is from the motion of the dual action polisher pushing a piece of dirt or other abrasive material against the paint.
 
Last edited:
Re: Removing Pigtails

HAHA Mike! PLEASE tell me you were curious about my results on wet-sanding the black Colorado and polishing out the sand marks with my Griot's, just to see if it works and you tried it there! That would make my day!!!! :D :D :D :D :D
 
Re: Removing Pigtails

HAHA Mike! PLEASE tell me you were curious about my results on wet-sanding the black Colorado and polishing out the sand marks with my Griot's, just to see if it works and you tried it there! That would make my day!!!! :D :D :D :D :D

Sorry, had nothing to do with that, in fact I forgot about it after posting to your thread as I have a zillion windows open almost all the time with text and photos going together. I chose the Griot's simply because it appears to have the most power at this point in time.

I chose the the smaller pads to insure most people that follow this will be successful and I chose the WG products because they are pretty much bubba-proof and are more than capable of what I'm going to show in most instances.

The how-to article I'm working on now was preceded by the below two threads from this morning.

I wrote this article after YEARS of reading people posting questions or comments about wet-sanding in general. For this I wrote and posted this article to try to get everyone on the same page as far as it comes to the 2 primary groups of paints being sanded.

Wet-sanding - Fresh Paint vs Factory Paint


Then I created this thread out of copy I've had written for years,

RIDS and Feathersanding - A Highly Specialized Technique by Mike Phillips


Then yesterday starting about 5:30pm I started the sanding and measuring steps to create this the thread I'm working on behind the scenes. What prompted me was years of reading hundreds of posts that were filled with confusion and because I can.


Here's some teasers shots from VARIOUS places in the thread; the below is not linear.

I'm quitting for the night and I'm at 70+ pictures.

Removing Sanding Marks with the Griot's ROP and the Wolfgang Twins

WetSandingExperiment1001.jpg


A few very important things to keep in mind.

1. The best tool for the job when it comes to removing sanding marks is a rotary buffer with a wool pad, the appropriate compound and a little experience.

2. Factory baked-on paint is usually thin and hard, that's two HUGE negatives working against you should you be in a position to want or need to sand on factory paint.

3. Always use the least aggressive approach to get the job done

4. Always do a Test Spot to a small section and make sure you can get 100% of your sanding marks out before sanding further.

5. Only sand enough to remove or improve the defects you're trying to remove

6. Remember that sanding removes paint as does the compounding and polishing process, so take this into account as you science-out the project.

7. If possible, use a Paint Thickness Gage to measure the film-build before sanding an note on a form the reading you take for before, during and after.

8. Most important - Always work clean. This includes your shop environment, the vehicle, your buffing pads, your tools, your polishing cloths, everything you have control over.
That said, I know a lot of enthusiasts are experimenting with wet-sanding factory baked-on finishes and then trying to remove their sanding marks using a dual action polisher.

In the below write-up I've included some tips for wet-sanding by hand and documented how much paint is being removed during each step.

All the work is being done on the factory finish on a GM Hood so that its' a better comparison of apples to apples.


So each section was sanded for 600 strokes.

I told you this would surprise you but wait till you see the measurements from the thickness gage readings and again, keep i mind that the #2500 and especially the #3000 grit papers feel like notebook paper, (almost).


Note the direction of my strokes and note the angle at which my pad is laying on the paint with one of the edges leading. This is correct backing pad alignment for hand sanding. The white stuff in the water is clear paint particles that have been sanded off. If this were a single stage paint you would see the color of the pigment in the water.
WetSandingExperiment1031.jpg


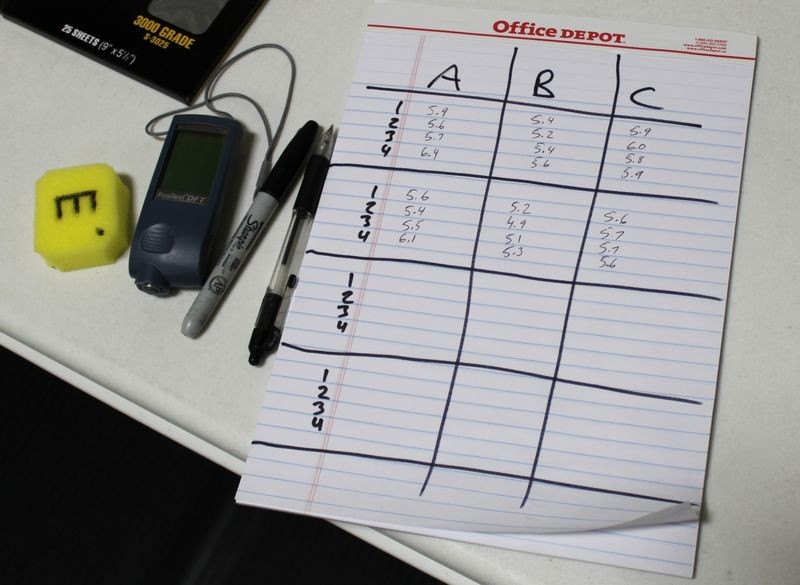
After wiping the surface clean, I placed the 3M Painter's Tape Grid System back onto the panel as best as I could and then made my marks using the Foam Equalizer and then used the PosiTest PTG to take measurements and record them.


WetSandingExperiment1047.jpg


WetSandingExperiment1048.jpg


In this shot I'm taking the last measurement in Location C and then recording it.
WetSandingExperiment1049.jpg


The PosiTest Paint Thickness Gage is easy to read...
WetSandingExperiment1050.jpg


WetSandingExperiment1051.jpg


p.s.

Removing sanding marks with a PC style polisher isn't new to me, it's just a slower, more careful method versus using a rotary buffer.

:props:
 
Re: Removing Pigtails

Then yesterday starting about 5:30pm I started the sanding and measuring steps to create this the thread I'm working on behind the scenes. What prompted me was years of reading hundreds of posts that were filled with confusion and because I can.

Cool!

There are a lot of internet flame wars regarding feathersanding using the DA. This article may neutralize the debate and lessen the tension somewhat.

:)
 
Back
Top