How thin is too thin? Question about PTG readings... Need opinions!

zmcgovern45

New member
Joined
Sep 5, 2012
Messages
3,443
Reaction score
0
So my fiance just bought a 2010 Mazda CX-7 a couple of months ago. I knew it needed some work when she bought it, but it was a great price and was exactly what she was looking for.

I recently purchased a paint thickness gauge and decided to wash the car and take some readings tonight since it was finally a bit warmer here in the Midwest.

The readings were surprisingly low! The lowest I have seen, actually. The readings averaged around 70 microns throughout the entire car. I am used to seeing 100-150ish as "normal" so I'm not sure exactly how to proceed with this new found information. The original plan was to do a 2 step correction to achieve 80-90% correction and then coat it with 22ple.

To be honest, I was feeling antsy this winter and decided to clay the car and do a test spot while I was at it (I did not have a PTG at this time). I used D300 + MF Cutting Pad and followed up with M205 on a polishing pad... it came out fine, no signs of compromising the clear coat or anything. Now, I take readings on my test spot and the areas directly surrounding it, and it seems the compounding and polishing only removed a few microns... is this to be expected? Minimal removal from compounding and polishing? Sounds plausible to me.


I would like some honest feedback from those of you who HAVE PTG's and have had to make these types of decisions with low readings on either your own car or a customer's car.


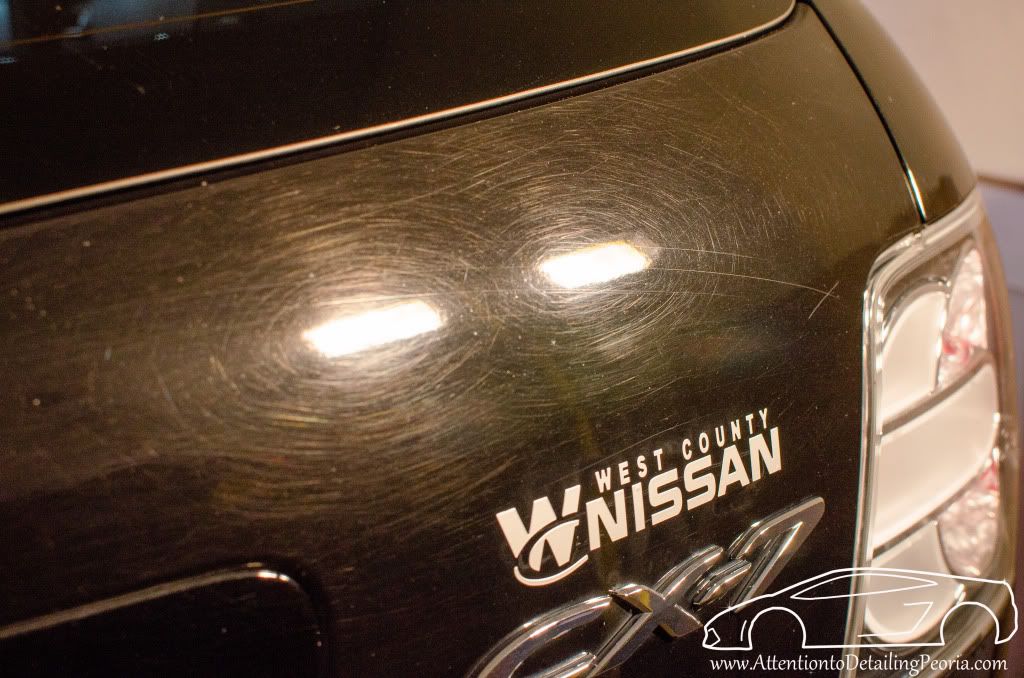
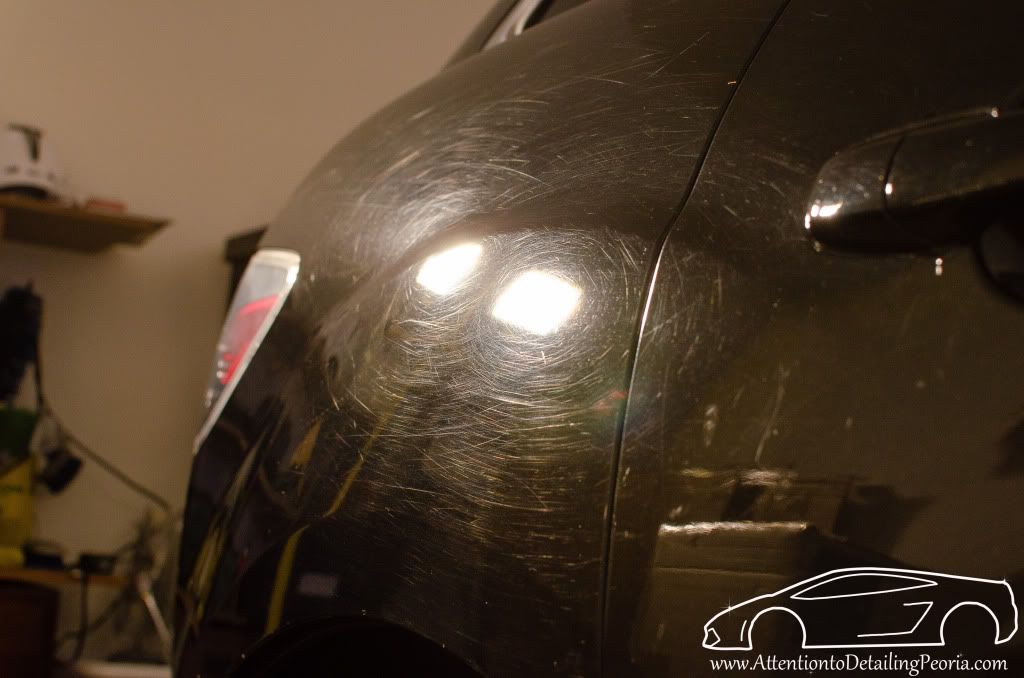
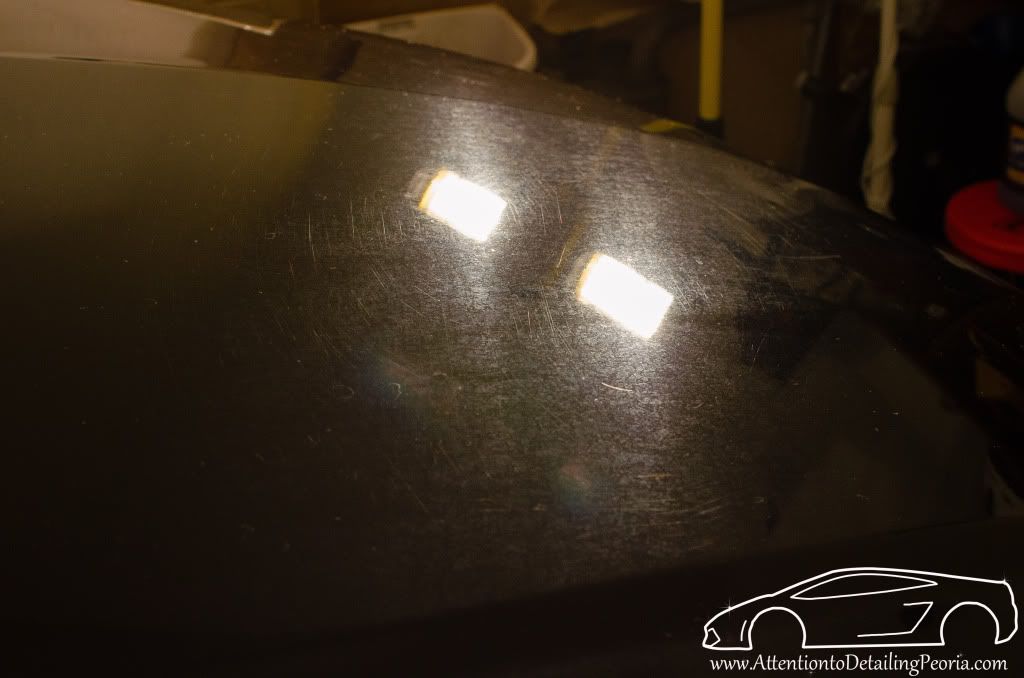
Here is what I am up against... plenty of scratches and swirls and a nice covering of hard water spots.

20130314-DSC_0014_zpsf830afdc.jpg


20130314-DSC_0017_zpsdc886c3f.jpg


20130224-DSC_0004_zps55eea1ed.jpg


Thanks in advance!
 
Zach, I am interested in this as well. I took readings with my new CM8801FN gauge of my WRX yesterday and the readings were in the 90 micron range mostly but the roof was as low as 83 in some spots. This has me worried because my other family's cars were in the normal 115 micron range.

I just corrected it a few weeks ago to almost 100% so my plan is to just use Optimum Finish Polish on it with a blue LC pad to remove some leftover micromarring/towel marks (Hopefully this combo should not remove much paint) and get two coats of Opti-Coat on it ASAP!

You might want to try to get a reading where there is primer and paint but no clear coat like some of the spots under the hood/in the door, and then you could guess clear coat thickness.

It would only be a good guess though becasue there is no telling if they used the same about of primer and paint on un-clearcoated areas as they did with clearcoated areas.
 
I've been told that The paint is about 70-80 Microns, Then the rest is Clear coat, I never compound a car with that low microns, and I give it a low cut ( VERY LOW )... never want to risk it...
 
200+ views and only 1 opinion on the matter?

BUMP!
 
better safe than sorry!

Meaning - don't touch it... or don't sand, compound and polish?

"Safe" is a very general word.

I was originally planning on doing a 2 step compound and polish, however I'll probably settle for a 1 step with much less correction. To me that seems safe.
 
My own vehicles are within that range as well, albeit my numbers were like that after a full correction and a few moderate polishes. Since your in the same boat as me I have been using Optimum Hyper Polish with a black B&S pad for any future corrections. Better to be safe than sorry.
 

Wow - home run! Exactly what I was after, and even Mazda specific! Thank you very much! Now I feel confident enough that I can at least use a mild compound (if needed) and polish for a 2 step process. I will be applying 22ple as the last step, so that should aid in the durability of this thin paint.

Thanks again!

This is why we are in AGO. To help each other out. Good Luck and be careful.
 
200+ views and only 1 opinion on the matter?

You did ask for replies only from those who actually use a paint thickness gauge so it might have scared off a few comments.

Did you measure the paint thickness in the door jamb area? Door jambs are generally a good indication of what the paint looked like from the factory.

I do agree the swirls are pretty severe but since you've base-lined the film thickness before you started, the measurement after compounding and polishing should give you a true reading of exactly how much paint you removed.
 
A little more on paint thickness.

I’m sure many hear have heard the term “burn through” and it’s generally associated with breaching the clear coat. The term burn through is a throwback from the days when the rotary polisher was king and the dual action polisher wasn’t even thought of.

Burning through the paint in those days was primarily due to friction. A rotating wool bonnet under pressure and in contact with the paint results in friction and we all know what happens when we rub our hands together quickly; things begin to get hot. As the temperature increases the paint softens and before you know it; “Burn Through”! :doh:

Dual action polishers by design operate in an orbital manor and do not rotate. Now before anyone posts an objection let me elaborate.

Under certain applied pressures or free wheeling, a dual action polishers pad will rotate but with minimal force. The main motion of these machines is oscillation, generally at high speeds and in small circles but generate almost no heat.


Automotive Paint


Over the years automotive manufactures have been on a quest to lower manufacturing cost and just one of those areas is paint. By doing so, these improvements translate directly to their bottom line as profits.

The actual film thickness of paint is what I call SCARY THIN, meaning it doesn’t take much effort to accidentally sand or compound through a layer. A layer of paint is so thin today it’s measured in microns rather than thousands of an inch.


Corrosion


How many of you can remember the days when a panel on a brand new car would show sighs of rust or corrosion in the first 2 years? You don’t have to go that far back because this was pretty much the norm in the 70’s and 80’s.

To combat this, car manufactures teamed up with paint suppliers like DuPont to develop coatings and processes to greatly reduce or eliminate corrosion and rust through.


Microns


Microns are typically associated with either of the two following symbols; µ or µm

Just how big or small is a micron? 0.001mm, or about 0.000039in

To illustrate this lets put this in perspective by comparing a known and relate it to microns. On average, a human hair is about 100 microns or 100µm.

1µ = 0.00003937in
10µ = 0.0003937in
100µ = 0.003937in

Now that we know how think a human hair is, see how it compares to the paint film thickness on most cars today....It's thicker than any individual coating applied and might be equal to all of the coating thicknesses combined! :eek:


Paint Application

Automotive paint is applied in layers and each one is designed to to work with out bond to the previous later. Today protective coating and paint layers can total 5 or more and at varying thicknesses. The photo below illustrates not only the coating but the average film thickness....

Layer03.jpg


  1. Phosphate - 1µ or 0.00003937in
  2. Electrocoat or E-Coat - 25µ or 0.0009843in
  3. Primer - 25µ or 0.0009843in
  4. Base or Color Coat - 20µ or 0.0007874in
  5. Clear Coat - 50µ = 0.001969in

Phosphate

Phosphate coatings offer excellent corrosion resistance. These coatings are usually applied to carbon steel, low-alloy steel, and cast iron. Phosphate coatings are most often applied by either spraying or immersing the substrate into a solution of dilute phosphoric acid combined with other chemicals that assist in the coating process.


Electrocoat or E-Coat


An unfinished panel is immersed in a bath containing the electrophoretic paint emulsion, and then an electric current is passed through both the product and the emulsion. The paint particles that are in contact with the product adhere to the surface, building up an electrically insulating layer thus improving the corrosion resistance of the metal..

If you look hard enough on You-Tube I'm sure you'll find a factory video showing the frame and body of a car being submerged in a bath to effectively these coating in every nook and cranny.

Primer, base coat and clear coat are pretty self explanatory so I won't go into detail.

Steel Thickness

The thickness of the sheet steel that makes up the majority of cars today has over the years become thinner and thinner. Some of this initiative is related to the overall weight but also fall right in line with lowering costs of raw materials.

What body and paint shops typically see in a single stage paint job.

In this photo you'll see the typical finish layers applied at the factory. Many times though shops uncover damage and additional paint repair that can add several subsequent layers that must be dealt with properly.

Layer02.jpg


This is a great example to illustrate different types of surface defects and their relative size when compared to one another.


Layers.jpg


Paint is only so thick. If you're using a heavy cut pad and an aggressive compound on a dual action polisher and hold it in one spot just a little too long what do you think will happen? Sand Through

Be careful out there.....:props:
 
You did ask for replies only from those who actually use a paint thickness gauge so it might have scared off a few comments.

Did you measure the paint thickness in the door jamb area? Door jambs are generally a good indication of what the paint looked like from the factory.

I do agree the swirls are pretty severe but since you've base-lined the film thickness before you started, the measurement after compounding and polishing should give you a true reading of exactly how much paint you removed.

My intention by asking for comments only from those with PTG's was to get advice from real world experience and not from someone who "heard anything below 90 microns was deadly and you should not touch it". That sort of thing - I had no intention of preventing others from commenting. Suppose I could have worded my expectations a bit better :xyxthumbs:

As far as door jams, I did measure them, and they were much lower - around 50 microns (give or take). I have always found door jams to be the lowest readings on every car so far.

It seems the D300 + MF Pad followed by M205 on Black Pad that I did as a test spot only removed a few microns. I have rethought my game plan since then, and given the fact that it is my fiance's car (and let's face it, she really could care less about swirls), I'll probably tackle it with a solid 1 step process using M205 on an orange or white pad to restore some clarity and minimize the total coverage of swirls. I'm in no need to chase after RIDS or other major defects as this is a DD and by no means a garage queen. The 1 step + 22ple will make it look much better than it does now, and it will be much better protected - which is my ultimate goal.

Thanks!

A little more on paint thickness........

Yup, I have read that article a while back. Thanks for the refresher!
 
Zach good luck and the coating is a great idea. I'm in the same boat with readings as low as 83 (But in most spots in the 90's) with my WRX, but fortunantely it is already 90% corrected so when I get to it, I am going to use a finish polish and use 2 coats of Opti-Guard 2.0 on it. Let us know how it goes.

BTW I would have never know how thin my WRX paint had gotten without that nice CM paint guage you recommended. It helped me make the decision to apply a coating.

Drew
 
Back
Top