EMC22
New member
- Oct 8, 2012
- 24
- 0
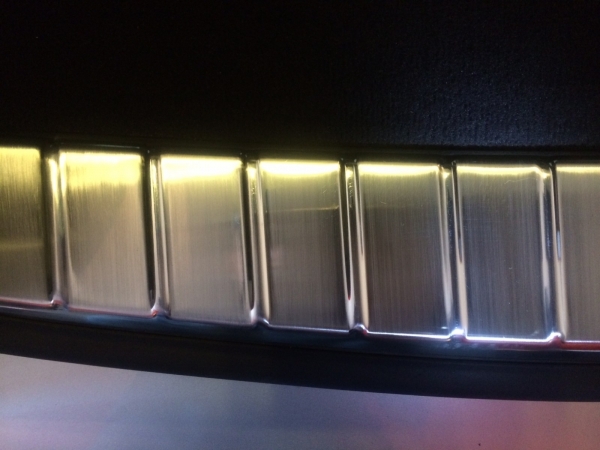
The stainless steel door sills on the Cayenne were in pretty bad shape, so I started looking for options to bring them back into respectable condition.
This is what they all looked like before I started:

So after some research and a little trial and error as well this is what I did:
Step 1: Wet sand with 150 grit sandpaper:
This is enough to take out even pretty deep scratches, although some may require a little more pressure in the affected area to get rid of)

Step 2: Wet sand with 220 grit sandpaper

For both of the above steps I used Diablo Palm sander sheets that I had lying around.
I wrapped the sandpaper around a sponge sanding block to ensure even distribution of pressure.
If you are very careful and linear with your motion you can achieve a nice “brushed” finish as can be seen in the picture.
I actually did this with the trunk trim (pictures later in the post), but for the door sills I wanted a high gloss finish.
For Steps 3 and 4 I used the Eastwood Automotive Polishing Kit Eastwood Buffing Kit - Paint Buffing Kits - Buffing and Polishing Kit
I also used a Craftsman Pro variable speed drill (running at 2500 RPM)
Step 3: Polish with Tripoli (brown) compound and the large round (cylindrical) buff
I do 4 very slow passes with a good amount of downward pressure, followed by 6 more passes reducing the pressure each time, thus allowing the buff to spin increasingly faster with each pass.
This step polishes out most of the 220 Grit sanding marks, but still leaves a slightly hazy appearance.

Step 4: Polish with White Rouge and the spiral sewn wheel.
I do 2 passes with medium pressure, followed by another 4 passes with reduced pressure allowing the wheel to spin faster each time. This results in a high gloss, mirror finish.:dblthumb2:


For the trunk I wet sanded with 150 to get the deep scratches out, then I polished with brown compound, to smooth it out a little and then went back with 220grit to get the brushed effect.
I didn’t have time to finish it off completely today, but here are some pics in the interim. I should have taken some before pics, but basically this area was even worse than the door sills before I started.

This is what they all looked like before I started:
So after some research and a little trial and error as well this is what I did:
Step 1: Wet sand with 150 grit sandpaper:
This is enough to take out even pretty deep scratches, although some may require a little more pressure in the affected area to get rid of)
Step 2: Wet sand with 220 grit sandpaper
For both of the above steps I used Diablo Palm sander sheets that I had lying around.
I wrapped the sandpaper around a sponge sanding block to ensure even distribution of pressure.
If you are very careful and linear with your motion you can achieve a nice “brushed” finish as can be seen in the picture.
I actually did this with the trunk trim (pictures later in the post), but for the door sills I wanted a high gloss finish.
For Steps 3 and 4 I used the Eastwood Automotive Polishing Kit Eastwood Buffing Kit - Paint Buffing Kits - Buffing and Polishing Kit
I also used a Craftsman Pro variable speed drill (running at 2500 RPM)
Step 3: Polish with Tripoli (brown) compound and the large round (cylindrical) buff
I do 4 very slow passes with a good amount of downward pressure, followed by 6 more passes reducing the pressure each time, thus allowing the buff to spin increasingly faster with each pass.
This step polishes out most of the 220 Grit sanding marks, but still leaves a slightly hazy appearance.
Step 4: Polish with White Rouge and the spiral sewn wheel.
I do 2 passes with medium pressure, followed by another 4 passes with reduced pressure allowing the wheel to spin faster each time. This results in a high gloss, mirror finish.:dblthumb2:
For the trunk I wet sanded with 150 to get the deep scratches out, then I polished with brown compound, to smooth it out a little and then went back with 220grit to get the brushed effect.
I didn’t have time to finish it off completely today, but here are some pics in the interim. I should have taken some before pics, but basically this area was even worse than the door sills before I started.
")

 rops: But the math doesn't add up. No offense intended.