How to use a foam gun by Mike Phillips

Dec 5, 2022
51,004
6
How to use a foam gun by Mike Phillips


watermark.php


Hey everyone...

Mike Phillips here from Autogeek! I'm a car washing fool! I love to wash my truck and "yes" I also love to wash my wife's car because I LIKE to keep our vehicles clean and shiny!

I also NEVER take our vehicles to any type of car wash because I know the ONLY way to avoid swirls, scratches and the dreaded water spots is to take OWNERSHIP of the car wash process. That means I know the only way to preserve the pristine finish I've already created on both of our rigs is to...

Do it myself

And if you're like me... that is you like your cars clean and shiny AND you've already come to the Aha Moment,

The-Aha_moment.jpg


The Aha Moment is when you finally figure out that you simply cannot trust others to "touch" your cars.... then you know you need a foam gun.


The next best thing to sliced bread!

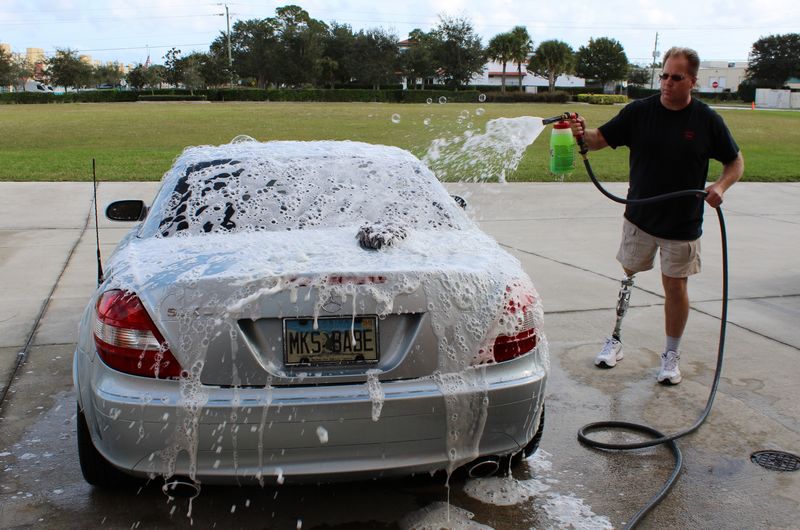
Foam guns are GREAT! Anyone that has read the AutogeekOnline.net car detailing discussion forum for any length of time and has read my posts on the topic of washing cars knows that when it comes to my wife's Mercedes-Benz SL500 and my own Chevy Silverado 4x4 truck, the ONLY way I wash my personal vehicles is with a foam gun.

Not only do foam guns work great at getting the car wash soap foam onto your car where you want it, they also make what is normally a very mundane and even boring job fun. And that's part of the secret to making any job, duty or task more enjoyable and that's to find a way to make it fun!

Besides only washing my own vehicles with a foam gun I also teach this in ALL my Competition Ready 3 Day Detailing Classes. And guess what? After showing my class how cool foam guns are for washing cars and how well they work - EVERYONE loves the foam gun!

If you don't have a foam gun and you are the "Car Washer" in your house or you detail cars for money and you are not currently using a foam gun when you wash a customer's car.... you're missing out. You need a foam gun. You also want a foam gun you just didn't know it till you >clicked< on the link to this article.

Below I'm going to show you first how to set-up your foam gun. No... it's not hard or tricky but the first time you do anything there's tricks to be learned so let me make learning how to set up your foam gun simple and easy so your first time out you'll be successful and you'll also be happy with your purchase.


What's in the box?

FOAM_GUN_061.jpg


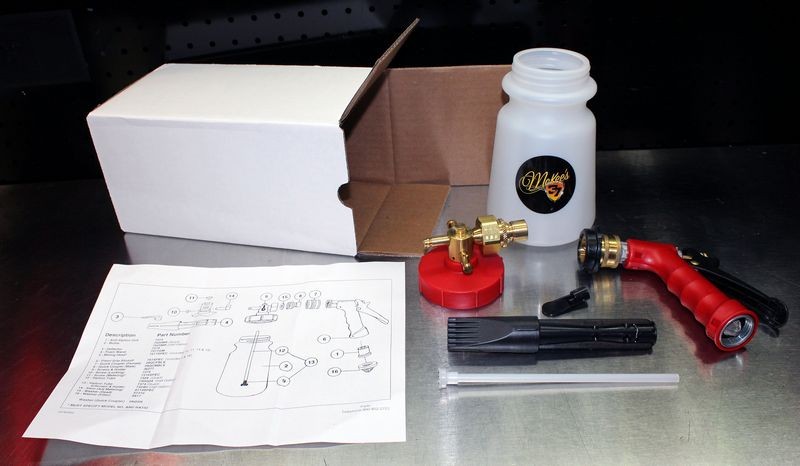
Everything you see pictured above comes in the box.

Instructions and parts list
Foam mixing head already mounted to the lid
1 quart mixing bottle
Foam wand
Foam defector
Siphon Tube
Pistol Grip Spray with quick-release attachment for foam mixing head


Now lets take a look at how to assemble, mix your soap solution and use your foam gun to wash your car.


:)
 
The Foam Mixing Head


First lets take a look at the Foam Mixing Head. This is where the magic happens!


Looking down on the foam mixing head you can see,

Top- Foam wand or Foam Defector attachment tube.
Bottom - Male Quick Connector
Right and left side - Foam Adjusting Metering Stem

watermark.php


The Foam Metering Stem
This component slides from one side to the other and allows you to select the volume of foam you want to spray. The small tip on the end simply serves as a handle to help you to grip the stem to either push or pull it into position.

watermark.php


Detent holes
Across the top of the Foam Metering Stem are a series of holes that are used to lock the stem into the desired position. Inside the top of the Foam Mixing Head is a spring loaded brass check ball that fits into the top portion of the chamfered holes. The spring load creates tension to hold the stem securely in place.

watermark.php


How to adjust foam level
To adjust the foam level from low to high simply turn the Foam Metering Stem 1/4 turn as shown in the picture below and now you can slide the stem from one side to the other side. After you have selected the volume of foam you want to use turn the Foam Metering Stem so the Detent Holes are facing up. Then you can slide the stem either in or out till you feel the check ball lock into a detent hole.

watermark.php


In the picture below I have turned the Foam Metering Stem upside down in order to take the next picture to show you the graduated siphon holes that meter the amount of soap solution drawn through the Foam Mixing Head.

watermark.php


Graduated siphon holes
With the Foam Metering Stem turned upside down you can see a series of holes that range from very tiny on one end to very larger on the other end.

watermark.php


In this picture I have pushed the Foam Metering Step all the way into the Foam Mixing Head so that the other side of the Foam Metering Stem will be visible out the other side.

watermark.php


Here you can see the largest available graduated siphon holes.

watermark.php


The largest siphon hole available for maximum foam generation is on the extreme right hand side of the Foam Metering Stem. In the picture below the pencil is pointing to the furthest right side detent hole. For maximum foam you'll want to select this siphon hole and detent hole.

watermark.php


watermark.php


To select the maximum foam setting the Foam Metering Stem will appear like you see below.

watermark.php


watermark.php


The above pictures show you how to adjust the volume of foam from high to low or somewhere in-between. I always use the foam gun with on the max foam setting for what it's worth.


Small brass screws on the Foam Mixing Head
On the very top of the Foam Mixing Head and on the right hand side of the Foam Metering Stem you will find small brass screws. This screw will adjust the foam mixture.


Screw all the way in - Maximum foam

Screw threaded out - Minimal foam


The below two pictures show the brass screw in the out position. If the brass screw is out like this you will get very, very little foam. So screw it all the way in and consider tightening it with a pair of plyers.

watermark.php


watermark.php


watermark.php


For most of us, you might as well tighten this screw down so you don't have to worry about it coming loose and getting lost.


Small brass screws on the side of the Foam Metering Stem

This screw simply prevents you from pulling the Foam Metering Stem out of the Foam Mixing Head. The outside of the screw head is larger than the hole so if you pull to hard it acts as a stop.

In the below picture I've removed the Brass Screw and pulled the Foam Metering Stem into the foam mixing chamber.

watermark.php


If I kept on pulling the step it would come all the way out and my guess is the spring and the check ball would fall out and I would never be able to re-insert the metering stem or not with out a little work.

watermark.php


For most of us, you might as well tighten this screw down so you don't have to worry about it coming loose and getting lost.

watermark.php


:)
 
Mixing your soap solution

First things first - in order to get a LOT of foam suds you need to use a car wash soap formulated for creating lots of foam suds. This is key to maximizing the performance of the foam gun because not all car wash soaps are high sudsing soaps.

McKee's 37 Xtreme Foam Formula

McKee's 37 Extreme Foam Formula is a super high sudsing car wash shampoo specifically formulated for use with foam guns. It creates mountains of rich, luxurious soap suds and also provides excellent cleaning ability for removing road film and dirt off your car. McKee's 37 Xtreme Foam Formula is pH balanced and non-detergent so it cleans well without being harsh to delicate clearcoat finishes. It's available in both 16 ounce bottles and 1-gallon jugs.


My comment....

This is the car wash soap I use for washing and maintaining the finish on my truck and my wife's Mercedes-Benz.


McKee's 37 Xtreme Foam Formula
watermark.php


How to mix the correct dilution of car wash soap and water

While you don't have to be a math genius or a chemist to correctly mix car wash soap with water it is important to mix the correct amount of soap to water for maximum suds.


The Glug-Glug Method

Here's my advice - don't use the glug-glug method. You guys all know what I'm talking about. That's when you simply pour the soap into the water without measuring, you know, glug, glug glug. The problem with using this Caveman technique is that if you under-use your soap you won't get great foaming action from the foam gun and if you overuse the soap you'll needlessly waste product. If you REALLY overuse product the solution can be so thick it wont draw through the siphon holes. This means it won't work!


The correct method for mixing soap for your 1-quart foam gun

So to make it simple I've done all the math and measuring and in the pictures below I show you how to use the markings on the 1-quart bottle to fill the bottle with the correct amount of water and soap for the perfect foam solution.

I like LOTS of suds so the directions below are for maximum suds with the McKee's 37 Xtreme Foam Formula soap and the directions it provides for mixing the proper dilution for maximum suds.


1 quart = 32 ounces

In the picture below, one quart fills the bottle to the location on the bottle the pencil is pointing to. I know for a fact because I filled my handy-dandy Better Crocker measuring cup with 32 ounce of water and then poured it into the foam gun bottle just to check so I would know 100% for sure.

watermark.php


The recommended dilutions for McKee's 37 Xtreme Foam Formula car wash soap are,

2 ounces soap to 6-8 ounces of water

Because I like lots of suds the below mixing instructions are for mixing 2 ounces of soap to 6 ounces of water.

32 divided by 6 = 5.3

If we just round the 5.3 to 5 that means 5 groups of 6 ounces will go into the one quart bottle but each group of 6 ounces will also get 2 ounces of soap. So that's 8 ounces. 8 will go into 32 3 times and now I'm done doing math. :laughing:


Instead of making this difficult I do what I call look at the BIG PICTURE. The big picture is I want lots of suds.

In order to completely fill the 1 quart bottle with a uniform mixture of soap and water solution at the 2 ounces of soap to 6 ounces of water dilution level I fudged the math to make it EASY to mix a strong dilution of soap and suds. If you want a weaker solution then simply add more water than I show below and less soap. For example you could add 24 ounces of water and 8 ounces of soap. Or add 28 ounces of water and 6 ounces of soap. For these dilutions, to make it easy on yourself, simply measure out the water first and then MARK the side of the bottle with a permanent marker. Then in the future you can quickly fill the bottle with water to the mark and then fill the rest of the bottle with soap.


For maximum suds

I filled the bottle with 22 ounces of water then added 10 ounces of soap. This gave me a total volume of 32 ounces of soapy water solution.


To add 22 ounces of water to the 1 quart bottle add water till it reaches the line I'm pointing to with the pencil.

watermark.php


watermark.php


Here I've placed a line on the side of the 1-quart bottle using a permanent marker

watermark.php


Measure the soap

Next I pour 10 ounces of soap into the measuring cup. This is mostly to show the math works, that is 22 + 10 = 32

watermark.php


watermark.php


Next I pour the soap into the 1-quart bottle

watermark.php


Stir for a uniform mixture

And here I'm stirring the soap and water together for a uniform mixture. This is important as it's not easy or effective to try to shake the bottle after the foam mixing lid is attached. So grab a pencil or anything long and skinny and simply stir the mixture. Since I write a lot of articles and take a lot of pictures I alwasy have pencils and ink pens handy in the garage.

watermark.php


Mmm.... soapy water!

watermark.php


There you go... perfectly mixed soap and water for maximum suds.

watermark.php


My comment....

A repeatable process that does not require thinking


The reason I do things like this is so in the future I don't have to re-think the dilution process out again. By nature I'm lazy. I like to do things one time, dial in a process and be done with it. Every time I wash my truck or my wife's car all I have to do is simply add water to the line you see below and then fill the rest with soap. I don't get out my Better Crocker mixing cup every time I wash my car and measure the soap like you'll see in the pictures below. This was a one time measurement and now each time I want to mix up some soap solution it will be quick and easy.


Hope all of the above is as clear as soap and water solution.


:)
 
Continued....

Installing the siphon tube, foam wand and then attaching the foam mixing lid to the bottle

The next thing you want to do is attach the siphon tube to the inside brass pickup tube on the inside of the Foam Mixing Head


Here's the siphon tube

watermark.php


This presses into the brass pick-up tube on the inside of the Foam Mixing Head

watermark.php


Next - attach the Foam Mixing Head

watermark.php


The foam gun comes with two foaming attachments.

This is the Foam Wand

This works great for creating mountains of foamy suds.

watermark.php


The Foam Deflector
For the life of me I have never figured out what the foam deflector is used for or why to use it. (I think I threw mine away after using it one time)

watermark.php


Attach the foam wand to the brass attachment tube
You'll see a spring loaded clip on the foam wand and you'll see a notch in the brass attachment tube. When you press the foam wand onto the brass attachment tube the spring loaded clip will seat into the notch and lock the foam wand into place so it doesn't fly off and hit your car when you squeeze the trigger of the spray gun.

watermark.php


Here's the wand attached to the Foam Mixing Head
watermark.php


You can twist the Foam Wand to spray a layer of foam in a horizontal or vertical pattern

watermark.php


watermark.php


The Foam Deflector

Again... I'm not sure what, when or why you would use this as it seems to offer no benefit. I took a picture of it in action to show you what the spray looks like coming out of the foam gun when the Deflector is attached and I think you'll agree - it doesn't seem to serve any purpose for washing a car. My guess is the Deflector is used with the foam gun in other industries.

watermark.php


VERY IMPORTANT

Now this is very important. That's why I made all the letters of the heading for this section in all capital letters.

The Pistol Grip Sprayer is attached to the Foam Mixing Head via a spring loaded quick-release coupling. The coupling on the sprayer is the female side and the coupling on the Foam Mixing Head is the male side.

To attach the sprayer, use two fingers like I show in the picture below to pull back the exterior plastic case around the spring loaded quick-release.

watermark.php


The next two pictures show the spring loaded quick-release pulled back to the rear position. What this does is allows the bearings in the component to roll away from the center since the housing surrounding them has been pulled back.

watermark.php


watermark.php


Next - Slide the female coupling onto the male coupling

watermark.php


Make sure when you release the quick-release that it fully returns to the outer edge of the nozzle and thus LOCKS ONTO the male coupling.

watermark.php


watermark.php


The below two pictures show the female coupling completely attached to the male coupling. At this point the bearings have moved onto the outer shoulder of the male coupling and are locked into their location but the outer spring loaded housing on the female coupling.


Here's why this is so important!

If the female coupling is NOT locked onto the male coupling, when the sprayer is hooked up to water and you press the sprayer the force of the water will push the Foam Metering Head and the quart of soapy water solution off the end of the sprayer and onto your car!

So pay attention!

watermark.php


watermark.php


This foam gun is ready to go!

watermark.php


:)
 
How to wash your car (or truck) with a foam gun

After you set-up your foam gun now comes the fun part!

Simply hook up your water hose to the sprayer and squeeze the sprayer to cover you car (or truck) with a thick layer of foam!


Start at the top and work your way down

I normally wash the wheels and tires first (as a best practice to avoid water spots on the paint) and then start at the top and work my way down.

watermark.php


watermark.php


watermark.php


watermark.php


watermark.php


Set the foam gun aside and then wash each panel with your favorite wash mitt and then rinse...

watermark.php


watermark.php


watermark.php


watermark.php


Once you use a foam gun to wash your car (or truck), you'll never wash without it again!


On Autogeek.com


All Foam Guns at Autogeek

Note there are two sizes of foam guns. There is the 1 quart model and the half gallon model. For this article I used the 1 quart model and with the 1 quart model I am easily able to wash the entire outside of my full size Chevy truck without running out of soap solution.


Here's the specific model I used...

McKee's 37 Quart Foamaster Foam Gun


And here's the high sudsing car wash I used. If you're like me and you wash your cars a lot then I'd recommend getting the gallon jug.


McKee's 37 Xtreme Foam Formula Auto Shampoo - 16 ounce

McKee's 37 Xtreme Foam Formula Auto Shampoo - 1 gallon


:)
 
Continued....


Using the foam gun right out of the box

The foam gun works perfect the way it comes out of the box. The way it comes out of the box is you screw the Pistol Grip Sprayer directly onto your water hose.

watermark.php


Ready to attach to the foam gun

watermark.php


After foaming and washing a panel you can rinse off your car one of two ways.

Rinsing with the foam gun attached

Here's the foam gun spraying foam onto my truck

watermark.php


Now to RINSE the truck WITHOUT removing the foam gun you twist the Foam Metering Step 1/4 turn.

watermark.php


See how this rotates the siphon holes to the side thus preventing the foam gun from drawing any soap solution into the stream of water passing through the Foam Mixing Head.

watermark.php


Look closely at the foam wand - that's just water coming out... not foam. I'm using the foam gun to rinse off my truck.

watermark.php


Here's a close shot of the water coming out of the foam wand (not foam).

watermark.php


You can also remove the sprayer from the foam gun and use the sprayer like a normal water sprayer to rinse off the dirt and foam.

Look closely at my hand - notice the foam gun has been removed and I'm using only the sprayer.

watermark.php


Mike's Tip...

So to be clear - the above works great. You can use the foam gun to foam and rinse your car exactly the way it comes in the box. That said, I prefer to accessories my foam gun and my washing process with a couple of cool tools to give me more control.


Note the brass connectors and the extra water sprayer in the Griot's cart below?

watermark.php


Brass Connector Shut Off Valve

First - This is a water shut-off valve. This allows me to turn the water off at the end of the hose where I'm working instead of walking all the way back to the water spigot. This water shut-off valve lets me change tools using brass quick release connectors.

Pictured below is a Brass Connector Shut Off Valve with a Female Brass Quick Connector attached to it. The Brass Quick Connector comes as a set that includes one Female connector and one Male connector.

If you have more tools you actually don't need more of the Female connectors since that's the part that connects to the hose but you do need more Male connectors, the part that connects to your tools and extras can be purchased separately.

watermark.php


Here you can see a Male Connector attached to the Foam Gun Sprayer

watermark.php


Here's the Foam Gun Sprayer attached to the water hose using the Brass Quick Connectors

watermark.php


For rinsing I prefer to use a sprayer with a shower setting. Here you can see I've attached a Male Connector to my water sprayer

watermark.php


Here's the water sprayer attached to the water hose using the Brass Quick Connectors

watermark.php


I like a sprayer with a good shower setting as this actually does a better job of flushing soap suds off body panels or rinsing wheels and tires. I also use these for rinsing engine compartments when doing a traditional engine detail.

watermark.php


watermark.php


watermark.php


On Autogeek.com


Brass Connector Shut Off Valve

Brass Quick Connector Set - One Female Connector and one Male Connector

Brass Male Quick Connectors - 3 Pack


Here's a short video that shows how to use these tools....


:)
 
A couple more cool tools for turning you into the Car Wash King of your block....


The Dual Bucket Dolly System with Grit Guard Inserts and Grit Guard Washboards

Even though you have a foam gun you still need a wash mitt or two and in-between washing body panels you need to rinse off your wash mitts to remove the dirt you loosened.

The trick is how to do it BEST.

Why?

Because if you don't remove any dirt particles trapped onto your wash mitt then you'll put scratches in your car's paint when you move onto the next panel.

The folks at Grit Guard came up with a solution to help all of us including yours truly from instilling scratches into our car's paint during the wash process. It's called the Dual Bucket Dolly System with Grit Guard Washboards inserted into each bucket.


The Dual Bucket Dolly System

It's two 5-gallon buckets connected at the middle so when you roll one bucket around your car you roll the other bucket at the same time. This saves you time, energy and steps.

Note the labels on the buckets? I tell you why you want these below....

watermark.php


Wash & Rinse Labels

Note the labels on the buckets? I tell you why you want these below....

watermark.php


FOAM_GUN_064.jpg


Grit Guard Washboards

Here you can see the Grit Guard Washboards sitting on top of Grit Guard Inserts inside of each bucket. First thing I'm going to do is add water to both buckets and then add some of the McKee's Extreme Foam Formula car wash shampoo to the wash bucket to saturate and lubricate my wash mitt with some car wash soap.

watermark.php


Here's what they look like inside a cut away bucket

FOAM_GUN_063.jpg


Now pay attention....

Here you can see the wash bucket is filled with soap solution and the rinse bucket is filled with clean, clear water.

watermark.php


High Quality Microfiber Chenille Wash Mitts

Here's my choice for wash mitts. I love these things!

FOAM_GUN_065.jpg


These are Microfiber Chenille Wash Mitts carried on the Autogeek.com store. I know you see these at discount stores but here's the deal.. The cheap ones fall apart. We only carry the high quality version. You get what you pay for. Don't waste your time or money on the cheap version they will simply fall apart.

The Microfiber Chenille Mitts we sell at Autogeek can be washed and dried in your washer and dryer without falling apart. The cheap ones will simply unravel and you'll end up throwing them away.


How to use the two bucket method

When you go to wash a body panel you always start out dipping your mitt in the bucket with soapy water and then wash the panel.

watermark.php


watermark.php


watermark.php


watermark.php


After washing a panel, next you dunk the mitt in the clear rinse water bucket to remove the dirt that accumulated onto the mitt.

NOTE since I'm just starting the clear RINSE water bucket is EASY to identify because the water is CLEAR.


watermark.php


Here I am scrubbing the mitt against the Grit Guard Wash Board to remove the dirt off the mitt. Note what's happening to the clear water?

watermark.php


Here's my mitt, rinsed off clean and ready for the next body panel....

watermark.php


Now look at the buckets?

Which bucket is the wash bucket and which bucket is the rinse bucket?

watermark.php


It's about speed and working effectively

That's what the wash and rinse labels are for... to enable you to visually identify which bucket is which after you start washing your car. After you dunk your wash mitt ONE TIME into the rinse water bucket without the labels you will not be able to quickly and easily tell which bucket is which.

watermark.php


Color coding system

Note I have a gold mitt and a gray mitt? I use the gold mitt for the upper panels and when I get to the lower panels or bumpers I use the gray mitt. This is a color coding method I use to help prevent getting the heavier dirt that accumulates on the bottom portions of a vehicle over upper panels that tend to be a lot cleaner.

watermark.php


Gray mitt for the lower, dirtier portions of a vehicle.

watermark.php


watermark.php


watermark.php


watermark.php


Going overkill
If you really want to go nuts then wash the lower portions of your rig first and then start at the top of the vehicle and work your way down. Somewhere on the forum I have an article about why to do it this way but here is the nutshell version.

My natural tendency is to go the extra mile. This applies to life and washing my truck. When I'm washing the upper, cleaner panels it's natural to want to reach a little further to do more work faster. This means using my best mitt, the gold mitt to wash the lower portions and this means contaminating my best mitt with dirt off the lower panels. So one way to avoid this is to wash the lowest dirties portions of a panel first BUT don't wash the upper sections at all. Then rinse and then move to the roof and work downward. By washing the dirtiest portions first with my gray mitt there's no way I can accidentally or by trying to hard, (going the extra mile), that I can contaminate my gold mitt with dirt on the lower panels because I've already washed these areas. This is about as anal retentive as I can get or anyone can get when it comes to washing your vehicle carefully and for most it's overkill but I still thought I would throw this out there.


Drying your car - Avoid water spots

After you've completely washed and rinsed your car (or truck), be sure to dry off any standing water to avoid water spots. Water spots are the worst type of defect to have to remove if there's anything corrosive in the water. Highly contaminated city water or well water can actually leave water spots in the paint that are not spots ON the paint but ETCHINGS IN THE PAINT and the only way to remove these types of water spots is usually to machine compound the paint. That's a lot of work. It's a LOT faster and easier to simply dry the water off.

There's all kinds of tools and all kinds of ways to dry a car Here's a really simple but effective way and that's to use Guzzler Microfiber Waffle Weave Drying Towels. I dried my entire truck using two of the 20" x 40" size towels and then I'll simply throw them in the washing machine and dryer and they'll be clean and ready to use the next time I need to dry my truck or someone's car.

watermark.php


Here she is sparkling clean!

watermark.php


On Autogeek.com

Grit Guard® Dual Bucket Washing System - CLEAR

Grit Guard Washboard Combo

Wash & Rinse Bucket Labels

Micro-Chenille Wash Mitt 3-Pack - Choose Your Color

3 Pack The Supreme Guzzler Waffle Weave Towels, 20 x 40 inches


Questions?

Post them to this thread or call our Customer Care Staff.


1-800-869-3011


They can help you get any or all of the above plus anything else you need to take care of your car the right way.


:)
 
My foam gun and grit guards should be here on Thursday. You're right, it does look like a lot of fun. I can't wait to break them out this Holiday weekend. I have a feeling my neighbors are going to be jealous, so as long as they chip in for a gallon of McKee's Extreme Foam I'll be up for doing all their cars too. Thanks for once again a detailed thread with lot's of pictures, it really helps us newbies.
 
My foam gun and grit guards should be here on Thursday. You're right, it does look like a lot of fun. I can't wait to break them out this Holiday weekend.

I have a feeling my neighbors are going to be jealous,

Or they'll think you've finally went off the deep end...


so as long as they chip in for a gallon of McKee's Extreme Foam I'll be up for doing all their cars too.

That would be a killer deal for them...


Thanks for once again a detailed thread with lot's of pictures, it really helps us newbies.


Just to note...

I have a few more pictures to add to really tie all the ideas, tips and techniques together.


I'll make another reply to this thread when all the pictures have been inserted.


:)
 
Sweet! Do they sell replacement parts for the foam gun? I lost the brass screw on the top of the mixing head which you said is prone to being lost :-p


Sent from my iPad using Tapatalk
 
Excellent write up as usual Mike, I'll be picking up a few of these items during the next sale, thanks for sharing.:dblthumb2:
 
Great write up Mike. I love foam guns!

And you're correct, the foam deflector is for use in food processing applications. They use products like foaming chlorinated de-greasers etc and the deflector lets you direct foam up under and behind the machines in the manufacturing areas.
 
Mike, thanks for the thread. I'm not completely sold on one yet, but I'm getting there. Do you find that the foam tends to resist drying on the paint any better than a traditional layer of mitt applied soapy water?

Sweet! Do they sell replacement parts for the foam gun? I lost the brass screw on the top of the mixing head which you said is prone to being lost :-p
If not, you may be able to find a brass replacement in a local hardware store; I've seen knurled thumbscrews at mine. Take the gun and remaining screw in (they look to be the same screw) and make sure the replacement has the same thread & length. A music store may have the correct part, too. Also, that might be a good place for some medium grade thread locker.

Great write up Mike. I love foam guns!

And you're correct, the foam deflector is for use in food processing applications. They use products like foaming chlorinated de-greasers etc and the deflector lets you direct foam up under and behind the machines in the manufacturing areas.

Might work well for wheel wells and under rocker panels, too. :dunno:
I'm thinking a foam gun would help me blast crud out of my truck's shocks, or at least neutralize some of the corrosive winter swarf.
 
Mike, thanks for the thread. I'm not completely sold on one yet, but I'm getting there. Do you find that the foam tends to resist drying on the paint any better than a traditional layer of mitt applied soapy water?


If not, you may be able to find a brass replacement in a local hardware store; I've seen knurled thumbscrews at mine. Take the gun and remaining screw in (they look to be the same screw) and make sure the replacement has the same thread & length. A music store may have the correct part, too. Also, that might be a good place for some medium grade thread locker.


Might work well for wheel wells and under rocker panels, too. :dunno:
I'm thinking a foam gun would help me blast crud out of my truck's shocks, or at least neutralize some of the corrosive winter swarf.

Foam gun doesn't have much pressure, it just lays the foam out. It definitely doesn't have enough power to dislodge dirt or mud build up. But it's the only way I wash my vehicles. In the time it takes to break out an electric or gas pressure washer and fire it up with a foam cannon I'm easily half way through washing my vehicle. That's one of the major benefits and they do create a lot of foam.

I like clean cars, I don't necessarily "like" cleaning cars LOL. So for me faster = better.
I was thinking that foaming the wheel wells might help break down what I can't easily reach. After a foam soak, my puny pressure washer or low pressure hose might do a better job in there. Having a better way to clean coilover shocks and leaf springs before applying a rust inhibitor would be welcome.

I've given up on using a pressure washer most of the time. In my experience, unless it's a commercial unit with serious gpm, high pressure soap, & heat, they don't offer much of an advantage unless I'm blasting off relatively loose material like mud. I do like the idea of speeding up the process, though. Walking through my process, I don't think the HP model would offer much time savings for me, either. With three vehicles to wash, $60 for the low pressure model seems like a reasonable price to save time when servicing the fleet.
 
Mike, thanks for the thread.

Been meaning to do a full write-up for some time now...


I'm not completely sold on one yet, but I'm getting there.

A foam gun isn't for everyone just like a RUPES isn't for everyone just like a Porter Cable isn't for everyone.

The thing is... for the most part you never know if you like something till you spend some time with it. I'd say RUPES polishers and the FLEX 3401 are good examples of this. A person that's always used a rotary buffer has to spend some time with a FLEX 3401 before they get a feel for the gear-driven orbital action. People that have always used 8mm free spinning tools like the PC and the Griot's need to spend some time behind a 15mm or 21mm orbital polisher before they become acquainted with the long orbit stroke action.

What I tried to do with this article is to give a person that's NEVER used a foam gun a LOT of information with really good pictures so at the intellectual level they "know" the tool.

This will help them decide if this is something they would like or take a pass on but a person really needs to get one and NOT use it one time but put some time behind it just like a person needs to put some time behind a new polisher to become good with it.

I can wash my truck or my wife's car in 30 minutes or less using the foam gun and do a damn good job. But that's because I've used it a lot and I have my "method of madness" dialed in.

As I typed the above paragraph, talking about washing in under 30 minutes it reminded me that I wrote an articles by that title.

Half the work I do on the forum is simply remember what I've written and how to find it. Then I can share it instead of re-doing work already done.

Here you go...


Wash and dry a car in less than 30 minutes!


Christmas_Car_Wash_001.jpg


You say you're not sold on one yet and I say go with your instincts. If you don't think it's for you then it's probably not.

I don't ever play the part of Salesman - I play the part of Problem Solver. If I can solve you're problem the product I'm showing with sell itself. This approach has been working for me for as long as I've been in this industry.


Do you find that the foam tends to resist drying on the paint any better than a traditional layer of mitt applied soapy water?

Nope. The laws of physics are not changed by how the soapy foam is transferred to a body panel.

What I've always done is MOVE FAST. Yep... even me with an artificial leg when it comes to washing cars I move fast. Wash a panel and then rinse.

This is why I shared the brass water connectivity tools I use. I have everything set-up for ME to wash my cars quickly and effectively. I hate rinsing water off with the red water sprayer that comes with the foam gun. Does it work? You bet. Do I like it? Not really. I like the sprayer I showed in the picture. I like a Shower setting. It's a LOT more effective that a Jet setting. At least for me.

This is why I took the extra time to show the tools in this write up and explain why and how they work. These tools solve problems.

I like my cars clean and shiny but that doesn't mean I like washing my cars. I wish they could keep themselves clean. But since that isn't going to happen I make washing my own cars as pleasant or fun as possible and this takes the paint out of the process.

Especially here in South Florida. Right now the only way to wash a car here in South Florida is very early in the morning before it gets hotter and more humid. It's already hot and humid in the morning so the earlier the better.

I STRONGLY believe washing your car (or truck), is a LOT FASTER when you maintain the finish. By maintain the finish I mean maintain a coat of wax, sealant or coating on the paint. Dirt doesn't like to stick to maintained paint like it does to neglected paint so to make the washing process fast and easy start by keeping a good coat of wax on the car.

I wax my truck but I use coatings for the wife's Mercedes. Both make washing and drying fast and easy.


Might work well for wheel wells and under rocker panels, too. :dunno:

A foam gun works well for spraying foamy soap into wheel wells, onto wheels and tires as well as into the back of a truck bed.


I'm thinking a foam gun would help me blast crud out of my truck's shocks,

The foam gun is not a replacement for the jet setting on a good water sprayer. The foam gun is LIGHT on how it sprays foamy soap onto a surface.


or at least neutralize some of the corrosive winter swarf.

Flushing a surface with water and/or foam followed by water will act to rinse the surface clean and probably to some level neutralize the surface just in that it's removing not so much chemically neutralizing.

I guess a person could add the appropriate chemical to the soap solution or use a soap solution formulated to neutralize but the soap I tend to use the most is formulated for normal cleaning of normal dirt and road grime.


I'd say the foam gun is a great tool for people that like to take care of their automotive investments. If you already LIKE washing and waxing your cars, that is you consider yourself a car guy or a car girl and besides washing your cars you also like polishing and waxing your cars and keeping the interior pristine... then you would like a foam gun and learn how to become great with it.

If a person looks at washing their cars or any part of car maintenance as a burden that they only do because they feel they have to then I don't think the foam gun is going to make them like washing their car and they might as well take their car to a swirl-o-matic car wash and be done with it.


Me? I love using a foam gun to wash my cars and I also use it to wash my customer's cars if they are modern cars. As a practice I don't use running water from a hose to wash classic cars, muscle cars or streetrods but instead I use a waterless wash as a professional courtesy to the car owner.

I don't introduce water to places where rust can be an issue on cars like these. Plus cars like these don't tend to be daily drivers and as such don't tend to be real dirty.


I do make exceptions to this practice and I'm making an exception this Thursday, that's tomorrow. Tomorrow night I have a detailing class where I'll be teaching some local guys how to machine polish as well as other detailing tasks. The car we're working on is a convertible 1969 Oldsmobile 442.

The owner has told me the convertible top is dirty. The RIGHT way to wash a convertible top is with running water so you can FLUSH the convertible top material to completely remove any dirt and cleaners. Convertible tops that are dirty are not good candidates for rinseless washes or waterless washes because you want to flush both the dirt and the cleaners out of the weave of the material to do the job right and you can't do that by wiping.

So tomorrow the owner is bringing the car in a few hours early and we're going to wash the convertible top using a product from Griot's and then we're going to wash the entire car, top and body panels using the foam gun.

In my world - this will be the last time I ever wash THIS car with running water. The car is for sale and my guess anyone purchasing a 1969 Oldsmobile 442 Convertible won't be washing it much into the future either as it is and will be a Garage Queen.


1969 Oldsmobile 442 Convertible

watermark.php


Stay tuned... I'll share some foam gun washing pictures from this project to this thread next week after the 4th of July Holiday Weekend.


:)
 
What I've always done is MOVE FAST. Yep... even me with an artificial leg when it comes to washing cars I move fast. Wash a panel and then rinse.

This is why I shared the brass water connectivity tools I use. I have everything set-up for ME to wash my cars quickly and effectively. I hate rinsing water off with the red water sprayer that comes with the foam gun. Does it work? You bet. Do I like it? Not really. I like the sprayer I showed in the picture. I like a Shower setting. It's a LOT more effective that a Jet setting. At least for me.

This is why I took the extra time to show the tools in this write up and explain why and how they work. These tools solve problems.

I like my cars clean and shiny but that doesn't mean I like washing my cars. I wish they could keep themselves clean. But since that isn't going to happen I make washing my own cars as pleasant or fun as possible and this takes the paint out of the process.

Especially here in South Florida. Right now the only way to wash a car here in South Florida is very early in the morning before it gets hotter and more humid. It's already hot and humid in the morning so the earlier the better.


:)

Great post. Thanks, Mike!

Based on these comments, is it safe to assume your only real defense against heat/sun is speed? I really like the idea of a foam gun, but envisioned the soap drying on the paint faster than I could wash it off, especially on a large-ish SUV. At times I find when even doing a panel at a time with the two bucket method, soap will start to dry before I can finish washing larger panels like a hood or roof.

I notice the ratio's are much higher when using a gun vs two bucket method. Does this lead to someone going through shampoo much faster than using a two-bucket method?
 
What I tried to do with this article is to give a person that's NEVER used a foam gun a LOT of information with really good pictures so at the intellectual level they "know" the tool.
And you did a great job or I probably wouldn't have bothered reading it. :xyxthumbs:

"Sold" seems to have struck a nerve! Mike, I'm new here, but I've read a lot of your posts and one of your books. You're clearly not the Professor Harold Hill of Detailing, and I don't think you'd ever push a product on anyone. My apologies.

"Convinced" would've been a more appropriate word. I completely agree with everything you said about a person figuring out if a product or process is right for them. I was just walking through my decision process in the thread, seeing if a foam gun would help meet my needs any better than what I currently use. Some of my questions were borne out of a desire to find more ways to use one. From what you and others have said, it's a tool that will be in my cart soon. Thanks for all of your articles, tips, and stewardship of the forum. PBMG made a wise move in bringing you on board.
 
I'll add that a foam gun is great for washing dogs and cats too. Both my dogs have thick fur and this cuts down on the shampoo used which in turn makes rinsing easier. It has cut their bath time in half. Because you don't have to wet them before the shampoo, cats are already wet and sudsed up before they're completely sure whats going on.

I also thrown some apc in it for various things around the outside of the house. It is definately more than a car washing tool.
 
Back
Top