How to use the Rupes Bigfoot Polisher - Detailing Class

Joined
Dec 5, 2022
Messages
51,004
Reaction score
6
How to use the Rupes Bigfoot Polisher - Detailing Class


Here's the pictures from the 1962 Chrysler 300 Sport that we used to teach how to use the Rupes Bigfoot Orbital Polishers as well as the Rupes Paint Polishing System.


First the car... this is a 1962 Chrysler 300 Sport. This belongs to my buddy Luc and the first time I saw this car was at the CarSpa Car Show at night where I took these pictures.


watermark.php


watermark.php


watermark.php


watermark.php


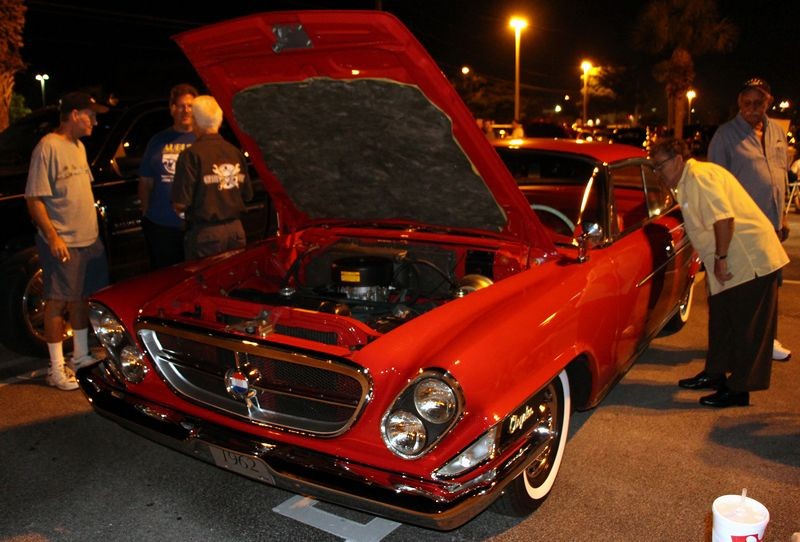
Besides the paint being swirled out with what appears to be holograms from the misuse of a rotary buffer the entire car including glass and trim had clear overspray paint all over it.


This made this car a perfect training car for my detailing boot camp class and also the perfect car for teaching the class how to use the Rupes Paint Polishing System.
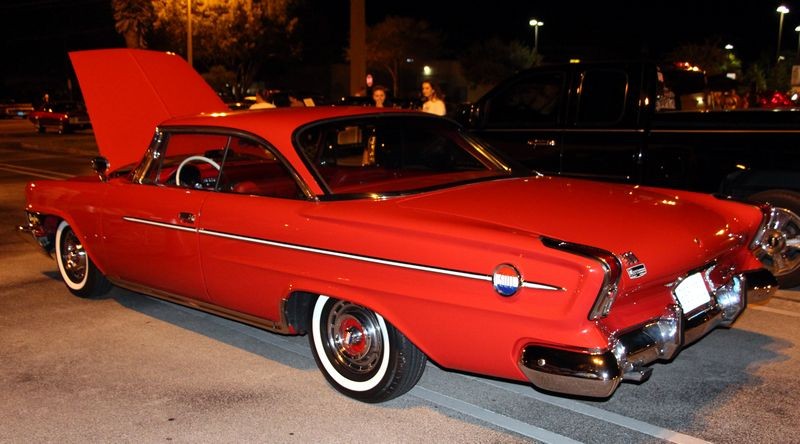
 
Inspecting the paint - the starting point to a show car finish


The first thing we do in this class is go over how to properly inspect the paint using both the sense of touch as well as visual inspection.

In this shot everyone is feeling the paint and what they found is it feels like #40 grit sandpaper. Even the glass and the metal trim.

watermark.php


For this car we're going to learn how to use the Nanoskin Autoscrub pads to remove the overspray paint and any other contaminants bonded to the surface. This is called,

Mechanical Decontamination

It's also vitally important if the goal is a true show car finish because in order to create the deep glossy appearance a true show car has you must first get the surface as smooth as possible. The Nanoskin Autoscrub pads are a replacement option for traditional claying with detailing clay.

watermark.php


watermark.php


watermark.php


watermark.php


watermark.php


watermark.php


watermark.php


:dblthumb2:
 
Doing a Test Spot
The most important first step before buffing out the entire car.

Decades ago I coined the term, practice and teaching of starting any machine polishing process out by doing what I call a test spot.

This is where you test the products you're thinking of using to buff out the entire car to one small section of paint and then STOPPING to inspect the results and MAKE SURE you're getting the results you hope for and dream about.

You start by using less aggressive products from the brand you've chosen to see if the correction work can be accomplished taking the least aggressive approach because if this gets the job done it leaves the most paint on the car and that is very important.

If your first products, pads and even tools of choice are not removing the defects fast enough or effectively enough then you do a NEW test spot in a new section of paint using a more aggressive approach.

You continue your testing until you dial in a process that works to your satisfaction. Then all you have to do is DUPLICATE the successful process over the rest of the car and theoretically if you do the same thing to the rest of the body panels you'll get the same results you proved on your test section and the paint will look as expected.


First up we go over how to the idea of a test spot and if we're not happy with the first test spot then how to move to a new or un-touched section of paint to do the second test spot.

watermark.php


Next we go over the Rupes Bigfoot Orbital Polishers including where the various switches, dials and speed locking mechanism are located.

watermark.php


watermark.php


Because the swirls are excessive in the paint on this car we're going to test out the Rupes Green Foam pad with the Rupes Quarz Gloss Medium Cut Gel Compound.

In this shot I'm also showing and explaining how to properly attach and remove Rupes pads to Rupes backing plates.

watermark.php


watermark.php


Next up is performing the test spot.

watermark.php


I practice, teach and recommend using a tape-line on a horizontal surface when doing a test spot and outline the reasons why in the class as well as how to avoid any problems.

watermark.php


watermark.php


Afterwards, we inspect the results and while the defects were about 90% removed I opted to do the next test spot using the more aggressive blue foam cutting pad and the Zephir Gloss Coarse Gel Compound.

We did a second test spot on the driver's side of the hood and the results were exactly what we were looking for and what the paint on this show car deserved.

watermark.php


:dblthumb2:
 
The Major Correction Step

In my first how to book I use the term, The Major Correction Step to describe and define the first step where any serious below surface defects like swirls, scratches, holograms, water spots and oxidation are removed.

Very Important
It's very important that you invest the time to do the major correcting step correctly or otherwise the swirls and scratches will still be in the paint when you wipe-off the wax.

It is during the major correction step that all the deepest defects are removed. If they are not removed during this first step they will not be removed during the less aggressive step.

In these shots the class gets busy after first watching the correct technique for holding and moving the Rupes Bigfoot Orbital Polishers over the paint.

watermark.php


watermark.php


watermark.php


After the demonstration Nick and I move from student to student to watch, correct and tweak each person's technique.

watermark.php


watermark.php


watermark.php


Most cars have curves, tight areas and complicated panel designs that need to be corrected and polished just like the easy to buff flat panels.

In these shots I'm showing the technique I use to prevent pad stalling so you can remove the swirls out of every square inch of paint.

watermark.php


watermark.php


:dblthumb2:
 
The Polishing Step or Minor Correction Step

Sometimes the paint on the car only needs polishing to remove shallow swirls and scratches this would be simply called the minor correction step.

If you're following a major correction step with a follow up step then this step is simply called the polishing step.

There's a subtle difference especially if you're selling/educating a customer.


We followed the aggressive compounding step using the super soft Rupes Diamond Ultra Fine Gel Compound, (actually a polish not a compound as we use these terms here in America), and the super soft white foam finishing pad.

This combo was indeed dialed-in during the second test spot.


Here's Meghan using the Rupes Bigfoot 21 - this is how you do it...


watermark.php


You focus on the task at hand...

watermark.php


Meghan already owns a Rupes Bigfoot 21 and knows how to make show car polishing look easy! This also shows how smooth the Rupes Bigfoot polishers are and especially the fine cut and ultra fine cut polishes and matching polishing pads.

watermark.php


Here's Barry using light pressure to perfect the finish...

watermark.php


:dblthumb2:
 
Machine Waxing or Machine Sealing the Paint

Most high quality compounds and polishes are pro grade and one of the characteristics about pro grade compounds and polishes is that most of them are made to be body shop safe.

Besides meaning they won't contaminate a fresh paint environment, (body shop), it also means they tend to be water soluble and thus the high shine finish they create won't endure over time when the paint is subjected to,


  1. Repeated washing and drying.
  2. Repeated exposure to the rain.
  3. Repeatedly being wiped down with spray detailers (high water content).

So what you want and need to do is seal the paint surface with something that is water in-soluble and this would be one of these three categories of products,

Car Wax - Typically have some form of Carnauba in them for high gloss and deep wet shine.

Synthetic Paint Sealant - These are man-made substitutes for car wax and quality synthetic paint sealants can equal the appearance of a high quality car wax plus they tend to last longer.

Paint Coatings - These are the new kids on the block and take the place of both car waxes and synthetic paint sealants.


For this car we're going to use Pinnacle Souveran Paste Wax because it's a true show car or finishing wax, (no abrasives or cleaners), and we're going to apply it by machine my preferred method of applying most waxes and sealants for reason I share and demonstrate in all my detailing classes.


In this shot I've removed the solid wax out of the wax jar and am carefully swiping the wax across the face of a soft blue Lake Country wax pad.

watermark.php


With the Porter Cable 7424XP you want to use a speed setting around the 4-5 speed setting. You don't want or need the highest speed setting for applying a finishing wax but you'll find the pad skims over the paint easier on the 4-5 speed setting than it will on the low speed settings.

watermark.php


One thing I like about the Porter Cable for applying waxes is that it's lightweight and compact so for vertical panels I can simply use one hand to hold the polisher and support and stabilize myself with my other hand.

watermark.php


watermark.php


:dblthumb2:
 
Wiping off the wax


This is actually a VERY IMPORTANT step.

The reason this step is important is because if your microfiber towels have any abrasive particles lodged into the fiber the particles will inflict scratches back into the paint and this is what I call working backwards. That is you're undoing all the hard work you did when you removed the swirls and scratches.

So before you take any microfiber towel and wipe the wax, sealant or coating residues off polished paint first take a few moments to both visually look at the towels for contaminants and then feel the towels with your clean bare hand.

A lot of time your hand will detect abrasive contaminants that your eyes could not see and you can either pick them out of the weave or get a different towel. And as a rule you should inspect each towel before use.

If you watch My Classic Car with Dennis Gage you'll see me demonstrate this tip this year in their new season of shows for 2015.


Here's Meghan demonstrating how to inspect a microfiber towel using her hand and after finding "something" she's removing it before folding the towel 4-ways and using it to wipe off the wax.


watermark.php


watermark.php


Next I demonstrate the technique,

Breaking open a coat of wax

And of course I share not only the technique for how-to in my classes but the why-to use this technique to make wiping any wax or sealant simple, safe and easy.

watermark.php


Then everyone inspects their towels, puts on a pair of microfiber gloves and carefully wipes off the Pinnacle wax for show car results.

watermark.php


watermark.php


:dblthumb2:
 
And here are the people behind this amazing transformation!


watermark.php


watermark.php


You to can learn how to use the Rupes Paint Polishing System as well as a host of other tools by attending one of this years detailing boot camp classes.

Each class is unique with amazing cars and hours of hands on training using the coolest tools on the coolest cars.


Here's the schedule for the rest of 2015


Note: Starting in May of 2015 the classes go to three days.


May 2015 Class

Friday May 1st
Saturday May 2nd
Sunday May 3rd

Click here to sign-up for this class


July 2015 Class
Friday, July 17th
Saturday, July 18th
Sunday, July 19th

Call 1-800-869-3011 to sign up for this class.


September 2015 Class
Friday, September 25th
Saturday, September 26th
Sunday, September 27th

Call 1-800-869-3011 to sign up for this class.


All classes always fill up so plan accordingly and get registered early.


See you here!


:)
 
Superb job everyone!

Imagine working on a show car, performing show car work, supervised by Mike Phillips... Oh, you just did it?

Being there is a dream coming true, congratulations to everyone attending.

Best Wishes, from Brazil.
 
Hey Mike, I am looking forward to the 2016 classes. When will the 2016 schedule be released?
Thanks. Congrats for the results. Great job everyone!
Rafael
 
Great thread!

My better half wanted me to go to this one, but funds said otherwise.

I understand that as of now Rupes doesn't feature a protective step in their range, but what would be the most efficient way to install wax or sealant using the Bigfoot machines?
 
Indeed, attending a Mike Phillips Boot Camp, would be a dream coming true. There are times in life you wish you were an American. Or to be living in US.
You guys who were lucky to be born in US, please don't take your country for a granted.
Regarding the Rupes, I'm planning, and saving $$$ for it, to buy an entire Rupes system to use with my 21. I think the only thing US is behind is the lack of 230V for my tools, I would miss that! All the best, from abroad.
 
What a car!!
Mike, was the team using LHR15's for the correction work or 21's??
 
Hey Mike, I am looking forward to the 2016 classes.

When will the 2016 schedule be released?


It's already released.


Here's the deal... as a company we decided 5 years ago to pick dates for our Detailing Boot Camp Classes and then stick to them. They repeat the SAME TIME each year.

This way, people in the U.S. and people around the world can more easily make their travel arrangements including, airlines, hotels and rental cars.

We have people that travel from all over the country and the world to attend these classes and keeping the dates the same time each year is really the best way for all involved.

Part of my job is to ingrain in the brain of every member and lurker that visits this forum the dates.

I always post a thread for the dates for each new year before the year starts in the Sign-up For Detailing Bootcamp Class - 2 Day Class forum group.


So here they are from this thread,


Detailing Classes at Autogeek for 2015


  1. Last weekend of January.
  2. First weekend of May
  3. Third weekend in July
  4. Last weekend in September

So while the "number" of the date for the above weekends may fluctuate due to normal calender changes from year to year, the WEEKENDS are always consistent.


And to reserve a seat in any of the classes all you have to do is contact Autogeek via phone, e-mail or the registration page.


Thanks. Congrats for the results.

Great job everyone!
Rafael


Thanks for the comments and questions Rafael. This write-up is to document a real class using the Rupes Paint Polishing System. I think it's the 4th or 5th documented class using the Rupes tools since Autogeek picked up the brand.

I've tried hard to document each class with pictures showing the people that attend this class don't sit in a chair and talk about the tools but in fact... have them in their hands buffing out not just cars... but cool cars.

Here's two more "dedicated threads" showing just the Rupes portion from past classes. I takes a lot of time to process these pictures and create these threads so I can't always do one for every class but here are two...


Rupes Bigfoot Polishers Detailing Class & Extreme Paint Restoration

Rupes Bigfoot Polishers Detailing Class - Swirled-out 1964 Impala

VIP Guest Marco D'Inca from Rupes at Autogeek's Detailing Boot Camp Class


:)
 
The great thing about the class is that is about 10% to 15% power point and sit down. The remaining 85% to 90% of the class is hands on. That is the best thing about attending. You get to actually use the tools and products on real interesting cars.
The SL500 Mercedes convertible had ceramiclear paint and was not as hard to correct as we all thought it would be. This was good learning experience that I recommend to all.
 
More classic Mopar! They had some interesting styling in the early to mid-60's.
 
Mike, I appreciate your reply. Clearly understood!

One more question. Is there a minimum age to attend the classes? 16, 18, 21?

Rafael
 
Did this class have the chance to use the UHS system from Rupes? Or only had time for their "regular" polishes and pads? I'm kind of interested in this one step solution. I look forward to get training on this system at the bootcamp class that I wish to attend in the near future, if possible.
thanks in advance.

Rafael
 
Back
Top