Mike Phillips
Active member
- Dec 5, 2022
- 51,004
- 6
How to wash wheels and tires INSIDE without a water hose by Mike Phillips
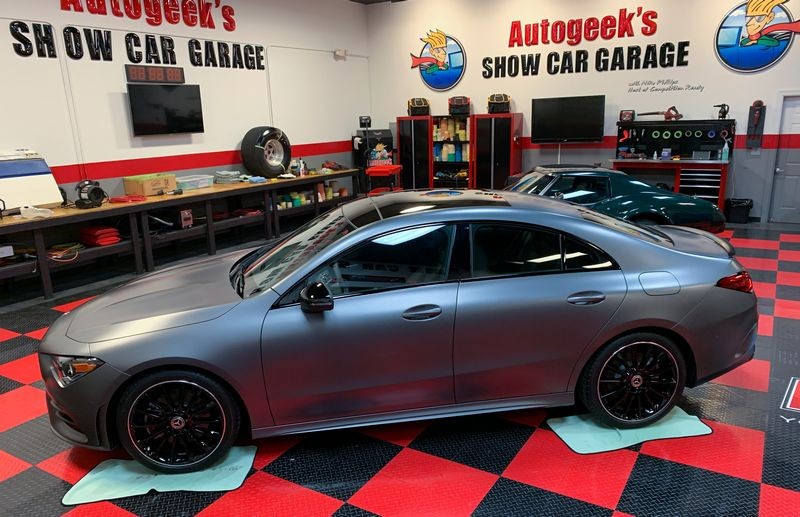
Recently I needed to wash a set of wheels and tires inside Autogeek's Show Car Garage. Due to the restrictions in Autogeek's lease, we are no longer permitted to wash any cars, truck, suvs or boats outside the Autogeek building. Here's the car, a 2020 Mercedes-Benz CLA250 with the Mercedes-Benz, designo Mountain Grey Magno matte paint option, which is an extra $2,500.00.
You can read my review for the GYEON Q2 Matte Ceramic Coating here.
2020 Mercedes-Benz CLA250 with the designo Mountain Grey Magno matte paint option

Wash dirty wheels without running water?
No problem.
I practice Kung Fu Detailing. In Kung Fu Detailing, there are no problems... only solutions waiting to be discovered. When I view car detailing everything is in a liquid motion, anything can be accomplished. All it takes is experience and the power to think-through to a solution.
Is washing dirty wheels the BEST way to get a set of wheels clean? The answer is no. Of course not. But when you have zero other options then you make a way.
Here's my product and tool choice, I'll list everything below this first pictures.

From left to right...
Wheel Woolies Boar’s Hair Wheel Brush
TUF SHINE Tire Brush
Large Multi-Purpose Brush
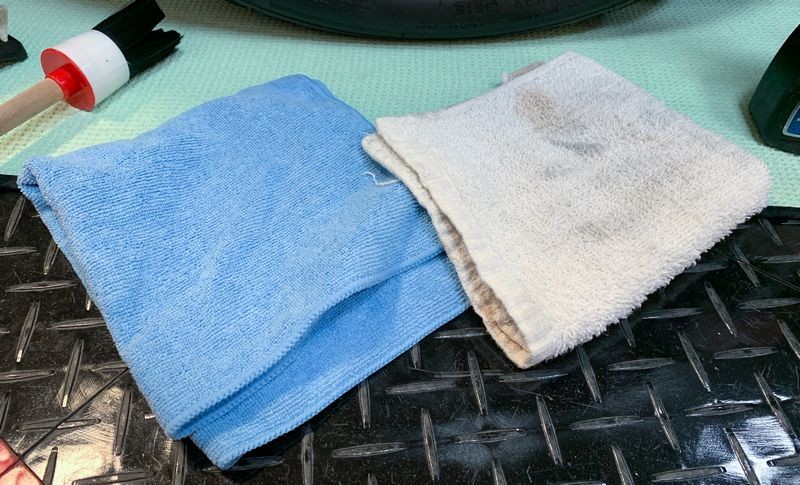
Cobra Blue All Purpose Microfiber Towels 3 Pack
Cotton Terrycloth Wash Cloth - Autogeek does not carry these but I keep them in our garage for doing dirty grunt work when you wouldn't use a microfiber towel.
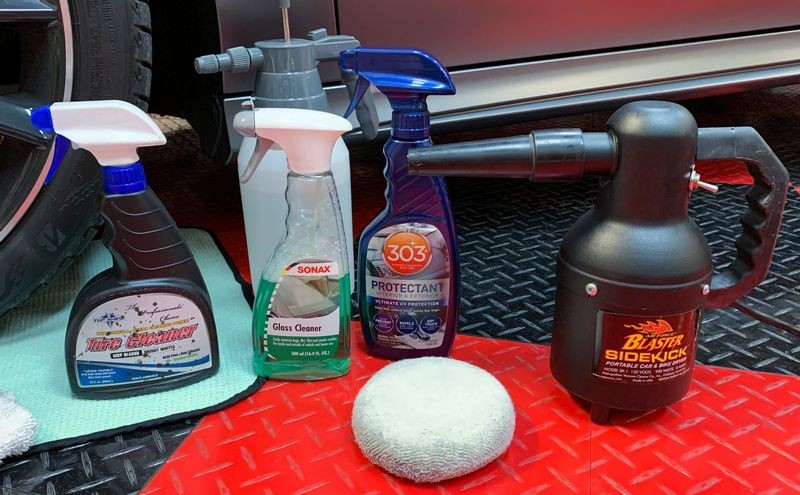
TUF SHINE Tire Cleaner 22 oz
SONAX Glass Cleaner
303 Automotive Protectant - Repackaged version of 303 Aerospace Protectant
Metro Blaster SideKick
Meguiars Even-Coat Applicator - 2 Pack - Any microfiber applicator will work, this one was just close to my hand.
Behind the SONAX Glass Cleaner
Autogeek Chemical Resistant Pressure Sprayer
And on the floor under each tire to capture dirt, brake dust, road film
The Supreme Guzzler Waffle Weave By Cobra, 20 x 40 inches
Here's a close-ups of everything I used...


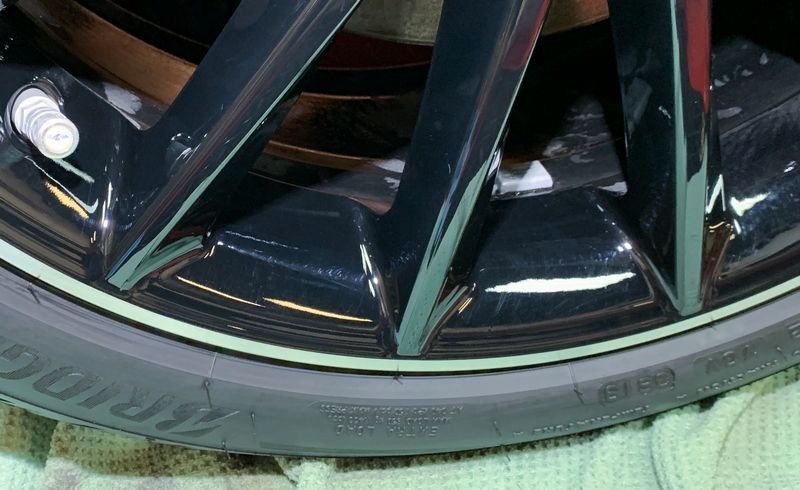
Here's a before shot of the tire and wheel
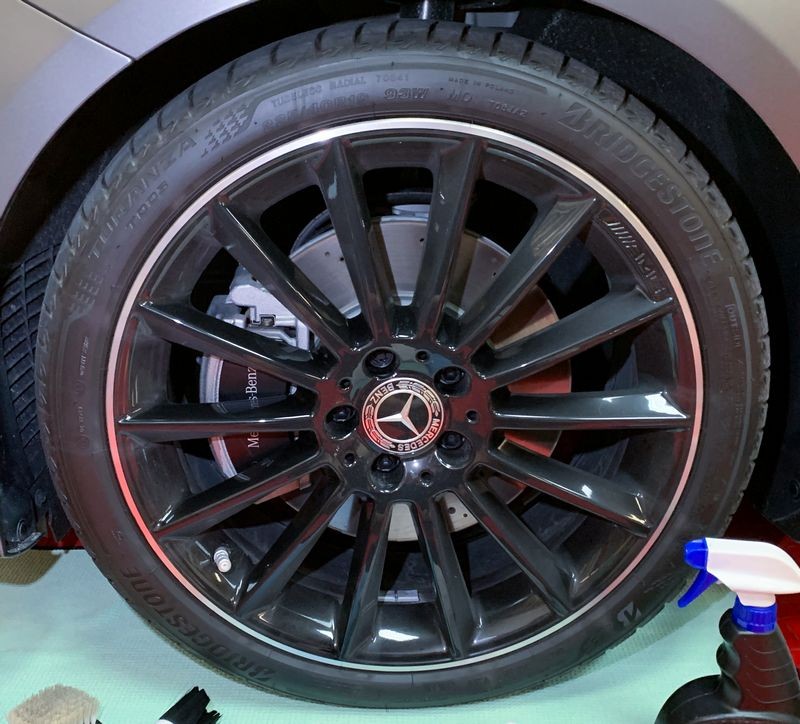
Here you can see a build-up of oily road film and brake dust.
If you don't know where ROAD FILM comes from read my article here and look at the pictures.

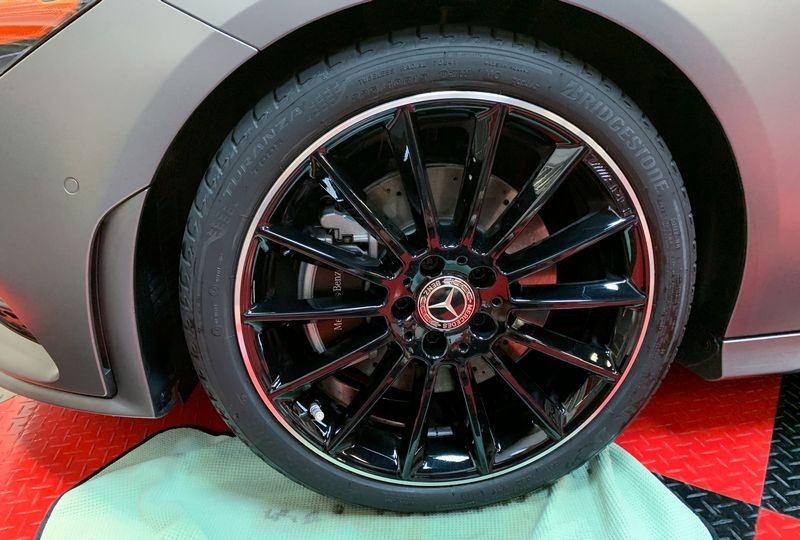
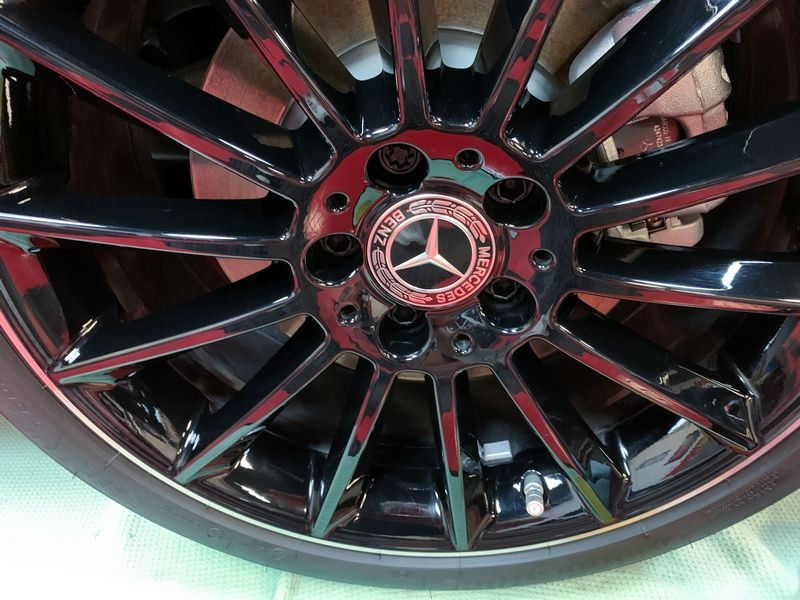
Here's the AFTER picture after cleaning the tire and the wheel.
Note: I had not applied the dressing yet in this picture.

Tire Coating & Tire Dressing
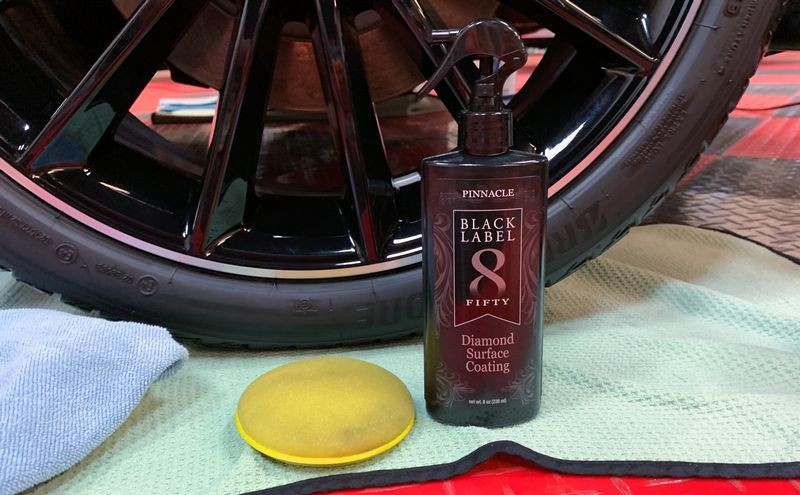
Here's the tire and wheel after hand applying the Pinnacle Black Label Surface Coating to the rim and spokes and the 303 Protectant to the tire sidewall.
Note: After applying and working in the 303 Protectant to the tire sidewalls, the tires were then wiped dry using the Cotton Terrycloth Wash Cloth. The Metro-Vac was used to blow the rinse water out of all the nooks and crannies after rinsing with the Autogeek Chemical Resistant Pressure Sprayer as well as to blow out any excess tire dressing around the rim so it would not sling off when the car was driven.

Method of ceramic coating application
I used a simple yellow foam applicator pad to apply the PBL Diamond Surface Coating to the outside rim, center section and spokes.
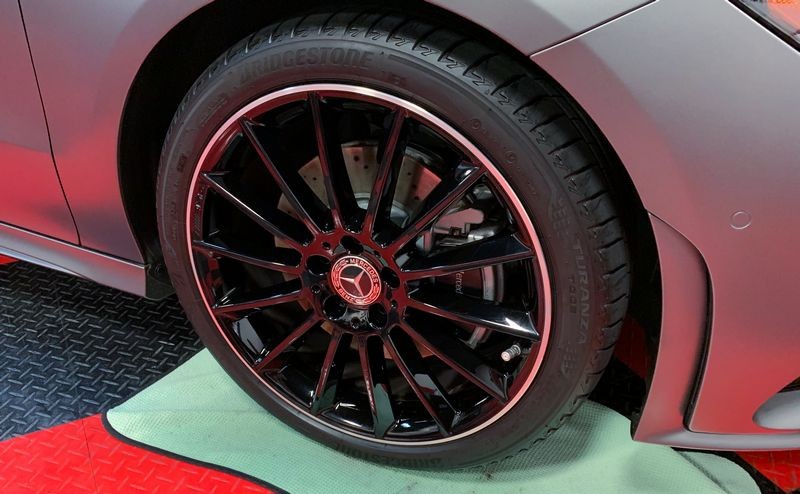
Here's the final results...
A clean, ceramic coated rim with cleaned and protected tires. Not bad considering I did this without a water hose.

Process
Here's my process - sorry no action shots, I was by myself.
Step 1: Spray Tuf Shine Tire Cleaner onto tires and scrub with the Tuf Shine Low Profile Tire Brush. (The Tuff Shine company spells the word Tuf with one f)
I did this twice to each tire and after each scrubbing I used the Autogeek Pressurized Sprayer (with only water in it) to rinse the tires and then I used the cotton terrycloth wash cloth to wipe the tires clean and dry.
Step 2: Spray the outer rim, center section and spokes down with SONAX Glass Cleaner and then agitate with the Wheel Woolies Boar's Hair Wheel Brush.
SONAX Glass cleaner is great at removing oily vinyl fog and smoker's film off the inside of car windows while leaving the glass streak-free. This characteristic also makes it viable for cleaning off oily road film from wheels while leaving them "mostly" streak free.
Step 3: Rinse the wheels after agitating the SONAX Wheel Cleaner with the brush using water from the Autogeek Pressurized Sprayer.
Because you can pump up and pressurize the sprayer, it works really well to create a CONSTANT stream of spray water to rinse off the glass cleaner and everything it loosened.
Step 4: Blast the wheel using the MetroVac Sidekick to blow off and blow out all the standing rinse water.
This works great for getting every drop of water out of the tight and intricate areas PLUS it also dries the wheel at the same time. The Green Guzzler Waffle Weave Drying Towels did a great job of collecting all the run-off water all around the wheel including the backside.
Step 5: : Using the blue microfiber towel, I gave the rim, center section sides of spokes and back of spokes a final wipe to remove any residual water.
These towels are simple, universal towels and worked just fine for this final wipe.
Step 6: I applied the 303 Protectant to the tire sidewalls.
For this I applied the product twice, working the protectant INTO the rubber with a massaging action and some old fashioned elbow grease. After application I wiped the sidewall dry to remove any excess protectant to avoid sling onto the body panels and I also used the MetroVac Sidekick to blow out around the edge where the rim meets the tire again - to remove any excess protectant so it wouldn't sling out when the owner drover off in the car. I love this tool and I think everyone should have on in their tool arsenal.
Step 7: Using a simple foam applicator pad I wiped-on the Pinnacle Black Label Diamond Surface Coating and the gave the wheel a final buff using a fresh, clean blue microfiber towel .
The final wipe removed any high spots as well as helped to spread out the product for uniform coverage. Note: Applying a ceramic coating to a wheel does NOT prevent road film and brake dust from accumulating onto the wheel. It simply makes future cleaning faster and easier.
The Autogeek Chemical Resistant Pressure Sprayer
A little bit about the pressure sprayer. This is the tool that enabled me to clean the wheels and the tires inside the garage without running water from a water hose. Again - I could do a much better job outside the garage using running water and the Speed Master Wheel Brush and the Wheel Woolies to get to the wheel barrel, but that's for OCD people that are actually going to CONTINUE doing this type of cleaning and the majority of car owners don't do this. So cleaning what I could access with the tools I shared above is more than sufficient for this type of situation.
Here's the Autogeek Chemical Resistant Pressure Sprayer with only clean water in it. You can use it with various cleaning chemicals and although the rubber O-rings in the spray head are chemical resistant I would still recommend emptying the sprayer when you're through using it with a chemical and then filling the container with clean water and then flushing clean water through the sprayer. An ounce of protection is worth a pound of cure. Once you get into the habit it's fast, easy and a no-brainier.
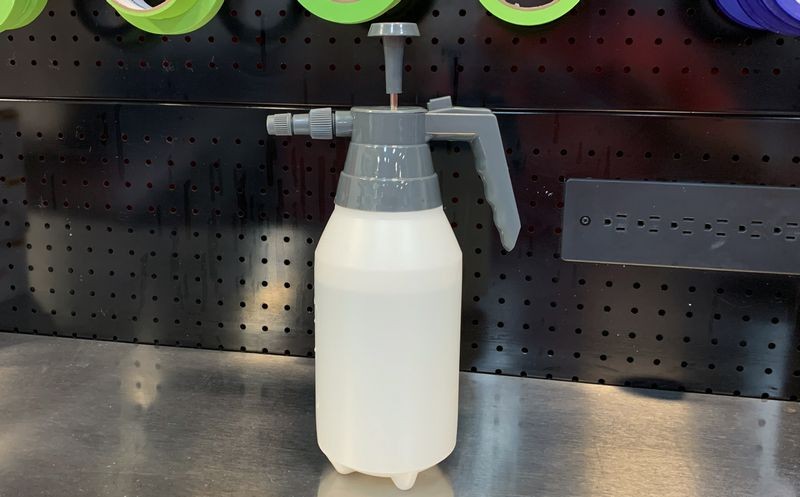
Besides being able to pump up the sprayer to create pressure, the cool feature about the sprayer is the adjustable nozzle.
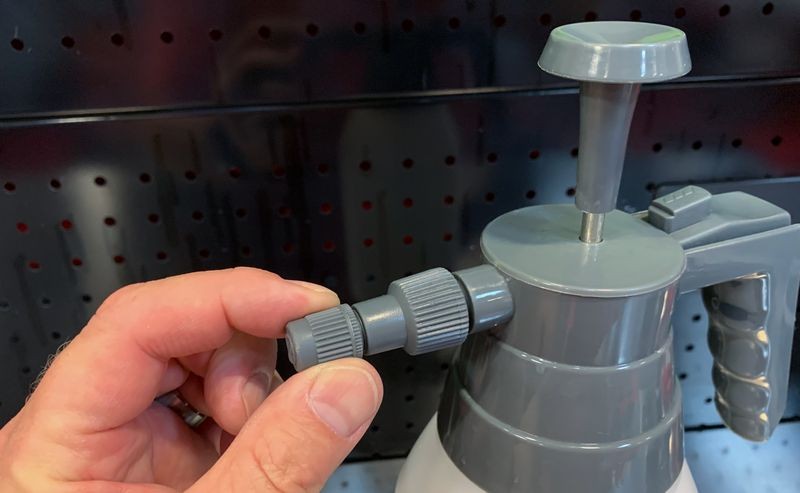
Before rinsing a tire or a wheel I adjusted the nozzle to be in the sweet spot for rinsing. The sweet spot is not to adjust the nozzle to the extreme open side for a STREAM of water and not adjusted the nozzle to the extreme closed side for a FINE MIST of water but right in the sweet spot for a all-encompassing SPRAY of water.

This spray pattern worked perfect for FLUSHING the dirt off the tire and the rim after agitating with cleaners and brushes.

And that's the way you do it. rops:
rops:
And the good news is, you can get everything but the cotton terrycloth wash cloths at Autogeek.com
Wheel Woolies Boar’s Hair Wheel Brush
TUF SHINE Tire Brush
Large Multi-Purpose Brush
Cobra Blue All Purpose Microfiber Towels 3 Pack
Cotton Terrycloth Wash Cloth - Autogeek does not carry these but I keep them in our garage for doing dirty grunt work when you wouldn't use a microfiber towel.
TUF SHINE Tire Cleaner 22 oz
SONAX Glass Cleaner
303 Automotive Protectant - Repackaged version of 303 Aerospace Protectant
Metro Blaster SideKick
Meguiars Even-Coat Applicator - 2 Pack - Any microfiber applicator will work, this one was just close to my hand.
Autogeek Chemical Resistant Pressure Sprayer
The Supreme Guzzler Waffle Weave By Cobra, 20 x 40 inches
simple yellow foam applicator pad
Pinnacle Black Label Diamond Surface Coating
Not pictured
Orange Heavy Duty Nitrile Gloves
I wear the XXL size but the link above will take you to the main landing page where you can order the size that fits your hand. I recommend getting one size larger than you think you wear to simply make them easier to put on and take off.
Hope that helps you if you're ever in a position where you need to clean and protect a set of wheel and tires and you don't have access to running water. It's not the best option but sometimes it's the ONLY option.
Comments, feedback and questions always appreciated.
")
Recently I needed to wash a set of wheels and tires inside Autogeek's Show Car Garage. Due to the restrictions in Autogeek's lease, we are no longer permitted to wash any cars, truck, suvs or boats outside the Autogeek building. Here's the car, a 2020 Mercedes-Benz CLA250 with the Mercedes-Benz, designo Mountain Grey Magno matte paint option, which is an extra $2,500.00.
You can read my review for the GYEON Q2 Matte Ceramic Coating here.
2020 Mercedes-Benz CLA250 with the designo Mountain Grey Magno matte paint option
Wash dirty wheels without running water?
No problem.
I practice Kung Fu Detailing. In Kung Fu Detailing, there are no problems... only solutions waiting to be discovered. When I view car detailing everything is in a liquid motion, anything can be accomplished. All it takes is experience and the power to think-through to a solution.
Is washing dirty wheels the BEST way to get a set of wheels clean? The answer is no. Of course not. But when you have zero other options then you make a way.
Here's my product and tool choice, I'll list everything below this first pictures.
From left to right...
Wheel Woolies Boar’s Hair Wheel Brush
TUF SHINE Tire Brush
Large Multi-Purpose Brush
Cobra Blue All Purpose Microfiber Towels 3 Pack
Cotton Terrycloth Wash Cloth - Autogeek does not carry these but I keep them in our garage for doing dirty grunt work when you wouldn't use a microfiber towel.
TUF SHINE Tire Cleaner 22 oz
SONAX Glass Cleaner
303 Automotive Protectant - Repackaged version of 303 Aerospace Protectant
Metro Blaster SideKick
Meguiars Even-Coat Applicator - 2 Pack - Any microfiber applicator will work, this one was just close to my hand.
Behind the SONAX Glass Cleaner
Autogeek Chemical Resistant Pressure Sprayer
And on the floor under each tire to capture dirt, brake dust, road film
The Supreme Guzzler Waffle Weave By Cobra, 20 x 40 inches
Here's a close-ups of everything I used...
Here's a before shot of the tire and wheel
Here you can see a build-up of oily road film and brake dust.
If you don't know where ROAD FILM comes from read my article here and look at the pictures.
Here's the AFTER picture after cleaning the tire and the wheel.
Note: I had not applied the dressing yet in this picture.
Tire Coating & Tire Dressing
Here's the tire and wheel after hand applying the Pinnacle Black Label Surface Coating to the rim and spokes and the 303 Protectant to the tire sidewall.
Note: After applying and working in the 303 Protectant to the tire sidewalls, the tires were then wiped dry using the Cotton Terrycloth Wash Cloth. The Metro-Vac was used to blow the rinse water out of all the nooks and crannies after rinsing with the Autogeek Chemical Resistant Pressure Sprayer as well as to blow out any excess tire dressing around the rim so it would not sling off when the car was driven.
Method of ceramic coating application
I used a simple yellow foam applicator pad to apply the PBL Diamond Surface Coating to the outside rim, center section and spokes.
Here's the final results...
A clean, ceramic coated rim with cleaned and protected tires. Not bad considering I did this without a water hose.
Process
Here's my process - sorry no action shots, I was by myself.
Step 1: Spray Tuf Shine Tire Cleaner onto tires and scrub with the Tuf Shine Low Profile Tire Brush. (The Tuff Shine company spells the word Tuf with one f)
I did this twice to each tire and after each scrubbing I used the Autogeek Pressurized Sprayer (with only water in it) to rinse the tires and then I used the cotton terrycloth wash cloth to wipe the tires clean and dry.
Step 2: Spray the outer rim, center section and spokes down with SONAX Glass Cleaner and then agitate with the Wheel Woolies Boar's Hair Wheel Brush.
SONAX Glass cleaner is great at removing oily vinyl fog and smoker's film off the inside of car windows while leaving the glass streak-free. This characteristic also makes it viable for cleaning off oily road film from wheels while leaving them "mostly" streak free.
Step 3: Rinse the wheels after agitating the SONAX Wheel Cleaner with the brush using water from the Autogeek Pressurized Sprayer.
Because you can pump up and pressurize the sprayer, it works really well to create a CONSTANT stream of spray water to rinse off the glass cleaner and everything it loosened.
Step 4: Blast the wheel using the MetroVac Sidekick to blow off and blow out all the standing rinse water.
This works great for getting every drop of water out of the tight and intricate areas PLUS it also dries the wheel at the same time. The Green Guzzler Waffle Weave Drying Towels did a great job of collecting all the run-off water all around the wheel including the backside.
Step 5: : Using the blue microfiber towel, I gave the rim, center section sides of spokes and back of spokes a final wipe to remove any residual water.
These towels are simple, universal towels and worked just fine for this final wipe.
Step 6: I applied the 303 Protectant to the tire sidewalls.
For this I applied the product twice, working the protectant INTO the rubber with a massaging action and some old fashioned elbow grease. After application I wiped the sidewall dry to remove any excess protectant to avoid sling onto the body panels and I also used the MetroVac Sidekick to blow out around the edge where the rim meets the tire again - to remove any excess protectant so it wouldn't sling out when the owner drover off in the car. I love this tool and I think everyone should have on in their tool arsenal.
Step 7: Using a simple foam applicator pad I wiped-on the Pinnacle Black Label Diamond Surface Coating and the gave the wheel a final buff using a fresh, clean blue microfiber towel .
The final wipe removed any high spots as well as helped to spread out the product for uniform coverage. Note: Applying a ceramic coating to a wheel does NOT prevent road film and brake dust from accumulating onto the wheel. It simply makes future cleaning faster and easier.
The Autogeek Chemical Resistant Pressure Sprayer
A little bit about the pressure sprayer. This is the tool that enabled me to clean the wheels and the tires inside the garage without running water from a water hose. Again - I could do a much better job outside the garage using running water and the Speed Master Wheel Brush and the Wheel Woolies to get to the wheel barrel, but that's for OCD people that are actually going to CONTINUE doing this type of cleaning and the majority of car owners don't do this. So cleaning what I could access with the tools I shared above is more than sufficient for this type of situation.
Here's the Autogeek Chemical Resistant Pressure Sprayer with only clean water in it. You can use it with various cleaning chemicals and although the rubber O-rings in the spray head are chemical resistant I would still recommend emptying the sprayer when you're through using it with a chemical and then filling the container with clean water and then flushing clean water through the sprayer. An ounce of protection is worth a pound of cure. Once you get into the habit it's fast, easy and a no-brainier.
Besides being able to pump up the sprayer to create pressure, the cool feature about the sprayer is the adjustable nozzle.
Before rinsing a tire or a wheel I adjusted the nozzle to be in the sweet spot for rinsing. The sweet spot is not to adjust the nozzle to the extreme open side for a STREAM of water and not adjusted the nozzle to the extreme closed side for a FINE MIST of water but right in the sweet spot for a all-encompassing SPRAY of water.
This spray pattern worked perfect for FLUSHING the dirt off the tire and the rim after agitating with cleaners and brushes.
And that's the way you do it.
rops:And the good news is, you can get everything but the cotton terrycloth wash cloths at Autogeek.com
Wheel Woolies Boar’s Hair Wheel Brush
TUF SHINE Tire Brush
Large Multi-Purpose Brush
Cobra Blue All Purpose Microfiber Towels 3 Pack
Cotton Terrycloth Wash Cloth - Autogeek does not carry these but I keep them in our garage for doing dirty grunt work when you wouldn't use a microfiber towel.
TUF SHINE Tire Cleaner 22 oz
SONAX Glass Cleaner
303 Automotive Protectant - Repackaged version of 303 Aerospace Protectant
Metro Blaster SideKick
Meguiars Even-Coat Applicator - 2 Pack - Any microfiber applicator will work, this one was just close to my hand.
Autogeek Chemical Resistant Pressure Sprayer
The Supreme Guzzler Waffle Weave By Cobra, 20 x 40 inches
simple yellow foam applicator pad
Pinnacle Black Label Diamond Surface Coating
Not pictured
Orange Heavy Duty Nitrile Gloves
I wear the XXL size but the link above will take you to the main landing page where you can order the size that fits your hand. I recommend getting one size larger than you think you wear to simply make them easier to put on and take off.
Hope that helps you if you're ever in a position where you need to clean and protect a set of wheel and tires and you don't have access to running water. It's not the best option but sometimes it's the ONLY option.
Comments, feedback and questions always appreciated.