Many Tiny white specks on black paint...

onboost

New member
Joined
Feb 25, 2015
Messages
4
Reaction score
0
First post so hi everyone!

I am having an issue with the original solid (non-metallic) black paint on my 2003 Porsche 911 Turbo. I bought the car a few months ago and overall the car is extremely clean and paint had very very minimal swirling (got rid of them easily with polish) all exterior rubbers and plastics are in perfect shape as well as interior is pretty much perfect. Have very extensive maintenance records so the car was well cared for.

I am having an issue with the hood. I have tried clay bar and I have also polished with a DA and blue foam pad with Meguiar's Ultimate Polish. Basically I was able to get rid of the minimal swirling and from any distance over about three feet from the hood the finish looks great!

BUT...I have not been able to get rid of these very tiny white specks. They are more concentrated near the leading edge of the hood and sort of fade out toward the back of the hood. They can't really be felt by finger tip or finger nail. They almost look like dust. You can't see them from about 3 feet away and are basically invisible in normal inside lighting or shade even when looking closely. But in direct sunlight and/or under close inspection with a flashlight,etc you can see them clearly.

I read some info about other cases of this maybe being some type of pitting and I'm hoping that maybe I can use some type of compound to get these specks out. Looking for any suggestions or advice on what this could be and what to do to try and improve this.

Thanks in advance for any help or guidance!

Couple pics below:

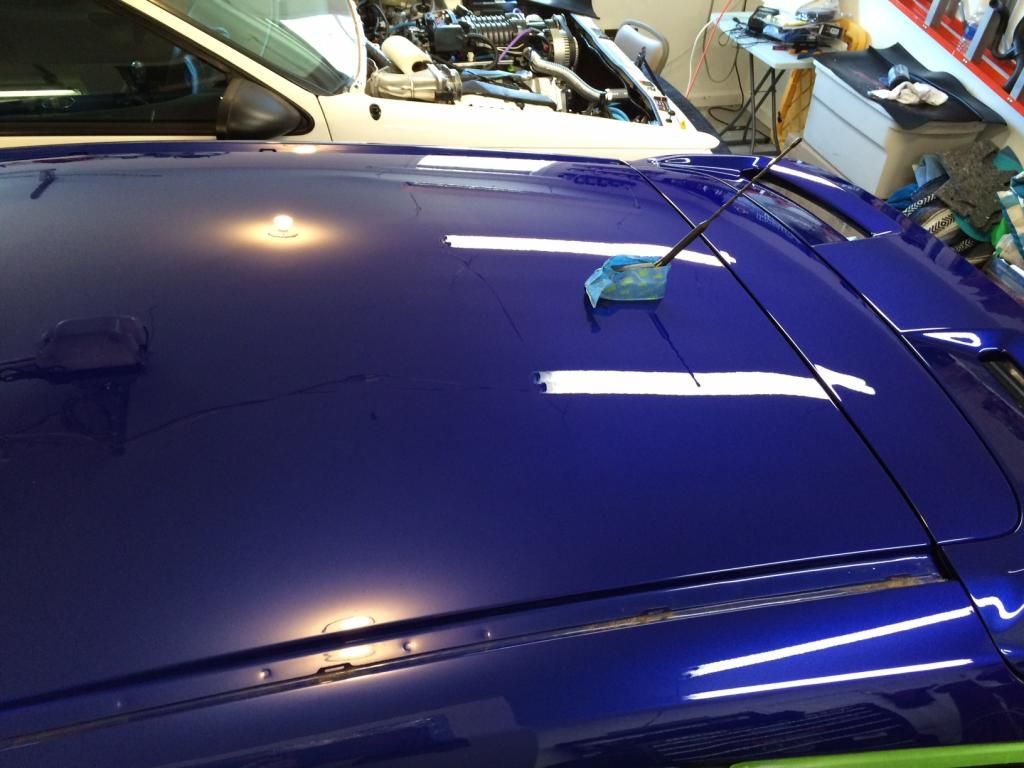
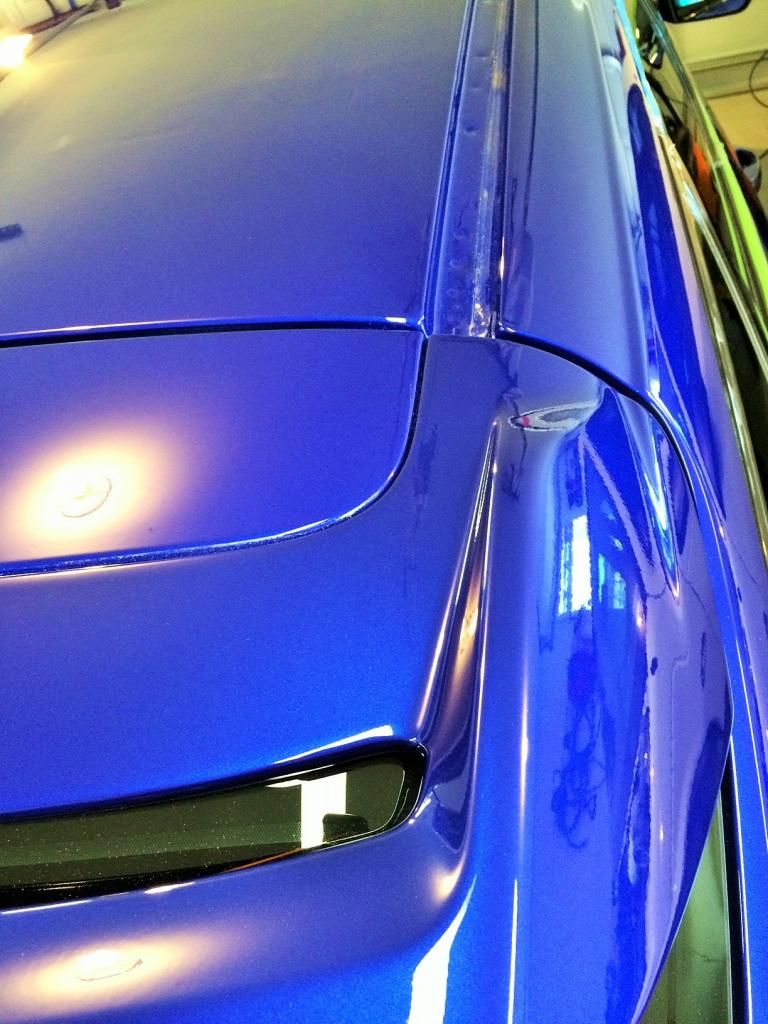
Here is a close up, you can see the specks and if you look really closely you can see that the sizes of them get super small. Again from just a couple feet away you can't see them and you can't feel them.

P2250572_zps1tjvykyn.jpg


Here is what the hood looks like from just a couple feet away:

P2250574_zpsozlo9shf.jpg
 
Sounds to me like rock chips. That is exactly the location you would expect to see them in. Not necessarily 'rock chips', but more like sand blasting. Not a whole lot you can do about them short of wet sanding the area and then polishing it out again. Or you could go for something like Dr. Colorchip and fill the chips in with paint. That's how I deal with the sand blasting effect on cars. Does it seem like they could be rock chips?
 
Are they just on the hood? My guess is it's "sand blasting" / road rash / rock chips. It could also be solvent pop - but if it's factory paint (is it?) - I doubt it. It sounds like you've already clayed and baggy tested the area with no results.

My guess is compounding / polishing will not remove these. As it seems like it's "in the paint" - not "on the paint", from your description. Another remote possibility is its some type of iron contamination that is showing up "white" for some reason. So, you have nothing to loose by trying IronX.

At this point, I see 3 possible roads to take.

1. Iron X, clay, then compound/polish the area (if you have not done so).

2. Have the hood repainted.

3. Enjoy the car and forget about it.

Depending how visible it is, I'd prolly go with #3.
 
Do you have a decent magnifying glass, or maybe even a small Jeweler's Loupe?

These should help you get a much better look at what this really is?
 
Have you tried an IPA solution to ensure there is not compound or polish in them?
 
Another thought that came to mind is that they were probably invisible until you polished the car. Now the specs have polish in them and that makes them stand out more. One thing you can do to reduce the appearance of small chips like that is to use something like Turtle Wax Black Box wax or something else with black pigment in it that is designed to fill things like that. I've used it on one of my client's cars who has nothing buck rock chips on the front while he saves up for a repaint and it works really well at minimizing them a bit. On yours they would probably disappear entirely.

So here is my thoughts for solutions/fixes:

1. wet sand and polish. This is aggressive, but would probably do the trick.

2. Dr. Colorchip. This would fill the chips with paint, but it is possible that the paint will come out at some point.

3. Use a color wax. The Turtle Wax Black Box is an option. Meguiar's has one for black as well. You may be able to find others, but this is a very temporary fix and they will come back.

4. The car is 12 years old and probably looks better than most new cars, so if you plan on driving it at all then you might want to get adjusted to slight imperfections like this. You could correct the chips and wrap the whole front end in a clear bra, but that won't be perfect either. Perfection is not something to strive for on something that will be driven on the roads, so some sand blasting on the front end is probably something you'll have to live with even after you correct it. If it is 3 feet perfect, then I'd say mission accomplished and you should enjoy it. 1% of 1% of the population will probably notice, but we won't give you a hard time over it. ;)
 
Thank you very much for all the replies folks. VERY much apprecated :dblthumb2:

OCDetails, thanks for all the feedback and ideas. My thinking is in line with what you are saying. I may be over thinking this a bit. The finish is actually pretty amazing for the age of the car and yes I do plan to drive it!!! It really is an awesome car to drive :) Since I do plan to drive it I'm not really looking for perfect as I know it will be impossible to keep the car perfect and still drive it on the street. I'm torn between basically just leaving it alone and at least trying to get it better. I have experience wet sanding but mainly on non-oem paint. If I do wetsand what would be the least agressive way to go about this. I know the whole point of wetsanding is to be agressive so I guess I mean what would be the safest way to go about this? I have 1000, 1500, and 2000 grit on hand but I will be honest that it makes me a bit nervous to wetsand the oem paint.

Swainicyouth, again I'm in between your point #3 and at least trying to make it better. It makes sense that they would be kind of like sand blasting just based on the fact that its worse near the front edge and fades as you move back on the hood. If these are in fact tiny sand pits would it be better to maybe try to improve it by wetsanding or could compound acheive the same improvement with less clear being taken off the car?

MarkD51, I have a small loupe somewhere I will try to find it and look closer.

irvsmith, can I just use regular household IPA or would it have to be some special version? Before claying and polishing I washed with dish soap very thoroughly.


I'm trying the path of least resistance first, that is why I just went with clay and polish so far. I'm wondering if I should try a small area with wetsand and polish to see what happens. Is it even worth trying with 2000 grit? Can I polish 2000 with Meguiar's Ultimate Polish or do I need something more agressive?

Thanks again for all the input!
 
I've polished out 1500 grit haze with Meguiar's Ultimate Compound, so you should be ok to get this done with locally available products. I'm not sure the Polish will do you much good, but the Compound is a very capable product. If you are just using 2000 grit then you should be able to handle it well.
 
I would be hesitant to "just go at it" with sandpaper. Maybe locate a scrap Porsche hood from a local body shop and practice on it for a good while, but honestly without a PTG I wouldn't even do it to my wife's 13 year old Accord, much less a 911 Turbo.
 
I put a buddy to work wet sanding and polishing his 89 911. I worked with him through one of the fenders and a door and showed him the process. The next day he came over while I was at work and finished out the rest of the car all by himself.


Even though he had never touched wet sanding before, it came out gorgeous.


There are still a couple rock chips that sanding isn't going to do anything for, but it took his car from a 6 foot beauty to a 1 foot beauty. Nobody will argue that the paint looks better than 90% of the cars on the road and way better than 100% of the 25 year old cars on the road.

The reason I share that with you is because I understand the hesitation to deliberately scrape up your paint with sand paper, but rest assured that you have the right tools and knowledge to correct it afterwards. Just take it slowly and find the right amount of sanding that is necessary to correct the issue and it won't be hard to find the right amount of polishing to correct the sanding marks. The end result is going to really make you proud and you'll feel more confident about tackling a similar issue in the future.
 
I could post some pictures almost just like that. A few of mine are a little larger and some even have like a trail behind them. I got on I-20 when the were resurfacing the road. There was ground up ash fault on the road. I tried slowing down to leave a large gap in front of me until I could get off but people were passing me and kicking it up. It actually sounded like my car was getting sandblasted. Bottom line is I would agree with the "sandblasting " theory. I've used Dr. Colorchip on a couple of black cars that looked like that...some of them larger chips and it worked real well covering them up.
 
Many of you folks are much braver, and much more experienced with the tasks of wetsanding. I myself would say I'm a huge "chickensh&t" when it comes to such, and try to avoid such at all costs.

Should it be determined that this is indeed a type of road rash, I myself think the Dr. Colorchip repair would be the least invasive and would at least save any further removal of valuable paint. You may wet sand, and still see this regardless. Thus, IMO, you've actually gotten nowhere.

About a month ago, I had received a 1oz bottle of Dr C-Chip for my junker Magenta Metallic 2001 Kia Spectra. With a couple of decent days in the mid-high 50's I set out to play some with the paint.

My hood was awful, like I followed a gravel truck for 500 miles, and this can probably be expected with a daily driver that's 14+ years old, and in a wild west state where there's gravel galore everywhere you go.

I spent about 2 days going around, and around, and around. Halogen lighting as an aid, some junky clothes on, and crawled around the car, working section at a time with a bottle of Carpro Eraser and some MF Towels first. PrepSolve might've been a better choice, but this is no Ferrari 458 Italia I have here, so wasn't too anal with what I was doing.

The hood alone must have a good 1000 little pock marks from stones, and I went to work, just using a simple dabbing, and hastily just blobbed the paint into damage, from the worst, then going onto less and less major chips.

I did not use the default method of dabbing, and smearing, figuring I was just then only pulling the paint right back out of these divots-chips.

I concentrated on small sections of the hood, maybe a 1'x1' or so area, dabbed in the paint with their little MF Applicator, waited a few minutes, then came behind with the Sealact Solution. Then moved on to the next small area.

As I was wiping with the sealact solution, I had really gotten down the finessing, and lightly wiped, and repeated, you can see it's getting better, and better, and better, and then bang!, the chip is gone! The damage became pretty much invisible to very close scrutiny. I'm talking just a mere few inches from the paint!

Not the first time I've used this system, but I was really getting some flabbergasting, killer results! The Folks at Dr. C-Chip did a totally phenominal job of the color match. I had to write them after, with a glowing 120% positive comment, and was far beyond my expectations, I was that blown away, and commonly, I'm usually the most critical, and pessimistic guy you'd ever meet.

Yes, it takes time to do. I did not resort to the "splash product on, then smear with a credit card" sort of approach, which they suggest themselves, as I did try it, and was both going through a heck of a lot of paint, and also finding difficulty removing all that acreage of smeared paint and using lots of valueable Sealact Solution as well.

The Hood came out looking about a 1000% better, the Hood had not looked that good in 10 years. With all the other touch up I did around the car, which was quite a lot admittedly, this is no show car for sure. But I made some vast improvements on the overall condition of the appearance of the car.

I then waited a few days, again, I did not get anal about the processes, out came the PC7424XP, White Flat LC Pads, Wolfgang Uber Compound, a slew of MF Towels, and got to work.

Again, pleasing results, the car was looking a whole lot better than it ever did, gone was a lot of swirling that I had never gotten out before, and the Dr. C-Chip touch up paint stayed put. I followed with WGDGPS 3.0 and all was looking great.

The Doctor Colorchip System is a great product to have on hand IMO. With any vehicle, it is inevitable that chips and damage will occur.
For sure, any different vehicle I ever buy in the future, I will be sure to have this product on hand.
 
•First:
-Clean out the tiny white specks of residue using
something like 3M Inspection Spray (#06082).

•Then:
-You can either "fill-them-in" with a Dr. Colorchip-type system, or even a respray;
-Or: just "seal-them-up" by using a clear-drying/curing Sealant, until a more permanent fix is decided upon.


Bob
 
That's a great story. Thanks for sharing. On a scale of 1-10, what is your skill level? I am a beginner but get good results with polishing and sealants. Just starting out with my DA and getting good results. How much paint experience do I need to use the D Color Chip system?
 
I have used dr c chip...with similar experience. ..it really is great stuff. When you have a chip you fill it, then wipe it with the liquid. The hole stays full and excess wipes right off. I love that it is a single stage paint so you don't even have to worry about getting a clear over it. In my case its really great because my paint is a solid color.

BUT.....The thing is that these specks are REALLY small, as in pin head small.. dust small. There is really nothing to actually fill. Like I said you can't even feel them.

Actually I did fill some in that we're tiny and not very deep. I actually used Griot's touch up paint kit to apply it instead of the wipe method. Then let it dry overnight and used the blending solution. Turned out great. The key is to not have a bunch of excess paint to remove let it dry thoroughly before using the blending solution. This kit was a huge help getting a tiny dot of paint in the tiny hole.I guess I can post the link. I've never found anything like this on AG.

Paint Touch Up Kit - Restoration - Car Maintenance - Griot's Garage
 
I just dealt with a similar problem on my Focus ST, I’m a long time Auto Geek customer but never joined the forums till I saw your post and figured I’d pass along info on how I handled them. I don’t know if they were really water spots but they looked like water spots only smaller. I’m pretty sure that you have the same thing going on and they are indeed spots of some sort just not chips or pits since you can’t feel them even with the bag test. The spots were small and white and almost looked like they were actually in the paint or part of the metallic flake of my paint. I was thinking they may have come from overspray of line painting or some sort of chemical rain when the car was at my buddy’s shop for like 6 months undergoing developmental work (way too much torque at the wrong wheels now!). Traditional water spots are larger than these were and since I also have a black car I’m used to dealing with those but these little guys were something new and they would not budge with my normal water spot routine. I’m not trying to sell anything here I’m just telling you what I’ve been using for years and what has worked for me. I have been OCD car guy ever since I was a kid, I build custom cars and do the detail thing on the side for friends and family as well.
Spots1_zps9lhchags.jpg

Spots!

First I washed the car then I clayed it and washed it again and did the bag test to feel the surface and make sure it was smooth. I use Pinnacle’s paintwork cleansing lotion before I do any polishing/buffing to make sure all the old wax if off and sometimes it also takes care of water spots. Lees is always better when dealing with paint so I always try to do the least aggressive procedure at the start and see what gives or in this case what doesn’t give! Even though the spots were only on the roof and hood I did the whole car with the cleanser since I had planned to polish the entire car anyway. I noticed the spots were still there after the “cleanse” and to be honest I expected that since I think I tried this before about a month ago to no avail. I was ready to spin up the DA and figured since these spots were so stubborn that I would go with the heavy hitters right off the bat at least on the roof and hood. I like to use Menzerna’s Polishing Compounds, lake County/Meguiars pads and a PC 7424XP for my buffing needs. I started out using Menzerna’s Power Gloss Compound (PG1000) in conjunction with a couple of Meguiars Soft Buff Foam Cutting pads (W7006). I did two passes and the spots were still there and I was sad… I moved to the next combo of Menzerna’s Intensive Polish (IP2000) and a Lake County orange pad. I preformed two passes using this combo and like magic the spots were finally leaving the building. I followed up with a pass using Menzerna’s Super Finish and a Meguiars polishing pad on the entire car and I’m happy to report that all was well except for the few rock chips on the front bumper. I don’t know why the initial pass of the more aggressive compound did not lift those suckers out but sticking to my tried and true game plan seemed to take care of them in the long run (3 days long).


Detail62_13_15_zps7221a6e3.jpg


Detail12_13_15_zpsf5ec7a52.jpg

* I remove the trim when I spin.

Garage1_zpse07f29d1.jpg


stde3_zpsa926e3a6.jpg

I followed it all up with Pinnacle's Souverän wax.

Good luck and hope this helps!

-Scott
 
Back
Top