Menzerna PF2500 and SF4000 by Hand

waterbeads

New member
Joined
Jan 27, 2014
Messages
17
Reaction score
0
To all the experts, a few days back i got a combo from AutoGeek of Menzerna 2500, 4000 and Power Seal... later i bought a polishing pal with lake Country 4' pads...so now my question is " what combination of pads should i use with the above products in order to correct some minor swirls by hand" my car is a toyota corolla and i will be doing it by hand.do not if it has soft paint or hard paint..i have read a lot about these products but nw i am getting confused..some say 4000 is to be used by machine only and others say 2500 can be used by hand and machine...
what i think im planning to do is using Lake Country 4' Orange pad on polishing pal with 2500 on it and start with 2 x 2 area...over lapping circular motions..after that using Gray pad ill use 4000 to bring the shine to it and later lock it with red pad and power lock... do i have to use 2500 and 4000 both or just 2500?
so now please if some one had written something on the steps to do this combo by hand and which pads to use...i was unable to find it on the forum.any link where mike has written an article on it..confusedFeed back please
 
I think you can use any of them by hand, the level of correction wanted or needed may not be achievable by hand. That being said, same rules apply, start with the least aggressive of the two, see what that gets you and then move up if that does not get you what you wanted. I dont think you will be able to use the LC pads by hand, may be a bit big, but you can try. I would say maybe a micro-fiber applicator pad would be better because you are working by hand.

HUMP
 
some say 4000 is to be used by machine only and others say 2500 can be used by hand and machine...

From my first-hand experience, (no pun intended), all Menzerna compounds and polishes can be used by hand. It requires a LOT more skill to work on a scratch-sensitive clear coat paint system by hand than it does by machine but if you have the drive, energy and patience you can do it.

Just to note... compounds and polishes that can be used successfully by hand means they'll remove defects without leaving their own defects. This is actually a MIGHTY task and I would sat not all, maybe even not most products in the compound and polish category can do this. Menzerna is one that can.

Here's proof...

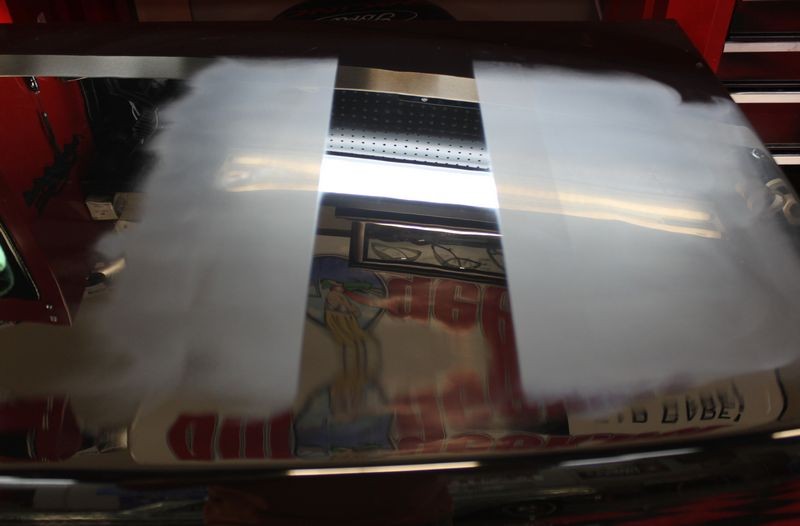
How to remove wetsanding scratches by hand - FG 400


Paint panel machine sanded using #3000 Triazact...

Remove_Sanding_Marks_by_hand_001.jpg


Remove_Sanding_Marks_by_hand_009.jpg


And if a person can remove sanding marks by hand well sanding marks a just a type of below surface defects and this mean you could remove ANY type of below surface defect with enough passion behind the pad...


what i think im planning to do is using
  • Lake Country 4' Orange pad on polishing pal
  • with 2500 on it
  • and start with 2 x 2 area...
  • over lapping circular motions..


Hmm.... good luck with that...

You can't even tackle 2' x 2' section with a Porter Cable as this is too large an area to work so only if you're Hercules the Detailer are you going to remove below surface defects to an area that large by hand. If you did remove all the defects to an area that large by hand you would be to tired to do the rest of the car.

I've rubbed entire cars out by hand and I've been doing this a long time and I'm here to tell you it's not only very muscle intensive it takes more skill than turning a simple tool like a Porter Cable 7424XP on and simply guiding it over the paint.

Instead, take a 16" square microfiber towel and place it on a panel, for example the hood and work an area this size or smaller.

Spread the product out using an overlapping circular motion because the EASIEST way to spread a product out by hand is by using an overlapping circular motion. THEN switch to straight line motions and,

  • Push down firmly, I would even say hard.
  • Move your hand at the speed of light
  • Do this for about 1-2 minutes.
  • Be sure to use enough product to keep plenty of lubrication and abrasives on the surface.
Keep in mind when you're doing this type of AGGRESSIVE work to your car's scratch-sensitive paint you will often remove the defects you were going after but that paint won't look perfect, at least not after the first step. That's where you have to re-polish with a less aggressive product and pad and use a more gentle polishing action with your had.

Removing swirls and scratches mean removing paint and to do this by hand you have to press hard and move your hand fast otherwise the abrasive won't take little bites out of the paint and level it. Make sense?


after that using Gray pad ill use 4000 to bring the shine to it

Good here...


and later lock it with red pad and power lock...

You're good here.


do i have to use 2500 and 4000 both or just 2500?

Depends on what you're trying to do and how good you end up being at working by hand.

If you're trying to remove swirls and scratches you're going to need the more aggressive product. Heck in the article I shared above I'm using the Menzerna FG 400 COMPOUND to remove #3000 grit sanding marks induced by machine. The only thing easier to remove than #3000 grit sanding marks by machine is #5000 grit sanding marks by machine.

(Hand sanding marks are ALWAYS a lot harder to remove than machine sanding marks, I demonstrated this in my wetsanding class at Mobile Tech this year).


Here's what I would recommend...

Test out everything you've described to one small section on the hood or trunk lid of your car, that is map out a section about a foot squared or like I said, the size of a 16" microfiber towel and do all the steps. Polish, re-polish and then seal.

Then inspect the results. See if your happy. Gauge your happiness or un-happiness to how much work you did and how much time you invested. Remember... we didn't make clear coat paints, car manufactures order their paints to their specs from paint manufacturers.

In the OLD DAYS it was very easy to rub out an old single stage lacquer or enamel paint job because this was REAL paint, not hard plastic.

Hang on and I'll dig up the article you should read...

Not trying to scare you from tackling your car by hand but letting you know it's a lot more work than doing it by machine. As long as you don't have show car expectation you should be okay.


:)
 
This one has a lot of detail....


How to use a hand applied abrasive polish or paint cleaner by hand


Fluff....

Priming your pad when working by hand


Something that shows a lot of technique on how to work by hand and also documents the time difference when working by hand versus working by machine. I don't think anyone has ever done any write-up like this before either.


Man versus Machine


In my how-to book for people that are new to machine polishing I recommend only tackling a singe panel their first time. For example buffing out the hood.

This would include,

First day - Thursday or Friday
Washing the car the day before so it's clean and DRY the next morning when you start.


Second day - Saturday starting at 8:00am in the morning

  1. Clay the hood
  2. Tape off any plastic trim.
  3. Compound the paint
  4. Polish the paint
  5. Remove any tape
  6. Seal the paint
  7. Wipe off the wax or sealant
  8. Stand back an admire the results
By the time a newbie does all the steps on a Saturday to just the hood I'll guarantee you it will be noon if they start at 8:00am. Maybe less time if they're focused and fast, maybe longer if they're not.


I'd recommend the same to you for tackling your car by hand.

This way you'll knock out one panel and still have half your day off to do something else, with the wife or girlfriend, kids etc.

This way you won't get burnt out.

You will also have a real good feel for what it's going to take to do the rest of the car.


And please do take a few pictures to share this project with the rest of us.


You can do it! We're here to help...


:dblthumb2:
 
For those that read this thread into the future, if you don't know much about car paint history and specifically about the single stage paints we had pre-1980 and the paint systems we all endure today... here's a primer...


The practical differences between single stage paints and a clear coat paints


I wrote the above back in 2009 and it's still just as accurate today as when I wrote it.

This is the good ol day of rubbing out single stage paint by hand... back when you could actually do it and also enjoy it...


Wayne_Carini_Hudson_Restored_By_Mike_Phillips_015.jpg


Mike_Phillips_Wayne_Carini_03.jpg


Mike_Phillips_Wayne_Carini_006.jpg


Good work out for your arms....


:D
 
Dear Mike..thanks a lot for all detailed explanation for my queries. i certainly will go for 16" as you have mentioned... i am aware of all the muscle power that is required when polishing by hand but i have to do it.no other choice.cant afford a DA right now, quite expensive in my country as its imported by few individuals...
but at the end of the day you can appreciate your hard work and there is no bigger gift for your self then self satisfaction...

one more thing i was wondering after the correction phase (which hopefully i will be successful in doing by my hands) applying a glaze in between the sealant bring some more shine and pop the flakes? i have Chemical Guys Black light and Gloss work glaze..so i am wondering to apply that and then top it with a sealant???

certainly mike i will try to capture this project of mine and try to show every bit of what i have achieved... i cant promise it soon but will certainly be capturing and sharing it with the experts for their advice :)
 
one more thing i was wondering after the correction phase (which hopefully i will be successful in doing by my hands) applying a glaze in between the sealant bring some more shine and pop the flakes?


I'd say "no".

Just use the two Menzerna products and focus on using good technique. Applying a glaze after using Menzerna SF4000 shouldn't add anything or improve any results already created by the Menzerna SF 4000 as it's pretty good to start with.


Break your car up into sections and only tackle a section a day.

Why?

Because as you get tired and you will get tired, your proficiency will fall off...

The goal when working on a clearcoat finish is to remove as many defects as you can as this will make the paint clear so you can see the color underneath the clear layer of paint.


Good luck and have fun...


:dblthumb2:
 
Back
Top