Polishing Principles DVD

AdrenalineJunky

New member
Joined
Sep 18, 2009
Messages
86
Reaction score
0
Just watched the Polishing Principles DVD. Overall it will be helpful for my first time buffing/polishing. I have some questions that the DVD did not seem to answer.

1. Which polisher of the two featured is preferred?

2. Mike talks about using different pads and products depending on what the paint requires. However it seems he only uses the one Scratch remover with the one pad. Will I need to have other products/pads on hand if my test area results are not to my satisfaction?

3. What about buffing/polishing smaller areas around the vehicle? In between molding/decals, etc. What technique should be used?

4. Is there any technique for using the buffer when going over contoured areas or edges?

5. Once the correct pad is chosen, can this single pad be used for the entire vehicle?
 
Hi AdrenalineJunky,

I just finished with a class here today and posting a few pictures from the class...


Pictures and Comments from April 24th Damp Sanding and Machine Polishing Class


Class days are pretty long but before I leave I wanted to try to give you a few nutshell answers...

Just watched the Polishing Principles DVD. Overall it will be helpful for my first time buffing/polishing. I have some questions that the DVD did not seem to answer.

1. Which polisher of the two featured is preferred?

I wrote an article where I ranked all the tools according to their "ease of use", ;you can read the article here,

How to choose the right polisher for your detailing project


I gave the Porter Cable style polishers an ease of use ranking a #1 and the Cyclo a #2 but they are both very easy to use. I don't like to make specific recommendations but I'm sure others will chime in...


2. Mike talks about using different pads and products depending on what the paint requires. However it seems he only uses the one Scratch remover with the one pad. Will I need to have other products/pads on hand if my test area results are not to my satisfaction?

In the video I used

Wolfgang Total Swirl Remover with a light orange cutting pad
Wolfgang Finishing Glaze with a white polishing pad
Wolfgang Deep Gloss Paint Sealant using a black/gray finishing pad

There was a section that went over the chemicals and pads specifically but to shorten the already long video it was edited out.

As for testing products, in order to test a few products you need to have a few products and the products I listed above are a good start as they will tackle most swirls and scratches most people want to remove using good technique.

You an always add more product at a later date if you like...


3. What about buffing/polishing smaller areas around the vehicle? In between molding/decals, etc. What technique should be used?

You can get a Spot Repair Kit which has 4" buffing pads for smaller, hard to reach or thin panels.

CCS Spot Buffs 4 Inch Foam Pad Kit Free Bonus!

Or you can purchase smaller pads by themselves, contact Customer Care at 1-800-869-3011 and then can help you get the pads you need for your car.


4. Is there any technique for using the buffer when going over contoured areas or edges?

A good rule of thumb is to not buff directly on top of hard body lines or edges, instead buff up to them, but not on them. With a DA Polisher it's actually not that risky, the idea of buffing up to them and not on top of them is just a "Best Practice" for any kind of electric polisher.


5. Once the correct pad is chosen, can this single pad be used for the entire vehicle

There's a thread posted in the last day or two that asks the question how many pads are needed to buff out an entire car, maybe some kind forum member can track it down and post the link to it in this thread?

Usually it's a good idea to have at a minimum 2-3 pads for the correction step, 1-2 pads for the polishing step and you should really only need on pad for applying a wax or paint sealant.


Great questions...


:xyxthumbs:
 
Anyone wanting more information on this DVD can find a list of what's on the DVD here,

http://www.autogeekonline.net/forum/new-car-care-products/24852-autogeek-show-car-garage-video.html

AGSCGDVD001.jpg


:)
 
Hi AdrenalineJunky,

I just finished with a class here today and posting a few pictures from the class...


Pictures and Comments from April 24th Damp Sanding and Machine Polishing Class


Class days are pretty long but before I leave I wanted to try to give you a few nutshell answers..
Hey Mike,
Thank you for responding as quickly as you did. I would be interested in attending your class, however unfortunately I'm further than a days drive.


I wrote an article where I ranked all the tools according to their "ease of use", ;you can read the article here,

How to choose the right polisher for your detailing project


I gave the Porter Cable style polishers an ease of use ranking a #1 and the Cyclo a #2 but they are both very easy to use. I don't like to make specific recommendations but I'm sure others will chime in...
Thank you for writing that article, that answered many of my questions. I believe the Porter Cable 7424XP will work best for me.

My biggest concern with choosing a polisher/buffer is safety. I do not want to end up doing more bad than good. I once had a "professional," body-shop owner buff out a truck. He did correct some of the swirl concerns, but also burnt/cracked the paint in various areas. In that case I would've been better off leaving it alone.

From what I've read on this site, the 7424XP, is 100% safe?


In the video I used

Wolfgang Total Swirl Remover with a light orange cutting pad
Wolfgang Finishing Glaze with a white polishing pad
Wolfgang Deep Gloss Paint Sealant using a black/gray finishing pad

There was a section that went over the chemicals and pads specifically but to shorten the already long video it was edited out.

As for testing products, in order to test a few products you need to have a few products and the products I listed above are a good start as they will tackle most swirls and scratches most people want to remove using good technique.

You an always add more product at a later date if you like...
I agree with what you mentioned in the video about using the least aggressive material as possible to achieve the results desired. With that being said, Wolfgang seems to offer only a broad range of strengths. Compared to Pinnacle which I believe has four products to use for correction.

Do some of the brand names offer better control when it comes to increasing strengths than others?


You can get a Spot Repair Kit which has 4" buffing pads for smaller, hard to reach or thin panels.

CCS Spot Buffs 4 Inch Foam Pad Kit Free Bonus!

Or you can purchase smaller pads by themselves, contact Customer Care at 1-800-869-3011 and then can help you get the pads you need for your car.
One of the nice things about your store is that you offer many products. However being a rookie, I find it overwhelming to choose one brand over another when they all seem to claim doing the same thing. I plan on contacting customer care tomorrow, and hope to put together a package that will suit my needs.

Are specific brands higher quality than others and simply the prices reflect this?

Is there a brand that you would recommend over others?


A good rule of thumb is to not buff directly on top of hard body lines or edges, instead buff up to them, but not on them. With a DA Polisher it's actually not that risky, the idea of buffing up to them and not on top of them is just a "Best Practice" for any kind of electric polisher.


There's a thread posted in the last day or two that asks the question how many pads are needed to buff out an entire car, maybe some kind forum member can track it down and post the link to it in this thread?

Usually it's a good idea to have at a minimum 2-3 pads for the correction step, 1-2 pads for the polishing step and you should really only need on pad for applying a wax or paint sealant.


Great questions...


:xyxthumbs:

I hope to correct paint swirls on two daily drivers. 08' VW Jetta (red) and 07' Dodge Ram (orange). This would be my first time attempting to correct swirls on my own and I would like to have all the materials needed to complete each vehicle once I start tackling each. I will be doing this outdoors, which is why I would prefer finishing the vehicle on the same day started.

I have not been able to locate any packages that contain the multiple pads, which you have suggested. Will I need to purchase these separate from a scratch correction package?

Do you have any sort of list that I could use as a guide to making sure I have all of the tools/materials necessary?

Thank you again. It's hard to find a business that has this level of customer support. I look forward to gaining knowledge and buying from AutoGeek. :dblthumb2:
 
From what I've read on this site, the 7424XP, is 100% safe?

Yes, did you see what I did to my hand in this video?

Porter Cable How-To Segment on Two Guy's Garage


:laughing:

Do some of the brand names offer better control when it comes to increasing strengths than others?

Yes, that is some brands offer a wider range of products. When it comes to paint correction there are only 3 products in the Wolfgang Line but they are all very safe and also very effective. You really can't go wrong with any of them and when using a DA Polisher the Wolfgang Total Swirl Remover and Finishing Glaze are both safe and effective.

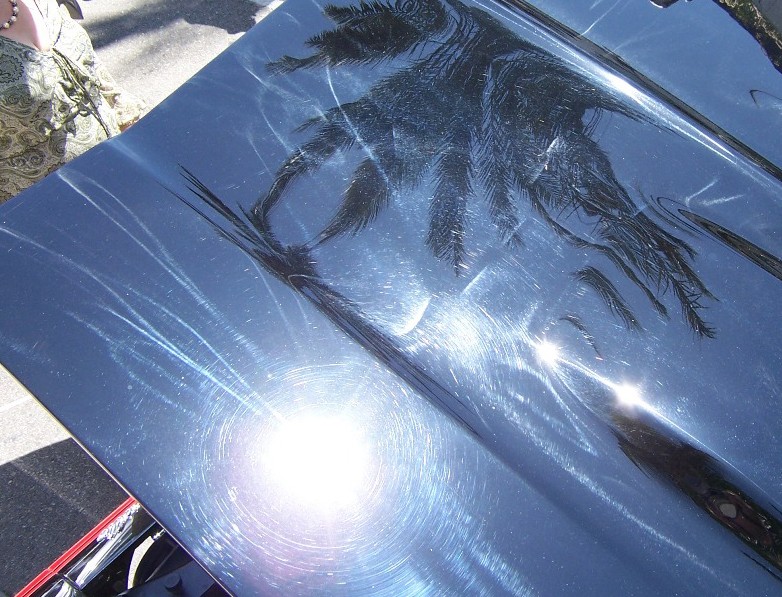
I am supposed to have a black Porsche come by the garage tonight that has light to medium swirls throughout the paint and the owner is older and has never used a machine to polish paint; I'm going to show him how to use the Wolfgang products with the PC 7424XP


:)


One of the nice things about your store is that you offer many products. However being a rookie, I find it overwhelming to choose one brand over another when they all seem to claim doing the same thing. I plan on contacting customer care tomorrow, and hope to put together a package that will suit my needs.

Trying teaching a class on just all the paint polishing products, pads and tool... :D


Are specific brands higher quality than others and simply the prices reflect this?

Everything we care is high quality otherwise we wouldn't carry it...

Is there a brand that you would recommend over others?

Not really, I can take anything off the shelf and make it perform using good technique, so all our products work, personal skill level comes from practice and experience. (You have to do that on your own :) )


I hope to correct paint swirls on two daily drivers. 08' VW Jetta (red) and 07' Dodge Ram (orange). This would be my first time attempting to correct swirls on my own and I would like to have all the materials needed to complete each vehicle once I start tackling each. I will be doing this outdoors, which is why I would prefer finishing the vehicle on the same day started.

I helped a guy yesterday learn how to use a PC to correct the paint on a "show truck", because of the size I recommended to him to only tackle a panel at a time and I recommend this to a lot of people if you really want the paint to come out looking GREAT!

The reason for this is because...

"You can't rush quality"

That is you can't simply move the polisher faster to get done quicker, when it comes to removing swirls you have to move the polisher slowly over the surface.

If you're new to machine polishing then doing all the steps to all the car in one day is a huge undertaking. Just doing the below will take you 4-6 hours.

  • Wash and dry the car
  • Clay the paint
  • Machine clean the hood to remove swirls
  • Machine polish the hood to maximize gloss and clarity
  • Machine or hand wax or seal the hood.
  • Remove the wax or paint sealant
  • Clean up and put your supplies away
Doing a good job of washing and drying the average car will take you up to an hour.

If you have a lot of passion then go for it otherwise maybe just tackle a few panels the first time, like the hood and trunk lid or hood and roof.

I don't' want to see you get burnt out. It's easy to start out all excited but then about 3-4 hours into the correction step, realize how much more work you have to do and then get in a hurry or then get disillusioned with the project.

I have not been able to locate any packages that contain the multiple pads, which you have suggested. Will I need to purchase these separate from a scratch correction package?

If you call Customer Care, they help people doing the same thing you're doing 6 days a week and are very good and making sure you have everything you need.

1-800-869-3011


Do you have any sort of list that I could use as a guide to making sure I have all of the tools/materials necessary?

Not really. I've created a list like this on another forum but it's old and out dated. Customer Care will be helping you with current products and tools.


Thank you again. It's hard to find a business that has this level of customer support. I look forward to gaining knowledge and buying from AutoGeek.

I like doing two things in this industry...

  • Detailing cars
  • Helping others to detail their cars...


Kind of simple, but that's what I like to do. I'm fortunate to have a job that includes doing what I like to do.


:xyxthumbs:
 
Hey Mike,

Here's what I ended up ordering today with the help of Matt. Hope these are products you also would recommend. Thanks again for the help.

MG-PC-1500XP - Meguiars Porter Cable XP Ultra Polish K
1 PAD-TOOL - Foam Pad Conditioning Brush
1 DP-730 - DP Polishing Pad Rejuvenator
1 BR-800-2200-0 - Brinkmann Maxfire Dual Xenon Rechargea
1 DP-360 - DP Poli-Coat Paint Sealant
1 DJ-SNYM1PC - Dodo Juice Supernatural Wash Mitt "Yeti'
1 DP-368 - 32 oz. DP Final Gloss Quick Detailer w/Spraye
 
The salesmen who helped me with my order was very knowledgeable and did a good job. However after studying your compound chart I question jumping into using the Meguiars Mirror Glaze #205 Ultra Finishing Polish. Based on the chart it is the most aggressive product Meguiars offers.

Perhaps I may need the strength available from the #205. However you have taught me to slowly move my way up as needed. Less=better.

Do I need to order other less aggressive compounds?


I meant to say the M105. Should I have something in between?

From the sound of the condition of your car's finish then go with the Wolfgang Total Swirl Remover, easy to use, works great, wipes off easy and proven winner for removing swirls and leaving behind an LSP ready surface for most people or further refine with a less aggressive product.

I have some Porsche pictures to post that was de-swirled using the Wolfgang Twins and the results are phenomenal. Cool thing is this was the FIRST time this guy ever buffed out a car by machine.


:xyxthumbs:

:buffing: I received my order today. I had to place a separate order for the Wolfgang Total Swirl Remover, so I'll have to wait for that to arrive before I tackle my vehicles.

I have a black craftsman tool box that has terrible scratches of various levels, so I figure this would be great for a first time practice run. Now I believe it is a powedercoat finish, black gloss. I could be wrong, but the point is I don't think it has a clear coat like my vehicles will have. After using the M105, the once orange pad was black. I assume this is normal for this type of finish. I then proceeded with the M205 and finished up with the DP finishing glaze. The results were noticeable, and the finish was restored to a smooth shiny finish. The scratches including some of the swirl/scratches were not 100% gone. I did about 5-6 passes with each compound at speeds of 5 and 4.5.


Auto Questions:

I see now the M205 is quite aggressive, will it remove clear coat on my autos finish as quickly?


Lets say I had the Wolfgang Total Swirl Remover only. After 6 passes the results were not enough to correct the swirls. If I were to continue making passes would I eventually achieve better results? Or, would a more aggressive compound be required?

Thanks:dblthumb2:
 
Now I believe it is a powedercoat finish, black gloss. I could be wrong, but the point is I don't think it has a clear coat like my vehicles will have. After using the M105, the once orange pad was black. I assume this is normal for this type of finish. I then proceeded with the M205 and finished up with the DP finishing glaze. The results were noticeable, and the finish was restored to a smooth shiny finish. The scratches including some of the swirl/scratches were not 100% gone. I did about 5-6 passes with each compound at speeds of 5 and 4.5.

From my experience, powder coatings don't polish well and they tend to be very hard, if you're seeing a lot of black paint and the scratches are coming out easy then it's probably some kind of enamel. Just a guess...

Pictures!


Auto Questions:

I see now the M205 is quite aggressive, will it remove clear coat on my autos finish as quickly?

No and no.

M205 is not aggressive at all, compared to other swirl mark removers it's very gentle. If that tool box is single stage black enamel then it's really soft and that's why you're seeing lots of black paint on your pad... see my article,

The Lesson White Paint Teaches Us


It touches on the topic of paint hardness as affected by pigment type...
(I see portions of this article posted all the time with no reference to the author)

Lets say I had the Wolfgang Total Swirl Remover only. After 6 passes the results were not enough to correct the swirls.

If I were to continue making passes would I eventually achieve better results? Or, would a more aggressive compound be required?

Theoretically if an abrasive polish can remove a little paint then applying it over and over again will remove more and more paint and eventually get you to where you want to be as it relates to removing swirls.


Anytime you see me write the below, (usually in the context of doing a Test Spot)

If the current swirl mark remover isn't getting the job done fast enough or effectively enough then you will need a more aggressive product.

Like posted here yesterday,

http://www.autogeekonline.net/forum/show-n-shine/25224-test-spot-my-new-polisher-newbie.html


Note the bold and italic words and gauge this criteria to your expectations.

Do some test spots... you're on your way!


:xyxthumbs:
 
These are attempts at before pictures of the 07' Dodge Ram 1500. The truck was recently spray washed, perhaps with a quality hand wash the pictures would show the true condition of the paint. In many areas spider webbing can be found. Believe it or not these pictures were taken in the worst areas. Even using the Brinkman did not improve viewing conditions for the photos. Is there a trick for this type of paint?

IMG_0449.jpg


IMG_0450.jpg


IMG_0451.jpg


IMG_0452.jpg


IMG_0456.jpg


IMG_0459.jpg


IMG_0460.jpg


IMG_0462.jpg


IMG_0464.jpg
 
Overhead bright sunlight works the best and then you want to take a picture of a horizontal surface, like the hood or roof. In your case you would need a sunny day and then you would have to get on a step ladder for the hood or jump into the back of the truck for the roof.

You can capture swirls on the side of a vehicle buy you need the sun lower in the sky, either early in the day or in the afternoon.

I captured these swirls while riding in a Taxi Cab in Vegas at SEMA this last year... the bright light in the corner of this picture is the sun...

Rotary Buffer Swirls or Holograms or Buffer Trails
rotarybufferswirlssema20092.jpg


The bright light on the hood of this BMW is the sun...

Cobweb Swirls also called Spider Web Swirls or Scratches
bmwcobwebswirls.jpg


The bright light on the hood of this car is the sun...

Rotary Buffer Swirls or Holograms or Buffer Trails
69ss4.jpg


The bright light on the side of this van is the sun...

Rotary Buffer Swirls or Holograms or Buffer Trails
HologramsInVan01.jpg
 
Hey Mike,

I made a second attempt on the photos. These represent the paints true condition. Do you think I have enough products to correct my concerns on the truck? Now that I have done this, I suppose it would've been better to show pics, get tips/instructions and then order the materials. If you don't mind looking, I made two new threads for each of the vehicles I mentioned.

http://www.autogeekonline.net/forum/show-n-shine/25342-08-vw-jetta.html

http://www.autogeekonline.net/forum/show-n-shine/25343-07-dodge-ram.html#post314295
 
Hi Mike,

I finished my first buffing project, being my John Deere Tractor. Overall I am satisfied with the results, considering it is a working tractor. However I was unable to correct 100% of the spider-webbing. (I Think I linked you my other thread for that?)

Now that I've completed my first project I have questions for the teacher.

1. I tried applying compound just like you taught in the DVD. "X" or in a circle. I'm not sure if I am beginning each section properly. I tried turning the DA on once it is on the paint, but it doesn't seem to spread as nicley as I think it should. I tried blotting the pads with the DA off and then turning it on, but this resulted in splatter. I know you went over this in the DVD, but I'm missing something.

2. Specifically on this tractor, there were many hard to access areas. The marjority of the panels were all contoured.

3. Specifically around the lights I had an issue with compound building up, in between he edge of the lens and the edge of the body panel.

4. I was able to fit this into my garage, out of the sun. The M105 & M205 was extremely difficult to remove. I had to use some DP clay lub spray to assist in removal. (Used the provided McGuire microfiber towels)

5. When should I be cleaning the pad with the brush?

6. What is the proper technique in using the cleaning brush?

7. When should each pad be replaced? (I only used one pad for each of the three steps I used)

8. How much of the DP sealant should I be applying on the pad?

9. How many passes should I be making when applying the sealant?

Thank you,
Mike
 
1 - Are you spreading it on a low setting? Speed 3 or 4? You should only apply that much product on a fresh pad and after cleaning. But on subsequent section passes, a pea-size dot on each side or in the middle would suffice.

2 - DAs would stop at non-flat areas. It's either you get the 4" pads for those, or you do it by hand.

3 - That's why it's important to tape the edges and areas you do not wish compound/polish/wax to creep into.

4 - I personally do not use a QD when polishing. I use water to reactivate and re-lubricate the section i'm working on. If it's difficult to remove, it means you have been either dry buffing or you're trying to remove marring.

5 - I usually clean mine before moving to a new panel or when the DA starts to bog down (this happens when the pad is caked up).

6 - I'm not sure how the conditioning brush is used, i only use a mother's nylon brush i have. I would just brush it from the middle towards the end while slowly turning the pad around.

7 - I usually use 2-3 pads per compound/polish and 1 for wax/sealant. It should be replaced when it has absorbed too much product and you are no longer getting the same correction - even after cleaning it.

8 - You don't need much when applying any type or brand of sealant/wax. A pea sized drop is all you need. You'll only be adding the same amount when needed.

9 - Just one pass is fine. Multiple thin applications is better than one thick coat.

Suggestion - It's easier to apply it thinly by hand. :)
 
When I was applying the final compound (DP sealant) I used a 5.5" Inch Red Soft Wax pad. The pad seemed to soak up the sealant, to where it was hardly leaving a layer of wax behind.

I'm attempting to clean this pad, but the wax is retaining in the pad. It definitely seems I used way too much. Any ideas what's going on here?

How do I clean this pad?
 
Yeah, the red ones are super soft and will absorb a lot of product. True, that is a good indication that the sealant is an excellent quality product when you are having a hard time removing it. I still have the xmt pad cleaner that came with my kit, but to be honest, i haven't used it much. I find the dishwashing liquid better at removing dried up wax or polish or whatnot.

Here's what i do - i brush it dry, then i take some dishwashing liquid and pour some on a container with water, give the water mixture a few whirls and throw it in there for 15mins. i return back, brush it again until all of the stains gone. But take caution on the soft pads, such as the red ones, you do not want to apply much force in brushing and cleaning it, you don't want to tear the foam. I dip, brush, then gently squeeze. I also tried detergents, but it's way faster to clean with dishwashing liquid. Others will surely chime in. That's just what works for me and i'm merely sharing. :) cheers!
 
Back
Top