problem polishing with Wolfgang products

robert1955

New member
Joined
Feb 19, 2011
Messages
66
Reaction score
0
Problem polishing with Wolfgang products


I am not quick sure it is me or the products. I did leave the same message for Michael Phillips who's instruction book I have read four times till I know it in my head. I should be able to do this since my experience level is not a beginer.

My wife's Mercedes-Benz 1992 300-E class o40 single stage black had some panels painted by my body shop
Beverly coach Craft in West Los Angeles. the trunk and hood are now 2 stage with a clear.

I am prepping my pads I choose a soft blue one because the severity of the swirl marks hidden by the glaze were staring to show up and I also wanted a good coat of Wolf Gang fusion wax to protect the car.. I did order a band new Cover craft out door car cover to protect the paint in inclement weather. should have it this week.

anyway I prepared the pad with Wolf Gang 3.0 swirl remover just like the book recommends. Made my six passes and jumped up the speed from 4 to 5 on my Porter Cable . took a clean plush microfiber pad folded 4 times to wipe the residue off . I found this very hard to remove. In the demonstration videos it should wipe off easily Right.

then I applied Wolf Gang 3.0 glaze with a clean pad same soft pad same problem. I found thee wax just as difficult to remove.

Can someone comment on what I might be doing wrong?
Sincerely

Bob Geco
 
If you are using a blue pad with the WG TSR 3.0 that is wrong pad unless it is a cyan hydro-tech pad. You probably want to use a orange pad or possibly a white one.

It should wipe off relatively easy if you do it immediately after polishing a small area. If not, you may be using too much product on the pad. Try using less. You can also use a 10% IPA solution to assist with removing or most Quick Retailers work well like Optimum No Rinse.

Make sure you don't use pressure with MF as it could cause marring/scratches. I also find that short nap microfiber towels remove wax/polish easier than the long nap ones.

http://www.autogeekonline.net/forum...ow-mix-ipa-inspecting-correction-results.html
 
OK I will try a white micro Fiber pad I purchased as selection of polishing pads for my Porter Cable from Auto Geek. But should not there require any assistance as in using 10%IPA to wipe off the residue? I read Michael's instructions to the T. I am not over loading the pad with product. I am going to try some side panels like doors as they are factory base.coat. Would like to know had I purchased works. I though I was purchasing a high end product.
Bob Geco
Relearning is the key to life
 
Maybe these videos will help:

[ame=http://www.youtube.com/watch?v=zUHRnHsSXZU]Part 1 - How to remove swirls, scratches and water spots using a Porter Cable 7424XP Polisher - YouTube[/video]

[ame=http://www.youtube.com/watch?v=fxwlWijdIxM]Part 2 - How to remove swirls, scratches and water spots using a Porter Cable 7424XP Polisher - YouTube[/video]
 
IMy wife's Mercedes-Benz 1992 300-E class o40 single stage black had some panels painted by my body shop

Beverly coach Craft in West Los Angeles. the trunk and hood are now 2 stage with a clear.

Hmm.... you're going to want to make sure the single stage paint is polished to the max to match the new bc/cc paint around it.

A while back Robert and I polished out a 1959 Cadillac that had ONE fender re-painted using basecoat/clearcoat paint while the rest of the body panels were single stage paint.

The new fender was clear and shiny since it was brand new paint while the single stage paint on the rest of the car had oxidized, so it was very obvious that while the car was all the same color it didn't look the same till after we removed the oxidation and restored clarity and gloss the the single stage paint.

1959CadillacExtremeMakeover014.jpg


I am prepping my pads I choose a soft blue one because the severity of the swirl marks hidden by the glaze were staring to show up

Like toycar18 stated, if the "blue" pad is a Hydro-Tech then that's the right pad. IF the blue pad is any type of open cell foam pad, like a flat pad or a CCS pad, then it's too soft to work with the diminishing abrasives in the Total Swirl Remover to remove swirls. In order to help you we need you to be more specific as to the "type" of pad you're using.


Made my six passes and jumped up the speed from 4 to 5 on my Porter Cable .

Just to clarify, when first starting out you spread the product out over the area you're going to buff like shown in the video Shawn posted and then you turn the speed up to the 6 setting and start making your "Section Passes".

On the PC you really need to be on the 6 setting to remove swirls. You want to see the pad rotating while you're applying around 15 pounds of downward pressure and the pad is going to rotate better on the highest speed setting, not the 4-5.


took a clean plush microfiber pad folded 4 times to wipe the residue off . I found this very hard to remove. In the demonstration videos it should wipe off easily Right.

Yep, it's alway easy for me.

Here's a tip...
ANYTIME a product is hard to wipe off, try taking smaller bites or swipes with each pass you make instead of trying to take huge chunks of residue off at once. By only trying to remove a little bit of residue your microfiber towel has more leverage over the residue. When you try to take off too much the grip the residue has on the paint has more leverage over you and your microfiber towel.


then I applied Wolf Gang 3.0 glaze with a clean pad same soft pad same problem. I found thee wax just as difficult to remove.

Sounds like the wrong pad for the glaze too... it would be the right pad for the wax though but we're all assuming which pad you're using because there's more than one type of "blue" pad on the market.

Read through my trouble shooting guide, it lists the most common mistakes and the remedies...

:xyxthumbs:
 
DA Polisher Trouble Shooting Guide


When you're first starting out machine polishing and learning to use a DA Polisher it's common to have questions about your results and your results are directly tied to your technique.

Here's a list of the most common problems,

1. Trying to work too large of an area at one time.

2. Moving the polisher too fast over the surface.

3. Using too low of speed setting for removing swirls.

4. Using too little downward pressure on the head of the polisher.

5. Using too much downward pressure on the head of the polisher so the pad quits rotating.

6. Not holding the polisher in a way to keep the pad flat while working your compound or polish.

7. Using too much product or using too little product.

8. Not cleaning the pad often enough.


Here's a list of the solutions in matching order,

1. Trying to work too large of an area at one time.
Shrink the size of your work area down. You can't tackle to large of an area at one time. The average size work area should be around 20" by 20". Most generic recommendations say to work an area 2' by 2' but for the correction step, that's too large. You have to do some experimenting, (called a Test Spot), to find out how easy or how hard the defects are coming out of your car's paint system and then adjust your work area to the results of your Test Spot. The harder the paint the smaller the area you want to work.


2. Moving the polisher too fast over the surface.
For removing defects out of the paint you want to use what we call a Slow Arm Speed. It's easy and actually natural for most people new to machine polishing to move the polisher quickly over the paint but that's the wrong technique. One reason I think people move the polisher too quickly over the paint is because they hear the sound of the motor spinning fast and this has psychological effect which causes them to match their arm movement to the perceived fast speed of the polisher's motor.

Another reason people move the polisher too quickly over the paint is because they think like this,

"If I move the polisher quickly, I'll get done faster"

But it doesn't work that way. Anytime you're trying to remove swirls, scratches, water spots or oxidation using a DA Polisher you need to move the polisher s-l-o-w-l-y over the paint.


3. Using too low of speed setting for removing swirls.
When first starting out many people are scared of burning or swirling their paint, so they take the safe route of running the polisher at too low of a speed setting but this won't work. The action of the polisher is already g-e-n-t-l-e, you need the speed and specifically the pad oscillating and rotating over the paint as well as the combination of time, (slow arm speed), together with the abrasives, the pad aggressiveness, and the downward pressure to remove small particles of paint which is how your remove below surface defects like swirls or scratches.

Removing below surface defects is a leveling process where you need the abrasives to take little bites out of the paint and to get the abrasives to take these little bites with a tool that uses a Free Floating Spindle Bearing Assembly you need all of the above factors working for you including a high speed setting.


4. Using too little downward pressure on the head of the polisher.
For the same reason as stated in #3, people are scared, or perhaps a better word is apprehensive, to apply too much downward pressure to the polisher and the result of too little pressure is no paint is removed thus no swirls are removed.


5. Using too much downward pressure on the head of the polisher so the pad quits rotating.
If you push too hard you will slow down the rotating movement of the pad and the abrasives won't be effectively worked against the paint. You need to apply firm pressure to engage the abrasives against the paint but no so much that the pad is barely rotating. This is where it's a good idea to use a permanent black marker to make a mark on the back of your backing plate so your eyes can easily see if the pad is rotating or not and this will help you to adjust your downward pressure accordingly.

Correct technique means finding a balance of applying enough downward pressure to remove defects but not too much downward pressure as to stop the rotating movement of the pad.

This balance is affected by a lot of factors like the lubricity of the product you're using, some compounds and polishes provide more lubrication than others and this makes it easier to maintain pad rotation under pressure.

Another factor that can affect pad rotation are raised body lines, edges and curved surfaces as anytime you have uneven pressure on just a portion of the face of the pad it can slow or stop pad rotation. This is where experience comes into play and experience comes from time spent behind the polisher.


6. Not holding the polisher in a way to keep the pad flat while working your compound or polish.
Applying pressure in such a way as to put too much pressure to one edge of the pad will cause it to stop rotating and thus decrease abrading ability.


7. Using too much product or using too little product.
Too much product hyper-lubricates the surface and the result is that abrasives won't effectively bite into the paint but instead will tend to skim over the surface. Overusing product will also accelerate pad saturation as well increase the potential for slinging splatter onto adjacent panels.

Too little product will means too little lubrication and this can interfere with pad rotation.

Again there needs to be a balance between too much product and too little product and finding this balance comes from reading articles like this one, watching videos an most important, going out into the garage and putting in time behind the polisher and as you're buffing with specific product and pad combinations, pay attention to pad rotation.


8. Not cleaning the pad often enough.
Most people simply don't clean their pad often enough to maximize the effectiveness of their DA Polisher. Anytime you're abrading the paint you have two things building up on the face of your buffing pad,
  • Removed paint
  • Spent product

As these to things build up on the face of the pad they become gummy and this has a negative affect on pad rotating plus makes wiping the leftover residue on the paint more difficult. To maintain good pad rotation you want to clean your pad often and always wipe-off any leftover product residue off the paint after working a section. Never add fresh product to your pad and work a section that still has leftover product residue on it.


Pad Cleaning Articles

Why it's important to clean your pads often...

How to clean your foam pad on the fly

How to use the Grit Guard Universal Pad Washer

buffing.gif
 
Michael:
I see I used the wrong pad , speed and technique. Because my car is very nice can I use the white pad for swirl removal. So speed 5 and 6 is the the recommended speed to remove theses critters from my black car, with slow arm movement at 15 pounds pressure then let up. Can I use if a white foam pad works on a test spot 20x20 can I use a new white pad for the WolfGang glaze 3.0.?

I guess I got confused. by the way I had a problem wiping of the Wolfgang Fusion was . Is this a hard wax virus a soft wax. I use new plush micro fiber pads and do not cross contaminate them while working on my car. They are folded to use in eight clean areas, very surgical. I have an industrial washing machine and drier in my garage Sold my blue portable lift to Richard Linn Some times it hard to lay on the ground to get the lower panes. I use a Snap-on stools to wheel around for the doors and anything I can reach.
My plan is to apply the Wolfgang sealant after the polishing work the go back the next day or so and apply the Wolfgang fusion wax. I want to blind people looking at my car, no really the goal is to have it as perfect as possible.

I wish I could attend one of your classes it different when the instructor is there to guide you.
Happy and safe New Year .
Bob Geco
 
Hi Bob,

Trying to select the correct pad and product combination can be a confusing and arduous task.

Foam Pads

Compounding

Compounds or aggressive products are generally used on firmer pads, Yellow, Orange, Green, and White.

Polishing

The White pad is one of those pads that can be used with some compounds but if generally relegated to Polishing.

Sealants & Waxes

Blue and Red foam pads work nicely for applying sealants and waxes.

Swirls, scratches, and surface defects


Wolfgang Total Swirl Remover 3.0
is at home with the more aggressive pads like Yellow, Orange, and Green. It's great for removing 2000 grit sanding and swirl marks and in general finishes out pretty well.

Wolfgang Finishing Glaze 3.0 is a finishing polish and when used with a White and Gray foam pad beautifully removes 2500 grit sanding and swirl marks to a superb glossy finish.

Pad Sizes

On the Porter Cable 7424 style machine the 5 1/2" pads really bring these polishers to life. Moderate pressure is needed to ensure that the backing plate and foam pad continue to rotate. also, if no one's mentioned it place a heavy black line on the edge of the pad so you can see whether or not it's rotating and adjust your pressure from there.

Here's some great information that will help you if you need it.

[FONT=&quot][/FONT]
Slow and consistent arm movement ensure uniformity but also allow enough time for the product and pad combination to do what it's designed to do..:props:

Happy New Year Bob!! :dblthumb2:
 
Michael:
I see I used the wrong pad , speed and technique. Because my car is very nice can I use the white pad for swirl removal. So speed 5 and 6 is the the recommended speed to remove theses critters from my black car, with slow arm movement at 15 pounds pressure then let up. Can I use if a white foam pad works on a test spot 20x20 can I use a new white pad for the WolfGang glaze 3.0.?

I guess I got confused. by the way I had a problem wiping of the Wolfgang Fusion was . Is this a hard wax virus a soft wax. I use new plush micro fiber pads and do not cross contaminate them while working on my car. They are folded to use in eight clean areas, very surgical. I have an industrial washing machine and drier in my garage Sold my blue portable lift to Richard Linn Some times it hard to lay on the ground to get the lower panes. I use a Snap-on stools to wheel around for the doors and anything I can reach.
My plan is to apply the Wolfgang sealant after the polishing work the go back the next day or so and apply the Wolfgang fusion wax. I want to blind people looking at my car, no really the goal is to have it as perfect as possible.

I wish I could attend one of your classes it different when the instructor is there to guide you.
Happy and safe New Year .
Bob Geco

You can try a white pad but it may not work or you will spend way more time than if you used an orange pad. If you don't get the results you want with the white pad change it to an orange pad and test it.

I thought I could get the results I wanted on my 98 Toyota Tacoma with TSR 3.0 but no luck. I went with a yellow pad and a compound followed by a polish. You may have just do some testing before you find the magic pad/polish combo
 
Michael:
I see I used the wrong pad , speed and technique.

Because my car is very nice can I use the white pad for swirl removal.


Doesn't matter if your car, truck, s.u.v. or "Special Interest Vehicle" is nice.

What matters first are,

  • How deep the defects "in" the paint are
  • How hard or soft the paint is


You can have a really nice car with shallow defects but very hard paint and it don't matter how nice your car is it's still going to take some work to remove the swirl along with a cutting pad and a true compound.

This is why doing some test or what I've always called a Test Spot is so important.

You dial in a process that works to one small area and when you prove the process works to the one small area to your satisfaction in theory if you simply repeat that process to the rest of the car you'll get the same results.

Then after repeating the process to the rest of the car after the final wipe you should have a show car finish or whatever level of finish you made as you're goal.

Both the Test Spot and "Choosing your Goal" are covered in my how-to book.


Process = Pad, product, tool and technique


Sometimes you can have the right pad, product and tool but need to tweak your technique... In cases like these, posting your process and your specific technique will usually enable the forum community to help you make the changes necessary to reach your goal.


As for attending a class, my next one is coming up at the end of this month, get a plane ticket and head on out. You also have Meguiar's in Irvine, California and Michael Stoops who took my place and continues to teach the 101 and Advanced 102 classes at Meguiar's corporate offices.


You can read the forum and watch videos but nothing takes the place of hands-on training and watching and listening to someone show you how to do a specific function in person.

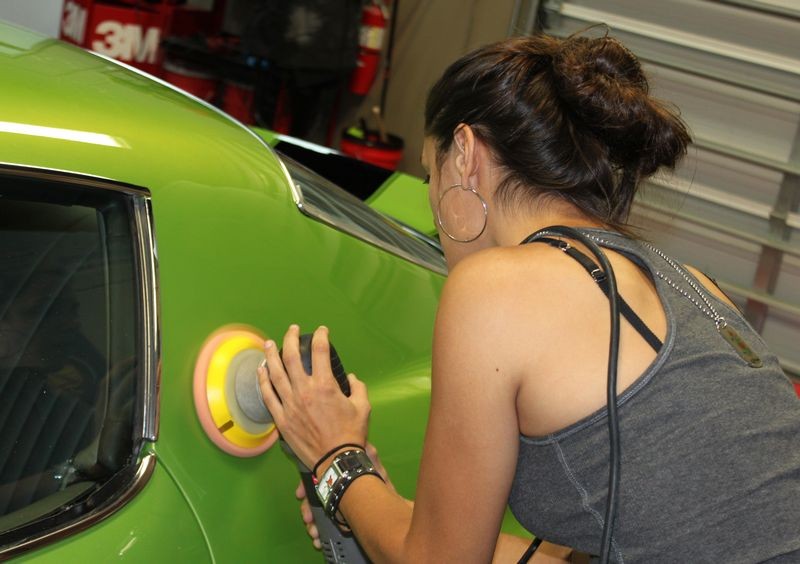
A little hands-on training...
1970Camaro005.jpg


Solo after about a minute....
1970Camaro006.jpg
 
If you are really scared about damaging the vehicle go to a junk hard and get a cheap hood, body panel, etc that is painted.

Then you can practice until you get the results you want. The exact formula may not transfer over but you will have the basic concepts and can try different pad/polish combos that get the job done.

Or go to Mike's Detailing Camp and learn hands on!!
 
Back
Top