Mike Phillips
Active member
- Dec 5, 2022
- 51,004
- 6
Restore Back Plastic Window - 1966 Ferrari Convertible by Mike Phillips

I don't get asked to fix flexible convertible windows this old very often but I do get asked once in a while. The owner of his 1966 Ferrari originally brought it to me for paint correction and waxing, yes waxing, not ceramic coating. I know the entire world mindset is engulfed in paint coatings but don't fall into that trap. Coatings are GREAT but that doesn't mean they should be used on each and every single car buzzing down the roads on Planet Earth.
Back to my how-to article. I don't get asked to this type of work very often but after inspecting the car I couldn't help but notice the flexible clear plastic back window in the original convertible top was in horrible condition.
Let's do the math....
2020 -1966 = 54 years old
We're just a few days away from the start of the year 2021 but I did the work this year thus the reason I'm using 2020 for my equation. The year I detailed this car the car and everything on it and in it was 54 years old. That's pretty old in convertible top years, kind of like Dog Years except completely different.
No promises
One of the first things every new detailer needs to learn is to under-promise and over-deliver, or at least try to over-deliver. Sometimes it's simply not possible. Some things simply cannot be fixed no matter what brand of goo you use. Such is the case with the clear, or what used-to-be-clear, flexible convertible plastic window in the top on this old European 2-door job. Plastic, like so many other materials used to build a car, oxidizes and becomes dull. And over time it also yellows. Now if the yellowing were limited to the outer surface then "sure", it could be fixed or mostly fixed. But for flexible clear plastic of this vintage, the yellowing was throughout the matrix of the film of plastic. Thus no amount of cleaning and polishing is going to turn yellow plastic "inside" this film of plastic clear. Doesn't matter how good you are or what brand of polisher you use - it's just one of those things that is past the point of no return simply due to age. I'm sure some that are reading this have in their lives old, antique vintage plastic that has yellowed with time.
That said, I'm still going to give it my best shot...
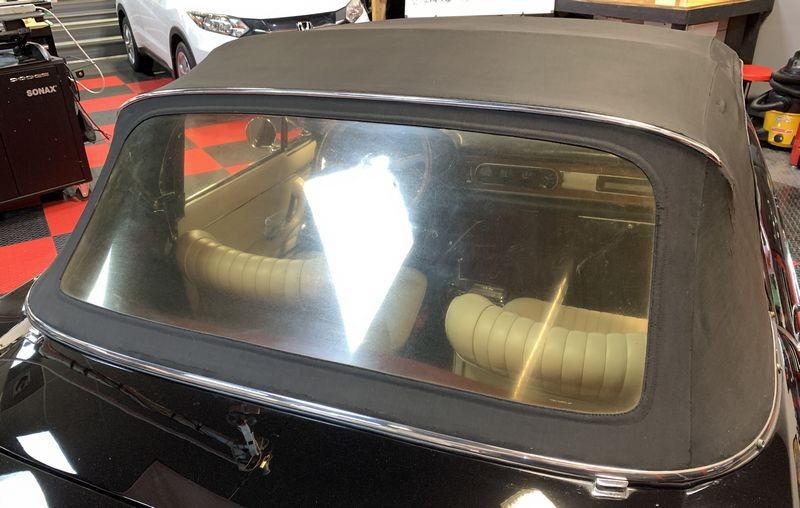
Starting point
Here's how the window looks before any cleaning and polishing. Also note the ancient fabric top. I'm going to detail the antique canvas top but the correct order when doing this type of work is to start with the plastic window and then proceed to the top.
Sense of touch
Those of you reading this just have to trust me on this - after wiping the plastic window clean, the surface of the plastic felt ROUGH. Rough like sandpaper. It should feel smooth.
Anyone want to guess why old, antique plastic would feel rough?
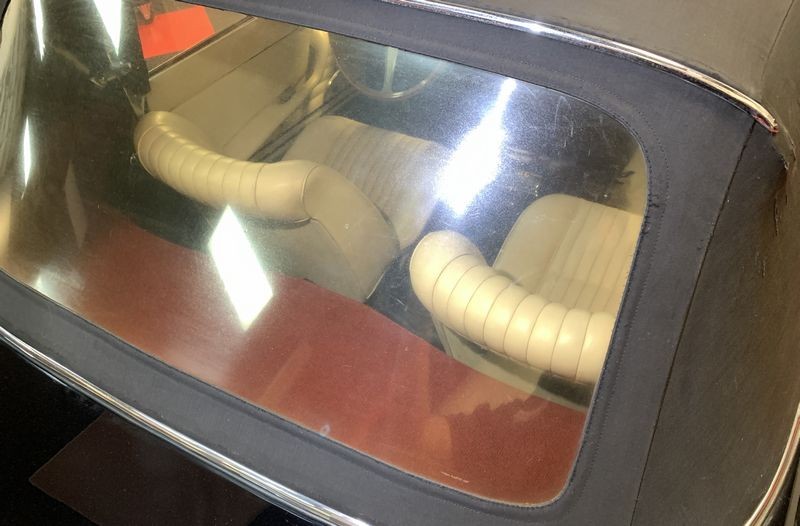
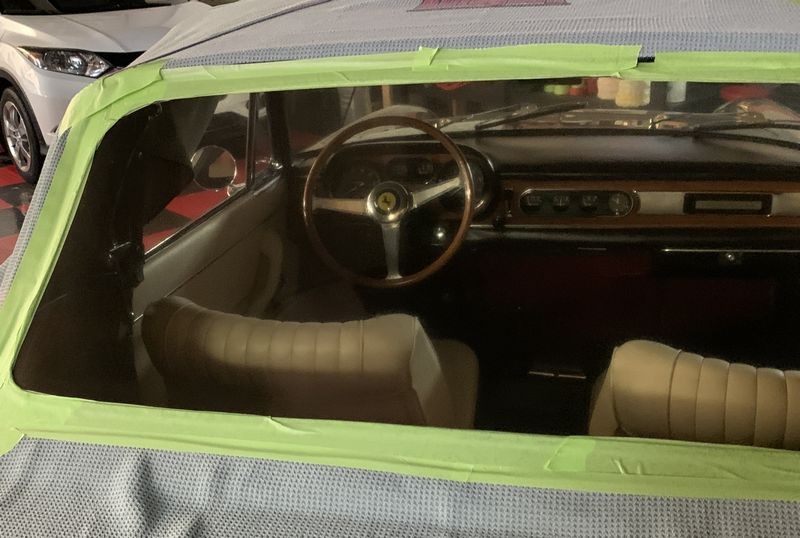
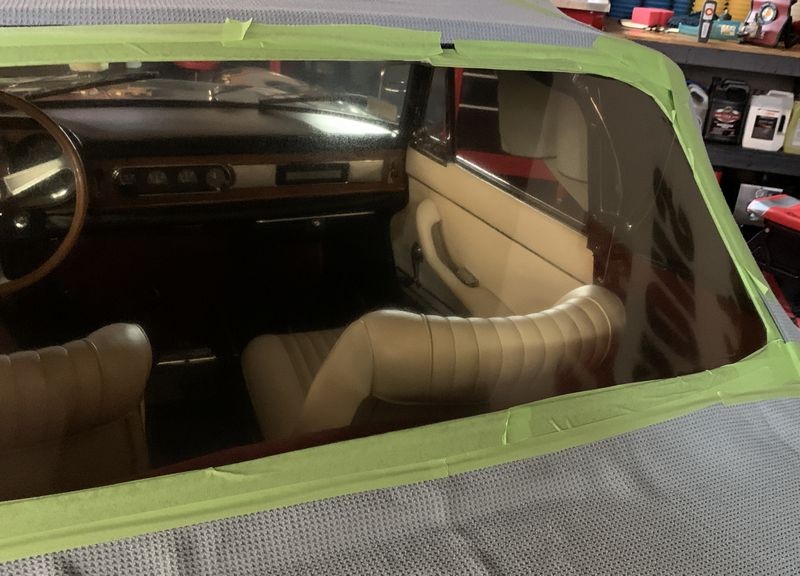
The seats inside the car are WHITE - but looking through the plastic window - they look yellowish, even brownish....

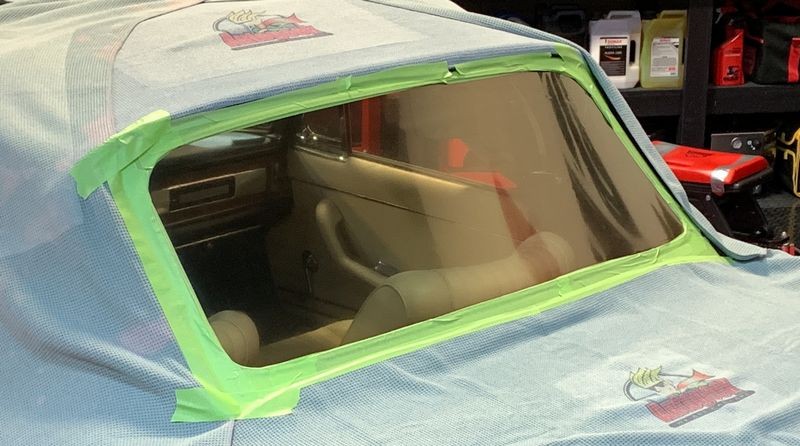
Dots or Pin Holes
Something else that's hard to explain is how the entire back window looks like it has tiny dots or tiny pin holes in it?

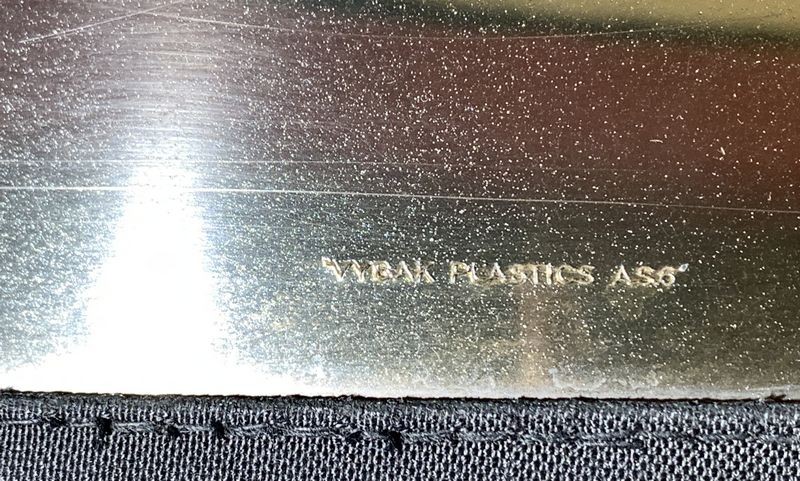
Close-up
You can see the dots or pin holes I'm talking about in this close-up of the brand for the plastic in the rear corner of the window. As you photography students would know, because the camera can focus on the writing as well as the fabric, the dots also come into focus.
I used Skynet and searched for VYBAK Plastics AS6 and found this - The Nolan Group
An ounce of prevention is worth 100 pounds of cure
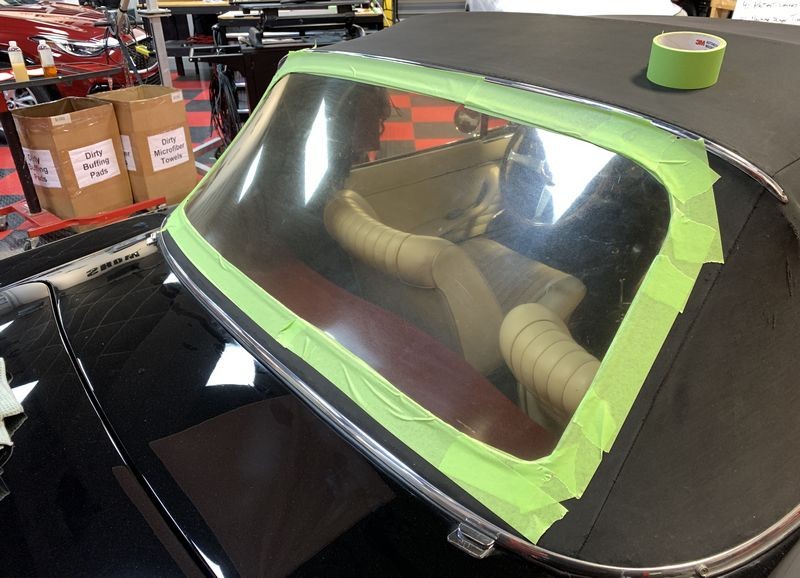
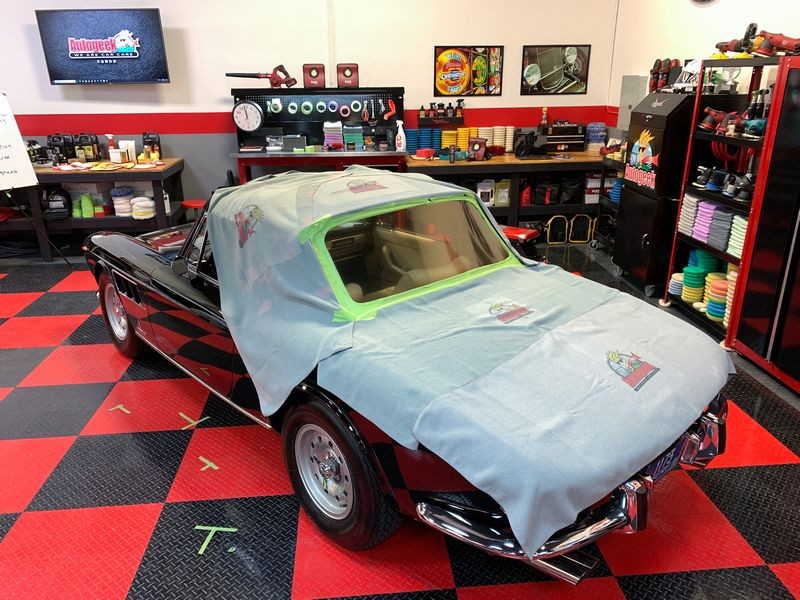
After first cleaning the canvas top and the back window, next up - and this is SO VERY IMPORTANT - I taped off all the canvas surrounding the plastic window. Does anyone know why from experience?

The Autogeek Cover-up Towel
Been here at Autogeek going on 11 years and have shared with you folks the Autogeek Cover-up Towel over all these years. Some of you agree with me and get some, some of you don't and either use an old beach towel, bed sheet or drop cloth or worse, waste time cleaning up splatter dots all over the place.
I'm lazy by nature but when it comes to this type of work I'm very, very, VERY meticulous.
DONE.
Sorry, no pictures of me doing the work but I was the only guy in the garage and it didn't buff itself out.

Not perfect but so much better....
Here's what I used...
Besides the 3M Painter's Tape and the Autogeek Cover-up Towels, I used Meguiar's PlastX to machine polish the plastic and then after wiping off all the plastic residue, I massaged in some 303 Aerospace Protectant. I think most people think that 303 Aerospace Protectant is for things like a vinyl top and it is - but it can also be used to clarify and maintain clear plastic windows.

A few comments....
Rough Feel
The plastic surface had a very rough feel to it after cleaning first with a microfiber towel and some SONAX Glass Cleaner. It felt rough like paint feels rough when it's been neglected for years and even decades. Machine polishing removed the roughness and restored a very smooth-to-the-touch feel to it.
Swirls and Scratches
It's very common for clear, flexible plastic windows to become filled with swirls and scratches. I believe, (not think but believe based upon experience), that part of the problem is car owners simply are not educated enough about this plastic material to know,
That it. That's in in a nutshell. And that's why most convertible with flexible clear plastic windows look all scratched-up, cloudy and hard to see through. :laughing:
Yellowed over time
Nothing much can be done about the yellowing of the plastic over time. My guess is NEW and MODERN formulas for these types of textiles have come a long way since 1966 and modern clear, flexible plastic windows are a LOT LESS PRONE to yellowing even with very little care on the part of the car owner.
Moving forward
This is a garage queen. It was owned by George Harrison of the Fab 4 Fame. It will always be a garage queen and also a show car as it has in the past and will in the future be displayed at high-end car shows. As such, there's really nothing for the current owner and future owners to do except whenever it is to be "touched" a clean, UNCONTAMINATED microfiber towels should be used and a safe product like 303 Aerospace Protectant. I'll include a link about the importance of inspecting your microfiber towels below.
For those that find this article and read it into the future...
If you're ever in a situation where you need to try to restore some semblance of clarity to the convertible plastic windows be it on a classic like this or even a modern Jeep that's been thrashed on the trail, then here's a few products that will give you the best shot at making a visual difference.
On Autogeek.com
Meguiars Plastx Clear Plastic Cleaner & Polish
Unique product on the market. Very safe. If this doesn't work to do the grunt work, probably nothing will safe the plastic. You can get more aggressive than this but if working on ANTIQUE plastic I would not advice it. As plastic ages it becomes brittle and if you push on it too hard it will simply SPLIT open. Splitting is a kind of crack.
303 Aerospace Protectant 16 oz
303 Automotive Protectant Wipes
You can use either/or when it comes to the last step product. I used the 303 Wipes simply because they were the closest version of 303 Aerospace Protectant to my hand.
Autogeek Detailing Cover-Up Towel
Everyone should have a few of these around...
Polishers?
For a polisher, you can use any orbital you like. I sometimes use a rotary polisher, but don't press hard and don't stay in one place too long or you'll heat up the plastic and S-T-R-E-T-C-H it out and that's never a good thing.
I used the FLEX Finisher and the FLEX PiXiE. Both are FREE spinning random orbital polishers and this means both are VERY SAFE polishers. My knower, (that's the grey stuff inside my head), my knower knows this plastic window is OLD and therefor BRITTLE - so I'm too wise to get to aggressive or the clear plastic will simply crack and SPLIT open. That ain't going to be me that does this kind of lack-of-experience mistake on this 1.7 million dollar car.
So I used a very gentle tool called the FINISHER. Think about the name. It's not called the HEAVY DUTY PAINT CORRECTION POLISHER - that would be one of the BEASTS or the Mille or a rotary.
FLEX Cordless FINISHER - Nobody calls it by it's part number but here it is: FLEX XFE15 150 Cordless Orbital Polisher
FLEX PiXiE - part number is FLEX PXE 80 12-EC (no one calls it by the part number)
I did my initial testing of the plastic to first see if any improvement was possible with an even safer tool, the FLEX PiXiE with the 12mm free spinning drive unit attached a soft foam polishing pad.
Pads
While it is possible to use sharp foam cutting pads on a modern or new plastic window in bad condition, (how and why would a NEW flexible plastic window get into bad condition? The loose nut behind the steering wheels?), as mentioned previously, this is antique plastic by anyone's measure so I tested a foam finishing pad and after getting a modicum of confidence then moved to a foam polishing pad.
If you are going to tackle a project like this and are unsure of what or which pad to use for your particular polisher - then ask below in this thread and myself or some other ne' er-do-well will do our best to guide you. But basically, any soft foam "polishing" pad is a good choice. At least to start with.
Link to more pads than you can imagine
Hope this helps...
")
I don't get asked to fix flexible convertible windows this old very often but I do get asked once in a while. The owner of his 1966 Ferrari originally brought it to me for paint correction and waxing, yes waxing, not ceramic coating. I know the entire world mindset is engulfed in paint coatings but don't fall into that trap. Coatings are GREAT but that doesn't mean they should be used on each and every single car buzzing down the roads on Planet Earth.
Back to my how-to article. I don't get asked to this type of work very often but after inspecting the car I couldn't help but notice the flexible clear plastic back window in the original convertible top was in horrible condition.
Let's do the math....
2020 -1966 = 54 years old
We're just a few days away from the start of the year 2021 but I did the work this year thus the reason I'm using 2020 for my equation. The year I detailed this car the car and everything on it and in it was 54 years old. That's pretty old in convertible top years, kind of like Dog Years except completely different.
No promises
One of the first things every new detailer needs to learn is to under-promise and over-deliver, or at least try to over-deliver. Sometimes it's simply not possible. Some things simply cannot be fixed no matter what brand of goo you use. Such is the case with the clear, or what used-to-be-clear, flexible convertible plastic window in the top on this old European 2-door job. Plastic, like so many other materials used to build a car, oxidizes and becomes dull. And over time it also yellows. Now if the yellowing were limited to the outer surface then "sure", it could be fixed or mostly fixed. But for flexible clear plastic of this vintage, the yellowing was throughout the matrix of the film of plastic. Thus no amount of cleaning and polishing is going to turn yellow plastic "inside" this film of plastic clear. Doesn't matter how good you are or what brand of polisher you use - it's just one of those things that is past the point of no return simply due to age. I'm sure some that are reading this have in their lives old, antique vintage plastic that has yellowed with time.
That said, I'm still going to give it my best shot...
Starting point
Here's how the window looks before any cleaning and polishing. Also note the ancient fabric top. I'm going to detail the antique canvas top but the correct order when doing this type of work is to start with the plastic window and then proceed to the top.
Sense of touch
Those of you reading this just have to trust me on this - after wiping the plastic window clean, the surface of the plastic felt ROUGH. Rough like sandpaper. It should feel smooth.
Anyone want to guess why old, antique plastic would feel rough?
The seats inside the car are WHITE - but looking through the plastic window - they look yellowish, even brownish....
Dots or Pin Holes
Something else that's hard to explain is how the entire back window looks like it has tiny dots or tiny pin holes in it?
Close-up
You can see the dots or pin holes I'm talking about in this close-up of the brand for the plastic in the rear corner of the window. As you photography students would know, because the camera can focus on the writing as well as the fabric, the dots also come into focus.
I used Skynet and searched for VYBAK Plastics AS6 and found this - The Nolan Group
An ounce of prevention is worth 100 pounds of cure
After first cleaning the canvas top and the back window, next up - and this is SO VERY IMPORTANT - I taped off all the canvas surrounding the plastic window. Does anyone know why from experience?
The Autogeek Cover-up Towel
Been here at Autogeek going on 11 years and have shared with you folks the Autogeek Cover-up Towel over all these years. Some of you agree with me and get some, some of you don't and either use an old beach towel, bed sheet or drop cloth or worse, waste time cleaning up splatter dots all over the place.
I'm lazy by nature but when it comes to this type of work I'm very, very, VERY meticulous.
DONE.
Sorry, no pictures of me doing the work but I was the only guy in the garage and it didn't buff itself out.
Not perfect but so much better....
Here's what I used...
Besides the 3M Painter's Tape and the Autogeek Cover-up Towels, I used Meguiar's PlastX to machine polish the plastic and then after wiping off all the plastic residue, I massaged in some 303 Aerospace Protectant. I think most people think that 303 Aerospace Protectant is for things like a vinyl top and it is - but it can also be used to clarify and maintain clear plastic windows.
A few comments....
Rough Feel
The plastic surface had a very rough feel to it after cleaning first with a microfiber towel and some SONAX Glass Cleaner. It felt rough like paint feels rough when it's been neglected for years and even decades. Machine polishing removed the roughness and restored a very smooth-to-the-touch feel to it.
Swirls and Scratches
It's very common for clear, flexible plastic windows to become filled with swirls and scratches. I believe, (not think but believe based upon experience), that part of the problem is car owners simply are not educated enough about this plastic material to know,
A: That it scratches easily - therefore they don't respect it and use crappy, contaminated cloths of some sort to wipe it. Same goes for washing, they use crappy contaminated wash mitts and scratch it every time they rub the wash mitt over the plastic.
B: It's beyond most people's skills, abilities, knowledge and TOOL ARSENAL, not to mention pad and product arsenal, to undo the damage.
B: It's beyond most people's skills, abilities, knowledge and TOOL ARSENAL, not to mention pad and product arsenal, to undo the damage.
That it. That's in in a nutshell. And that's why most convertible with flexible clear plastic windows look all scratched-up, cloudy and hard to see through. :laughing:
Yellowed over time
Nothing much can be done about the yellowing of the plastic over time. My guess is NEW and MODERN formulas for these types of textiles have come a long way since 1966 and modern clear, flexible plastic windows are a LOT LESS PRONE to yellowing even with very little care on the part of the car owner.
Moving forward
This is a garage queen. It was owned by George Harrison of the Fab 4 Fame. It will always be a garage queen and also a show car as it has in the past and will in the future be displayed at high-end car shows. As such, there's really nothing for the current owner and future owners to do except whenever it is to be "touched" a clean, UNCONTAMINATED microfiber towels should be used and a safe product like 303 Aerospace Protectant. I'll include a link about the importance of inspecting your microfiber towels below.
For those that find this article and read it into the future...
If you're ever in a situation where you need to try to restore some semblance of clarity to the convertible plastic windows be it on a classic like this or even a modern Jeep that's been thrashed on the trail, then here's a few products that will give you the best shot at making a visual difference.
On Autogeek.com
Meguiars Plastx Clear Plastic Cleaner & Polish
Unique product on the market. Very safe. If this doesn't work to do the grunt work, probably nothing will safe the plastic. You can get more aggressive than this but if working on ANTIQUE plastic I would not advice it. As plastic ages it becomes brittle and if you push on it too hard it will simply SPLIT open. Splitting is a kind of crack.
303 Aerospace Protectant 16 oz
303 Automotive Protectant Wipes
You can use either/or when it comes to the last step product. I used the 303 Wipes simply because they were the closest version of 303 Aerospace Protectant to my hand.
Autogeek Detailing Cover-Up Towel
Everyone should have a few of these around...
Polishers?
For a polisher, you can use any orbital you like. I sometimes use a rotary polisher, but don't press hard and don't stay in one place too long or you'll heat up the plastic and S-T-R-E-T-C-H it out and that's never a good thing.
I used the FLEX Finisher and the FLEX PiXiE. Both are FREE spinning random orbital polishers and this means both are VERY SAFE polishers. My knower, (that's the grey stuff inside my head), my knower knows this plastic window is OLD and therefor BRITTLE - so I'm too wise to get to aggressive or the clear plastic will simply crack and SPLIT open. That ain't going to be me that does this kind of lack-of-experience mistake on this 1.7 million dollar car.
So I used a very gentle tool called the FINISHER. Think about the name. It's not called the HEAVY DUTY PAINT CORRECTION POLISHER - that would be one of the BEASTS or the Mille or a rotary.
FLEX Cordless FINISHER - Nobody calls it by it's part number but here it is: FLEX XFE15 150 Cordless Orbital Polisher
FLEX PiXiE - part number is FLEX PXE 80 12-EC (no one calls it by the part number)
I did my initial testing of the plastic to first see if any improvement was possible with an even safer tool, the FLEX PiXiE with the 12mm free spinning drive unit attached a soft foam polishing pad.
Pads
While it is possible to use sharp foam cutting pads on a modern or new plastic window in bad condition, (how and why would a NEW flexible plastic window get into bad condition? The loose nut behind the steering wheels?), as mentioned previously, this is antique plastic by anyone's measure so I tested a foam finishing pad and after getting a modicum of confidence then moved to a foam polishing pad.
If you are going to tackle a project like this and are unsure of what or which pad to use for your particular polisher - then ask below in this thread and myself or some other ne' er-do-well will do our best to guide you. But basically, any soft foam "polishing" pad is a good choice. At least to start with.
Link to more pads than you can imagine
Hope this helps...
