Mike Phillips
Active member
- Dec 5, 2022
- 51,004
- 6
Review and how-to: Griot's Garage Detailing Cart at Autogeek.com
What a great job I have!
Nick's always bringing me cool stuff to test out and play with. I can never show everything until it's released but here's something that's both released and cool!
The Griot's Garage Detailing Cart

What makes this car different from others?
First... the hidden feature... extra bracing under the handle to fortify and strengthen the handle so it wont crack and break like similar carts. For me this was the key feature. When I would grab the handle it felt a lot more rigid than other carts? So I looked underneath the handle and found out why.
Here's a shot of the underneath of the handle side of the cart. I have the flash on to light up the reinforcement structures.

And in the shots below I've cropped out the sections that show how the handle is reinforced both in the handle and where it attaches to the cart.


The cart "holds" things and any cart can do that... but YOU grab the handle over and over and over again and take my word for it, it's this simple design improvement to the Griot's Detailing Cart that makes it worth choosing over other car options.
Built-in Power Strip
Here's the next thing I like about the car and that's how Griot's came up with the idea to build into the handle an electrical POWER STRIP!

With this built in 15 amp power strip you an plug up to three tools directly into the cart.
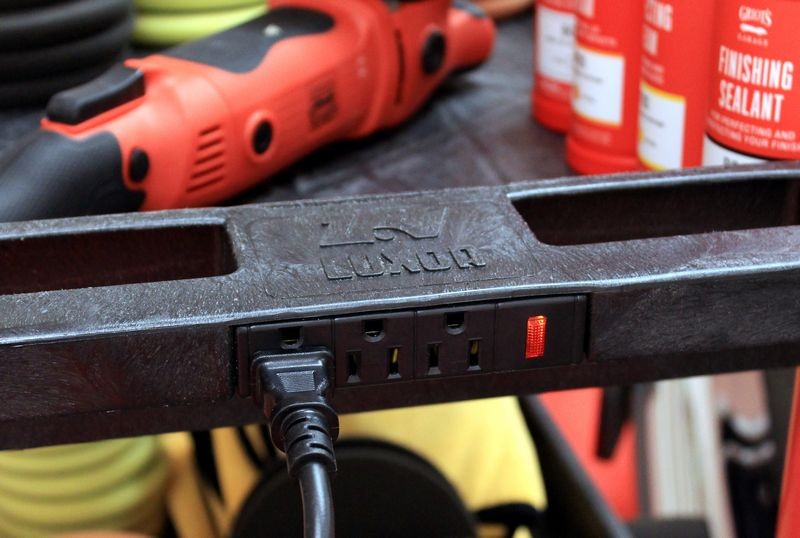
Long plug in cord
The power strip comes with a 14.5' cord which means that once plugged in you can easily push and position the cart to the front, side or back of your car and then run your tools from the cart instead of using extension cords. AND just as important the power cord is a heavy gauge cord so there's no risk to your tools electronics do to too light of gauge wiring.

It's like a helping hand in the garage
And of course the other thing that's handy about the cart is that it's a cart! Yeah that's right! load it up with your tools, pads and products and take them to where you're working instead of walking back and forth from your work bench to the car wasting time and taking hundreds of extra step.

On Autogeek.net
Griots Garage Rolling Cart with Outlets
")
What a great job I have!
Nick's always bringing me cool stuff to test out and play with. I can never show everything until it's released but here's something that's both released and cool!
The Griot's Garage Detailing Cart
What makes this car different from others?
First... the hidden feature... extra bracing under the handle to fortify and strengthen the handle so it wont crack and break like similar carts. For me this was the key feature. When I would grab the handle it felt a lot more rigid than other carts? So I looked underneath the handle and found out why.
Here's a shot of the underneath of the handle side of the cart. I have the flash on to light up the reinforcement structures.
And in the shots below I've cropped out the sections that show how the handle is reinforced both in the handle and where it attaches to the cart.
The cart "holds" things and any cart can do that... but YOU grab the handle over and over and over again and take my word for it, it's this simple design improvement to the Griot's Detailing Cart that makes it worth choosing over other car options.
Built-in Power Strip
Here's the next thing I like about the car and that's how Griot's came up with the idea to build into the handle an electrical POWER STRIP!
With this built in 15 amp power strip you an plug up to three tools directly into the cart.
Long plug in cord
The power strip comes with a 14.5' cord which means that once plugged in you can easily push and position the cart to the front, side or back of your car and then run your tools from the cart instead of using extension cords. AND just as important the power cord is a heavy gauge cord so there's no risk to your tools electronics do to too light of gauge wiring.
It's like a helping hand in the garage
And of course the other thing that's handy about the cart is that it's a cart! Yeah that's right! load it up with your tools, pads and products and take them to where you're working instead of walking back and forth from your work bench to the car wasting time and taking hundreds of extra step.
On Autogeek.net
Griots Garage Rolling Cart with Outlets


