Mike Phillips
Active member
- Dec 5, 2022
- 51,004
- 6
Review: Leatherique Rejuvenator Oil & Prestine Clean - Ruby Red Napa Leather Seats - 2015 Dodge Challenger
Leatherique Rejuvenator Oil & Leatherique Prestine Clean

My First Leatherique Experience
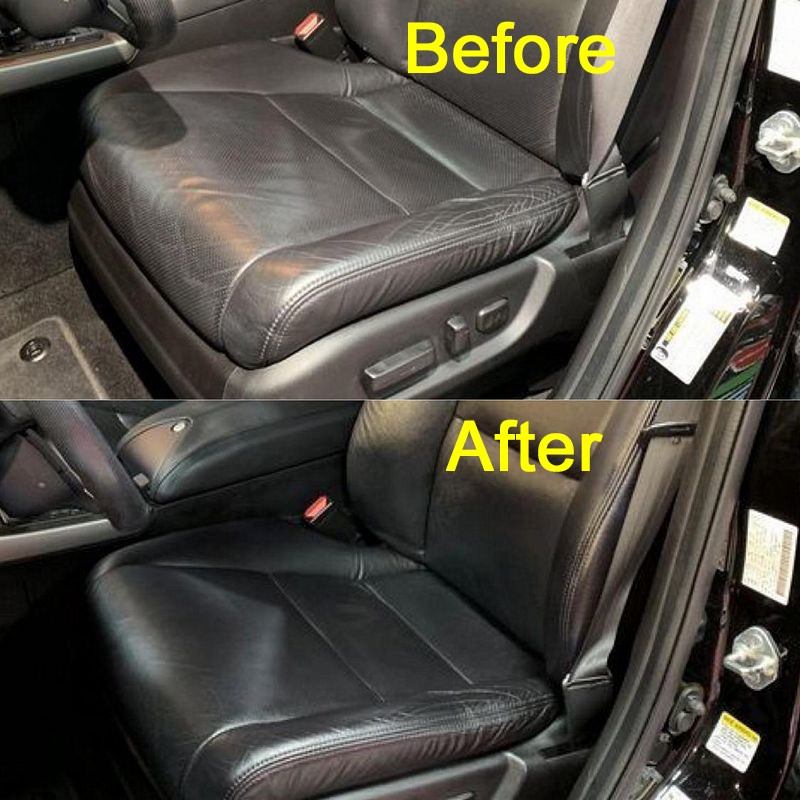
The first time I used these products was on the leather interior for a 2011 Acura RDX. In this original and first review, which is also an in-depth how-to article, I go into detail about the products and the process. I share that the process for using these two products goes against your our normal way of thinking in that you use the rejuvenating oil FIRST and the cleaner SECOND. ----- think about it ------ don't we normally CLEAN before rejuvenating or conditioning leather? Yes we do. But that's not how this system works. Instead of re-typing all that information here, if you're ready to take the step and take care of your car's leather interior - be sure to read my write-up below as it's the shorter version of the original - but be sure to click the link below and read, not scan my entire article. It will explain EVERYTHING.
Here's the link to the full write-up and it IS very in-depth.
Review: The Leatherique Treatment - Leather Rejuvenator Oil and Prestine Clean
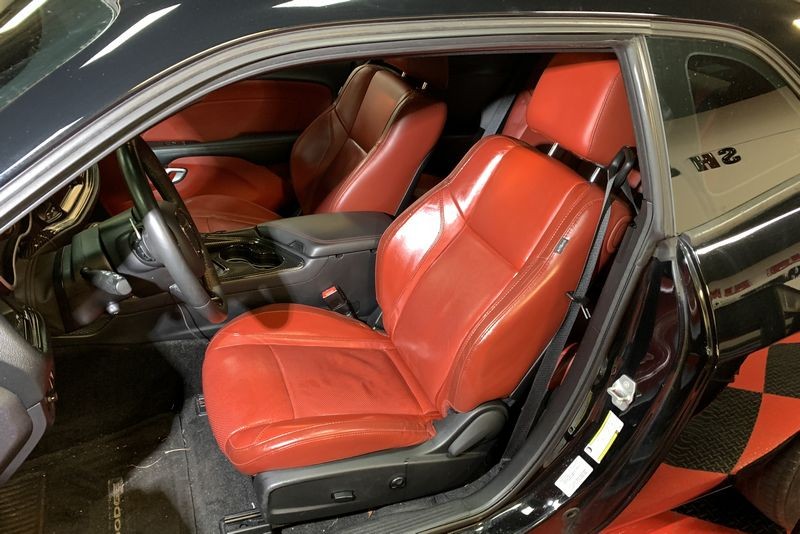
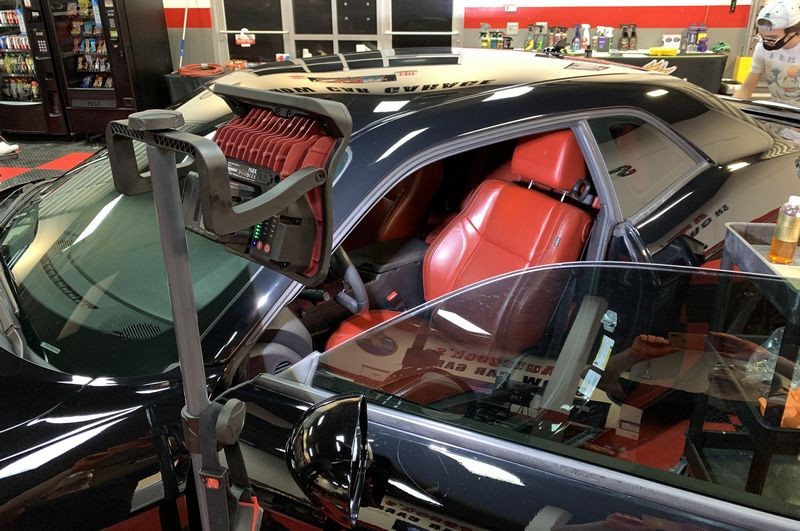
The Ruby Red Nappa Leather Seat Option for the 2015 Dodge Challenger
There were 4 interior options for the 2015 Dodge Challenger, this particular car has Option 3.
1: Sedoso/Houndstooth Premium cloth Sport seat. Black. Also available in Sedoso/Tungsten Torque Premium cloth in Black/Tungsten — Standard on SXT and R/T2
2: Sedoso/Ballistic Performance cloth seats with Tungsten accent stitching. Black — Standard on R/T Shaker and R/T Scat Pack. Also available in Sedoso/Ballistic Performance cloth with embroidered logo and Tungsten accent stitching. Black — included with Scat Pack Appearance Group on R/T Scat Pack
3: Nappa leather trim with accent stitching and Nappa perforated inserts. Black/Pearl. Also available in Black and Dark Ruby/Ruby Red — Standard on SXT Plus and R/T Plus
4: Nappa leather trim with Alcantara® suede bolsters, Tungsten accent stitching and Alcantara perforated suede inserts with embroidered logo Performance seats. Black. Also available in Black/Ruby Red — Optional on R/T Plus with R/T Classic Package
Because I know there's a LOT of confusion over the topic of modern automotive leather used in cars, I did a little research and found this,
From bestleather.org
Napa leather is typically a full-grain, un-split leather made from lamb, kid, or sheepskin. Full-grain means that the skin surface has not been modified apart from the removal of hair. Full grain leather is often regarded as the most authentic type of leather because it keeps all of the texture from the original hide.
So working from the above, I moved forward in the Leatherique Treatment process of first rejuvenating the leather followed by cleaning the leather.
Before
As of the year of this seat cleaning, (2020), these seats are now 5+ years old. Not a long time in the context of owning and driving cars, but probably due for a thorough cleaning and conditioning.


Step backwards to move forwards
The first step is to lather the seats down using the Leather Rejuvenator Oil. To the normal person, this would seem to be working backwards. It would seem the first step product would be the Pristine Clean followed by the Rejuvenator Oil. But that's not how the Leatherique Twins are to be used. You start with the oil.

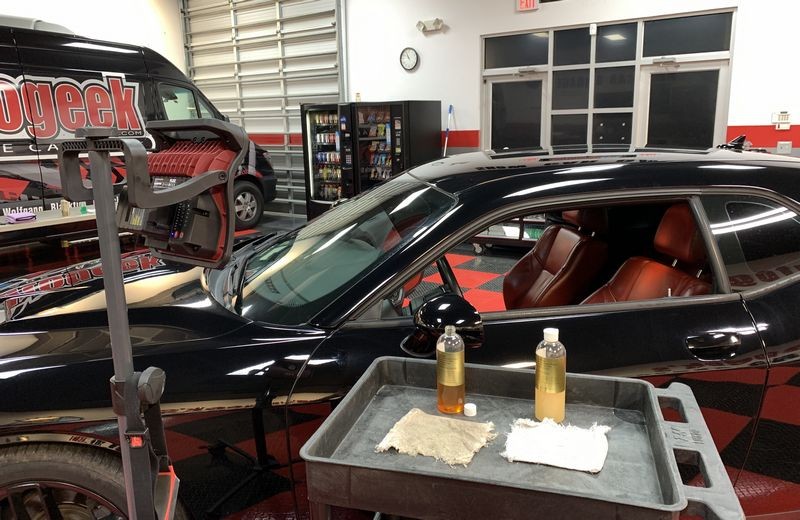
Cotton Terrycloth
For applying the two Leatherique products, I use some ordinary cotton terrycloth cut from some normal cotton hand towels. I know most car detailing enthusiasts have a track that runs in their brain that tell them to use microfiber for just about anything and everything related to detailing a car. But when it comes to leaning leather, cotton is still soft but offers a tick more stoutness for more scrubbing and massaging power.
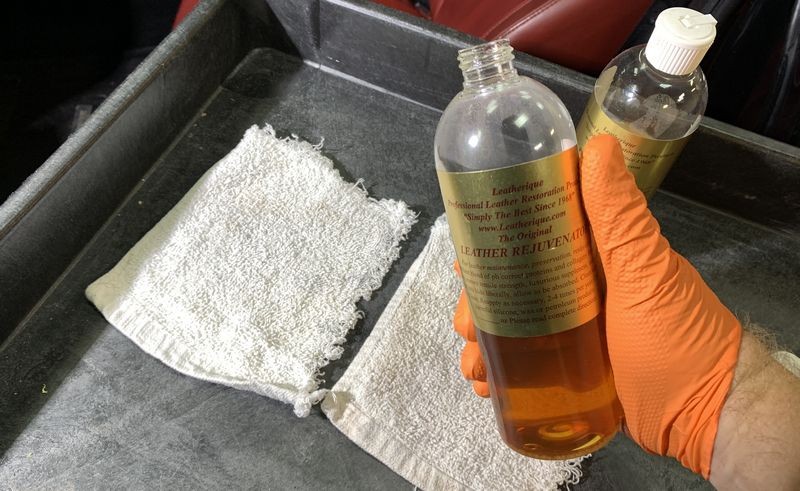
Be generous
For rejuvenating neglected leather seats, you want to use a generous amount of the Leatherique Rejuvenator Oil. Some of this will soak into the cotton cloth just like it would soak into any cloth. But once you reach the point where the cloth is saturated with oil, any extra product will now be introduced to the seat.


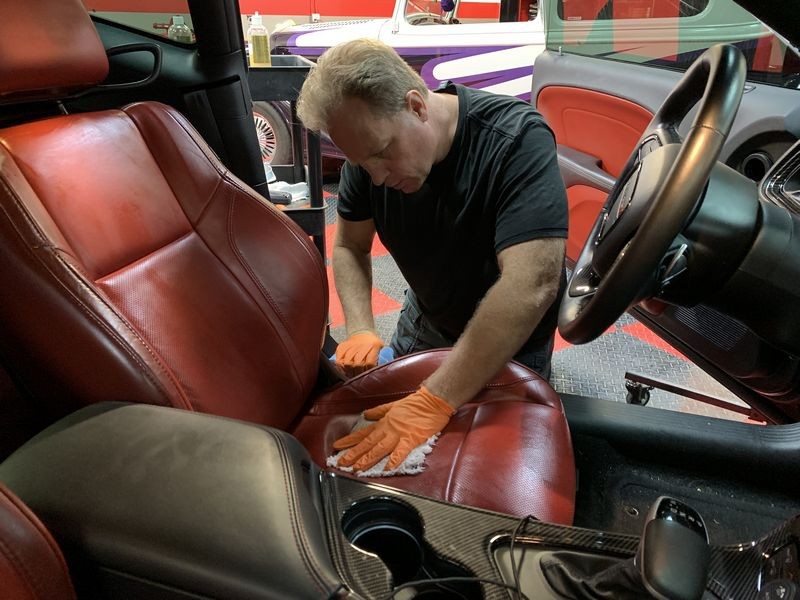
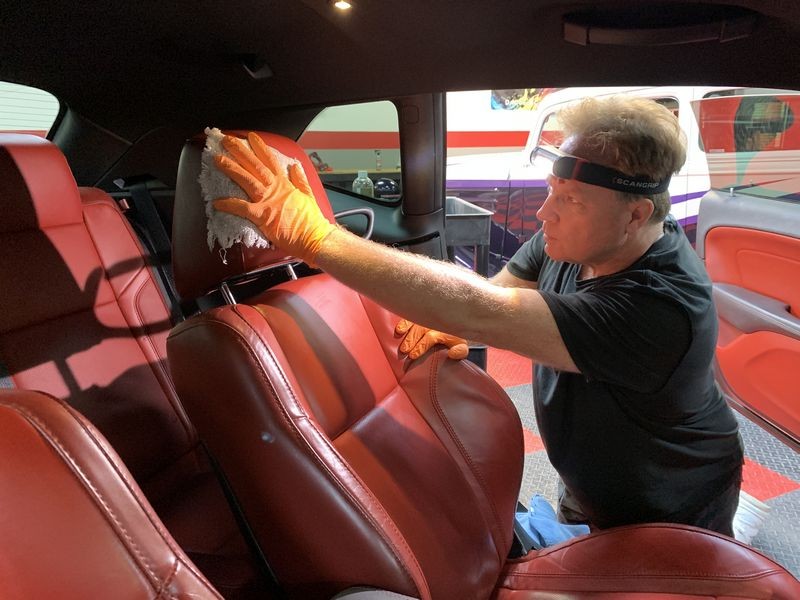
Massage over and into the leather surface
If you look at the bolster or "side" of the seat next to the perforated section of the seat you can see it has the Rejuvenator Oil on it. This is because I started by applying to this flat section of leather before moving onto the perforated portion so that I didn't simply drench the perforated section with this rich rejuvenating oil.

Continue applying until you treat the entire car seat.

The seat should look wet and shiny with the Rejuvenator Oil after application. Repeat this to any leather surface you want to clean, rejuvenate and condition.
Soaking Time
After application - if it's sunny and hot outside, move the car outside with the windows rolled-up and allow the interior of the car to heat-up. When the temperature increases, the leather will expand just like pretty much everything expands when it's warmed or heated. This expanding reaction will help facilitate the oils to penetrate into the leather and work its magic.
10:55am

4 hours later....

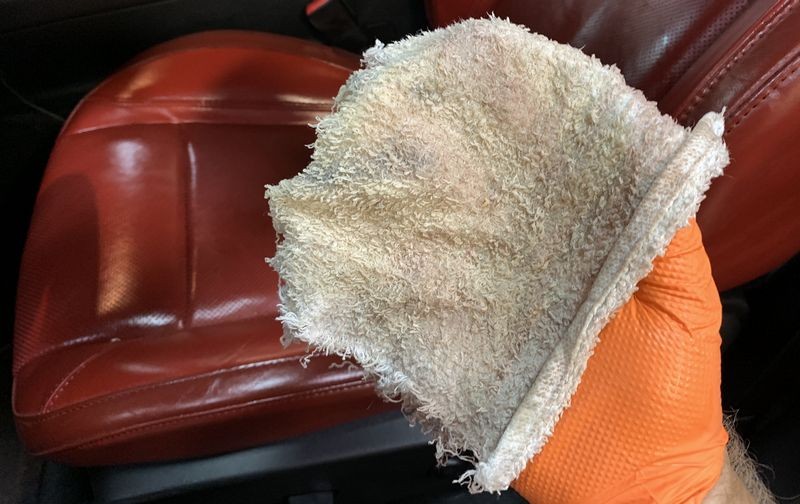
I let the Rejuvenating Oil soak for almost 4 hours and then moved onto the next step.

The shine has diminished as the oils soaked into the leather. The seats are still shiny, but not near as shiny as immediately after application.

FLEX DW 2500 Light
Just to comment, I often use swirl finder lights for video and photography work. This is the new FLEX DW 2500 and it uses the same rechargeable batteries used by FLEX tools. It does a LOT of things and you can find out more by clicking this link.

Without an outside source of light, it would be really hard to capture good pictures showing this process.


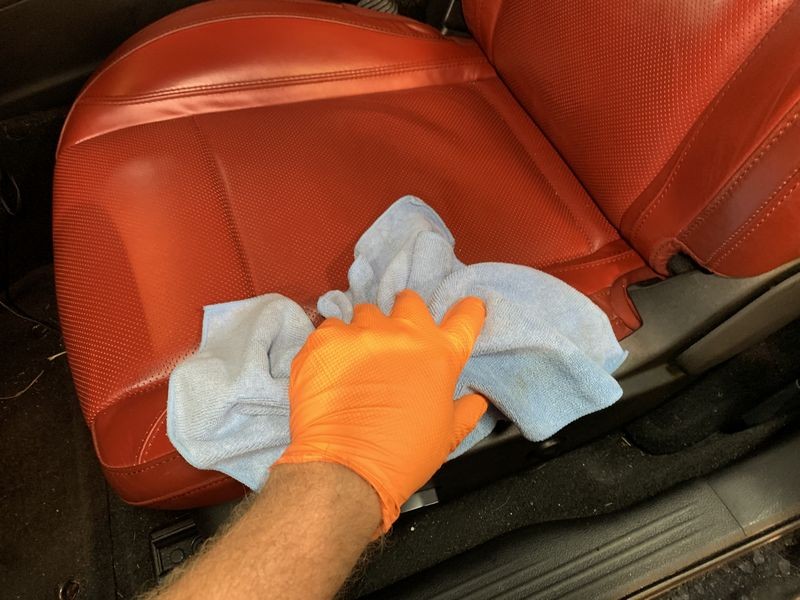
Next step - clean the seats
Yeah, yeah I know... I'm doing this backwards. Nope. This is how Leatherique system works. You start with the oil and then after the leather has gelled for a few hours, you come back and re-wipe the seats using the Leatherique Pristine Clean. This will remove any ground-in dirt and grime that has accumulated in and on the leather and now risen to the surface as well as remove all the excess Rejuvenating Oil so the leather surface will be dry to the touch, not oily.


Technique & Tool Tip
I've shared this in the past, but wanted to share it again and the "it is the SCANGRIP I-Match II headlamp you see me wearing in this pictures. While I believe SCANGRIP originally created this for doing paint correction, where it really shines is when detailing car interiors. Unless you're working on a convertible with the top down, or working on hardtop car with a light or white interior, it can be hard to see well. Lots of cars have black carpeting and black seats and door panels, this makes detailing the inside of a car like working in a CAVE. A set of headlamps like the SCANGRIP I-Match II completely light up the interior so you see what the freak you're doing and because they attach to your head both your hands are freed-up to do the work.
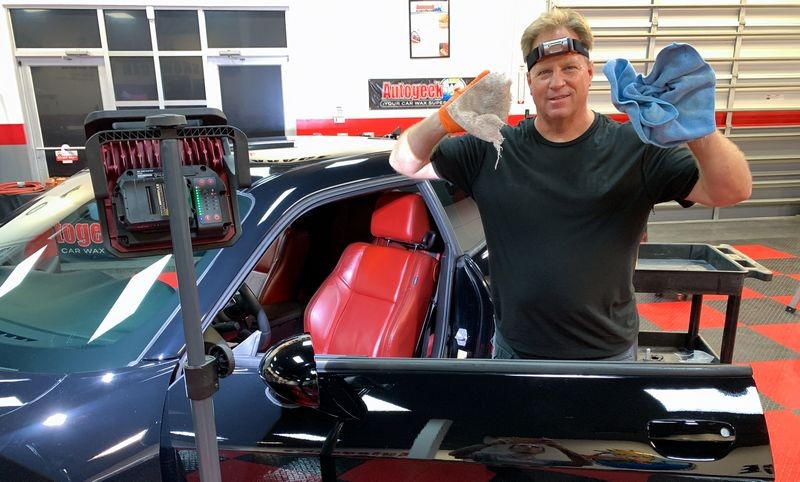
If you do a lot of interior detailing you can't go wrong with a quality headlamp.

The Final Wipe
After using the Pristine Clean to re-wipe all the leather surfaces treated with the Rejuvenating Oil, use a clean DRY microfiber towel to give all the leather surfaces a final wipe. This simply ensures any oil or cleaner residues have been removed for a uniform appearance and touch and feel.

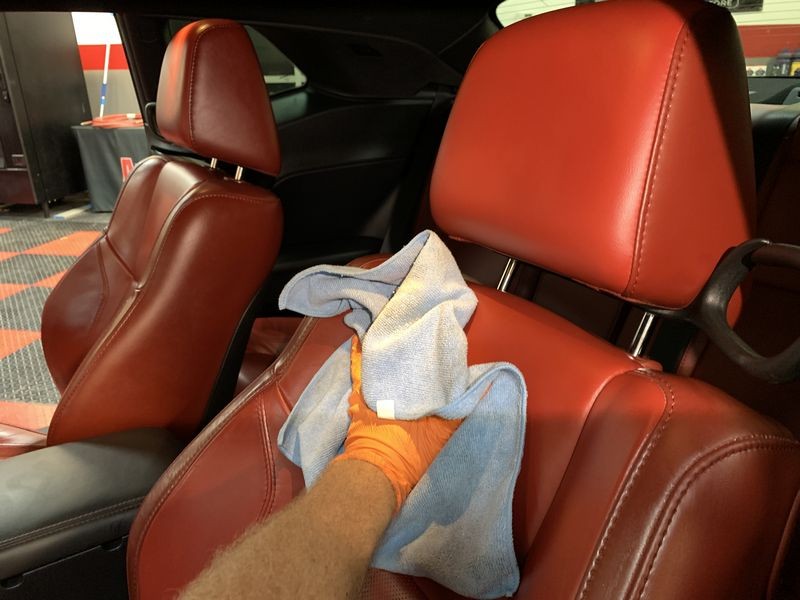
DONE!
Here's the owner inspecting the seats as well as my work.
He said,
My car's seats have never looked so clean or so nice!

Another win for the Leatherique Twins


Here's everything I used...

Review
This is the second time I've used the Leatherique products to clean, condition and rejuvenate a car's leather interior. It works just as well this time as it did the first time. These seats were not extraordinarily dirty but they were dull and lifeless looking before the two-step process.
The oil conditioning step followed by the cleaning step jump-started the Ruby Red color bringing the seats back to life both visually and in the way this leather option looks. The process is simple and straightforward. I doesn't require any special tools or skills for that matter, just wipe, wait, re-wipe and done.
Normally a leather interior option costs more when purchasing a car. It adds value to the car while you own and drive the car as well as when you sell or trade the car in for our next ride. From experience, I would say most people don't take care of their car's leather interior but let it go instead. Letting a leather interior go, that is to neglected it and never lift a finger or a bottle of "something" to even try to maintain both the durability of the leather let alone the appearance shows up over time as crappy looking seats. And this rolls-over to lower re-sale or trade-in values.
So it's up to you whether or not you lift a finger or a hand to periodically do something to take care of your car's leather interior. But one thing for sure, neglected leather over time is a lot less forgiving than neglected cloth and/or vinyl.
The Leatherique 2-step approach is great for doing everything you can to bring back and try to restore neglected leather interiors. Then afterwards, do a periodic rejuvenating and cleaning step. once or twice a year on warm days. Your car's leather will look better and feel better and there's nothing wrong with taking a little pride in a job you do yourself.
On Autogeek.com
Leatherique Rejuvenator Oil 16 oz
Leatherique Prestine Clean 16 oz
All Leatherique Leather Care Products
")
Leatherique Rejuvenator Oil & Leatherique Prestine Clean
My First Leatherique Experience
The first time I used these products was on the leather interior for a 2011 Acura RDX. In this original and first review, which is also an in-depth how-to article, I go into detail about the products and the process. I share that the process for using these two products goes against your our normal way of thinking in that you use the rejuvenating oil FIRST and the cleaner SECOND. ----- think about it ------ don't we normally CLEAN before rejuvenating or conditioning leather? Yes we do. But that's not how this system works. Instead of re-typing all that information here, if you're ready to take the step and take care of your car's leather interior - be sure to read my write-up below as it's the shorter version of the original - but be sure to click the link below and read, not scan my entire article. It will explain EVERYTHING.
Here's the link to the full write-up and it IS very in-depth.
Review: The Leatherique Treatment - Leather Rejuvenator Oil and Prestine Clean
The Ruby Red Nappa Leather Seat Option for the 2015 Dodge Challenger
There were 4 interior options for the 2015 Dodge Challenger, this particular car has Option 3.
1: Sedoso/Houndstooth Premium cloth Sport seat. Black. Also available in Sedoso/Tungsten Torque Premium cloth in Black/Tungsten — Standard on SXT and R/T2
2: Sedoso/Ballistic Performance cloth seats with Tungsten accent stitching. Black — Standard on R/T Shaker and R/T Scat Pack. Also available in Sedoso/Ballistic Performance cloth with embroidered logo and Tungsten accent stitching. Black — included with Scat Pack Appearance Group on R/T Scat Pack
3: Nappa leather trim with accent stitching and Nappa perforated inserts. Black/Pearl. Also available in Black and Dark Ruby/Ruby Red — Standard on SXT Plus and R/T Plus
4: Nappa leather trim with Alcantara® suede bolsters, Tungsten accent stitching and Alcantara perforated suede inserts with embroidered logo Performance seats. Black. Also available in Black/Ruby Red — Optional on R/T Plus with R/T Classic Package
Because I know there's a LOT of confusion over the topic of modern automotive leather used in cars, I did a little research and found this,
From bestleather.org
Napa leather is typically a full-grain, un-split leather made from lamb, kid, or sheepskin. Full-grain means that the skin surface has not been modified apart from the removal of hair. Full grain leather is often regarded as the most authentic type of leather because it keeps all of the texture from the original hide.
So working from the above, I moved forward in the Leatherique Treatment process of first rejuvenating the leather followed by cleaning the leather.
Before
As of the year of this seat cleaning, (2020), these seats are now 5+ years old. Not a long time in the context of owning and driving cars, but probably due for a thorough cleaning and conditioning.
Step backwards to move forwards
The first step is to lather the seats down using the Leather Rejuvenator Oil. To the normal person, this would seem to be working backwards. It would seem the first step product would be the Pristine Clean followed by the Rejuvenator Oil. But that's not how the Leatherique Twins are to be used. You start with the oil.
Cotton Terrycloth
For applying the two Leatherique products, I use some ordinary cotton terrycloth cut from some normal cotton hand towels. I know most car detailing enthusiasts have a track that runs in their brain that tell them to use microfiber for just about anything and everything related to detailing a car. But when it comes to leaning leather, cotton is still soft but offers a tick more stoutness for more scrubbing and massaging power.
Be generous
For rejuvenating neglected leather seats, you want to use a generous amount of the Leatherique Rejuvenator Oil. Some of this will soak into the cotton cloth just like it would soak into any cloth. But once you reach the point where the cloth is saturated with oil, any extra product will now be introduced to the seat.
Massage over and into the leather surface
If you look at the bolster or "side" of the seat next to the perforated section of the seat you can see it has the Rejuvenator Oil on it. This is because I started by applying to this flat section of leather before moving onto the perforated portion so that I didn't simply drench the perforated section with this rich rejuvenating oil.
Continue applying until you treat the entire car seat.
The seat should look wet and shiny with the Rejuvenator Oil after application. Repeat this to any leather surface you want to clean, rejuvenate and condition.
Soaking Time
After application - if it's sunny and hot outside, move the car outside with the windows rolled-up and allow the interior of the car to heat-up. When the temperature increases, the leather will expand just like pretty much everything expands when it's warmed or heated. This expanding reaction will help facilitate the oils to penetrate into the leather and work its magic.
10:55am
4 hours later....
I let the Rejuvenating Oil soak for almost 4 hours and then moved onto the next step.
The shine has diminished as the oils soaked into the leather. The seats are still shiny, but not near as shiny as immediately after application.
FLEX DW 2500 Light
Just to comment, I often use swirl finder lights for video and photography work. This is the new FLEX DW 2500 and it uses the same rechargeable batteries used by FLEX tools. It does a LOT of things and you can find out more by clicking this link.
Without an outside source of light, it would be really hard to capture good pictures showing this process.
Next step - clean the seats
Yeah, yeah I know... I'm doing this backwards. Nope. This is how Leatherique system works. You start with the oil and then after the leather has gelled for a few hours, you come back and re-wipe the seats using the Leatherique Pristine Clean. This will remove any ground-in dirt and grime that has accumulated in and on the leather and now risen to the surface as well as remove all the excess Rejuvenating Oil so the leather surface will be dry to the touch, not oily.
Technique & Tool Tip
I've shared this in the past, but wanted to share it again and the "it is the SCANGRIP I-Match II headlamp you see me wearing in this pictures. While I believe SCANGRIP originally created this for doing paint correction, where it really shines is when detailing car interiors. Unless you're working on a convertible with the top down, or working on hardtop car with a light or white interior, it can be hard to see well. Lots of cars have black carpeting and black seats and door panels, this makes detailing the inside of a car like working in a CAVE. A set of headlamps like the SCANGRIP I-Match II completely light up the interior so you see what the freak you're doing and because they attach to your head both your hands are freed-up to do the work.
If you do a lot of interior detailing you can't go wrong with a quality headlamp.
The Final Wipe
After using the Pristine Clean to re-wipe all the leather surfaces treated with the Rejuvenating Oil, use a clean DRY microfiber towel to give all the leather surfaces a final wipe. This simply ensures any oil or cleaner residues have been removed for a uniform appearance and touch and feel.
DONE!
Here's the owner inspecting the seats as well as my work.
He said,
My car's seats have never looked so clean or so nice!
Another win for the Leatherique Twins
Here's everything I used...
Review
This is the second time I've used the Leatherique products to clean, condition and rejuvenate a car's leather interior. It works just as well this time as it did the first time. These seats were not extraordinarily dirty but they were dull and lifeless looking before the two-step process.
The oil conditioning step followed by the cleaning step jump-started the Ruby Red color bringing the seats back to life both visually and in the way this leather option looks. The process is simple and straightforward. I doesn't require any special tools or skills for that matter, just wipe, wait, re-wipe and done.
Normally a leather interior option costs more when purchasing a car. It adds value to the car while you own and drive the car as well as when you sell or trade the car in for our next ride. From experience, I would say most people don't take care of their car's leather interior but let it go instead. Letting a leather interior go, that is to neglected it and never lift a finger or a bottle of "something" to even try to maintain both the durability of the leather let alone the appearance shows up over time as crappy looking seats. And this rolls-over to lower re-sale or trade-in values.
So it's up to you whether or not you lift a finger or a hand to periodically do something to take care of your car's leather interior. But one thing for sure, neglected leather over time is a lot less forgiving than neglected cloth and/or vinyl.
The Leatherique 2-step approach is great for doing everything you can to bring back and try to restore neglected leather interiors. Then afterwards, do a periodic rejuvenating and cleaning step. once or twice a year on warm days. Your car's leather will look better and feel better and there's nothing wrong with taking a little pride in a job you do yourself.
On Autogeek.com
Leatherique Rejuvenator Oil 16 oz
Leatherique Prestine Clean 16 oz
All Leatherique Leather Care Products