CEE DOG
New member
- Jul 12, 2009
- 7,358
- 0
Review: Sonax Nano Technology Paint Cleaner
(Not to be confused with Sonax Premium Class Paint Cleaner)
Introduction:
When the Sonax line was introduced to Autogeek Meghan sent me 3 Sonax products to review. Thanks again to Meghan and AG for their generosity!! This is the 3rd of the 3 products. Because of a couple of the products claims I’ve had a little difficulty deciding how to do my testing. Initially I wanted to find an old panel that was in not all scratched up but did have severe fading and oxidation. However after finding more information on the product I decided the black Lexus panel should work fine for my review in spite of the scratches. I also cleaned my entire Saturn SL with Sonax NTPC as part of my testing. The directions for use on the bottle describe hand application but also note that you can use a machine.
Product Description (from back of bottle):
Based on a newly developed combination of effective ingredients, specially formulated for heavily weatherworn paintwork and painted parts. Highly effective nanosized abrasives easily remove the damaged clear coat layer. Hazing disappears and color is restored, leaving a new, deep gloss shine. Nano technology engineered, Carnauba wax particles penetrate the small cracks and crevices protecting the paint for several weeks.
Initial Product Observations:
1.- Manufacturer Claims: True
2.- Packaging: Fancy Bottle with a very pronounced flip up nozzle (Lid doesn’t seem to be removable)
3.- Directions: Very detailed and fairly clear
4.- Consistency: Very thin lotion (Thin enough to drip if your not careful)
5.- Color: White
6.- Scent: None
7a- Size: 16.9 oz. (500 ml)
7b- Additional Sizes available: N/A
8.- Current Price: $24.99 ($1.48 per ounce)
9.- Manufacturer: Sonax
10.-Made in: Germany
Additional products used for prep, during application, or removal:
1.- Flex 3401
2.- Microfiber towels
3.- Wolfgang Finger pocket
4.- Crimson Hydro Tech Foam Pad (6 1/2")
5.- Meguiars Gold Class Shampoo
6.- Carrand Chenille Micro Fiber wash Mitt
Method of Application, and noted Observations:
Hand Application (Lexus Rear Lid - Black)
First I applied Sonax NTPC by hand with a Wolfgang finger pocket. After it hazed I gave it about a minute and wiped it off. I say wiped because it comes off so easily. It’s really nice as far as that goes. I was also very impressed with how quickly and easily it brought the gloss back to the paint. Of course with the panel as scratched up as it is it’s still a mess but as you’ll see in the pictures it did it’s job.
Machine Application (Lexus Rear Lid - Black)
Next I took out my Crimson HT pad and centered it onto my Flex 3401. I placed a fair amount of NTPC onto the pad and spread it quickly across the paint. Then I cranked up the machine and worked it into the paint with medium pressure until it hazed. The product spreads very easily and is very wet going on. After setting aside my 3401 I waited about a minute and buffed it off. Again it wiped off extremely easy.
I decided that I’d like to remove as much of the swirls, scratches, and water spots as possible and test it as a finishing polish as well. With the aid of SYN 1, and M105 I corrected the paint across 2 more sections of the panel. Next I finished the paint on one section with M205 using a white LC flat pad. Finally it was back to the Sonax. I took out my Crimson Pad, which I had kept in a sealed Ziploc baggie in the meantime and placed it back on the Flex. With this combination I finished the paint in the final section removing pretty much all of the marring in that section that had been left by the previous step.
Machine and Hand Application (Saturn SL1 – Green with Flake)
I gave the car a quick wash with Megs Gold Class and a Carrand Chenille MF wash Mitt. Then I took about a 5 minute brake while most of the water dried off. On the bottle the directions note that “The vehicle does not need to be completely dried”.
I placed a LC flat gray finishing pad on my 3401 and applied a fair amount of product. This time I had decided I would see how much area I could effectively cover using the product as paint cleaner. I completed about 1/3rd of the hood in 1 section. At this point I also decided instead of letting it sit for a minute after hazing and removing it I would complete the vehicle before buffing or wiping it off. I repeated the process by machine across the majority of the car.
It was broken into sections as follows:
Hood: A total of 3 sections
Roof: 2 sections
Driver’s side: 4 sections
Rear lid: 2 sections
The rear lid was not protected from the sun (by the canopy) so I got to test application of the product on a hot panel as well. I wasn’t too fun when the sun was out but when it dipped behind a cloud I finished it up and it wasn’t a problem even though the panel was very hot. The driver’s side gave me a couple seconds of trouble due to some water that was forced from the window seals but it wasn’t a big deal. Without stopping operation I just picked up the seeping water with the pad and worked it another minute. The passenger side and the rear (around the license plate) I completed manually. The rear was much easier to access by hand and I figured the passenger side would give me some more feel for how I liked applying it manually. Now was another moment of truth. Was I going to have a Klasse HGSG moment? I got the polish removal towels out and started wiping/buffing the hazed product from the paint. For the most part it was very easy to remove and I had no regrets. The problems were in a few small locations at certain edges of certain panels or in tight lines where a little bit of product had gone and not been worked properly. At these locations (probably having nothing to do with the wait time) it was a pain to wipe off. So, I grabbed my ONR QD and those areas came clean very easily. As I was removing the product I was treated to a nice glossy finish beneath. The Sonax NTPC had also easily removed some kind of staining which had been on my passenger side doors.
Please see the pictures and rejoin me afterwards to see the listed Pros, Cons, and Summary. Oh, by the way I think some of the pictures of the black panel make it look a little better then it does in real life.
Machine Application (Lexus Rear Lid - Black)
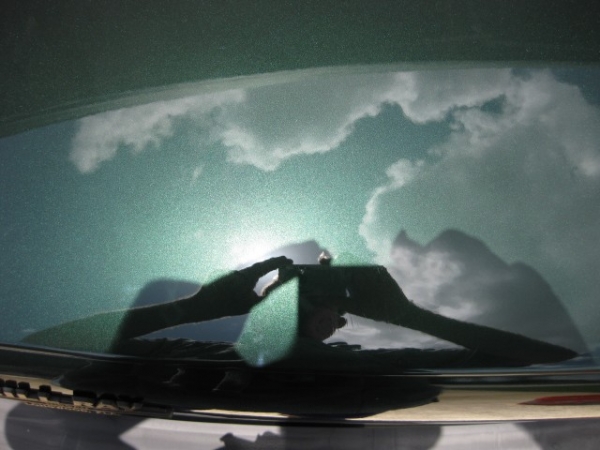
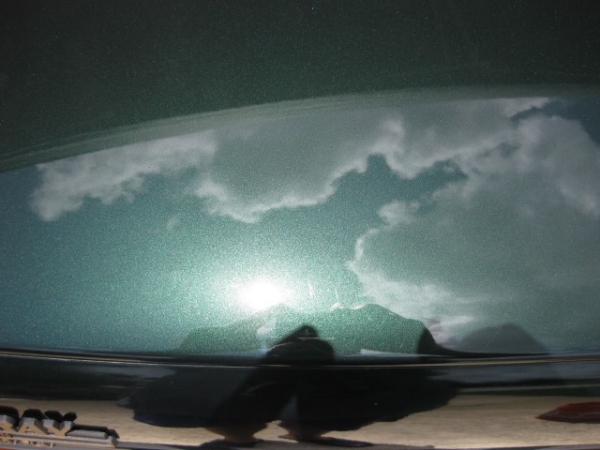
01.- Conditions

02.- Products

03-06.- After washing with ONR / Before Anything Else


07.- Before on Left / Hand Application on Right

08.- Before on Bottom / Hand Application on Top

09.- Before on Bottom / Hand Application and then IPA on top

10.- Before on Left / Hand Application and then IPA on right

11.- Machine application products

12.- Using Crimson HydroTech pad with Sonax Paint Cleaner

13.- Before on Left / Machine Application and then IPA on right

14-15.- Removed Defects (Then 205 with white pad on left / Sonax with Crimson HT Pad on right)


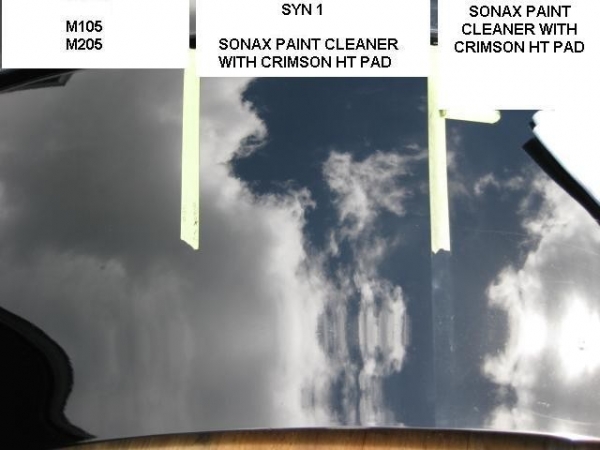
16-17.- M105 & 205 on Left / SYN 1 and Sonax in Mid / Sonax alone on right

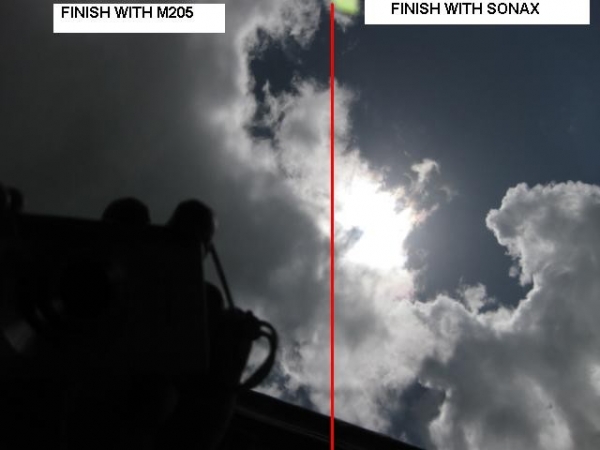
18.- Finish w/ M205 on Left / Finish w/ SONAX on Right
19.- Finished w/ SONAX

20-21.- Finished w/ SONAX between tape lines


22-25. Finished w/ SONAX


Machine and Hand Application (Saturn SL1 – Green with Flake)
26.- Conditions

27.- BEFORE

28.- AFTER (Waxed as well)

29.- Hood with Hazed Sonax Paint Cleaner

30.- Wiping off Haze

(Not to be confused with Sonax Premium Class Paint Cleaner)
Introduction:
When the Sonax line was introduced to Autogeek Meghan sent me 3 Sonax products to review. Thanks again to Meghan and AG for their generosity!! This is the 3rd of the 3 products. Because of a couple of the products claims I’ve had a little difficulty deciding how to do my testing. Initially I wanted to find an old panel that was in not all scratched up but did have severe fading and oxidation. However after finding more information on the product I decided the black Lexus panel should work fine for my review in spite of the scratches. I also cleaned my entire Saturn SL with Sonax NTPC as part of my testing. The directions for use on the bottle describe hand application but also note that you can use a machine.
Product Description (from back of bottle):
Based on a newly developed combination of effective ingredients, specially formulated for heavily weatherworn paintwork and painted parts. Highly effective nanosized abrasives easily remove the damaged clear coat layer. Hazing disappears and color is restored, leaving a new, deep gloss shine. Nano technology engineered, Carnauba wax particles penetrate the small cracks and crevices protecting the paint for several weeks.
Initial Product Observations:
1.- Manufacturer Claims: True
2.- Packaging: Fancy Bottle with a very pronounced flip up nozzle (Lid doesn’t seem to be removable)
3.- Directions: Very detailed and fairly clear
4.- Consistency: Very thin lotion (Thin enough to drip if your not careful)
5.- Color: White
6.- Scent: None
7a- Size: 16.9 oz. (500 ml)
7b- Additional Sizes available: N/A
8.- Current Price: $24.99 ($1.48 per ounce)
9.- Manufacturer: Sonax
10.-Made in: Germany
Additional products used for prep, during application, or removal:
1.- Flex 3401
2.- Microfiber towels
3.- Wolfgang Finger pocket
4.- Crimson Hydro Tech Foam Pad (6 1/2")
5.- Meguiars Gold Class Shampoo
6.- Carrand Chenille Micro Fiber wash Mitt
Method of Application, and noted Observations:
Hand Application (Lexus Rear Lid - Black)
First I applied Sonax NTPC by hand with a Wolfgang finger pocket. After it hazed I gave it about a minute and wiped it off. I say wiped because it comes off so easily. It’s really nice as far as that goes. I was also very impressed with how quickly and easily it brought the gloss back to the paint. Of course with the panel as scratched up as it is it’s still a mess but as you’ll see in the pictures it did it’s job.
Machine Application (Lexus Rear Lid - Black)
Next I took out my Crimson HT pad and centered it onto my Flex 3401. I placed a fair amount of NTPC onto the pad and spread it quickly across the paint. Then I cranked up the machine and worked it into the paint with medium pressure until it hazed. The product spreads very easily and is very wet going on. After setting aside my 3401 I waited about a minute and buffed it off. Again it wiped off extremely easy.
I decided that I’d like to remove as much of the swirls, scratches, and water spots as possible and test it as a finishing polish as well. With the aid of SYN 1, and M105 I corrected the paint across 2 more sections of the panel. Next I finished the paint on one section with M205 using a white LC flat pad. Finally it was back to the Sonax. I took out my Crimson Pad, which I had kept in a sealed Ziploc baggie in the meantime and placed it back on the Flex. With this combination I finished the paint in the final section removing pretty much all of the marring in that section that had been left by the previous step.
Machine and Hand Application (Saturn SL1 – Green with Flake)
I gave the car a quick wash with Megs Gold Class and a Carrand Chenille MF wash Mitt. Then I took about a 5 minute brake while most of the water dried off. On the bottle the directions note that “The vehicle does not need to be completely dried”.
I placed a LC flat gray finishing pad on my 3401 and applied a fair amount of product. This time I had decided I would see how much area I could effectively cover using the product as paint cleaner. I completed about 1/3rd of the hood in 1 section. At this point I also decided instead of letting it sit for a minute after hazing and removing it I would complete the vehicle before buffing or wiping it off. I repeated the process by machine across the majority of the car.
It was broken into sections as follows:
Hood: A total of 3 sections
Roof: 2 sections
Driver’s side: 4 sections
Rear lid: 2 sections
The rear lid was not protected from the sun (by the canopy) so I got to test application of the product on a hot panel as well. I wasn’t too fun when the sun was out but when it dipped behind a cloud I finished it up and it wasn’t a problem even though the panel was very hot. The driver’s side gave me a couple seconds of trouble due to some water that was forced from the window seals but it wasn’t a big deal. Without stopping operation I just picked up the seeping water with the pad and worked it another minute. The passenger side and the rear (around the license plate) I completed manually. The rear was much easier to access by hand and I figured the passenger side would give me some more feel for how I liked applying it manually. Now was another moment of truth. Was I going to have a Klasse HGSG moment? I got the polish removal towels out and started wiping/buffing the hazed product from the paint. For the most part it was very easy to remove and I had no regrets. The problems were in a few small locations at certain edges of certain panels or in tight lines where a little bit of product had gone and not been worked properly. At these locations (probably having nothing to do with the wait time) it was a pain to wipe off. So, I grabbed my ONR QD and those areas came clean very easily. As I was removing the product I was treated to a nice glossy finish beneath. The Sonax NTPC had also easily removed some kind of staining which had been on my passenger side doors.
Please see the pictures and rejoin me afterwards to see the listed Pros, Cons, and Summary. Oh, by the way I think some of the pictures of the black panel make it look a little better then it does in real life.
Machine Application (Lexus Rear Lid - Black)
01.- Conditions
02.- Products
03-06.- After washing with ONR / Before Anything Else
07.- Before on Left / Hand Application on Right
08.- Before on Bottom / Hand Application on Top
09.- Before on Bottom / Hand Application and then IPA on top
10.- Before on Left / Hand Application and then IPA on right
11.- Machine application products
12.- Using Crimson HydroTech pad with Sonax Paint Cleaner
13.- Before on Left / Machine Application and then IPA on right
14-15.- Removed Defects (Then 205 with white pad on left / Sonax with Crimson HT Pad on right)
16-17.- M105 & 205 on Left / SYN 1 and Sonax in Mid / Sonax alone on right
18.- Finish w/ M205 on Left / Finish w/ SONAX on Right
19.- Finished w/ SONAX
20-21.- Finished w/ SONAX between tape lines
22-25. Finished w/ SONAX
Machine and Hand Application (Saturn SL1 – Green with Flake)
26.- Conditions
27.- BEFORE
28.- AFTER (Waxed as well)
29.- Hood with Hazed Sonax Paint Cleaner
30.- Wiping off Haze


 Gotta get more then 5 hours sleep tonight! Talk to you tommorrow