Radarryan
New member
- Nov 9, 2012
- 778
- 0
Ultima Interior Guard Plus+ (UIGP) is one of those products that everyone knows of. It seems that whenever anyone is in need of a good interior product, UIGP is always at the top of the list. Even so, unfortunately there aren’t that many reviews out there on the product.
My need for the product was because I was in need of an interior dressing that has strong UV-inhibitor properties. My current go-to interior products (1Z Cockpit Premium and SONAX Dashboard) are more cleaners and don’t have (as much, or any in some cases) protection. Since I have a convertible, the windshield and windows don’t have the same opportunity to block the sun’s harmful rays. I certainly did not want my dash to have any fading or cracking, so I decided that I would need a product that provided protection. The biggest thing was I did not want a greasy look, but rather I preferred the factory, matte look that so many of us desire. Both the SONAX Dashboard cleaner and 1Z Cockpit Premium impart the look that I like, but I heard that this is just a hair more sheen than factory. In fact, some have said that they thought this was about as factory matte as it gets, at least when talking about a dressing or protection product.
After consulting quite a few walk-throughs and reviews, I had a pretty good idea about how this product would react, and the proper way to apply it. It seems if you apply it thin, it can self-level and leave you with a perfect satin, matte look. Any high spots that appear can be either buffed with a microfiber towel or smoothed out with the included applicator.
Here is the product when you first receive it.

As you can see, it comes with an applicator pad and is in its own little container.
Here’s the front of the bottle:

And the back:

I will just point out a few of the claims made by Ultima in the copy: The clear sealant dries completely and will not leave a greasy, slippery film that attracts dust – for every surface in your car – whether it be leather, fabric or vinyl. I am assuming that the fabric can also include Alcantara, if you’re vehicle is equipped with it.
Okay, so now onto the application of the product.
Here is the driver’s side door, before.

Passenger dash, before:

After priming the applicator with three sprays, I kind of spread it out with my finger, which was protected, as always, with nitrile gloves. After the priming, I started spreading it out on the passenger side of the dash.
Here is a shot of me still spreading the product out on the passenger side, with the high spots already becoming visual. I continued using the applicator to “knock down” the high spots to kind of spread it around and make sure there is uniform coverage.

One thing that is evident right off the bat is the dramatic difference in “color” or the sheen or shine that the product produces. I continued and pressed on because I knew that when it dried it would be more of the matte, somewhat factory look that I desired. Despite the directions saying to use a microfiber towel to buff dry after five or so minutes, I did not do this. After reading quite a few reviews and responses from the manufacturer, I had come to the conclusion that this was truly an optional step that was for those who were not familiar with spreading a product thin, but rather had a heavy-handed application that many of us did when we were new to detailing.
In fact, after the applicator, which was very sturdy and made out of high quality foam, was primed, it was very easy to spread the product far. I only had to spray a few more sprays on the applicator to do the entire dash and door interiors. I big bottle like I bought may outlive me, and I’m in my 20s!
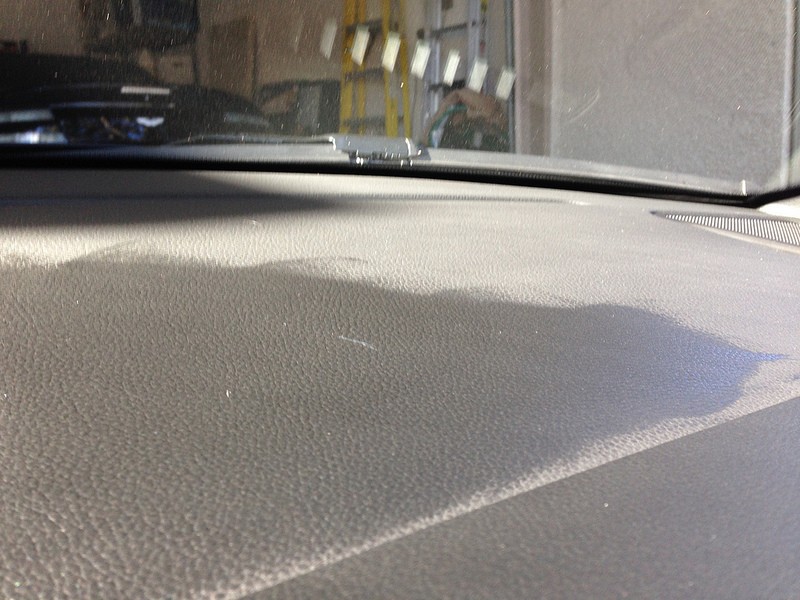
Here is a rough ¾ of the of the passenger dash completed. You can clearly see the line on the left side of the picture where the dressing application ended. This will give you a real idea on how the dressing looks just after the application.

Here’s another picture of a 50/50 shot in the center of the dash, just under the chronograph. In the top of the picture you can see smooth plastic that covers the chrono and vents. When I did apply to the smooth plastic, I did buff it a couple of minutes later with a microfiber towel. I did not buff the textured rubber or plastic.

Here is the entire passenger side, completely dressed. You can see the applicator, which due to the size I was not able to get into the corners of the dash. For this task, I used a corner of the microfiber towel. I could have compressed the foam, but I did not want to risk getting the dressing onto the glass, which in my experience with other dressings is always a pain to get off.

Here’s a view of the top of the dash, with only a couple high spots remaining. In my experience, this self-levels and there is no need to buff with a microfiber towel or go back over it with the applicator to smooth it out, unless it is exuberantly wet or much higher than the surrounding area.

One thing that I noticed when I looked down, was when I was priming my applicator or something, some overspray got on the center console smooth plastic and aluminum. Here’s what I’m talking about.

You can see the spots on the black plastic and smudges on the aluminum. Now, these were not too hard to get off, I just grabbed my 1Z Cockpit Premium and the microfiber towel and the dressing overspray came right off. Without the Cockpit Premium, however, the dressing just smudges, like it has on the aluminum on the right side. On that side, I had just tried to clean it up with a fluffy side of a microfiber towel, which did no good. Thankfully, a fantastic interior light cleaning spray, such as SONAX Dashboard, 1Z Cockpit Premium, or Auto Finesse Interior Quick Detailer, will easily clean up any overspray or smudges that you want to get out.
Moving on to the passenger's side door, here is a 50/50 shot.

Again, you can see the stark difference in the appearance of the bare side and the side with dressing on it. Of course, this is exaggerated and as it dries, the appearance becomes less and less. Fully dried, next to the bare side, there is only a slight difference between the sides, which is why this product is so popular – it doesn’t drastically alter the appearance of the underlying material. Here is the door, with the door fully dressed.

You can see a high spot that is pretty much the size of the applicator and roughly the same shape in the rough center left side of the picture. I would think this is where I pressed down, inadvertently of course, before removing the applicator from the door panel. Since this is a test, I didn’t want to buff the high spot off with a microfiber towel. Thankfully for me, the high spot self-leveled within a few hours and now a few days later, there is only one high spot that is visible. Ironically, it isn’t where the high spot in this picture is visible, but rather near the leather door inserts. If I were to go over it with a microfiber towel half an hour or so after application, it probably would have prevented all high spots, but I still don’t think this is necessary if you focus on a thin application. If you prefer heavy applications, then a wipe down would be in your best interest.
In the picture below of the driver's door, you can see high spots, especially above and under the leather armrest. Under the armrest, it is smooth plastic that probably should have been buffed with a microfiber towel, but was not. In retrospect, those spots near the armrest should have been re-leveled with the applicator above, and wiped down below the armrest.

Here’s another shot of the door, with the only “shiny” spot being above the armrest, which was probably due to misapplication by your dear reviewer.

Other than that, in my opinion, the door is looking pretty good, and most importantly, is protected against harmful UV rays and other things.
Moving back into the car, I decided that the center of the wheel, which is textured plastic surrounded by aluminum and clear plastic. This picture is right after the application, when the product is looking very wet. It may have been a heavy-handed application because right before, I had just re-primed my applicator.

Anyways, here is what you get right after the Ultima Interior Guard Plus+ is applied.

I think that it looks great even wet. Maybe it is a little Armor-All-y for many, but it looks great and looks even better when it is dried. You’ll see with some of the pictures the next day just how it dries to a very nice satin sheen.
Now, around this time I decided that I would try coat the smooth plastic and aluminum trim with the product, even though not thirty minutes before I was wiping it off with an interior quick detailer because of the overspray that got on it. Usually I just use the interior QD and no dressing to clean the center console, since smudges, oil from my skin, etc. usually dirty it up quickly. Since this is a test, though, I wanted to see how it looked, especially since it looked so terribly with the overspray on it. And man, I am glad I did because it looked great when it was all said and done!

As you can see, the smooth, black plastic looks very nice with a deep sheen, as the aluminum trim has a nice glow. You can just tell that it is protected by the look of it. Where the light bounces off (near the gear selector), you can see that there are no streaks and a nice, dry shine. I will continue to use the interior quick detailers to maintain the look of the console, but I really like how it looks right after the application.
As I inspected the passenger side of the car, I noticed more smudges on the aluminum trim, as you can see here.

Thankfully, the 1Z Cockpit Premium and a microfiber towel made quick work of the now-dried overspray. Now, the aluminum shines as it is supposed to.

As I was walking away, I snapped this picture that shows the dressing in various stages of drying.

As you can see, the passenger side, which was applied first, only has a couple high spots remaining, while the drivers side has many more. Above the gauge cluster on the dash, you can see many more spots like this. The steering wheel still looks somewhat wet and, at this point, it wouldn’t appear that the dressing is drying evenly or nicely at all. I didn’t worry, though, and knew that all would be well and my patience would be awarded.
The next day, I was able to take these pictures. I apologize for the light. It was quite cloudy outside and I kept the car in the garage to prevent leaves from falling into the car or cowl. What you’ll see, however, is an even, dried dressing. There are no high spots visible, and the dash looks fantastic. Hopefully, you’ll agree.


Looks pretty great, right? Now we can put everything back into its package, and put the applicator into a Ziploc bag.

CONCLUSION
Pros:
Cons:
Final Thoughts
Well, there is a reason why this is recommended by so many when someone is asking about an interior dressing. Frankly, this is the king and there have been few products that do what Ultima Interior Guard Plus+ does. I wasn’t kidding when I said that the 12oz bottle of UIGP would outlive me. Judging how I probably used 1/8 to 1/4 of an ounce when applying the product, with over-application (sometimes deliberate, sometimes not) and priming the pad way too much, I would see how subsequent applications would use half of what I used this first time.
If you’re looking for a interior dressing that doesn’t drastically alter the appearance of the underlying surface, is a great value, and provides needed interior protection, including against the Sun’s harmful rays, then I would highly recommend Ultima Interior Guard Plus+! Everyone can’t be wrong when they keep recommending UIGP, and I hope that this review illustrates just how versatile and great this product is, while still being economical in the long run.
I look forward to everyone’s opinion regarding the product, and any questions or comments regarding the review, my methodology, or observations. And, as always, happy detailing!
My need for the product was because I was in need of an interior dressing that has strong UV-inhibitor properties. My current go-to interior products (1Z Cockpit Premium and SONAX Dashboard) are more cleaners and don’t have (as much, or any in some cases) protection. Since I have a convertible, the windshield and windows don’t have the same opportunity to block the sun’s harmful rays. I certainly did not want my dash to have any fading or cracking, so I decided that I would need a product that provided protection. The biggest thing was I did not want a greasy look, but rather I preferred the factory, matte look that so many of us desire. Both the SONAX Dashboard cleaner and 1Z Cockpit Premium impart the look that I like, but I heard that this is just a hair more sheen than factory. In fact, some have said that they thought this was about as factory matte as it gets, at least when talking about a dressing or protection product.
After consulting quite a few walk-throughs and reviews, I had a pretty good idea about how this product would react, and the proper way to apply it. It seems if you apply it thin, it can self-level and leave you with a perfect satin, matte look. Any high spots that appear can be either buffed with a microfiber towel or smoothed out with the included applicator.
Here is the product when you first receive it.
As you can see, it comes with an applicator pad and is in its own little container.
Here’s the front of the bottle:
And the back:
I will just point out a few of the claims made by Ultima in the copy: The clear sealant dries completely and will not leave a greasy, slippery film that attracts dust – for every surface in your car – whether it be leather, fabric or vinyl. I am assuming that the fabric can also include Alcantara, if you’re vehicle is equipped with it.
Okay, so now onto the application of the product.
Here is the driver’s side door, before.
Passenger dash, before:
After priming the applicator with three sprays, I kind of spread it out with my finger, which was protected, as always, with nitrile gloves. After the priming, I started spreading it out on the passenger side of the dash.
Here is a shot of me still spreading the product out on the passenger side, with the high spots already becoming visual. I continued using the applicator to “knock down” the high spots to kind of spread it around and make sure there is uniform coverage.
One thing that is evident right off the bat is the dramatic difference in “color” or the sheen or shine that the product produces. I continued and pressed on because I knew that when it dried it would be more of the matte, somewhat factory look that I desired. Despite the directions saying to use a microfiber towel to buff dry after five or so minutes, I did not do this. After reading quite a few reviews and responses from the manufacturer, I had come to the conclusion that this was truly an optional step that was for those who were not familiar with spreading a product thin, but rather had a heavy-handed application that many of us did when we were new to detailing.
In fact, after the applicator, which was very sturdy and made out of high quality foam, was primed, it was very easy to spread the product far. I only had to spray a few more sprays on the applicator to do the entire dash and door interiors. I big bottle like I bought may outlive me, and I’m in my 20s!
Here is a rough ¾ of the of the passenger dash completed. You can clearly see the line on the left side of the picture where the dressing application ended. This will give you a real idea on how the dressing looks just after the application.
Here’s another picture of a 50/50 shot in the center of the dash, just under the chronograph. In the top of the picture you can see smooth plastic that covers the chrono and vents. When I did apply to the smooth plastic, I did buff it a couple of minutes later with a microfiber towel. I did not buff the textured rubber or plastic.
Here is the entire passenger side, completely dressed. You can see the applicator, which due to the size I was not able to get into the corners of the dash. For this task, I used a corner of the microfiber towel. I could have compressed the foam, but I did not want to risk getting the dressing onto the glass, which in my experience with other dressings is always a pain to get off.
Here’s a view of the top of the dash, with only a couple high spots remaining. In my experience, this self-levels and there is no need to buff with a microfiber towel or go back over it with the applicator to smooth it out, unless it is exuberantly wet or much higher than the surrounding area.
One thing that I noticed when I looked down, was when I was priming my applicator or something, some overspray got on the center console smooth plastic and aluminum. Here’s what I’m talking about.
You can see the spots on the black plastic and smudges on the aluminum. Now, these were not too hard to get off, I just grabbed my 1Z Cockpit Premium and the microfiber towel and the dressing overspray came right off. Without the Cockpit Premium, however, the dressing just smudges, like it has on the aluminum on the right side. On that side, I had just tried to clean it up with a fluffy side of a microfiber towel, which did no good. Thankfully, a fantastic interior light cleaning spray, such as SONAX Dashboard, 1Z Cockpit Premium, or Auto Finesse Interior Quick Detailer, will easily clean up any overspray or smudges that you want to get out.
Moving on to the passenger's side door, here is a 50/50 shot.
Again, you can see the stark difference in the appearance of the bare side and the side with dressing on it. Of course, this is exaggerated and as it dries, the appearance becomes less and less. Fully dried, next to the bare side, there is only a slight difference between the sides, which is why this product is so popular – it doesn’t drastically alter the appearance of the underlying material. Here is the door, with the door fully dressed.
You can see a high spot that is pretty much the size of the applicator and roughly the same shape in the rough center left side of the picture. I would think this is where I pressed down, inadvertently of course, before removing the applicator from the door panel. Since this is a test, I didn’t want to buff the high spot off with a microfiber towel. Thankfully for me, the high spot self-leveled within a few hours and now a few days later, there is only one high spot that is visible. Ironically, it isn’t where the high spot in this picture is visible, but rather near the leather door inserts. If I were to go over it with a microfiber towel half an hour or so after application, it probably would have prevented all high spots, but I still don’t think this is necessary if you focus on a thin application. If you prefer heavy applications, then a wipe down would be in your best interest.
In the picture below of the driver's door, you can see high spots, especially above and under the leather armrest. Under the armrest, it is smooth plastic that probably should have been buffed with a microfiber towel, but was not. In retrospect, those spots near the armrest should have been re-leveled with the applicator above, and wiped down below the armrest.
Here’s another shot of the door, with the only “shiny” spot being above the armrest, which was probably due to misapplication by your dear reviewer.
Other than that, in my opinion, the door is looking pretty good, and most importantly, is protected against harmful UV rays and other things.
Moving back into the car, I decided that the center of the wheel, which is textured plastic surrounded by aluminum and clear plastic. This picture is right after the application, when the product is looking very wet. It may have been a heavy-handed application because right before, I had just re-primed my applicator.
Anyways, here is what you get right after the Ultima Interior Guard Plus+ is applied.
I think that it looks great even wet. Maybe it is a little Armor-All-y for many, but it looks great and looks even better when it is dried. You’ll see with some of the pictures the next day just how it dries to a very nice satin sheen.
Now, around this time I decided that I would try coat the smooth plastic and aluminum trim with the product, even though not thirty minutes before I was wiping it off with an interior quick detailer because of the overspray that got on it. Usually I just use the interior QD and no dressing to clean the center console, since smudges, oil from my skin, etc. usually dirty it up quickly. Since this is a test, though, I wanted to see how it looked, especially since it looked so terribly with the overspray on it. And man, I am glad I did because it looked great when it was all said and done!
As you can see, the smooth, black plastic looks very nice with a deep sheen, as the aluminum trim has a nice glow. You can just tell that it is protected by the look of it. Where the light bounces off (near the gear selector), you can see that there are no streaks and a nice, dry shine. I will continue to use the interior quick detailers to maintain the look of the console, but I really like how it looks right after the application.
As I inspected the passenger side of the car, I noticed more smudges on the aluminum trim, as you can see here.
Thankfully, the 1Z Cockpit Premium and a microfiber towel made quick work of the now-dried overspray. Now, the aluminum shines as it is supposed to.
As I was walking away, I snapped this picture that shows the dressing in various stages of drying.
As you can see, the passenger side, which was applied first, only has a couple high spots remaining, while the drivers side has many more. Above the gauge cluster on the dash, you can see many more spots like this. The steering wheel still looks somewhat wet and, at this point, it wouldn’t appear that the dressing is drying evenly or nicely at all. I didn’t worry, though, and knew that all would be well and my patience would be awarded.
The next day, I was able to take these pictures. I apologize for the light. It was quite cloudy outside and I kept the car in the garage to prevent leaves from falling into the car or cowl. What you’ll see, however, is an even, dried dressing. There are no high spots visible, and the dash looks fantastic. Hopefully, you’ll agree.
Looks pretty great, right? Now we can put everything back into its package, and put the applicator into a Ziploc bag.
CONCLUSION
Pros:
- Can be used on any interior surface (save for glass)
- A little goes a long way
- The closest to a factory matte look while still providing protection
- Price (when you take into account how concentrated it is)
- Provides superior interior protection (when looking at other long-term reviews)
- Dries dry with no greasy feel, even on smooth surfaces
Cons:
- Price (it is expensive initially, when talking about dollars spent)
- Does darken compared to factory matte (or using 1Z Cockpit or SONAX Dashboard products)
Final Thoughts
Well, there is a reason why this is recommended by so many when someone is asking about an interior dressing. Frankly, this is the king and there have been few products that do what Ultima Interior Guard Plus+ does. I wasn’t kidding when I said that the 12oz bottle of UIGP would outlive me. Judging how I probably used 1/8 to 1/4 of an ounce when applying the product, with over-application (sometimes deliberate, sometimes not) and priming the pad way too much, I would see how subsequent applications would use half of what I used this first time.
If you’re looking for a interior dressing that doesn’t drastically alter the appearance of the underlying surface, is a great value, and provides needed interior protection, including against the Sun’s harmful rays, then I would highly recommend Ultima Interior Guard Plus+! Everyone can’t be wrong when they keep recommending UIGP, and I hope that this review illustrates just how versatile and great this product is, while still being economical in the long run.
I look forward to everyone’s opinion regarding the product, and any questions or comments regarding the review, my methodology, or observations. And, as always, happy detailing!
 rops:
rops:")