RV roof to side gutter question?

Red Fire

New member
Joined
Aug 20, 2012
Messages
57
Reaction score
0
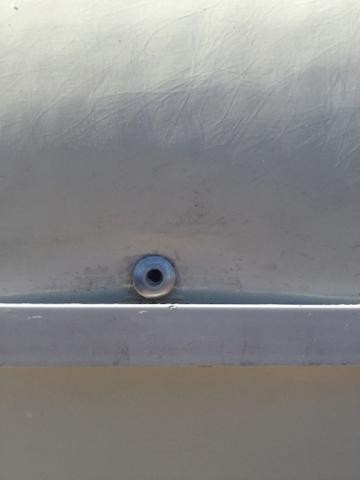
Why would they put this rivet right here? See pictures below.

This is the roof to side gutter. I was pulling off the old caulking and silicon , thinking I would clean it then reapply new.

The problem is that the other side of the RV does Not have this done only in the two places where the awning attach.

My questions are:

If these are designed for the roof to come over and drop into the gutter with no caulking, then why did the previous owner do this?

Did he or a shop put that rivet in?

Why?

Is it supposed to be there? As you can see it doesn't allow the roof to press against the gutter for it to seal.

I think they may have done it in one more place as well but won't know until tomorrow when I get to that spot.

This was already siliconed like that when I got it but I wanted to clean it up and if I had to put it back on, do it nicer.

This doesn't make since to me as I said the other side has no silicon(awning only spots).

The roof comes over then inside of it, pressing against it to seal it.

If water does get in there it should just run down the gutter and out one of the 3 holes in it 1 each end and 1 in the middle.

I had a leak last year, so Ins. paid to send it to the (RV PROFESSIONALS)WAJ. The fixed the inside dried it all that stuff.

Resealed the roof. Then to my very unhappiness just siliconed over the side gutter and looked like crap again. I asked them why it even had to be there. Answer "because someone put it there for a reason". What the ????!! because some put it there that don't matter. What's the reason its there and not on the other side of the RV?

I called Winnebago and asked him why you would silicon the crap out of the side like that.

They said they weren't sure why, that you could put a small bead along it, as the gutters are J style, flat up, flat down, J as the the gutter. That made sense to me. But why no signs of factory silicon in the roof to inside of the gutter part?

I didn't know about the rivets at the time of this phone call.

Maybe I need to reexamine the other side for factory silicon inside the gutter?

Obviously you can see this is in my head and I can't except "because someone put it there"

This is our first RV so I'm learning as I go, but this has bugged me for awhile.

I was hoping someone with RV experience could help with this.

And Yes the simple fact of it leaked is why, has crossed my thinking.

But why then does the other side not leak?

You can push the roof inside the gutter in theres about a 1/4" space/gutter, when you let go it presses back against the inside of the gutters edge.


If you could explain this to me or if you know the proper way? Example: a little silicon on the inside of the roof to gutter part.
I would appreciate it.

If this is the case what about the rivets?

What way would be best to silicon them without clogging the gutter, causing a potential backup of water and another leak?

By the way this is why I feel it leaked last winter.
 
they put it there to stop leak .If it was me just leave it there .but if its that big of a deal to you. Get some marine 5200 sold at west marine and put it in the gap then use a 2x4 and some long straps to hold it to the trailer till it drys.put plastic over 2x4 as not to sick the 5200 to the wood.after it drys trim with razor blade. hope this helps you
 
If these are designed for the roof to come over and drop into the gutter with no caulking, then why did the previous owner do this?

More than likely the previous owner had a leak in that area. The exact source of a leak can be extremely difficult to find. Most people try to caulk in the general area they think the leak is coming from. When it still leaks they add more caulk to a broader area.

You will find that leaks in an RV are a fact of life. I've owned 5 different ones & they all developed leaks somewhere. Yes it can drive you crazy. At one time I became so disgusted with leaks that I almost sold mine & decided to give up RVing. The truth is I enjoy it too much & so I've just learned to accept it as part of the "RV life".

Did he or a shop put that rivet in? Why? Is it supposed to be there?

Every RV mfg. does things a little differently. All the RV's I've ever owned, the J channel was screwed there & not riveted. The only person who could answer that is the factory or someone that has the same make, model & year RV as you have.

Some people & even repair shops, come up with their own "homegrown solution" to a problem without understanding the consequences of their actions. Sometimes they work well & sometimes not.

Normally, that J channel is caulked at the joints to prevent a leak & a small bead across the top where it meets the rubber roof. These pics definitely show an aftermarket caulk job.

They said they weren't sure why, that you could put a small bead along it, as the gutters are J style, flat up, flat down, J as the the gutter. That made sense to me. But why no signs of factory silicon in the roof to inside of the gutter part?

Even though these things are very expensive, quality control is not what it should be. The awning side is usually caulked the same or more due to the larger screws that hold the awning rail. Maybe that's the way this factory does it.
 
I would leave it like that and just re caulk. But this time tape the top and bottom with blue tape. After you apply the caulking smooth it out, them remove the tape so a perfect line comes out. Make sense?? One thing you must know about RV's, they will ALWAYS have some little thing wrong with them. Good luck!


Sent from my iPhone using AG Online
 
Thanks guys for responding, I thought you would have an idea.

I have heard all sorts of things about RV's and I guess, my problem is I like to do it right. So when one side looked like this and the other nice and clean with no silicon it just didn't make since to me.

I like the tape suggestion at least it will look nicer.

The last pictures were after I removed the old silicon and what the other side looks like.

So if I'm hearing you guys right your saying to silicon it up and don't let the water even get into the gutter?

Thanks Again.

PS Jomax nice pictures, looks good I'm curious to see what mine looks like in the spring.
 
Last edited:
Don't fill up the gutter. Just put a small bead across the top of the channel where it meets the rubber roof. It should seal the gap between the rubber roof & the top edge of the metal channel. That's all that it needs.

I would take a pic of mine to show you but it's 250 miles away at the beach.
 
I would leave it like that and just re caulk. But this time tape the top and bottom with blue tape. After you apply the caulking smooth it out, them remove the tape so a perfect line comes out. Make sense?? One thing you must know about RV's, they will ALWAYS have some little thing wrong with them. Good luck!


Sent from my iPhone using AG Online

Great advice!


Not uncommon in the RV world.
 
Now that vegas blew that pic up I can see better.

Does your rubber roof run inside the J channel?
 
Now that vegas blew that pic up I can see better.

Hey, on the pics I down size them from original until AG says they aren't to big to upload. So get your magnifying glass out :joking:or get AG to let me upload larger pics. At least they aren't sideways anymore.:)


Does your rubber roof run inside the J channel?[/QUOTE]

Yes.

I finished cleaning out the old silicone and they had filled the gutter full of silicone close to were I would guess the leak started to come in last year. Which makes sense if water made its way into the gutter but had no place to go, it would just back up and find the easiest exit.

With that being said I dug as much out as I could, but not so sure I would want water to get into the gutter again as I couldn't get it all out as some was behind the rubber roof.

It had 3 rivets total on that side.

I was also thinking of using white silicone instead of clear do to looking so dirty so fast.
 
It's not Rubber it's Filon (fiberglass) We have the same model of Winnebago.

They had a problem by design, where in that area the Filon would banjo and make popping sound while driving under the right wind conditions.

That's an old guy fix as is all the caulking, your going to have to put some caulking there now to keep from future leaks.

What we would use is Dicor 502-LSW and start about 5ft back of the front cap and work forward, do this sparingly as this self leveling. So apply it and leave it alone, the tape is a good idea
 
Thanks Randy, at least I now know why the rivets are there.

How did the Dicor hold up?

Better than the silicone?

I was looking at getting the highest level silicone (flex, cracking, etc.) I could today and sealing it back up.

I have to pick up some Dicor anyways.

It's 100 today but rain will come unexpected this time of year.

There was also some caulking in there as it came out some white rubbery and some white powdery.
 
It's not Rubber it's Filon (fiberglass) We have the same model of Winnebago.

They had a problem by design, where in that area the Filon would banjo and make popping sound while driving under the right wind conditions.

That's an old guy fix as is all the caulking, your going to have to put some caulking there now to keep from future leaks.

What we would use is Dicor 502-LSW and start about 5ft back of the front cap and work forward, do this sparingly as this self leveling. So apply it and leave it alone, the tape is a good idea


Do you recommend Dicor over silicone to use around windows, side compartment edges around outside lights, etc?

Sent from my iPhone using AG Online
 
It's not Rubber it's Filon (fiberglass) We have the same model of Winnebago.

If this is Filon could you buff/polish and seal the roof just like the sides of the RV?

OK, called Winnebago they said: You could polish the roof but don't need
to. They also said they never have had rubber roofs only fiberglass and aluminum.

He said to use a urethane sealant (dicor) to seal the roof to the gutter. Thanks Randy.

Also recommended the tape it first idea. Thanks Jomax

As for the sides : on hold and I know you can only edit for 20min. before you time out. So I'll answer in a minute. D nm it timed out during the edit but if you click the x the copy your writing you can paste it in a new reply.

Sides Urethane NON self leveling.
 
Dicor is for roofs only it is the sealant you find on the roof seams and around vents very thick and rubbery.

Will run if you try to use it vertically for more than a few inches
 
Did some research online and found this product.

ProFlex RV Flexible Sealant - colors: clear, white, almond.
around $9-$10 a tube. If you have a Camping World (they have it on line)or something similar I'm sure they have or could get it for you.

I went to the RV store and they are going to order it in for me. He said he had used it before and that it works great.

I will let you know, it don't get in until friday so it will probably be the weekend before I get to use it.

I'm going to use it on the roof to gutter and sides.

He said you could use the dicor on the gutter but to use only a small amount then smooth it out so it won't sag.
 
Just to add, Dicor also has a "Non-Sagging" caulk that does not run when use on vertical surfaces. The stuff really 'skins over' quickly.

Bill
 
I found this on another forum, they said this is what Winnebago was using.

The other info I found also said, what ever you use (silicone, urethane, etc.) DON'T mix clean off old and use one or the other.

Home Depot page.

212 – Crystal-Clear Roof Patch
henryimg_212.gif
Henry 212 Crystal-Clear Roof Patch is a one-part, high-performance thermoplastic sealant at low cost. The cured sealant exhibits good physical properties such as excellent adhesion to a variety of construction materials including wet surfaces, rubber-like characteristics with the ability to be compressed or extended, and a non-sag consistency for application by caulking gun in vertical and horizontal joints. It is also non-staining.
Features


  • Adheres efficiently, wet or dry, to most building materials and is highly elastic
  • Skins over, tack free within 30 minutes
  • Exhibits excellent low temperature flexibility
  • Offers wide temperature range from -20ºF to 160ºF (-29ºC to 71ºC),
  • Won’t attack or adversely affect building materials such as glass, brick, or aluminum
  • No primer needed
Sizes Available


  • 10.1 oz cartridge
Color


  • Clear
 
Just brought the RV home to charge batteries and check the side/roof sealant. I am NOT very impressed and DON'T recommend this product (Henry 212 Crystal-Clear Roof Patch) for the roof to side sealing.
It turned a yellowish color and cracked, it's more hard than flexible.
Going to try the Pro flex RV this time.
 
Having a good result on Gutter and Roofing installation is very satisfying, it is a great experience for everyone


Spam link removed -Mike Phillips


:nomore:
 
Back
Top