single stage paint.. input please

SON1C

New member
Joined
Apr 4, 2011
Messages
3,442
Reaction score
0
I've detailed too many times and too many cars
kidding there's no such thing! :buffing:
but I've never worked on a single stage paint, everything has been base/clear
its iirc a 79 vette single stage brown paint, what am I up against here?
will my standard 1-2 knock out be sufficient?
105 cyan
205 tangerine
 
I have only done 4 cars now so I am not an expert but they were all SS paint. I spent a ton of time on my SS white painted Camry which was oxidized and your combo worked best in the end for me. The other part of the combo was the Flex 3401. I finished up with 2 coats of WGDGPS 3.0 and 90% WG Fuzion. Did the hood with Collinite 845 as a test. So far so good.
 
first , do a 360 around the car and inspect the paint , the edges , under hood/trunk , inside door , see if any panels are not line up , look for burn spots, compound dots, clear coat failure dots , wetsand pigtails , bondo work .... most likely on a car that old it has some respray on it or bodywork.
test spot , if the paint transfer than is single , and do a light test on most panels or at least the one`s that look suspicious.

i will start with finish combo first and a da, from there you go with a bit more aggressive pad and finish , or same pad and more aggressive paste , i will not chase perfection on a car like that.
also have some tape handy for edges , i think that`s a must on that car.
also if you can borrow a paint meter , that helps too. if is single stage the paint is very-very soft , some people had trouble finish it nice.
also don`t use any kind of products related with liquor thinner or paint thinner , even if are spray or for wipe down polish etc

usually classic cars are restored on budget and they tend to fall apart so... watch trims, rubber gasket , accessories etc
:buffing:
 
its been in his family for ~30 years, they're the original owners, to my knowledge its never seen anything other than hand application and has sat for atleast 10 years if not more and was just restored this month or last, garage kept for decade + lol but they stored items on top of it so I'm expecting some bad RIDS
what I'm thinking is tangerine and d151 at this point for a good cut at it without breaking out the 105
 
no offense , i hear car stories everyday ....
do your inspection first around the car , see if has un-match orange peel , or any of the details i mention in the other post.
people tend to say that their car is perfect , every time !
forget what the owner said , do your own professional look around the car and judge the car by that.

about correction , start low on the finish/polish side and see how the paint is. a good point is to inspect the car after claybar , and see how bad was marr, that way you know if is soft , very soft, or normal , or hard paint.
 
no i completely understand and of course!
appreciate the input :xyxthumbs:
 
Depends how bad it is. Here is a SS Paint that was very oxidized
M105 on orange CCS
100_3606.jpg

NOW! Depending on the condition of the paint, you may want to just go with Mike's thread on detailing a SS paint
http://www.autogeekonline.net/forum...w-car-finish-antique-single-stage-paints.html
 
whatever the condition i would recommend a good application of M7 show car glaze before compound, i do it with a cheese cloth, makes it alot easier to get it to spread uniformly.

i just restored a panel of my car's single stage and did it according to Mike Phillips guide. to experiment whether the M7 feeding really did matter i tried compounding an area that had not been fed with m7 and it was very very hard for me to get it haze free. i was working by hand.
:xyxthumbs:

Good luck:buffing:
 
no offense , i hear car stories everyday ....
do your inspection first around the car , see if has un-match orange peel , or any of the details i mention in the other post.
people tend to say that their car is perfect , every time !
forget what the owner said , do your own professional look around the car and judge the car by that.

about correction , start low on the finish/polish side and see how the paint is. a good point is to inspect the car after claybar , and see how bad was marr, that way you know if is soft , very soft, or normal , or hard paint.

Sage advice.

If the paint is very soft, then the d300 will perform similar to rocks in a bottle on that particular finish.
 
but I've never worked on a single stage paint, everything has been base/clear

its iirc a 79 vette single stage brown paint, what am I up against here?


will my standard 1-2 knock out be sufficient?
105 cyan
205 tangerine
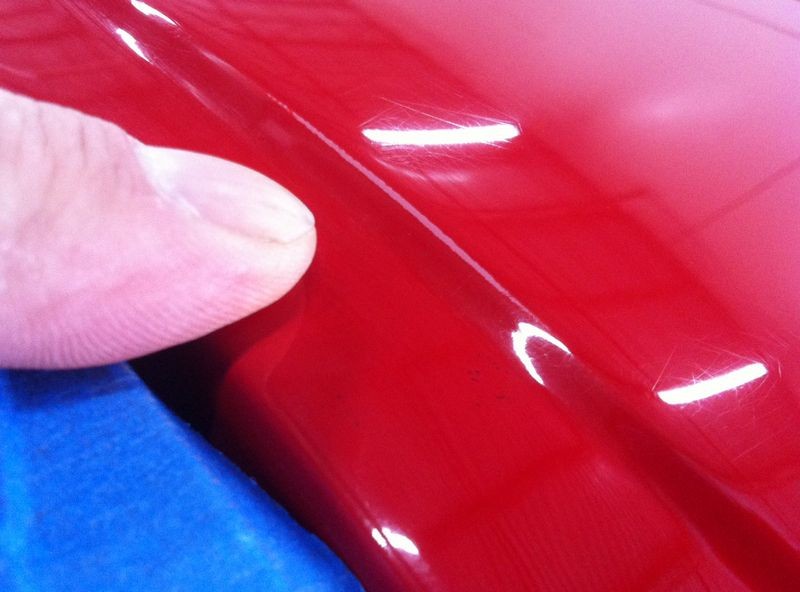
Cosmin gave you some very good advice.

I would just back him up on the recommendation to inspect any raised body lines, corners or edges first and if you find any signs of thin paint then mark these areas on your Vehicle Inspection Form, take a picture of them and show the owner before you start working.

If you find any thin spots, you can either place some painter's tape on them or next to them if you want to be SUPER careful. And then remember as you start buffing where these thin spots are and don't buff on them.

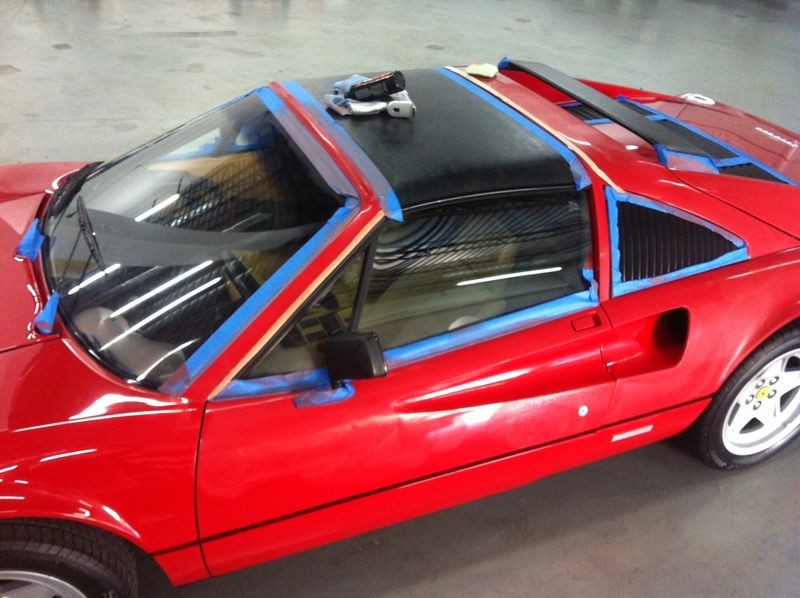
I buffed out a Ferrari recently and ran into this problem and did all of the above.


Just by coincidence, I have an all original, including 100% all original single stage paint 1979 Corvette and after inspecting it I found thin spots on some of the raised body lines. Already pointed them out to the owner. Often times the owners of cars don't even realize they have thin spots because they are so used to looking at the car "big picture", you as a detailer don't look at the car you examine the car and defects stand out like a sore thumb.

This is why you want to inspect, document and show the owner anything that looks risky before you touch the car.


Here's the area on the Ferrari with the thin paint...

Single_Stage_Paint_Thin_Spot_001.jpg


Here it is after I taped-off anything I didn't feel like "detailing" afterwards...

Single_Stage_Paint_Thin_Spot_002.jpg


Here I've circled the thin spot and you can see a strip of painter's tape actually over the thin spot.

Single_Stage_Paint_Thin_Spot_003.jpg


And keep in mind, if you find one raised body line that someone else has burned through in the past, there could be other raised body lines that are not burned through yet but the paint is whisper thin and even if you're as careful as humanly possible you could still burn through, even if you're working by hand.


Finished
Single_Stage_Paint_Thin_Spot_004.jpg


:)
 
its iirc a 79 vette single stage brown paint, what am I up against here?


will my standard 1-2 knock out be sufficient?

105 cyan
205 tangerine

Single stage paints, except for white, tend to be softer than modern basecoat/clearcoat paints. Black tends to be the softest. What determines paint hardness when it comes to a single stage paint is the pigment.

You take resin, (that's the actual paint), and by itself it has a hardness/softness value. Now add a pigment to it and what you're doing is modifying the resin with the pigment and the pigment can make the resin harder or softer depending on whether the pigment itself is hard or soft.

I talk about the Mohs Hardness scale and this topic in my article here,

The Lesson White Paint Teaches Us

Mike Phillips said:
The Mohs Scale of Hardness

In 1822, an Austrian scientist by the name of Fredrick Mohs created a scale from 1 to 10, for measuring and determining hardness. Hardness refers to the measure of resistance a surfaces has to abrasion. Talc is rated at 1 while a diamond is rated at 10.

Titanium dioxide, the substance used as pigmentation in white paint, is rated at 7 on the Mohs scale. As far as pigments go, titanium dioxide is very hard. By contrast, black paints, (single-stage), are soft. The pigment used to make paint black is Carbon black, which has a Mohs hardness rating of 2.

While some will argue the Mohs Hardness Scale isn't the best way to explain paint hardness, in this example I'm only using it as an indicator of the hardness of different substances used as pigments or colorants used in automotive paints and when it comes to a single stage paint the type of pigment used WILL effect the hardness or softness of the resin/paint and this will affect how easy or hard it is for someone to work on the paint.


When it comes to buffing out older, softer single stage paints you really want to follow the careful practice shared here,


"Use the least aggressive product to get the job done"


And start by doing a Test Spot and I know you already know to do this by I always write for the future and by this I mean that more people will read this thread into the future that might not be up to speed to normal and recommended protocols.

How To Do a Test Spot
(and why it's so important)


So test the M205 first with the Tangerine Polishing Pad, you might find it gets the job done. If it doesn't then try the M105 with the Tangerine pad, you might find this to be a winning combination.

Do be very careful around the raised body lines on this Corvette, my experience has shown me that the paint is thin from the factory to start with and it doesn't get any thicker over time.

Looking forward to your before and after pictures and be sure to take a great before picture before you "touch" the paint. See my article on this topic here,


The power in the after shots is created in the before shots


:)
 
One more thing...


After this experience, come back to the forum and share with everyone your thoughts on working on single stage paint as compared to working on clear coat paints.


Here's my take...
I love working on singe stage paints as they are the real deal, that is they are real paint and they polish up so much better and differently than a modern basecoat/clearcoat paint system.

You can create very dramatic before and after differences when working on neglected single stage paints that are much harder to do with clear coat paints.

Plus, often times if you're working on a single stage paint you're also working on a SIV or Special Interest Vehicle, and that makes the project even more fun.


Just treat the car like it's you're own and it will come out perfect...


The Mindset of a Professional Detailer


:)
 
Incredible input, ill definitely follow up on here :D
 
I bought a 2002 Toyota Corolla that had always been parked outdoor and never waxed, EVER!
Should have named it "Old Chalky"

So I followed Mike's instruction to the letter. Applied Meguiar's #7 five times, letting it sit on the paint overnight (in a warm garage).

What an improvement! The paint absorbed an amazing amount of "nourishment" from the #7
And then It polished out beautifully.

Here is a link to Mike's treatment;

The Secret to Removing Oxidation and Restoring a Show Car Finish to Antique Single Stage Paints


:xyxthumbs:
 
I bought a 2002 Toyota Corolla that had always been parked outdoor and never waxed, EVER!
Should have named it "Old Chalky"

That's funny....


So I followed Mike's instruction to the letter. Applied Meguiar's #7 five times, letting it sit on the paint overnight (in a warm garage).

What an improvement! The paint absorbed an amazing amount of "nourishment" from the #7

And then It polished out beautifully. Here is a link to Mike's treatment;


The Secret to Removing Oxidation and Restoring a Show Car Finish to Antique Single Stage Paints


It's amazing what can be brought back to life...


no they rescheduled, should be working on it 1/7


Cool. Looking forward to your results.


:xyxthumbs:
 
Mike in the picture with the exposed primer on the body line in your first post, do you have any advice for correcting (touching up) it or is it too far gone to save?
 
Mike in the picture with the exposed primer on the body line in your first post, do you have any advice for correcting (touching up) it or is it too far gone to save?

You mean this one?

Single_Stage_Paint_Thin_Spot_001.jpg


You can invest a ton of time and great results or more often just mediocre results or you can invest just a little time and get mediocre results. Kind of a crap shoot.

The most important thing is to not make the place that some other guy has burned through grow, that is to get larger. That's why I taped the area off, so I wouldn't get buried in my work and accidentally run my pad over it as that would have really made it stand out.

Here's the quick, down and dirty way to fix a burn through like you see above and that's to take your touch-up paint, shake it really well, dab some on your fiber and rub it over the primer area. Quickly rub any touch up paint not on primer off. Might have to use a little IPA or some type of solvent but you have to be careful with this as you could just rub the touch-up paint off.

I just use a very tiny amount of paint and rub it over the burn-through area and call it good. Spending or investing more and more time into something this small can take a mole hill and turn it into a mountain.

When I did this job I noted the burn-through area on my VIF, showed the customer AND took pictures to fully document I did not cause the damage. Then I just didn't make it any worse.

Major on the majors... minor on the minors...


:)
 
That's funny....


It's amazing what can be brought back to life...


Cool. Looking forward to your results.


:xyxthumbs:

For the record your input was spot on Mike and M7 , m205, and dodo juice blue velvet pro knocked it out of the park, the owners were ecstatic
 
Back
Top