25 is of course the price to just create the foamer attachment, if you are doing everything together, creating the entire setup will cost just over 50 (gun included).
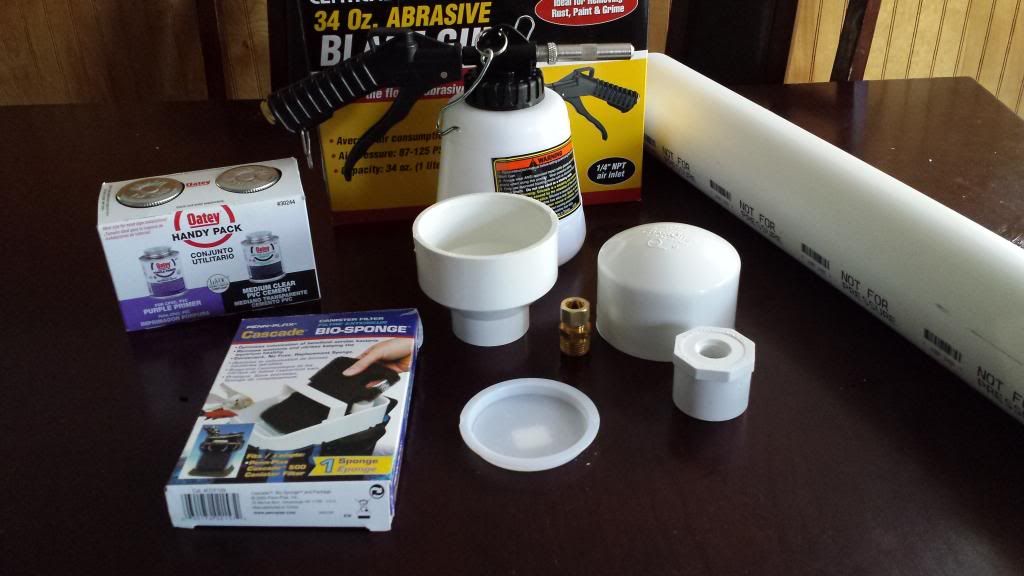
to accomplish this, you'll need everything here. you can save money if you already have some pvc cement and primer like most people have. but in this case you will definitely need it because a couple of the joints have only 1/4 of seating area to keep the size down.
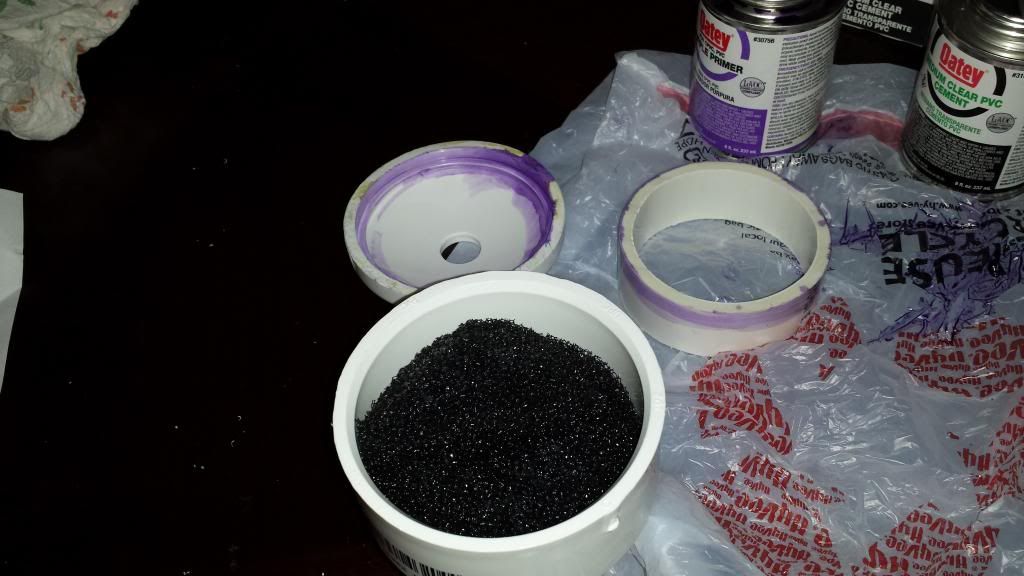
Filter bio-sponge (make sure it's the specific large pore type, i don't know if the small pore will work, and didn't try because this is the EXACT filter that tornador gun has in it)- Petco 8.99
3"-1.5" reducer (lowes) - 3.17
1.5"-1.2" threaded bushing (lowes) - 1.56
3" end cap (lowes) - 3.81
3" test cap (lowes) - .72
3" dia PVC length (you'll only need 1-1/2" inches of it, so buy the smallest length you can find, this is not a coupler, this is the pvc tube which is 3" ID, any coupler will have a larger ID because it fits over the pvc tubing) (lowes) - 6.28
total - 24.53
i bought some of the primer and glue because i was going to need some later and my others somehow were left uncapped, it was around 6 for the pair. you can buy the smallest ones you can find if you won't use it for much else.
Brass Compression fittings (menards) - 12.99 5pk (sorry, i couldn't find locally any 1/2" compression x 1/2" npt that came in a single pack, so i spent 13 to get it so i could finish this up, if you are going to make it. find a brass fitting that you can be single, and it should only be around 3.50-4 for one fitting, you'll never use 5 unless you make these for other people.
harbor freight abrasive sandblast gun, 20.50 after 25% discount coupon (they accept any coupons, even online shown on your phone, as long as its not expired. find a 25% on garagejournals HF coupon thread, they are always up).
Onto the goods.
i won't bother with using step 1, 2, etc, because things can be done out of order, this is just how i chose to do them.
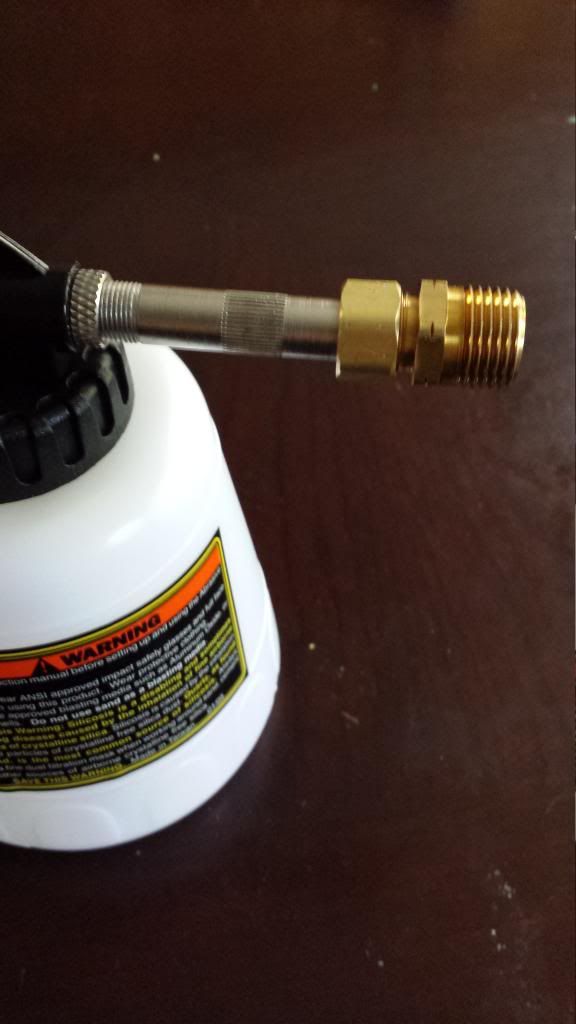
put your brass compression fitting on the end of the HF gun nozzle, slip it on just like it comes, or if it comes apart, it goes cap, compression ring, then fitting.
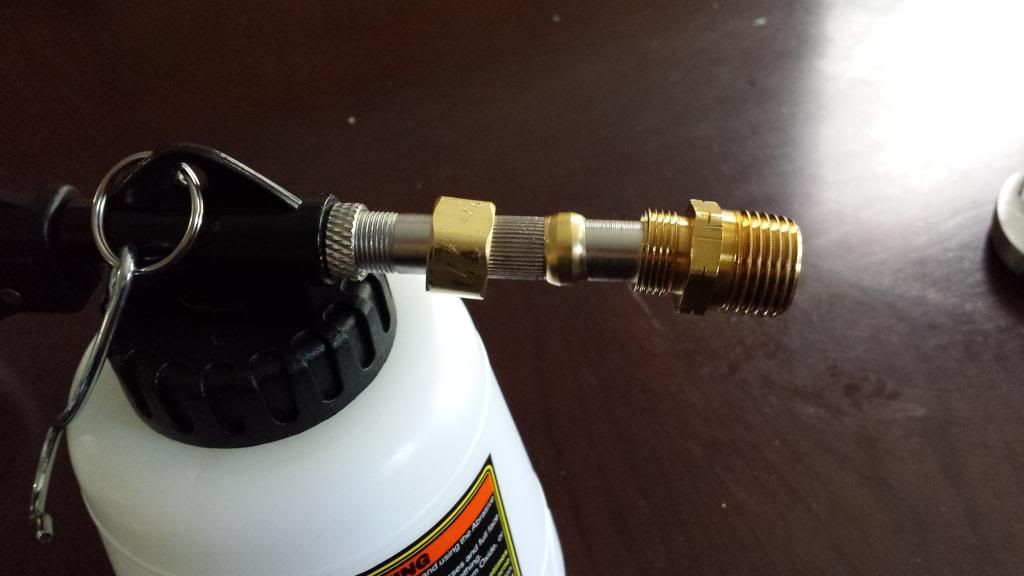
tighten it down and the compression fitting will clamp down on the nozzle, i used this because i wanted anyone at home to be able to put it together, even though i have access to lathes and an entire machine shop and maintenance shop, i could have made everything custom.
Next
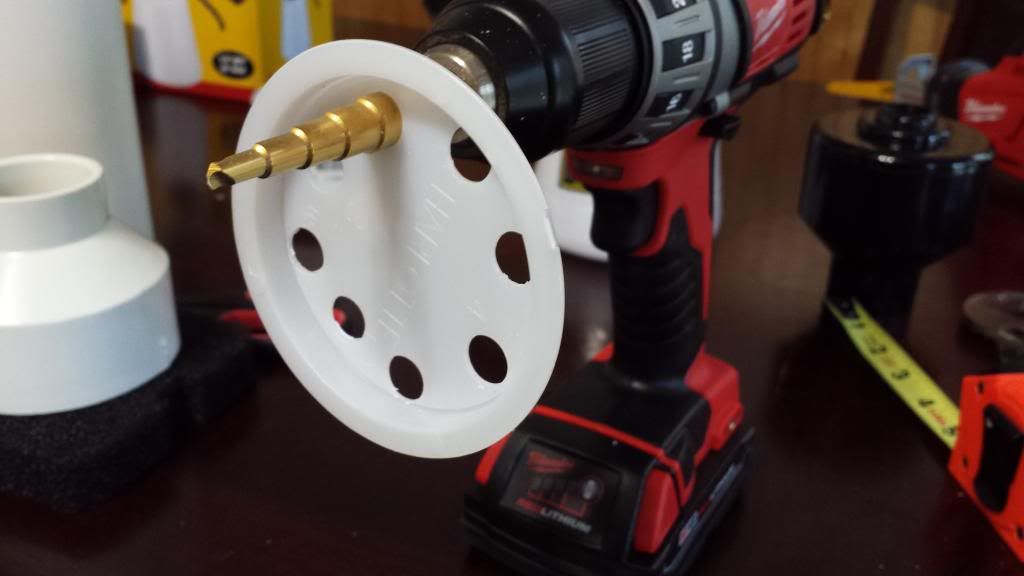
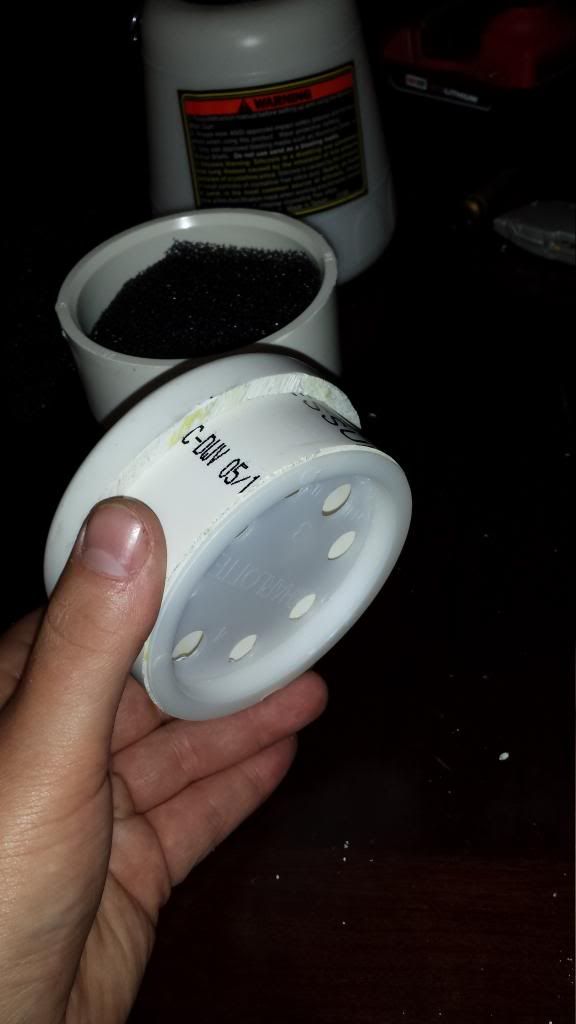
Take your Test cap, and drill 8 (or 9, the tornador has 9, but 8 worked for me). 7/16 to 1/2" holes. you want these to as close as possible to the outside ring, even biting into the outside ring is just fine, i was a bit sloppy with mine due to children running in and out lol.
take your cap and place it 3" side down ontop of the filter material, get your outline, and cut to the exact size of the OD (outside diameter). you'll cut a taper into it in the next step so it can sit a bit more recessed inside the cone area without being bunched up.
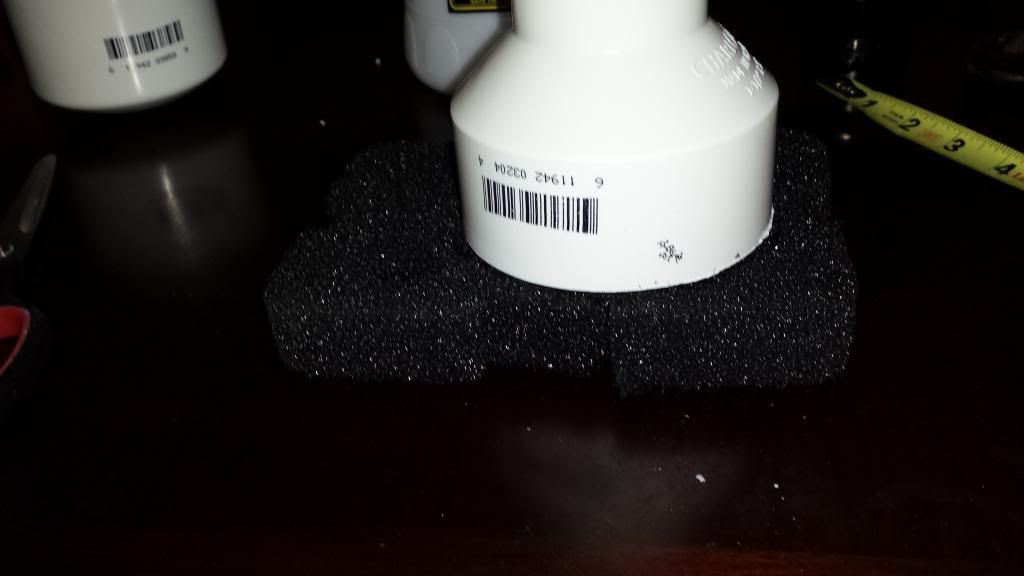

^ to achieve that kind of cut, just use scissors and cut the corner off of one side all the way around.
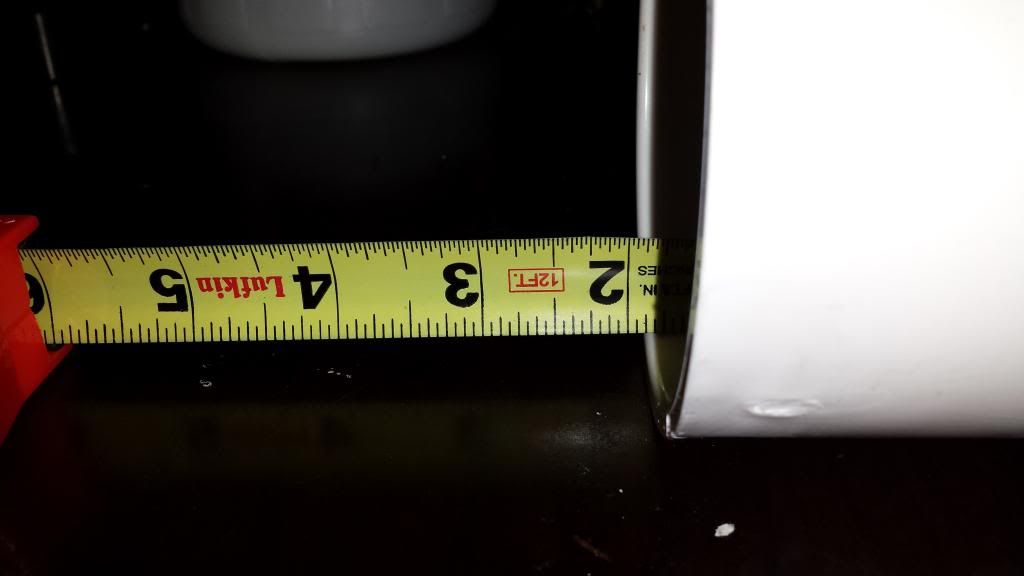
Now the cap part. you'll take the cap and measure out how long the inside is to the inner lip that sits against the pvc pipe. mine happened to measure 1-7/8. and i wanted a 1/4 lip for seating at the end, so i ended up cutting off 1-5/8 to get my lip size, mark everything by measuring and marking with dashes all the way around so you can ensure you are cutting straight, lets not waste 3 bucks on a budget build right!
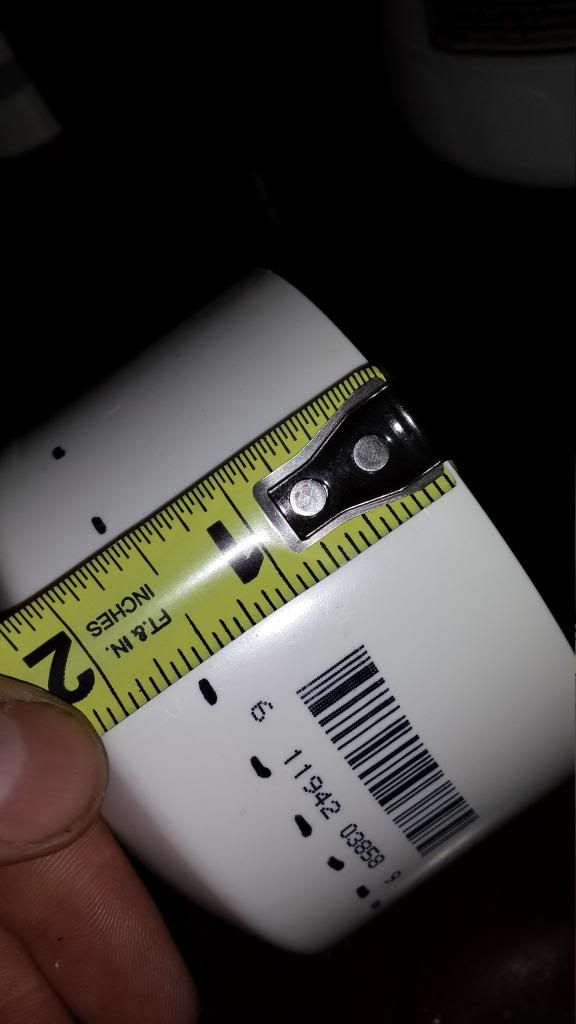
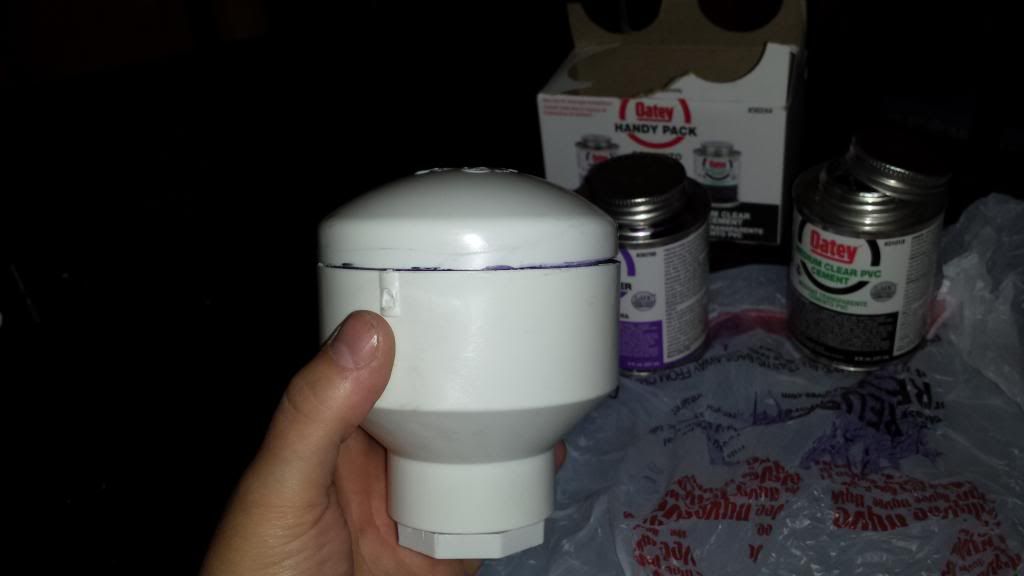
This is what you should end up with. notice the small 1/4" lip, perfect seating area, i used a milwaukee hackzall (awesome little sawzall) to make my cuts, i recommend buying one for all kinds of reasons if you need one, otherwise any ole handheld hacksaw can take care of it, just slower.
^ notice the hole in the center of the cap, i didn't take pictures but you'll want to drill right in the center of the cap a 3/4" hole, make it 3/4" as this is the size you'll need if you ever decide to tap that hole for 1/2" npt threads (npt is measured on the inside of the pipe, not the outside, so the drilled hole is larger than the tap nominal size) so you can play with adapters and such or use adapters from a different tornador gun
Next up is the length of pvc pipe you purchased. hopefully you got it cheaper than me, i found it cheaper afterwards but kept the one i bought anyway.
mark and cut off 1 1/2" inches of pvc in the same way you did the cap, this is as much as you'll need to slightly compress and hold the foam in place, while allowing enough room for the foam expansion and expulsion.
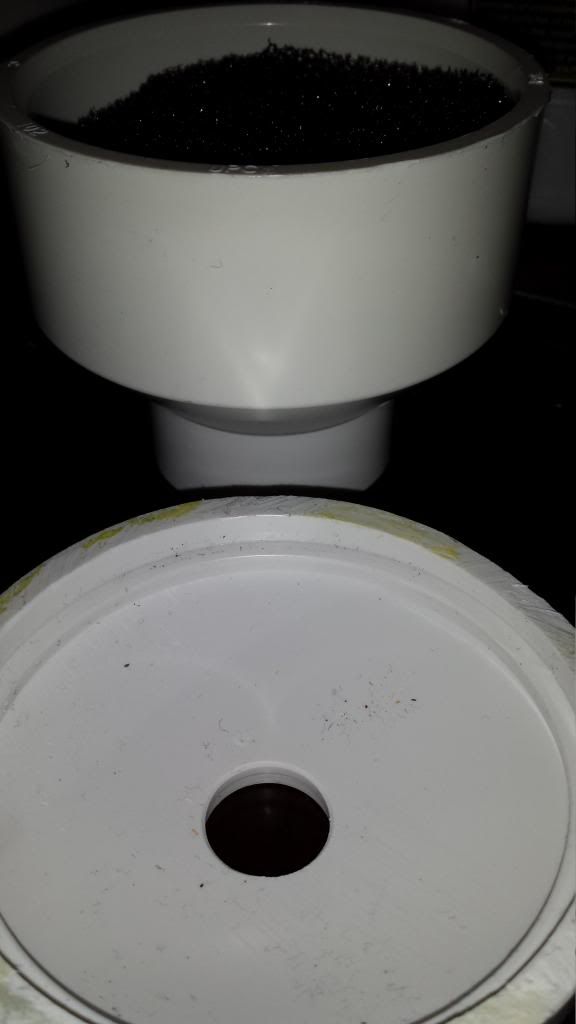
this is what you will end up with.
for Pure cosmetics i also cut 1/2" off of my bushing so that it sat flush with the whole assembly. worked out very well because if i were to sand the nut end round and cut off a little more, it would be the exact same size and profile as the tornador, but i'm fine with how it turned out
before how it looked with the measurement (i always measure the gap, then take off that amount off the end, easiest way to get things to fit real well)

by now you have everything nice and cut, and you've deburred all the edges (take a razor to it, or a file, or anything you got to get rid of those little pieces of plastic, no one wants plastic scratching their cars finish!)
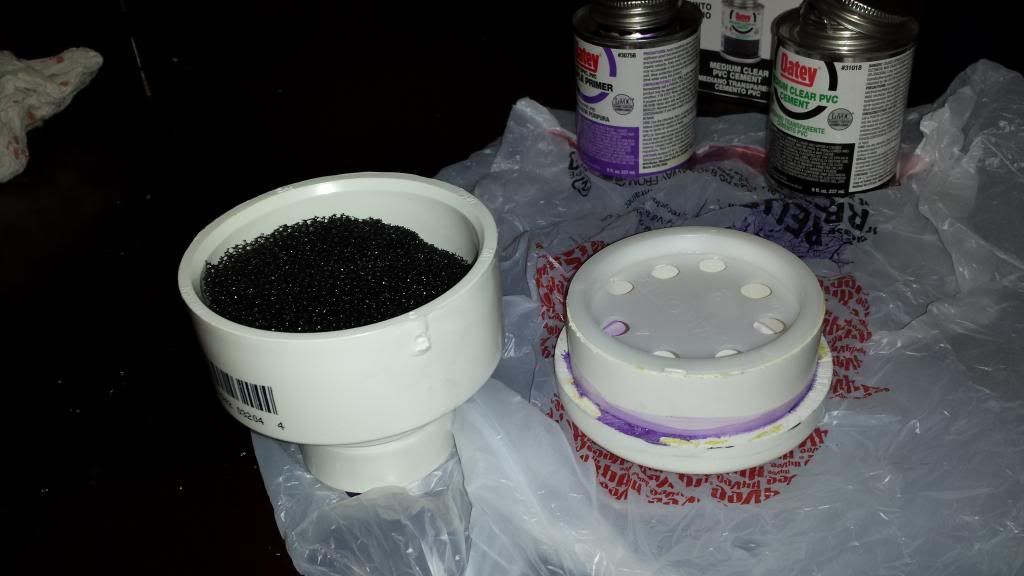
so go ahead and do a test fit. one thing i didn't mention is the filler foam. the initial piece you cut and tapered should be sitting somewhat deep in the unit, you'll need to build up another layer of foam so it has adequate material to push through. you'll need to make two half circles of foam cutout to put on top of the foam you have in there, and you'll need to take off 1/3 of the foams thickness so it isn't too thick and being compressed. this is important because this NEEDS to have non-compressed foam in order to work, but needs to be fully filled.
get your foam cut up and test fit the cap assembly, make sure that you are just pushing on the foam enough to keep it in place and not squishing it down, but make sure there is no gap between the test cap with holes, and the foam inside the unit.
^VERY IMPORTANT.
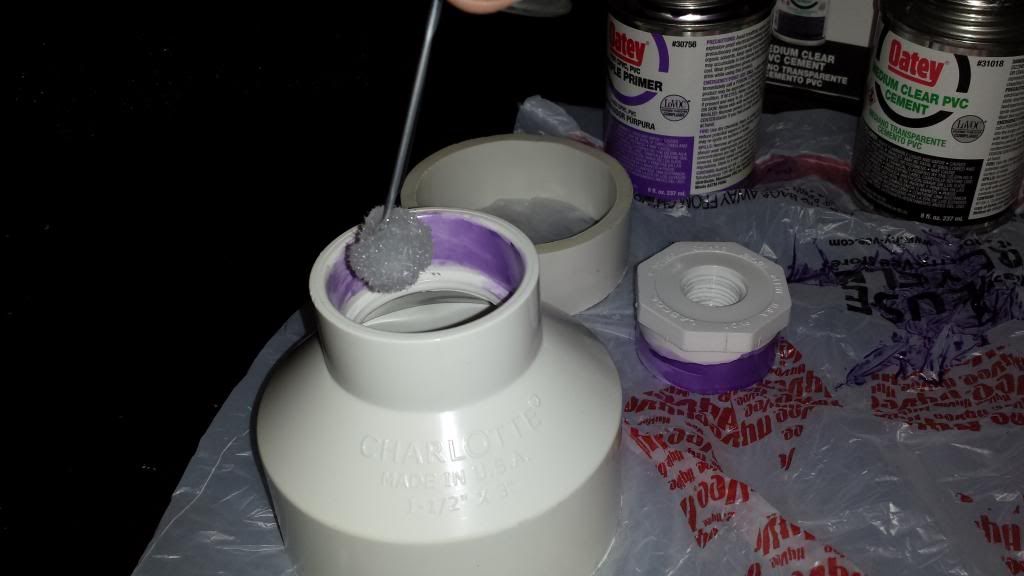
now lets assemble
pvc primer and glue. DONT GET IT ON THE FOAM, thats bad.
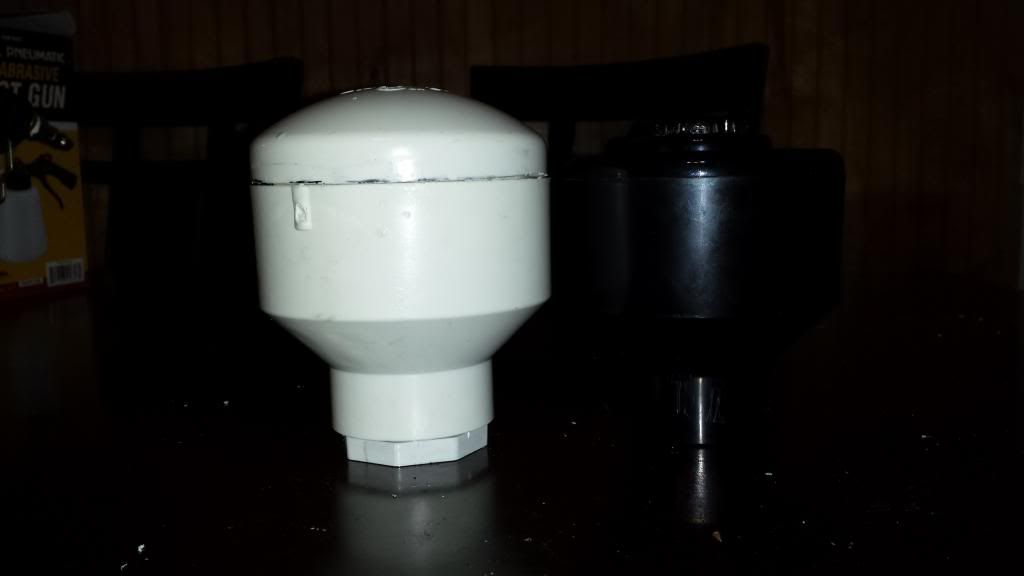
DONE!!! and look, it's 99" the same size. if i had recessed that bushing, they would be the same exact size. they have the same foam content, same foam makeup, similar hole design to force the foam through, and similar gun setups.

^ it was extremely similar to the HF gun. the cap on the sand blaster is smaller by 1/4 inch, so not quite the same. but the designs are dead on (except the HF one could use a slightly longer hose for the venturi effect, but it works fine.)
on to the test pictures????
tell me which side came from which gun??
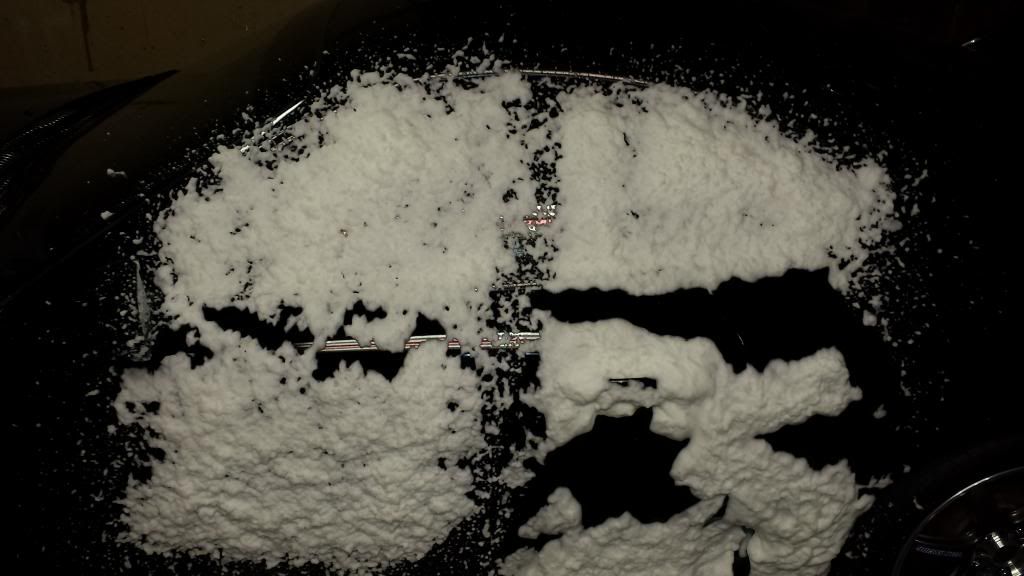
because the gun i got from HF was a little messed up because of my own desire to tear things apart (i ruined the seal at the handle and caused it to have a decent air leak while shooting, i'll return it and get a new one later that is nice and sealed up) it didn't shoot foam as quickly as the other, but there are a few restriction. ie. the air piping and gun on the hf one are not as large as the tornador gun. but here is the upside. that foam on the right took all of the solution from the tornador, and the foam on the left took only half of the solution from the homemade gun.
both guns had the same solution, mixed in a seperate conatiner and were given the same amounts.
overall, i'm pretty happy with the results, this is a very affordable alternative for people who don't want to spend 130 for a foaming gun, or who already have the regular tornador and just want the foaming attachment.
caution as is though, this walkthrough has a 1/2" thread for the adapter, but the tornador uses something close to a 3/8" or at a 3/8" so if you want to just make the foamer attachment and use it on your current gun, you can, but you'll need to purchase a 1/2" to 3/8" bushing as well so it fits with no issues.
i'm open to criticisms and questions, i hope this helps the community out, not to hurt the tornadors creators business or anything, i'm not looking to sell these or anything.
Ian.
to accomplish this, you'll need everything here. you can save money if you already have some pvc cement and primer like most people have. but in this case you will definitely need it because a couple of the joints have only 1/4 of seating area to keep the size down.
Filter bio-sponge (make sure it's the specific large pore type, i don't know if the small pore will work, and didn't try because this is the EXACT filter that tornador gun has in it)- Petco 8.99
3"-1.5" reducer (lowes) - 3.17
1.5"-1.2" threaded bushing (lowes) - 1.56
3" end cap (lowes) - 3.81
3" test cap (lowes) - .72
3" dia PVC length (you'll only need 1-1/2" inches of it, so buy the smallest length you can find, this is not a coupler, this is the pvc tube which is 3" ID, any coupler will have a larger ID because it fits over the pvc tubing) (lowes) - 6.28
total - 24.53
i bought some of the primer and glue because i was going to need some later and my others somehow were left uncapped, it was around 6 for the pair. you can buy the smallest ones you can find if you won't use it for much else.
Brass Compression fittings (menards) - 12.99 5pk (sorry, i couldn't find locally any 1/2" compression x 1/2" npt that came in a single pack, so i spent 13 to get it so i could finish this up, if you are going to make it. find a brass fitting that you can be single, and it should only be around 3.50-4 for one fitting, you'll never use 5 unless you make these for other people.
harbor freight abrasive sandblast gun, 20.50 after 25% discount coupon (they accept any coupons, even online shown on your phone, as long as its not expired. find a 25% on garagejournals HF coupon thread, they are always up).
Onto the goods.
i won't bother with using step 1, 2, etc, because things can be done out of order, this is just how i chose to do them.
put your brass compression fitting on the end of the HF gun nozzle, slip it on just like it comes, or if it comes apart, it goes cap, compression ring, then fitting.
tighten it down and the compression fitting will clamp down on the nozzle, i used this because i wanted anyone at home to be able to put it together, even though i have access to lathes and an entire machine shop and maintenance shop, i could have made everything custom.
Next
Take your Test cap, and drill 8 (or 9, the tornador has 9, but 8 worked for me). 7/16 to 1/2" holes. you want these to as close as possible to the outside ring, even biting into the outside ring is just fine, i was a bit sloppy with mine due to children running in and out lol.
take your cap and place it 3" side down ontop of the filter material, get your outline, and cut to the exact size of the OD (outside diameter). you'll cut a taper into it in the next step so it can sit a bit more recessed inside the cone area without being bunched up.
^ to achieve that kind of cut, just use scissors and cut the corner off of one side all the way around.
Now the cap part. you'll take the cap and measure out how long the inside is to the inner lip that sits against the pvc pipe. mine happened to measure 1-7/8. and i wanted a 1/4 lip for seating at the end, so i ended up cutting off 1-5/8 to get my lip size, mark everything by measuring and marking with dashes all the way around so you can ensure you are cutting straight, lets not waste 3 bucks on a budget build right!
This is what you should end up with. notice the small 1/4" lip, perfect seating area, i used a milwaukee hackzall (awesome little sawzall) to make my cuts, i recommend buying one for all kinds of reasons if you need one, otherwise any ole handheld hacksaw can take care of it, just slower.
^ notice the hole in the center of the cap, i didn't take pictures but you'll want to drill right in the center of the cap a 3/4" hole, make it 3/4" as this is the size you'll need if you ever decide to tap that hole for 1/2" npt threads (npt is measured on the inside of the pipe, not the outside, so the drilled hole is larger than the tap nominal size) so you can play with adapters and such or use adapters from a different tornador gun
Next up is the length of pvc pipe you purchased. hopefully you got it cheaper than me, i found it cheaper afterwards but kept the one i bought anyway.
mark and cut off 1 1/2" inches of pvc in the same way you did the cap, this is as much as you'll need to slightly compress and hold the foam in place, while allowing enough room for the foam expansion and expulsion.
this is what you will end up with.
for Pure cosmetics i also cut 1/2" off of my bushing so that it sat flush with the whole assembly. worked out very well because if i were to sand the nut end round and cut off a little more, it would be the exact same size and profile as the tornador, but i'm fine with how it turned out
before how it looked with the measurement (i always measure the gap, then take off that amount off the end, easiest way to get things to fit real well)
by now you have everything nice and cut, and you've deburred all the edges (take a razor to it, or a file, or anything you got to get rid of those little pieces of plastic, no one wants plastic scratching their cars finish!)
so go ahead and do a test fit. one thing i didn't mention is the filler foam. the initial piece you cut and tapered should be sitting somewhat deep in the unit, you'll need to build up another layer of foam so it has adequate material to push through. you'll need to make two half circles of foam cutout to put on top of the foam you have in there, and you'll need to take off 1/3 of the foams thickness so it isn't too thick and being compressed. this is important because this NEEDS to have non-compressed foam in order to work, but needs to be fully filled.
get your foam cut up and test fit the cap assembly, make sure that you are just pushing on the foam enough to keep it in place and not squishing it down, but make sure there is no gap between the test cap with holes, and the foam inside the unit.
^VERY IMPORTANT.
now lets assemble
pvc primer and glue. DONT GET IT ON THE FOAM, thats bad.
DONE!!! and look, it's 99" the same size. if i had recessed that bushing, they would be the same exact size. they have the same foam content, same foam makeup, similar hole design to force the foam through, and similar gun setups.
^ it was extremely similar to the HF gun. the cap on the sand blaster is smaller by 1/4 inch, so not quite the same. but the designs are dead on (except the HF one could use a slightly longer hose for the venturi effect, but it works fine.)
on to the test pictures????
tell me which side came from which gun??
because the gun i got from HF was a little messed up because of my own desire to tear things apart (i ruined the seal at the handle and caused it to have a decent air leak while shooting, i'll return it and get a new one later that is nice and sealed up) it didn't shoot foam as quickly as the other, but there are a few restriction. ie. the air piping and gun on the hf one are not as large as the tornador gun. but here is the upside. that foam on the right took all of the solution from the tornador, and the foam on the left took only half of the solution from the homemade gun.
both guns had the same solution, mixed in a seperate conatiner and were given the same amounts.
overall, i'm pretty happy with the results, this is a very affordable alternative for people who don't want to spend 130 for a foaming gun, or who already have the regular tornador and just want the foaming attachment.
caution as is though, this walkthrough has a 1/2" thread for the adapter, but the tornador uses something close to a 3/8" or at a 3/8" so if you want to just make the foamer attachment and use it on your current gun, you can, but you'll need to purchase a 1/2" to 3/8" bushing as well so it fits with no issues.
i'm open to criticisms and questions, i hope this helps the community out, not to hurt the tornadors creators business or anything, i'm not looking to sell these or anything.
Ian.