The SECRET to Wet Wash Engine Detailing by Mike Phillips

Joined
Dec 5, 2022
Messages
51,004
Reaction score
6
The SECRET to Wet Wash Engine Detailing by Mike Phillips


The secret is all in the sprayer....

(plus good products and brushes)

4def1addd6aa7f11c4a43b213139b7f7.jpg


This will be a text book example for how to SAFELY take a really dirty and neglected engine compartment and do what I call a,

Wet Wash Engine Detail

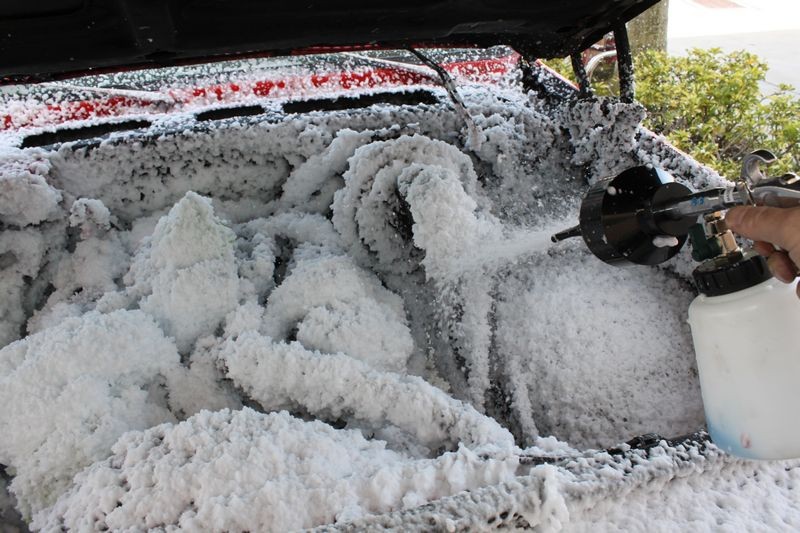
A wet wash engine detail is when you use RUNNING WATER to wash the engine compartment. It also means you're going to use a dedicate ENGINE DEGREASER with a variety of brushes to SCRUB the engine and then FLUSH the engine compartment with water without causing any electrical or sensor problems.

And for those that might not know, the other type of engine detailing is called,

Kosmetic Engine Detailing

And this is where you DON'T use any source of running water, i.e. a garden hose or pressure washer. You clean using a spray-on cleaner and the cleaning comes for the cleaner, some towels and elbow-grease.


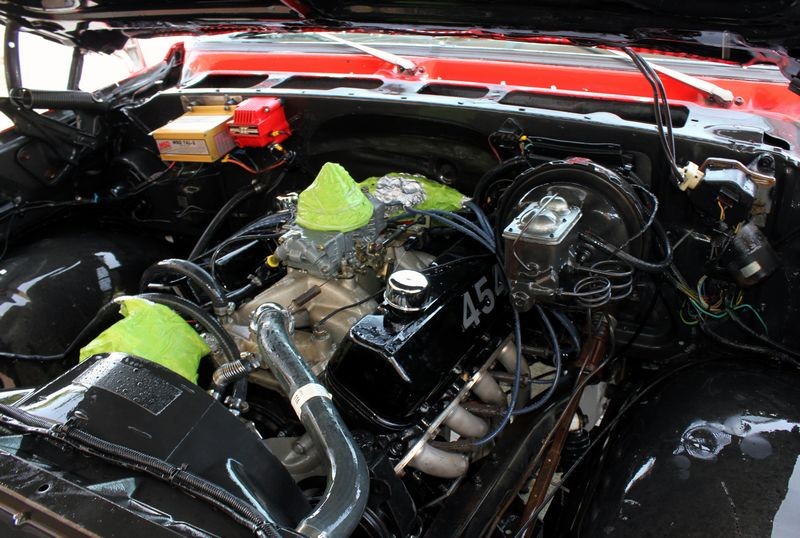
Now this is neglected and about as dirty as they come...

b1b5478f10a8e9434bea98434b900d3d.jpg


aa81077fe9f4cdb0d2555866d10f67f9.jpg


f269094c500f15ad7ab3eda9235d3afa.jpg


5435b9e8b39e725472e5a922f444664a.jpg


See the bucket-o-brushes in the lower right hand corner of the below picture? You NEED a variety of great brushes to be effective with your time and energy.

6ea7036acd1fd2aae5b956d57b5ce669.jpg


One reason I feel comfortable teaching complete strangers how to do a Wet Wash Engine Detailer is because the SONAX Engine Degreaser not only works great but it's safe on any surface. Thus no worries about it STAINING any surface under the hood of any car. Like polished aluminum.

3eb9ed418df371b7bb99c1abb5324040.jpg


ALWAYS clean the underside of the hood first.

7592377c7bbcf3317692fef3f0401e33.jpg


Here's the Mike Phillips SECRET to never having electrical or sensor problems - use a sprayer with a SHOWER setting.

DON'T BLAST WATER INTO PLACES IT SHOULDN'T BE!

And this is done using a shower setting on your spray nozzle.

da2142806c0065f00ebf0b082c7b34ab.jpg


After you wash and rinse the inside of the hood, now clean and scrub the engine compartment.

d0069ca25015ec4d73328b20533fcfd3.jpg


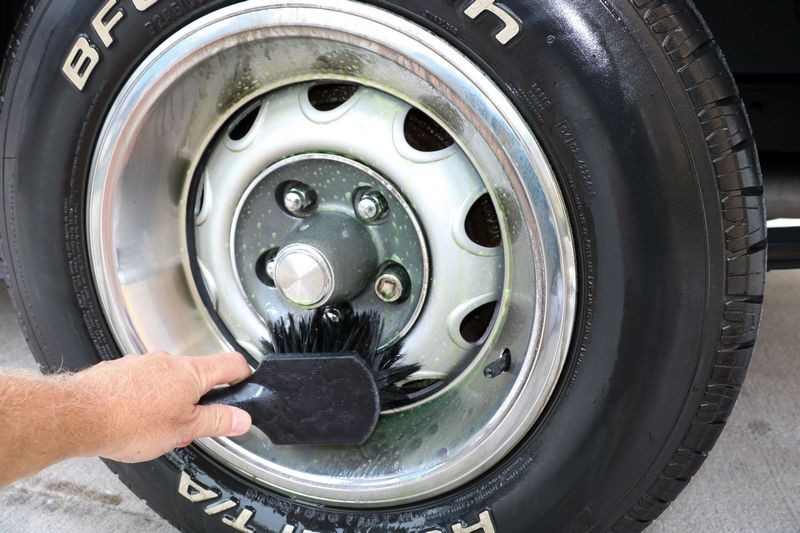
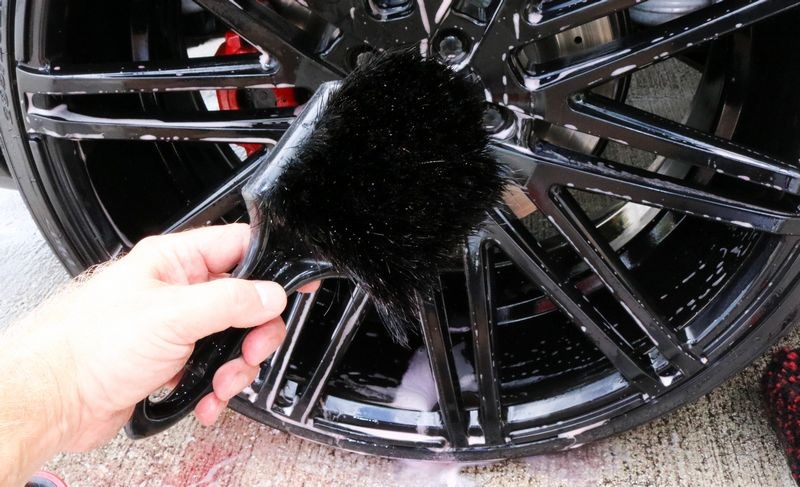
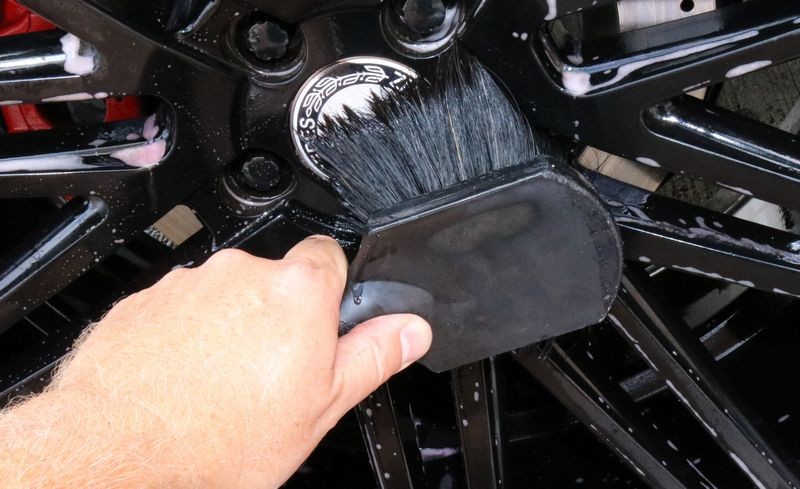
My favorite engine scrubbing brush is also my favorite interior scrubbing brush and my favorite wheel face brush.

0823f0ef969612adc4d7143a718b9bea.jpg


5caddc8af48110ea90a549490c63e6c0.jpg


Wheel Woolies Boar’s Hair Wheel Brush


Low pressure - not high pressure

And this my friends is how you work smarter, not harder. You use the cleaner, great brushes and elbow grease to do the cleaning work and the sprayer is ONLY for rinsing. People that use Pressure Washers are using the POWER of pressurized water to both clean and rinse and this is when you can create an electrical or sensor problem.

I care not how YOU do your wet wash engine detailing but when I'm TEACHING complete strangers the art of engine detailing - I teach them the SAFE way. Later in their lives they can do it however they want to.


Here's working smarter - not harder and most important - NO FEAR of causing a problem in some other persons' car. $$$$$$$$$$$$


b4971553cc263afbb930f7dbb6311b54.jpg


d204761403b791df6f80c9d27de00217.jpg


4def1addd6aa7f11c4a43b213139b7f7.jpg


Next - blow out any standing water from any electrical connection.

783f6d14288859dc9f19b0d35aa3fda2.jpg


aeace36870c64da1490706db682eb899.jpg


Non-sticky Engine Dressing

Next PLASTER the entire engine compartment with SONAX Plastic Care.


7012f3de7588ab45867a431cf72b8e4f.jpg


a7d9da3b1e51f0b007e5faf09512614a.jpg


Yep - just spray this stuff EVERYWHERE!

When done, close the hood and run the motor for about a half hour. It's the engine heat AND the moving air from the engine cooling fan that acts to quick dry the Plastic Care.

04c0bf3b9ed246c1e02751f6ebc54b11.jpg


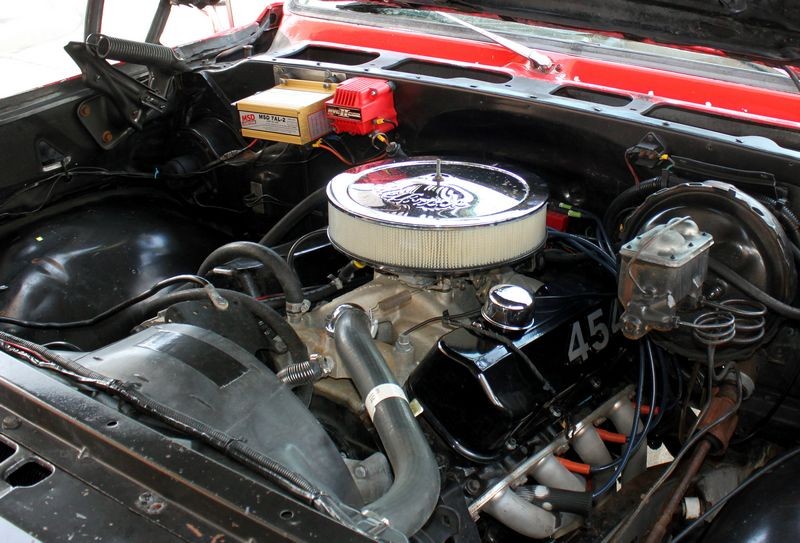
Results are DRY to the touch.

471f2ced32373faca0a5c2f943e746e9.jpg


59f389ebf04cea7b9cdb926c6f1136fd.jpg


27c230b4bd5e2e972488bf5053eec5e8.jpg


ac988b42fbbb46722b502f00f92ce75c.jpg


The above was done in about 25 minutes as that's what I teach in the class. How to do it safely and do it fast.


Nice work everyone at the Colorado Roadshow Class in 2019

Pictures: Colorado Roadshow Class- Denver Auto Shield


Just one of the things I teach in my car detailing classes.


On Autogeek.com


SONAX Engine Cleaner

SONAX Plastic Care

Speed Master Wheel Brush

Wheel Woolies Boar’s Hair Wheel Brush

Famous Detailing Brush


:)
 
More....

And of course this brush works great for wheels too....

Must Have Wheel Cleaning Brushes that make cleaning wheels fast and easy


The perfect wheel cleaning brush
This is my favorite wheel cleaning brush. Why? Because the bristle are perfect for effective cleaning. They are stout enough to agitate the wheel cleaner but still flexible enough to bend and flex so the ends of the bristles can get into intricate areas. At the same time they won't scratch so they're safe for any finish.

watermark.php


Not only are the bristles the perfect combination of not to soft or not to stiff but the ends are flagged so they thousands of tips can agitate wheel cleaner in tight cracks, crevices and other wheel designs.

watermark.php


After you use the Wheel Woolies black wheel brush one time you'll agree they are the perfect wheel cleaning brush. I use them for cosmetic engine detailing for the same reasons I like them for wheel cleaning.

watermark.php


watermark.php


watermark.php


watermark.php


Makes cleaning any type of wheel fast and efficeient....


The most awesome wheel face brush...
I teach a lot of classes and one of the things I remind people of is out of all the "things" you do to your car... washing is the most common and most repeated thing you do. So it only makes sense to have GREAT car washing tools and products to make a job I really don't like doing as fast as possible while keeping my results professional quality consistently. Make sense?

FLEX_Tire_Scubber_10.JPG


Not too soft not too stiff - the perfect balance...

The bristles on the Boar's Hair Wheel Face brush work so well because the bristles are the perfect balance of medium stiffness, that is not too hard and not so limp they are useless.


Speed_Master_WT_030.JPG


Speed_Master_WT_031.JPG


Speed_Master_WT_032.JPG


:)
 
I will add, the Sonax engine cleaner is the good stuff. All I use. followed by Sonus engine kote.
 
Good post Mike. I was expecting to see a bag cover certain components under the engine. Surprised not to see any. I have wet washed the engine bays in my cars in the past and have always had good results. Had my brushes, degreasers, and a bag to cover the areas I felt had exposed electrical wiring.
 
I will add, the Sonax engine cleaner is the good stuff. All I use. followed by Sonus engine kote.

I have read enough horror stories about people using "something" and then RUINING some "surface" in their engine compartment and then... trying to find some easy fix.

The easy fix doesn't exist.

I have an e-mail from someone, I don't think I ever shared it. The person used something to clean their engine compartment, the intake manifold was polished aluminum.

The product completely stained it.

He asked me,

How can I fix this?


I'm confident he didn't like my answer. The fix wasn't cheap. The fix wasn't easy.

My guess is the stained intake still looks like crap today.


There are lots of great engine cleaners on the market. SONAX is one of many. I always feel "comfortable" recommending their degreaser when I don't know the SKILL LEVEL or KNOWLEDGE LEVEL or EXPERIENCE LEVEL of the person I'm trying to help.

I'm sure there are stronger cleaners.

When it comes to YOUR engine compartment - hey... it's all yours.

When it comes to SOMEONE else's engine compartment - if your in my position - be careful about making recommendations.


:)
 
Good post Mike.

I was expecting to see a bag cover certain components under the engine.

I can probably find just about anything anyone wants to see photo-documented.

Check this write-up out,

How to clean an engine compartment


See the carb, distributor and alternator covered up? There's also a microfiber cloth under the tape over the 750 Holley.

800_How_To_Detail_Engine_003.jpg


800_How_To_Detail_Engine_009.jpg


800_How_To_Detail_Engine_014.jpg


800_How_To_Detail_Engine_015.jpg


800_How_To_Detail_Engine_018.jpg


Much better....

800_How_To_Detail_Engine_020.jpg


Ready to cruise...

1975Jimmywith454.jpg


:)
 
I hope this doesn't sound picky. But, after watching your video, thinking about my experiences, and others I've watched, wouldn't you say that more times than not the engine compartment gets divided in thirds rather than quarters? It seems to be work one side of the compartment; work the motor area; work the other side of the compartment.
 
I hope this doesn't sound picky. But, after watching your video, thinking about my experiences, and others I've watched, wouldn't you say that more times than not the engine compartment gets divided in thirds rather than quarters? I

t seems to be work one side of the compartment; work the motor area; work the other side of the compartment.


Sometimes the way a person teaches - his way of explaining a process can evolve. Such is the case here.

A one-size fits all approach doesn't work because engine compartments are all different.

How I teach cleaning really dirty engine compartments is like this,

Let the engine compartment be your guide

What I mean by this is look for NATURALLY defined sections that make for easy cleaning at one time.


Make sense?


:cheers:
 
Thanks Mike. This will be my project for today’s detailing.
 
Nice write up.

The Sonax Plastic Care looks good.


Sure works as well as you see in the pictures.


I show this in all my car detailing classes and in most classes, the people cleaning the engines and applying the SONAX Plastic Care have NEVER performed a Wet Wash Engine Detail. But every engine compartment comes out looking just like this,


BEFORE

b1b5478f10a8e9434bea98434b900d3d.jpg


AFTER

471f2ced32373faca0a5c2f943e746e9.jpg


:)
 
How does Sonax Plastic Care differ from Sonax MotorKote? Would you recommend spray everywhere and running the engine?

I used motorkote on one of my vehicles. Took a long time to dry but looks amazing. Just curious your insights.
 
How does Sonax Plastic Care differ from Sonax MotorKote? Would you recommend spray everywhere and running the engine?

I used motorkote on one of my vehicles. Took a long time to dry but looks amazing. Just curious your insights.


I've never used the SONAX MotorKote. We don't have it in the AG store so....


My guess is they are similar. And "no" I don't spray onto a running motor but AFTER spraying the engine and engine compartment down I close the hood and turn the engine on and let her run for about 20 to 30 minutes. This gets it mostly dry and then it will fully dry overnight.

What dries the coating is both the engine HEAT and also the moving air from the fan.


I demonstrated this product on some kind of hybrid car that as far as I could tell, either didn't have a cooling fan, (at least that I could see or feel air movement from), or it wasn't operating at IDLE. Took a lot longer to dry.

Moving air is where it's at man....


:)
 
I attended Mike's January 2019 boot camp, and the process he describes in this post is the same process he taught us in the class.

Over the weekend, I used this process, and the same products in this post, to clean my car's engine bay. It was the first time I've ever done it outside of the boot camp.

I'm very happy with the results:

MurrowEngineDetail.jpg


Unfortunately, I did not take a "before" pic.


Mike's class was a great experience.

It was invaluable for a hobbyist like me, but there were also plenty of people who detail professionally who seemed to get a lot out of it too.

I highly recommend it.


:xyxthumbs:
 
Looks incredible.

I've deviated from the engine bay dressings and started using Meguiar's Quik Interior Detailer. Leaves very little shine, but repels dust/dirty extremely well. 303 was my go to. Still good but I'm liking the Meguiar's Quick Interior the best.
 
I've never used the SONAX MotorKote. We don't have it in the AG store so....


My guess is they are similar. And "no" I don't spray onto a running motor but AFTER spraying the engine and engine compartment down I close the hood and turn the engine on and let her run for about 20 to 30 minutes. This gets it mostly dry and then it will fully dry overnight.

What dries the coating is both the engine HEAT and also the moving air from the fan.


I demonstrated this product on some kind of hybrid car that as far as I could tell, either didn't have a cooling fan, (at least that I could see or feel air movement from), or it wasn't operating at IDLE. Took a lot longer to dry.

Moving air is where it's at man....


:)

I completely agree. Whether it was Sonus Motorkote, 303, or Hyper Dressing, I would always spray it on to a clean dry engine then drive the car until it was hot. Would take it on the highway for a bit. An hour or so later it lays and dries perfectly. Heat and air is the key.
 
I attended Mike's January 2019 boot camp, and the process he describes in this post is the same process he taught us in the class.

Thank you for sharing this, I try to keep the techniques I teach in my class consistent. Plus I only show products and tools that I trust and use myself.


Over the weekend, I used this process, and the same products in this post, to clean my car's engine bay. It was the first time I've ever done it outside of the boot camp. I'm very happy with the results:

MurrowEngineDetail.jpg


Looks great! Actually, looks brand spanking new! Nice work. :dblthumb2:


Unfortunately, I did not take a "before" pic.

Ding dang.... that's okay but for everyone that will read this into the future, before any detailing project, take a moment to get the BEFORE shot. Remember, the POWER in the AFTER picture is CREATED in the BEFORE pictures.

In fact, I have an article on this topic,

The power in the after shots is created in the before shots

800_beforeaftershot.JPG


In the picture below, if you DIDN'T know how bad the paint was BEFORE the paint correction, you wouldn't have as much appreciation for the AFTER results. It's the before shot that gives perspective. It's the before shot that provides context.


Mike's class was a great experience. It was invaluable for a hobbyist like me, but there were also plenty of people who detail professionally who seemed to get a lot out of it too.

I highly recommend it.


Thank you for the first hand testimony. I appreciate your trust that when you have other options when it comes to detailing classes, you chose Autogeek.


:cheers:
 
Back
Top