Trouble with haze and tick marks after DA Polishing

Bryan W

New member
Joined
Jul 15, 2014
Messages
42
Reaction score
0
Hi Mike,

I have always owned older cars and had no problem hand polishing them now and then. Just purchased a brand new VW TDI Sportwagen and decided to try a DA polisher to remove some light factory-installed swirls before sealing the paint. Unfortunately, I did not get the results I hoped for.

Method
My goal isn't to create a show car, but to keep it looking as good as new for many years.

My process was as follows:
  1. Wash with Optimum Car Wash. Two bucket method with Grit Guards and microfiber mitt.
  2. Clay with the Meguiars kit I already owned.
  3. Polish with m205 using HexLogic white polishing pad.
  4. Klasse AIO with a HexLogic blue pad, and by hand in the tight spots, using the microfiber applicator provided in the Klasse Kit.
  5. Klasse SG with the foam applicator provided in the Klasse Kit.
  6. Maintain with Optimum Car Wax

Somewhere along the way, I introduced some tick marks and a general haze to the surface. Don't get me wrong, the paint is shiny and glossy, but it doesn't have the clarity I expected it to after all that work. Now I'm regretting not just leaving it alone and waxing, as I think I made it worse than when I started.

In hindsight, I should have done a test spot clear through step 7, but instead, I only did a test spot with the m205. It looked pretty good at that point, but the sun wasn't fully out yet (I got an early start). I continued to do the rest of the car, though I skipped the m205 in areas that didn't seem to need it.

A few hours later, I pulled the car into the bright afternoon sun and was really disappointed with the results. Instead of beautiful clear glossy paint, I had a shiny but hazy mess.


Troubleshooting
My first thought was that the Klasse SG wasn't completely removed, but I don't think that's it. I tried some of the tricks for removing Klasse, including an IPA wipedown, but the haze continued.

After doing some more research through tons of helpful threads here, I think my issue looks a lot like the DA tic marks and marring photos you've posted. I wonder if that's from the DA process only, or if I was also too aggressive with my microfibers during the Klasse SG removal.

The next day, I went at it again, stepping up to an Orange HexLogic pad with the 205 to try to remove some of the haze. I then moved back to the white pad to try to bring out some gloss, but I'm still having the same issue with tic marks and a general haziness. I have tried all kinds of pressure and speed combinations, including heavy-pressure (but pad still spinning)/speed 5-6, light pressure/5-6, medium-pressure/3-4…you get the idea.

I still don't really seem to be getting a clear "polished" result. Is it just the hard as nails VW clear coat? Do I need a different product? Is my technique really that bad? I hand-rubbed a black Mazda 6 to a beautiful gloss using Meg's consumer-grade products. Shouldn't I be getting better results with these products and a DA?

I watched hours of your videos, drew on my previous experience of detailing my own vehicles, and read numerous posts on this forum, but I'm still stuck. Do I need to try a more aggressive product? Less aggressive product? Better MF towels? Help!

Photos
Here is the car in indirect sunlight. Not bad!
View attachment 29053

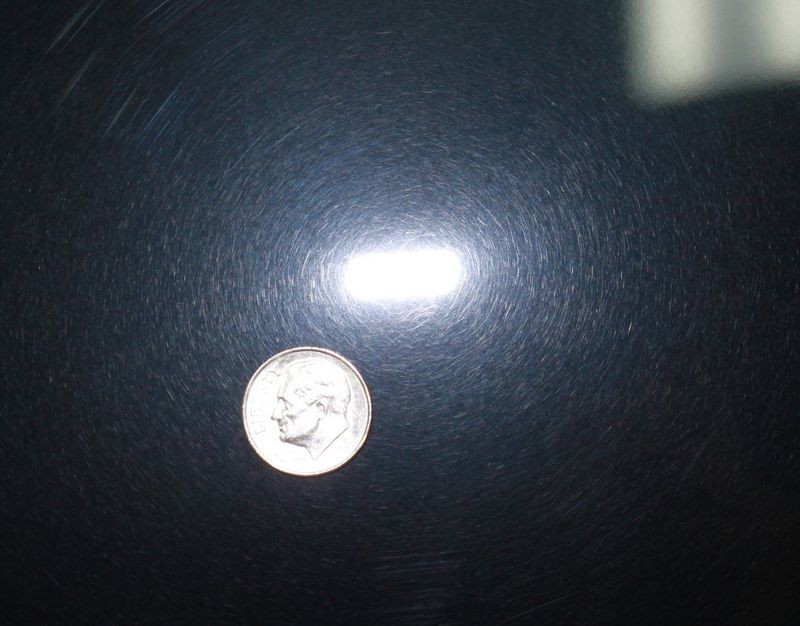
But here is a closeup in the sun.
View attachment 29054

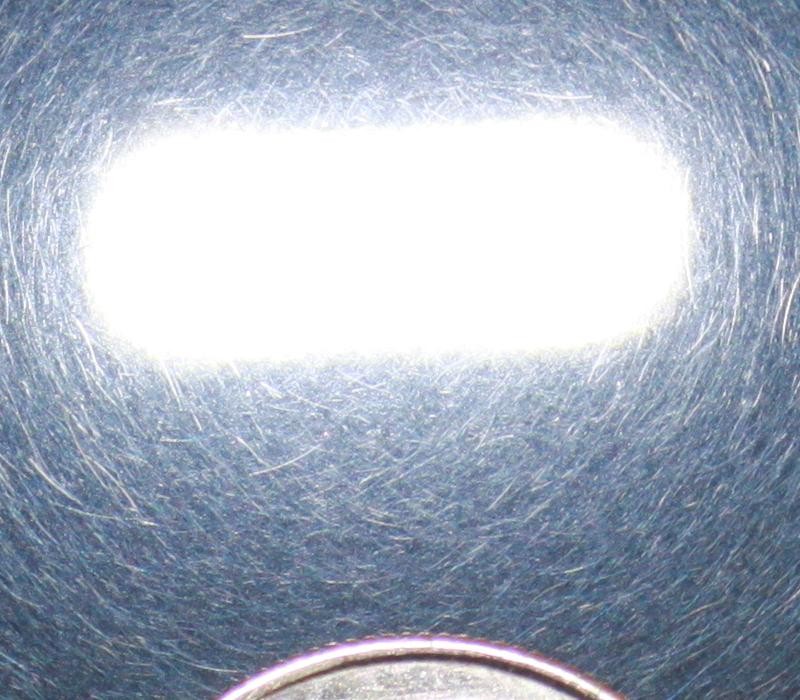
Here's another one from the next day (after my Round 2 attempt)
View attachment 29055

Notice the dullness in the reflections?
View attachment 29056

Thanks again. Hoping I can do better than this! I'm really discouraged right now.
 
Hey Bryan,

I'm sorry I can't really tell from the photos but what it sounds like is you applied too much Klasse High Gloss Sealant. Your explanation sounds eerily familiar to something I went through when I first started using it.

If the sealant is applied to heavy it creates one heck of a mess and the best way to remove it with mineral spirits, "I think"..

I believe Scott, Killerwheels" posted a method some time ago and he simply sprayed it on lightly much like a spray wax......and this method works very well!! :props:
 
I'm sorry I can't really tell from the photos but what it sounds like is you applied too much Klasse High Gloss Sealant. Your explanation sounds eerily familiar to something I went through when I first started using it.

Thanks Bobby. That would be GREAT news if that's all it was.

I do see some tick marks in addition to the general hazing, so I think I'll need to try polishing again after stripping the Klasse. That brings up a couple more questions:

Do you think the m205 is aggressive enough for the VW's hard clear coat, or will I need to order something stronger?

Could my microfibers be causing the marring and tick marks?
 
From my personal experience 205 on a newer vw isn't enough to really correct anything. I had to step to microfiber pads just to get light swirls out of my 2011 CC and my buddies 2014 gli. The 205 would be fine as a final polish just to get the most gloss you can out of the finish though. I've had great results with either megs d300 or menzerna fg400 or pf2500 as a start for my first step in vw to try removing defects.


Also is it possible some tick marks were there and swirls were hiding them? Did you happen to have any contamination in your pads or towels?

Not sure how much more you would like to spend on products and equipment, but the megs mf kit would be a good start for you I think with this car.
 
Also double check your clay to make sure its also clean and free of any small particles that could have damaged the finish. It's hard to see anything in your pictures though so I can't give much advice on the marks.
 
I would again try using Meguiar's M205 and a white foam pad. Do only a small section with 3 to 4 sectional passes. Give the product and pad combination time to work by slowing down your arm speed. Once complete carefully wipe with a clean microfiber towel and mineral spirits and evaluate.

Any aggressive rubbing to remove a product can potentially damage the finish even with the softest of towels.

If your finish looks like this I don't feel it's coming from a microfiber towel

MicromarringTickMarks01.jpg


MicromarringTickMarks02.jpg


Two over the counter products that are available just about everywhere from a company that wrote another book on detailing is Meguiar's...

Meguiar's Ultimate Compound

Meguiar's Ultimate Polish
 
Thanks Trutech! Some helpful stuff in your posts.

From my personal experience 205 on a newer vw isn't enough to really correct anything. I had to step to microfiber pads just to get light swirls out of my 2011 CC and my buddies 2014 gli. The 205 would be fine as a final polish just to get the most gloss you can out of the finish though. I've had great results with either megs d300 or menzerna fg400 or pf2500 as a start for my first step in vw to try removing defects.
Ok that's good to know. At least I know I wasn't doing something wrong with my technique. Of the three products you recommended, is there one that really stands out? I see that the megs is a bit cheaper, but I'm okay paying more if the results have been better for you

Also is it possible some tick marks were there and swirls were hiding them? Did you happen to have any contamination in your pads or towels?
It's possible, but I've had the car less than 3 weeks. I think the towels are the most likely culprit (my pads were brand new but the towels are a few years old). Time for some new towels?

Also double check your clay to make sure its also clean and free of any small particles that could have damaged the finish.
The clay was from a brand-new unopened package, so I don't think that was it.

Not sure how much more you would like to spend on products and equipment, but the megs mf kit would be a good start for you I think with this car.
I don't want to spend a fortune, but if the products are a good investment and will last, then I'm happy to get them.
 
I would again try using Meguiar's M205 and a white foam pad. Do only a small section with 3 to 4 sectional passes. Give the product and pad combination time to work by slowing down your arm speed. Once complete carefully wipe with a clean microfiber towel and mineral spirits and evaluate.

Thanks Bobby. I will try that again tomorrow evening and let you know how it goes. If I can get the car in full sun, I'll take a before and after photo of the new test spot.

Any aggressive rubbing to remove a product can potentially damage the finish even with the softest of towels.

If your finish looks like this I don't feel it's coming from a microfiber towel
Some of them are more patterned like the photos you provided, but a few are more random. Based on your responses and Trutech's, I'm thinking the towels might be the problem with the random marks. Maybe the others are just a matter of not polishing long enough (I did about 6 s-l-o-w passes, but I can try some more).
 
It's not the towels, no matter what brand or condition.

If you polished the paint and therefore removed the defects..your towel marks will be in the direction you moved them across the surface of the paint, not in a random pattern.

You would really have to intentionally try to inflict the type of damage in Bobby's picture.

IMO the defects have been there all along

+1 for the Meguiar's MF system. The D300 is a defect killer and finishes LSP ready in some cases. Make sure you properly prime the pad and clean often for maximum cut and minimum haze.
 
If you polished the paint and therefore removed the defects..your towel marks will be in the direction you moved them across the surface of the paint, not in a random pattern.

IMO the defects have been there all along
Well I'm sorta glad to know I didn't cause the problems, but I also wonder what the heck the dealer did with a 150-mile car to instill that much marring into the paint!

I know they "detailed" the car before we bought it, but I didn't think it looked THAT bad. Is it possible they used a filler wax that caused me to not notice the more severe marring until after I washed, clayed, and polished it?

+1 for the Meguiar's MF system. The D300 is a defect killer and finishes LSP ready in some cases. Make sure you properly prime the pad and clean often for maximum cut and minimum haze.
Very interesting. I hadn't looked at that system when choosing products for a new car because I thought they were geared toward older neglected finishes, not brand new paint. But it sounds like the VW paint needs something that aggressive.

My other option would be to try one of the Menzerna polishes with my foam pads, which would be cheaper now, but possibly more expensive in the long run. Thoughts?
 
Well I'm sorta glad to know I didn't cause the problems, but I also wonder what the heck the dealer did with a 150-mile car to instill that much marring into the paint!

I know they "detailed" the car before we bought it, but I didn't think it looked THAT bad. Is it possible they used a filler wax that caused me to not notice the more severe marring until after I washed, clayed, and polished it?


Very interesting. I hadn't looked at that system when choosing products for a new car because I thought they were geared toward older neglected finishes, not brand new paint. But it sounds like the VW paint needs something that aggressive.

My other option would be to try one of the Menzerna polishes with my foam pads, which would be cheaper now, but possibly more expensive in the long run. Thoughts?

I am not sure if you mentioned it or not but which DA do you have????
 
It's not the towels, no matter what brand or condition.

If you polished the paint and therefore removed the defects..your towel marks will be in the direction you moved them across the surface of the paint, not in a random pattern.

You would really have to intentionally try to inflict the type of damage in Bobby's picture.

IMO the defects have been there all along

+1 for the Meguiar's MF system. The D300 is a defect killer and finishes LSP ready in some cases. Make sure you properly prime the pad and clean often for maximum cut and minimum haze.

This is what I was thinking.

The hazing/swirls were probably there all along but hidden by a glaze and/or wax. You uncovered them with M205, but M205 isn't aggressive enough to remove them.

Try Bobby's advice with the M205 (on a test spot) first, but my feeling is you will need to step it up...
 
Thanks Bobby. I will try that again tomorrow evening and let you know how it goes. If I can get the car in full sun, I'll take a before and after photo of the new test spot.


Some of them are more patterned like the photos you provided, but a few are more random. Based on your responses and Trutech's, I'm thinking the towels might be the problem with the random marks. Maybe the others are just a matter of not polishing long enough (I did about 6 s-l-o-w passes, but I can try some more).

If you find the finish is indeed that hard, it might be time to try a more aggressive pad and product combination.

As I mentioned above, an over the counter products that is available just about everywhere is Meguiar's Ultimate Compound . This is a fantastic over the counter product and when used with lets say an Orange foam pad should provide better results.


Foam Pads

Yellow Cutting Foam
- Use this pad to apply compounds or polishes to remove severe oxidation, swirls, and scratches. It is the most aggressive and should only be used on oxidized and older finishes. Always follow this pad with an orange or white pad and a fine polish to refine the paint until it is smooth.

Orange Light Cutting Foam - Firm, high density foam for scratch and defect removal. Use this pad with polishes and swirl removers. It’s an all-around pad that will work on most light to moderate imperfections.

White Polishing Foam - Less dense foam formula for the application of waxes, micro-fine polishes and sealants. This pad has very light cutting power so it’s perfect for pre-wax cleaners.

Gray Finishing Foam Pad - Composition is firm enough to withstand added pressure during final finishing to remove buffer swirls. It has no cut and will apply thin, even coats of waxes, sealants, and glazes.

Blue Finessing Foam – Pad has soft composition for applying glaze, finishing polish, sealants, and liquid waxes. Flat pad provides full contact with paint surface to minimize the pressure applied by the user.[FONT=&quot]
[/FONT]
 
I am not sure if you mentioned it or not but which DA do you have????

I have the Harbor Freight DA (don't laugh, it got lots of favorable reviews in another AG thread), a 5" backing plate from Chemical Guys, and 5.5" Hex Logic pads from Chemical Guys.

This is what I was thinking.

The hazing/swirls were probably there all along but hidden by a glaze and/or wax. You uncovered them with M205, but M205 isn't aggressive enough to remove them.

Try Bobby's advice with the M205 (on a test spot) first, but my feeling is you will need to step it up...

Thanks to all three of you guys! Feeling much better about my technique after hearing that the haze might have been there all along. I tried again with M205 and an orange pad and the results were no better, so I think it's time to step to a more aggressive compound. I'll post an update once I try that.
 
Hey Bryan, if you want a few ounces of some Menz products or some D300, or Megs MFD's to use just let me know. All you would have to do is come and pick them up. I'm about 20-30 north from you.
 
Hey Bryan, if you want a few ounces of some Menz products or some D300, or Megs MFD's to use just let me know. All you would have to do is come and pick them up. I'm about 20-30 north from you.

That's amazing. What is your favorite beverage? Even some quick test spots with a couple of those products would be super helpful!
 
Sound advice from Bobby. Ultimate compound is fairly cheap and works well. Give that a shot.
 
Here's another tip...

When testing the more aggressive product, place a tape-line down on the hood or trunk lid, some place where you can easily see the tick marks you're trying to remove. Then buff on just one side of the tape line.

This is called troubleshooting.

You will then be able to quickly tell if the side you're buffing on is getting better - Tick marks are gone.

Of staying the same. Or getting worse.

Also, anytime you use a pad with a design to the face of the pad you have to be super careful that the pad is clean in the low impression portions of the pad. It's possible for the paint you're removing and the product you're using to load up in these low depressed areas and this gunk can cause hazing of the paint. This one reason I'm in the Flat Pad Club when it comes to pad face design. If you look at most if not all the show cars we work on and even daily drivers we're using Lake Country Flat pads and I also share this in my how-to book.


So do some troubleshooting with your next aggressive product.


One more comment... I've seen M205 and SMAT products in general like D151 leave haze, tick marks or micro-marring, whatever you want to call it it's all the same, in softer paints.

So instead of having super hard paint it's possible the paint on this specific car is not as hard as you might think.

And just to double check... you have marked your backing plate so you can make sure your pad is rotating?


Video: Mark your backing plate to make it easy to see pad rotation


MarkYourBackingPlate01.jpg


Here's a quick video that show how and why to mark your backing plate to see and monitor pad rotation while doing any correction or polishing steps.


[video=youtube_share;QM8PnDooZP8&hd=1"]How To Check Pad Rotation on a DA Polisher -...[/video]​

:xyxthumbs:
 
And if you haven't read this yet... I recommend everyone read it BEFORE they need to start troubleshooting to make sure they don't make any of the most common mistakes people make when learning to use a dual action polisher.


DA Polisher Trouble Shooting Guide


Tyler, age 15 removing swirls using a Porter Cable 7424XP Dual Action Polisher
1965Plymouth035.jpg


When you're first starting out machine polishing and learning to use a DA Polisher it's common to have questions about your results and your results are directly tied to your technique.

Here's a list of the most common problems,

1. Trying to work too large of an area at one time.

2. Moving the polisher too fast over the surface.

3. Using too low of speed setting for removing swirls.

4. Using too little downward pressure on the head of the polisher.

5. Using too much downward pressure on the head of the polisher so the pad quits rotating.

6. Not holding the polisher in a way to keep the pad flat while working your compound or polish.

7. Using too much product or using too little product.

8. Not cleaning the pad often enough.
Here's a list of the solutions in matching order,

1. Trying to work too large of an area at one time.
Shrink the size of your work area down. You can't tackle to large of an area at one time. The average size work area should be around 20" by 20". Most generic recommendations say to work an area 2' by 2' but for the correction step, that's too large. You have to do some experimenting, (called a Test Spot), to find out how easy or how hard the defects are coming out of your car's paint system and then adjust your work area to the results of your Test Spot. The harder the paint the smaller the area you want to work.


2. Moving the polisher too fast over the surface.
For removing defects out of the paint you want to use what we call a Slow Arm Speed. It's easy and actually natural for most people new to machine polishing to move the polisher quickly over the paint but that's the wrong technique. One reason I think people move the polisher too quickly over the paint is because they hear the sound of the motor spinning fast and this has psychological effect which causes them to match their arm movement to the perceived fast speed of the polisher's motor.

Another reason people move the polisher too quickly over the paint is because they think like this,

"If I move the polisher quickly, I'll get done faster"

But it doesn't work that way. Anytime you're trying to remove swirls, scratches, water spots or oxidation using a DA Polisher you need to move the polisher s-l-o-w-l-y over the paint.


3. Using too low of speed setting for removing swirls.
When first starting out many people are scared of burning or swirling their paint, so they take the safe route of running the polisher at too low of a speed setting but this won't work. The action of the polisher is already g-e-n-t-l-e, you need the speed and specifically the pad oscillating and rotating over the paint as well as the combination of time, (slow arm speed), together with the abrasives, the pad aggressiveness, and the downward pressure to remove small particles of paint which is how your remove below surface defects like swirls or scratches.

Removing below surface defects is a leveling process where you need the abrasives to take little bites out of the paint and to get the abrasives to take these little bites with a tool that uses a Free Floating Spindle Bearing Assembly you need all of the above factors working for you including a high speed setting.


4. Using too little downward pressure on the head of the polisher.
For the same reason as stated in #3, people are scared, or perhaps a better word is apprehensive, to apply too much downward pressure to the polisher and the result of too little pressure is no paint is removed thus no swirls are removed.


5. Using too much downward pressure on the head of the polisher so the pad quits rotating.
If you push too hard you will slow down the rotating movement of the pad and the abrasives won't be effectively worked against the paint. You need to apply firm pressure to engage the abrasives against the paint but no so much that the pad is barely rotating. This is where it's a good idea to use a permanent black marker to make a mark on the back of your backing plate so your eyes can easily see if the pad is rotating or not and this will help you to adjust your downward pressure accordingly.

Correct technique means finding a balance of applying enough downward pressure to remove defects but not too much downward pressure as to stop the rotating movement of the pad.

This balance is affected by a lot of factors like the lubricity of the product you're using, some compounds and polishes provide more lubrication than others and this makes it easier to maintain pad rotation under pressure.

Another factor that can affect pad rotation are raised body lines, edges and curved surfaces as anytime you have uneven pressure on just a portion of the face of the pad it can slow or stop pad rotation. This is where experience comes into play and experience comes from time spent behind the polisher.


6. Not holding the polisher in a way to keep the pad flat while working your compound or polish.
Applying pressure in such a way as to put too much pressure to one edge of the pad will cause it to stop rotating and thus decrease abrading ability.


7. Using too much product or using too little product.
Too much product hyper-lubricates the surface and the result is that abrasives won't effectively bite into the paint but instead will tend to skim over the surface. Overusing product will also accelerate pad saturation as well increase the potential for slinging splatter onto adjacent panels.

Too little product will means too little lubrication and this can interfere with pad rotation.

Again there needs to be a balance between too much product and too little product and finding this balance comes from reading articles like this one, watching videos an most important, going out into the garage and putting in time behind the polisher and as you're buffing with specific product and pad combinations, pay attention to pad rotation.


8. Not cleaning the pad often enough.
Most people simply don't clean their pad often enough to maximize the effectiveness of their DA Polisher. Anytime you're abrading the paint you have two things building up on the face of your buffing pad,
  • Removed paint
  • Spent product
As these to things build up on the face of the pad they become gummy and this has a negative affect on pad rotating plus makes wiping the leftover residue on the paint more difficult. To maintain good pad rotation you want to clean your pad often and always wipe-off any leftover product residue off the paint after working a section. Never add fresh product to your pad and work a section that still has leftover product residue on it.


Pad Cleaning Articles

Why it's important to clean your pads often...

How to clean your foam pad on the fly

:xyxthumbs:
 
Back
Top