Navigation
Install the app
How to install the app on iOS
Follow along with the video below to see how to install our site as a web app on your home screen.
Note: This feature may not be available in some browsers.
More options
Style variation
You are using an out of date browser. It may not display this or other websites correctly.
You should upgrade or use an alternative browser.
You should upgrade or use an alternative browser.
What's color sanding?
- Thread starter mcpp66
- Start date
sgtmillhouse648
New member
- Jun 16, 2010
- 106
- 0
Mike does an excellent job of explaining it here
It's essentially a term which came about when wetsanding a single stage paint system but has come by many to include clearcoat finishes as well. It is used generally immediately after painting to remove any orange peel and unevenness to a cars' finish. The slurry created when sanding was the color of the paint being sanded hence the term "color sanding"
It's essentially a term which came about when wetsanding a single stage paint system but has come by many to include clearcoat finishes as well. It is used generally immediately after painting to remove any orange peel and unevenness to a cars' finish. The slurry created when sanding was the color of the paint being sanded hence the term "color sanding"
Mike Phillips
Active member
- Dec 5, 2022
- 51,004
- 6
Here's an article on the three general terms or types of sanidng...
Wet-sanding, Color-sanding & Damp-sanding
Just to note, wet-sand and color-sand, or wet-sanding and color-sanding, are interchangeable terms.
Color Sanding
The term color-sanding came from the time cars were primarily painted with single stage paint and as such when you sanded them dry or with water you would see the color of the paint coming off the car, thus the term color-sanding. If you were wet-sanding a pigmented or single stage paint, your water slurry would be the color of the paint.
Wet Sanding
Wet-sanding is just a term to describe sanding automotive paints with water. If you're wet-sanding a single stage paint you'll see the color of the paint in your water slurry as you sand. If you're sanding a clear coat finish your water slurry will be a whitish color as the sanded particles of clear paint are not clear but whitish or opaque and thus the water slurry will have a whitish appearances to it.
Damp Sanding
Damp-sanding is simply a variation of wet-sanding except that you use less water with sanding discs designed for use with a process that uses less water. The water slurry from damp-sanding will either be whitish if you're sanding a clear coat finish, or the color of the paint if you're sanding a single stage finish.
Water Slurry
The water on the surface of your work area that suspends particles of paint removed off the surface from the abrading action of your sanding paper or sanding disc.
Here's a list of all my articles on the topic of Wetsanding in my articles list which there's a link to in my Signature Line...
Wet-Sanding
Damp-Sanding Tools, Tips and Techniques by Mike Phillips
Meguiar's 6" Unigrit Sanding and Finishing Discs
Wet-sanding, Color-sanding & Damp-sanding
The difference between 3M's Hookit and Hookit II Hook-N-Loop Interface Systems
List of Sanding Discs at Autogeek.net
The Rule of Thumb
If it has paint... it gets polished...
RIDS and Feathersanding - A Highly Specialized Technique by Mike Phillips
Wet-sanding - Fresh Paint vs Factory Paint
Basic Hand Sanding Techniques
Removing Orange Peel & Sanding Marks with the Griot's ROP and the Wolfgang Twins
How long will a half sheet of wet/dry sandpaper last before it stops cutting and you need to replace it?
Fight or Flight Method for Gaging Surface Temperature
")
Wet-sanding, Color-sanding & Damp-sanding
Copyright ©PBMA - AutogeekOnline.net® All Rights Reserved
Just to note, wet-sand and color-sand, or wet-sanding and color-sanding, are interchangeable terms.
Color Sanding
The term color-sanding came from the time cars were primarily painted with single stage paint and as such when you sanded them dry or with water you would see the color of the paint coming off the car, thus the term color-sanding. If you were wet-sanding a pigmented or single stage paint, your water slurry would be the color of the paint.
Wet Sanding
Wet-sanding is just a term to describe sanding automotive paints with water. If you're wet-sanding a single stage paint you'll see the color of the paint in your water slurry as you sand. If you're sanding a clear coat finish your water slurry will be a whitish color as the sanded particles of clear paint are not clear but whitish or opaque and thus the water slurry will have a whitish appearances to it.
Damp Sanding
Damp-sanding is simply a variation of wet-sanding except that you use less water with sanding discs designed for use with a process that uses less water. The water slurry from damp-sanding will either be whitish if you're sanding a clear coat finish, or the color of the paint if you're sanding a single stage finish.
Water Slurry
The water on the surface of your work area that suspends particles of paint removed off the surface from the abrading action of your sanding paper or sanding disc.
Here's a list of all my articles on the topic of Wetsanding in my articles list which there's a link to in my Signature Line...
Wet-Sanding
Damp-Sanding Tools, Tips and Techniques by Mike Phillips
Meguiar's 6" Unigrit Sanding and Finishing Discs
Wet-sanding, Color-sanding & Damp-sanding
The difference between 3M's Hookit and Hookit II Hook-N-Loop Interface Systems
List of Sanding Discs at Autogeek.net
The Rule of Thumb
If it has paint... it gets polished...
RIDS and Feathersanding - A Highly Specialized Technique by Mike Phillips
Wet-sanding - Fresh Paint vs Factory Paint
Basic Hand Sanding Techniques
Removing Orange Peel & Sanding Marks with the Griot's ROP and the Wolfgang Twins
How long will a half sheet of wet/dry sandpaper last before it stops cutting and you need to replace it?
Fight or Flight Method for Gaging Surface Temperature
The Heater
New member
- Dec 26, 2010
- 78
- 0
Don't try it without someone showing you face to face how to do it. And start out on something expendable. It takes a lot of practice to get it right and there is a very small margin of error if you don't know what you are doing.
Mike@DedicatedPerfection
New member
- Feb 26, 2011
- 12,365
- 0
Looks like dull paint from sanding. Finish the sanded areas out with 3000 and then run a machine over it.
Mike Phillips
Active member
- Dec 5, 2022
- 51,004
- 6
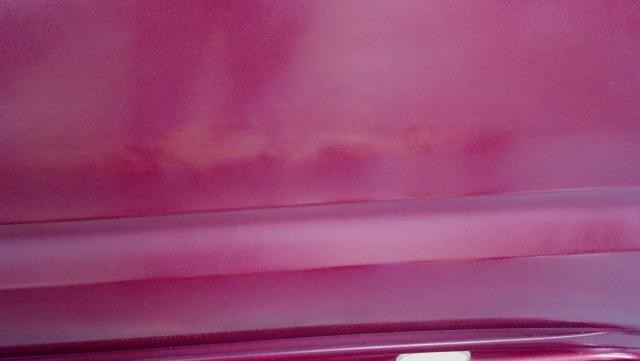
Why is my paint yellowing after wet sanding?Feed back please
I would be worried you're hitting yellow or gold colored primer from the picture...
What are you working on?
It's a good idea to tape-off body lines so you don't sand over them too. Paint is thinnest on high points and remember,
Like I posted in this thread today, see post #
http://www.autogeekonline.net/forum...burn-through-repair-advice-needed-please.html
Mike Phillips said:Something I point out in all my detailing classes on the topic of wetsanding and that is,
So everything is working against you from the very start...
- Sanding removes paint
- Compounding removes paint
- Polishing removes paint
- Paint from the factory is thin
If you're new to wetsanding AND you're sanding factory paint, that is it's NOT a custom paint job, read my article here,
Wetsanding - Fresh Paint vs Factory Paint
The Heater
New member
- Dec 26, 2010
- 78
- 0
I want to first make sure I understand what you are asking. You said wet sanding made the paint "yellow" or that it was, as a result of wet sanding, "yellowing". Right?
I don't see yellow in your picture.
What I see is normal hazing that is a result of wet sanding. My process that has been very successful is to use 1000, 1500 (one or the other), lightly sanding with a liberal lubrication with a water spray bottle, then graduate to 2000, sanding lightly again, then wipe off water and material to view to see if scratches are removed. Then I start compounding with an orbital polisher, carefully going from fast cut compound to less abrasive compounds (see below for my choice of product line). In the end, I have always gotten a glassy finish, and yes, the first time I wet sanded, I was told by a body and paint expert what it would look like but I still freaked out because I thought I sanded too far. Well, I was wrong, and the compounding made it smooth as glass.
As Mike's message above implies, you have to be very careful using any abrasive on paint (regardless of whether it is factory paint or otherwise). Once you have done it enough and had the failures many of us have had in the process, you gain enough fund of experience to know just how much or little to sand with each grade of paper on the specific paint damage you have. Until you get that experience, the best rule of thumb is to sand LESS than you think you need to do. Undersanding can always be remedied, but oversanding cannot without repainting in most cases.
Anyway, as the first responder stated, you can use 3000 paper. Or go to a fast cut rubbing compound. Eventually you have to compound it. I like 3M Perfect-It products. You can buy this at any good auto body supply store, and they can talk to you about your situation and give you direct advice on what you need to get your paint to a finished state and looking like glass. Take heart, you probably have not ruined your paint!
Mike Phillips
Active member
- Dec 5, 2022
- 51,004
- 6
I don't see yellow in your picture.
I "think" I see yellow splotches?
I can draw circles around the yellow splotches or maybe someone else can?
In order to sand through to primer you first have to sand through the clear coat for a clear coat finish or the color coat for as single stage finish.
Sanding paint is an art form...
Another thing I tell people in all my classes is that,
Sanding paint is the easy part, that's putting scratches into the paint... the tricky part is getting them out...

vtfreeiii
New member
- Oct 30, 2012
- 14
- 0
Gentlemen, confession time. Mike Phillips was correct, that was the red filler primer I sprayed under the base color. I guess I did not spray enough coats of base color and after wet sanding the clear coat and also over using Meguiar's medium-cut cleaner this was the results. I thought over buffing with the Maguiar's Cleaner would smooth out the cloudy looking clear coat that I sprayed over the base coat. The clear coat spray by Automotive Touchup for $7.95 I think was the problem because I used too much of the cleaner. May be I should use their clear coat with isocyanates for $18.95. I am going to clean up what I have done and this time spray 3-4 coats of base color this time along with a more expensive clear coat. do I really need to use cutting compound this time instead of the cleaner?
The Heater
New member
- Dec 26, 2010
- 78
- 0
For smoothest finish, wet sand between each clear coat. If you are not comfortable working with a film that thin, you can wet sand after applying 3-5 coats of clear. (but I would sand between coats myself).
vtfreeiii
New member
- Oct 30, 2012
- 14
- 0
Gentlemen, confession time. Mike Phillips was correct, that was the red filler primer I sprayed under the base color. I guess I did not spray enough coats of base color and after wet sanding the clear coat and also over using Meguiar's medium-cut cleaner this was the results. I thought over buffing with the Maguiar's Cleaner would smooth out the cloudy looking clear coat that I sprayed over the base coat. The clear coat spray by Automotive Touchup for $7.95 I think was the problem because I used too much of the cleaner. May be I should use their clear coat with isocyanates for $18.95. I am going to clean up what I have done and this time spray 3-4 coats of base color this time along with a more expensive clear coat. do I really need to use cutting compound this time instead of the cleaner?
BobbyG
New member
- Dec 29, 2009
- 13,211
- 0
I "think" I see yellow splotches?
You aren't the only one Mike.
These photos clearly show sanding has gone through the clear and the color revealing a sealant or primer coat.
vtfreeiii
New member
- Oct 30, 2012
- 14
- 0
You aren't the only one Mike.
These photos clearly show sanding has gone through the clear and the color revealing a sealant or primer coat.
Please, after reapplying 3-4 coats of base color should I use urethane clear coat instead of the acrylic clear coat I used before for $7.95? I over used the Maguiar medium cut cleaner along with wet sanding because the spray clear coat had a cloudy look even after buffing.Feed back please
Mike Phillips
Active member
- Dec 5, 2022
- 51,004
- 6
Gentlemen, confession time. Mike Phillips was correct, that was the red filler primer I sprayed under the base color.
I guess I did not spray enough coats of base color
Actually, you needed to spray more clear. More clear will give you a thicker layer to sand and buff.
Once you sand and/or buff through the clear layer... game over...
Please, after reapplying 3-4 coats of base color should I use urethane clear coat instead of the acrylic clear coat I used before for $7.95?
Check with the manufacture of the product for their recommendation as they know their paint chemistry best.
I over used the Maguiar medium cut cleaner along with wet sanding because the spray clear coat had a cloudy look even after buffing.
The #1 Medium Cut Cleaner can remove sanding marks but I think you'll find Meguiar's M105 a better option with either a foam pad or a wool pad on a rotary buffer.
hernandez.art13
New member
- Apr 8, 2013
- 6,958
- 0
I've color sanded to "mirror finish" it was great. It was a green Al Bundy type classic car. Like Pimps drive. Not a Cadillac more like a Chrysler idk. Lightly hit it with 1000, then 1500, 2000, 2500 then finally finished it with 3000. Only the 3000 was damp sand everything else was dry using the DA, microfiber towel and spray bottle to wipe off the dust.
(The Owner didn't order it, I just thought it would be fun to try) I was all proud...!
I couldn't wait till the owner came and picked it up to see my work. He just said "ok thanks" and drove off...
:buffing::buffing::buffing:
:nomore:
oh well...:laughing:
(The Owner didn't order it, I just thought it would be fun to try) I was all proud...!
I couldn't wait till the owner came and picked it up to see my work. He just said "ok thanks" and drove off...
:buffing::buffing::buffing:
:nomore:
oh well...:laughing:
Kainic
New member
- May 18, 2018
- 2
- 0
I have been dry sanding since the waterbug. Maybe 14 years ago? typically using a hard 3M stick it 6" pad. I didn't mean to say I felt the interface pad was better, there's no doubt its letting the paper follow highs & lows even more. Its just less dangerous for the average user.
I'm not at all afraid of the standard pad, thats how I cut my teeth dry sanding. The last car I sanded was a driver, I just wanted the peel gone, so interface pad worked ok for that. something different so I thought I would try it I should have worded that better
I'm not at all afraid of the standard pad, thats how I cut my teeth dry sanding. The last car I sanded was a driver, I just wanted the peel gone, so interface pad worked ok for that. something different so I thought I would try it I should have worded that better
You don't need to buy the more expensive clearcoat, I use automotive touchup clear all the time, but you need several coats of it before you start to go sanding. I would suggest:
one coat of primer,
2 to 3 coats of base very thin,
three coats of clear,
then 3000 grit,
and then finish out with a rotary with a hybrid wool pad
then Meguires 105 and 205 on an orbital with a medium pad.
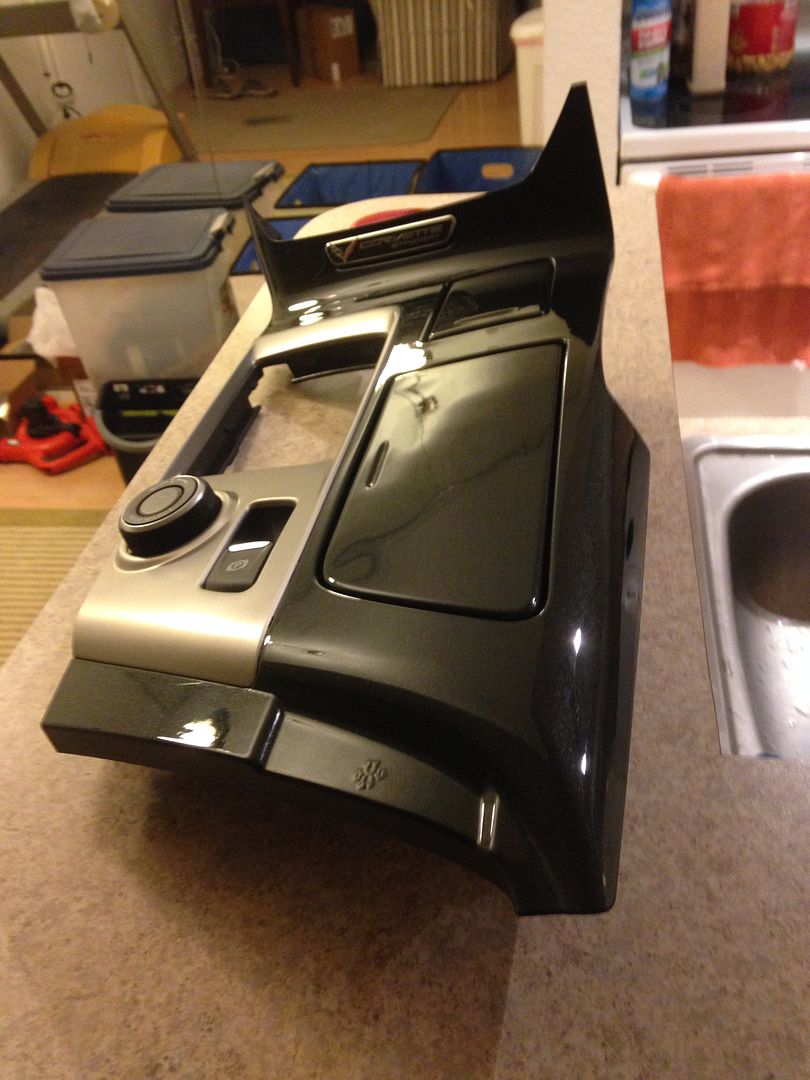
I get amazing results. A corvette console I did a few years ago with atouchup products.
one coat of primer,
2 to 3 coats of base very thin,
three coats of clear,
then 3000 grit,
and then finish out with a rotary with a hybrid wool pad
then Meguires 105 and 205 on an orbital with a medium pad.
I get amazing results. A corvette console I did a few years ago with atouchup products.

Here is an example of the types of amazing results you can achieve with 3M's Trizact 1500/3000 disc combo followed by a buff/polish. These are before and after photos of a a black hood that I leveled some orange peel on after a respray...pretty much speaks for itself. If done correctly, the results are simply astonishing.I have been dry sanding since the waterbug. Maybe 14 years ago? typically using a hard 3M stick it 6" pad. I didn't mean to say I felt the interface pad was better, there's no doubt its letting the paper follow highs & lows even more. Its just less dangerous for the average user.
I'm not at all afraid of the standard pad, thats how I cut my teeth dry sanding. The last car I sanded was a driver, I just wanted the peel gone, so interface pad worked ok for that. something different so I thought I would try it I should have worded that better


Sent from my SM-G955U using Autogeekonline mobile app