Hologram issues need help

Speed 6 on that machine with adequate pressure ,that's probably why your finished result isn't good.what kind of car.Dry buffing is to little product on pad,and when the product has flashed or broken down your marring the paint from heat that's generated from the pad.The black pad can be used for polishing prime the pad and set machine on 4. With slow overlapping passes.
 
6 inch plate, 6.5 pads

The car In question is a 2011 gti

Sent from my XT1254 using Tapatalk
 
Vw should have pretty hard paint so it should not be a soft paint issue. Did you compound first with m105? Might want to try to clean your pad real good, get it nice and dry. Prime the pad and work smaller sections. Try on 4-5 with a little pressure and slow arm movement.
 
I did compound first, weather is too cold atm to detail. I appreciate all of the input.

Sent from my XT1254 using Tapatalk
 
:iagree:
Vw should have pretty hard paint so it should not be a soft paint issue. Did you compound first with m105? Might want to try to clean your pad real good, get it nice and dry. Prime the pad and work smaller sections. Try on 4-5 with a little pressure and slow arm movement.
:iagree: on hard paint .
 
Any recommendations for good micro pads and towels?

Sent from my XT1254 using Tapatalk
 
I'm almost wondering if the compound step may have left a little bit of a hologram and then with the paint being hard the green pad isn't tough enough to knock them out.

When you wipe them with a towel do the holograms stay put or do they move around like an oily residue when you wipe with a microfiber towel.
 
Any recommendations for good micro pads and towels?

Sent from my XT1254 using Tapatalk

Did you totally break down 205 when polishing.The question about pads and micros.everyone has there own preference when it comes to micro towels.for me I use Home Depot 9.98 a pack,I like them for the money and they fit perfectly in my hand total control and no drag.I don't invest in quality towels,I do a lot of planes .Today I detailed a Beechcraft under any plane there is a oily soot so I chucked like 20 micro towels.also classic car billet or any kind of metal polish I throw them away.
 
I'm almost wondering if the compound step may have left a little bit of a hologram and then with the paint being hard the green pad isn't tough enough to knock them out.

When you wipe them with a towel do the holograms stay put or do they move around like an oily residue when you wipe with a microfiber towel.

Unfortunately car is dirty now and can't confirm hour suspicions. Though it did at first but I was able to remove it via wet microfiber.

Sent from my XT1254 using Tapatalk
 
Did you totally break down 205 when polishing.The question about pads and micros.everyone has there own preference when it comes to micro towels.for me I use Home Depot 9.98 a pack,I like them for the money and they fit perfectly in my hand total control and no drag.I don't invest in quality towels,I do a lot of planes .Today I detailed a Beechcraft under any plane there is a oily soot so I chucked like 20 micro towels.also classic car billet or any kind of metal polish I throw them away.

Break down do you mean like buff till there was a very light haze?

Sent from my XT1254 using Tapatalk
 
Yes but very little beyond that you will be dry buffing.
 
Ahh I understand. Still gaining experience and again I appreciate the wealth of information.

Sent from my XT1254 using Tapatalk
 
Did you totally break down 205 when polishing.The question about pads and micros.everyone has there own preference when it comes to micro towels.for me I use Home Depot 9.98 a pack,I like them for the money and they fit perfectly in my hand total control and no drag.I don't invest in quality towels,I do a lot of planes .Today I detailed a Beechcraft under any plane there is a oily soot so I chucked like 20 micro towels.also classic car billet or any kind of metal polish I throw them away.

Meguiar’s 205 doesn’t break down, being SMAT based, the abrasives just continue to cut.
Actually… (especially with a compound) the longer you work them (SMAT products) the more likely you are to end up working backwards. In that as the abrasives start to collect spent product, dirt, abraded paint and such, they end up getting bigger, and because of that they’ll end up working the product backwards from what it’s designed to do.

Always best to work those products to where they leave a wet film behind. Work them dry and it’s trouble looking for a place to land. (Everyone has a nightmare story of M105 turning to cement from working too long.) :eek: Best to work it as little as possible (as few as 1~2 section passes), wipe it while it’s still wet, inspect the work, reapply and continue till you’ve achieved the desired level of correction.


Wonderful insight. I do have a black pad. I don't clean them during the work but after.

Using light pressure buffing at 5 out of 6 could definitely lower it.

No repainted panels.

Mf towels are new. Recommendations for a different towel?

Not sure what dry buffing is I use polish.

Larry at ammo suggest it might be soft paint so your last comment sparks my curiosity.

Sent from my XT1254 using Tapatalk


First things first.
Forum rules don’t allow posting to outside vendors. (Such as an Amazon selling page.) ;)

The towels you linked are fine for interiors, wheels, polishing chrome, grills and such, but I’d not suggest them for a final wipe after polishing.

If you are totally sold on Chemical Guys towels, you’ll want to get their Chemical Guys MIC50612 “Professional Grade Premium Microfiber Towels”. Better yet, get yourself a couple dozen 360 GSM towels in white or gold from Microfiber Tech, or even the Gold Plush Jr’s from Autogeek. The MFT ones are identical, and a LOT cheaper, both of which I much prefer to the CG towel (which I also have a few of).

You said your towels are “new”. You did WASH them first, right?:dunno:
Please tell me you washed them. :eek:

Unwashed towels can absolutely cause what you're seeing.

Speaking of washing… you’ll want to make sure you prepare your washer before trusting your microfiber collection to it. Wash a load of bath towels, jeans or something on HOT, with ZERO fabric softener, and an extra rinse. Then move them to the dryer, NO fabric softener sheets.

You don’t have to use a dedicated microfiber detergent, but you DO want to use a ‘clear’ detergent, such as All Free and Clear. Also, you can put a couple ounces of white vinegar in the wash right at the end (for the rinse cycle).

If you want to be extra OCD… you can wipe the inside of the dryer with straight alcohol before drying your microfiber collection. Just MAKE SURE you air it out first as the alcohol vapor is high flammable. ;)

Did you do your test spot? What were the results from that?

You might try it something like this.
Divide the hood into 6 sections, tape them off, get a pad and paper, write down the process.
So say we do this:
Section 1:
Meguiar’s 205, Pink pad, machine speed 5, arm speed slow (1” per second), arm pressure medium (12~14 pounds), FOUR section passes

Section 2:
Meguiar’s 205, GREEN pad, machine speed 5, arm speed slow (1” per second), arm pressure medium (12~14 pounds), FOUR section passes

Note the only difference between the first two sections is the pad.

The only reason we’re doing ONLY 4 passes is so we can check the progress. I highly doubt that only 4 (section) passes will correct that (hard) paint, but by maintaining the same amount of passes you can then determine what the PAD is doing. You’ll wipe it off while it’s still wet (you want to leave a wet trail from the pad), then if need be you can go back and do an additional 4~6 passes.

Section 3:
Meguiar’s Ultimate Compound, Pink pad, machine speed 5, arm speed slow (1” per second), arm pressure medium (12~14 pounds), FOUR section passes

Section 4:
Meguiar’s Ultimate Compound, GREEN pad, machine speed 5, arm speed slow (1” per second), arm pressure medium (12~14 pounds), FOUR section passes

Note with these sections you’ve changed your compound, but still using the same pads as before.

Now with Sections 5 and 6 you can move to yet another pad, or you might change the machine speed, although always keeping slow arm speed, and AT LEAST medium arm pressure *until you find out how much pressure you need*.

This is where you might find that you need a bit more cut in your compound, but less in your pad(s). It's even possible to start a section with a heavier cut pad (and do the first 4~6 passes) then not change the compound, but switch to a lighter cut pad and THEN finish it down with a bit faster machine speed, maybe a bit faster arm speed, and you'll end up getting exactly what you're looking for yet only using a single buffing liquid. (I call that a 1.5 step process.) ;)

I suspect you may be using your pad too long, not be going slow enough, and/or using too little arm pressure. (Not necessarily in that order of importance.) ;)

Remember, WRITE IT ALL DOWN. This is critical, because you need to be able to reproduce the best results for each ‘section’ you have around the entire vehicle.

Once you have the results figured out, for that pad, for that paint, for THAT vehicle, then you know what works.

Keep in mind that you’ll need to do this for compounding first, then for polishing. So say you figured out on section 3 that, that is the process you most like, but you want to polish it out a bit more to ‘finesse’ it from that point THEN you’ll finish several sections in the same manner to prepare for the polishing segment.

Again…. now you’ll take your chosen polish, chosen pad, in each section, and hit it to figure out what gives you the results you want. Don't be afraid to switch pads, speeds, polishes, just as long as you are keeping notes.

Remember… you only want to do the least amount you can to get the desired result. No need to hit it with maximum cut, maximum pressure, maximum machine speed.
When medium cut, medium pressure, and machine speed 5 will work. :D

You might find out that once you get it compounded that a red pad with a light cut compound finishes down better for you than a white pad with a medium cut polish. You simply won’t know until you have all your sections first all done the same in step one and ready to finish in step two.

Another thing on the pads.

You said you’re not cleaning your pad(s) during polishing. Whew… that’ll end up biting ya’.
Just as not using enough pads will also end up hurting. You want to use AT LEAST 3~4 pads when polishing, more when compounding.

That’s not saying do half the car with one then switch either!

When polishing… You wouldn’t want to do more than half the hood with one pad, then do the other half with a new pad. (Compounding, you would want to change pads out much more often because they build heat much faster.)

You will ALWAYS want to “clean on the fly” after you do each section, (section being a square that fits between your shoulders, or something like 2’ square MAX). You can do multiple sections with a single pad, but not multiple panels. Pads will build up heat inside the pad, and against the backing plate (plus the plate itself builds up heat). This is why you, clean on the fly, as well as change your pads often.

It’s possible to polish with 2 pads if you take your time but MUCH easier with 3~4. If it's cool weather the pads will cool faster, but if it's in the 90's pad #1 will still be warm when pad #2 comes off the machine.

Start with #1, do say half the hood, (cleaning on the fly after each section) then clean the pad and lay it out to cool/dry. Move to #2, finish the hood, then lay it out to cool/dry. Move to #3, #4 etc. then go back to #1 and rotate FI-FO, (First In – First Out).

Hopefully that all made sense.... it's getting late around here. :buffing:


Meguiar’s 205 doesn’t break down, being SMAT based, the abrasives just continue to cut.
Actually… (especially with a compound) the longer you work them (SMAT products) the more likely you are to end up working backwards. In that as the abrasives start to collect spent product, dirt, abraded paint and such, they end up getting bigger, and because of that they’ll end up working the product backwards from what it’s designed to do.

Always best to work those products to where they leave a wet film behind. Work them dry and it’s trouble looking for a place to land. (Everyone has a nightmare story of M105 turning to cement from working too long.) :eek: Best to work it as little as possible (as few as 1~2 section passes), wipe it while it’s still wet, inspect the work, reapply and continue till you’ve achieved the desired level of correction.


First things first.
Forum rules don’t allow posting to outside vendors. (Such as an Amazon selling page.) ;)

The towels you linked are fine for interiors, wheels, polishing chrome, grills and such, but I’d not suggest them for a final wipe after polishing.

If you are totally sold on Chemical Guys towels, you’ll want to get their Chemical Guys MIC50612 “Professional Grade Premium Microfiber Towels”. Better yet, get yourself a couple dozen 360 GSM towels in white or gold from Microfiber Tech, or even the Gold Plush Jr’s from Autogeek. The MFT ones are identical, and a LOT cheaper, both of which I much prefer to the CG towel (which I also have a few of).

You said your towels are “new”. You did WASH them first, right?:dunno:
Please tell me you washed them. :eek:

Unwashed towels can absolutely cause what you're seeing.

Speaking of washing… you’ll want to make sure you prepare your washer before trusting your microfiber collection to it. Wash a load of bath towels, jeans or something on HOT, with ZERO fabric softener, and an extra rinse. Then move them to the dryer, NO fabric softener sheets.

You don’t have to use a dedicated microfiber detergent, but you DO want to use a ‘clear’ detergent, such as All Free and Clear. Also, you can put a couple ounces of white vinegar in the wash right at the end (for the rinse cycle).

If you want to be extra OCD… you can wipe the inside of the dryer with straight alcohol before drying your microfiber collection. Just MAKE SURE you air it out first as the alcohol vapor is high flammable. ;)

Did you do your test spot? What were the results from that?

You might try it something like this.
Divide the hood into 6 sections, tape them off, get a pad and paper, write down the process.
So say we do this:
Section 1:
Meguiar’s 205, Pink pad, machine speed 5, arm speed slow (1” per second), arm pressure medium (12~14 pounds), FOUR section passes

Section 2:
Meguiar’s 205, GREEN pad, machine speed 5, arm speed slow (1” per second), arm pressure medium (12~14 pounds), FOUR section passes

Note the only difference between the first two sections is the pad.

The only reason we’re doing ONLY 4 passes is so we can check the progress. I highly doubt that only 4 (section) passes will correct that (hard) paint, but by maintaining the same amount of passes you can then determine what the PAD is doing. You’ll wipe it off while it’s still wet (you want to leave a wet trail from the pad), then if need be you can go back and do an additional 4~6 passes.

Section 3:
Meguiar’s Ultimate Compound, Pink pad, machine speed 5, arm speed slow (1” per second), arm pressure medium (12~14 pounds), FOUR section passes

Section 4:
Meguiar’s Ultimate Compound, GREEN pad, machine speed 5, arm speed slow (1” per second), arm pressure medium (12~14 pounds), FOUR section passes

Note with these sections you’ve changed your compound, but still using the same pads as before.

Now with Sections 5 and 6 you can move to yet another pad, or you might change the machine speed, although always keeping slow arm speed, and AT LEAST medium arm pressure *until you find out how much pressure you need*.

This is where you might find that you need a bit more cut in your compound, but less in your pad(s). It's even possible to start a section with a heavier cut pad (and do the first 4~6 passes) then not change the compound, but switch to a lighter cut pad and THEN finish it down with a bit faster machine speed, maybe a bit faster arm speed, and you'll end up getting exactly what you're looking for yet only using a single buffing liquid. (I call that a 1.5 step process.) ;)

I suspect you may be using your pad too long, not be going slow enough, and/or using too little arm pressure. (Not necessarily in that order of importance.) ;)

Remember, WRITE IT ALL DOWN. This is critical, because you need to be able to reproduce the best results for each ‘section’ you have around the entire vehicle.

Once you have the results figured out, for that pad, for that paint, for THAT vehicle, then you know what works.

Keep in mind that you’ll need to do this for compounding first, then for polishing. So say you figured out on section 3 that, that is the process you most like, but you want to polish it out a bit more to ‘finesse’ it from that point THEN you’ll finish several sections in the same manner to prepare for the polishing segment.

Again…. now you’ll take your chosen polish, chosen pad, in each section, and hit it to figure out what gives you the results you want. Don't be afraid to switch pads, speeds, polishes, just as long as you are keeping notes.

Remember… you only want to do the least amount you can to get the desired result. No need to hit it with maximum cut, maximum pressure, maximum machine speed.
When medium cut, medium pressure, and machine speed 5 will work. :D

You might find out that once you get it compounded that a red pad with a light cut compound finishes down better for you than a white pad with a medium cut polish. You simply won’t know until you have all your sections first all done the same in step one and ready to finish in step two.

Another thing on the pads.

You said you’re not cleaning your pad(s) during polishing. Whew… that’ll end up biting ya’.
Just as not using enough pads will also end up hurting. You want to use AT LEAST 3~4 pads when polishing, more when compounding.

That’s not saying do half the car with one then switch either!

When polishing… You wouldn’t want to do more than half the hood with one pad, then do the other half with a new pad. (Compounding, you would want to change pads out much more often because they build heat much faster.)

You will ALWAYS want to “clean on the fly” after you do each section, (section being a square that fits between your shoulders, or something like 2’ square MAX). You can do multiple sections with a single pad, but not multiple panels. Pads will build up heat inside the pad, and against the backing plate (plus the plate itself builds up heat). This is why you, clean on the fly, as well as change your pads often.

It’s possible to polish with 2 pads if you take your time but MUCH easier with 3~4. If it's cool weather the pads will cool faster, but if it's in the 90's pad #1 will still be warm when pad #2 comes off the machine.

Start with #1, do say half the hood, (cleaning on the fly after each section) then clean the pad and lay it out to cool/dry. Move to #2, finish the hood, then lay it out to cool/dry. Move to #3, #4 etc. then go back to #1 and rotate FI-FO, (First In – First Out).

Hopefully that all made sense.... it's getting late around here. :buffing:


I meant for the 205 to be worked in pretty good,not to the point of breaking down the polish sorry for the misinterpreted word I was trying to use.
 
Those lines are buffer trails, not specifically holograms.

Holograms are a scratch pattern imparted by a rotary buffer. You're using a dual action polisher.

It's possible the lines are holograms put into the paint by someone else using a rotary buffer and you're simply not getting them out using a dual actioin polisher with a FINE cut polish like M205.

If you are in fact imparting the lines or buffer trails then one simple thing you can do to TEST is to get a differnet polish. M205 is known for causing micro-marring on softer paints.

Get a bottle of Pinnacle Advanced Swirl Remover and using this with a Lake Country 5.5" white foam polishing pad and my guess is the lines will go away.

Also... it's vitally important to clean you pads often. You have two things building up on the face of your pad when you're abrading paint.

1. Spent product
2. Removed paint.

If you don't clean this off the face of the paint then you're grinding it back into the paint.

Here's an article on residue control from 2010 - 5 years ago...


Why it's important to clean your pads often...

When you're buffing out a car it's important to clean your pads often. By cleaning your pad often you will work faster and you will enable your pad and product to work more effectively. Be sure to have both clean terry cloth towels on hand and also a nylon pad cleaning brush. It's also a good idea to have plenty of pads so as a pad becomes wet with product you can switch over to a clean dry pad. Dry pads work better than wet pads.


ANYTIME you're abrading the surface whether you're using an aggressive cutting compound of an ultra fine polish, you have two things building up on the face of your buffing pad...
  • Spent product
  • Removed paint
You need to remove both of these substances from the face of the pad and the panel you're working on before you apply fresh product. If you don't,
  • You increase your chances of leaving micro-marring in the paint.
  • Adding fresh product to spent product and removed paint adulterates the fresh product, it also dilutes it.
  • Buffing with a dirty pad will be more difficult.
  • The product will cake-up on the face of the pad.
  • The product will become gummy on the paint and hard to wipe off.
How to clean your pads and other options to make buffing clean again...
  • You can scrub the face of the pad with a nylon brush like a pad conditioning brush or even a nylon toothbrush
  • If using a Dual Action Polisher or a Rotary Buffer you can clean your pad on the fly with a terry cloth towel
  • You can wash your pads in a bucket of water.
  • You can wash your pads in a sink under running water.
  • You can wash your pads in a pad washer.
  • You can switch to a clean, dry pad.
  • You can switch to a brand new pad.
  • You can used compressed air to blow off residue.

That's the whole idea behind cleaning your pad on the fly... you can remove a majority of the spent product and removed paint and then get back to running the buffer... buffing out an entire car already takes a l-o-n-g time... stopping to do some kind of pad cleaning procedure that isn't quick and easy keeps you from buffing on the paint.


Fast methods include,
  • Pad Washers
  • Cleaning your pad on the fly with a terry cloth towel
  • Using a nylon pad conditioning brush
  • Using a Spur if you're using a wool pad on a rotary buffer

Slow methods, (they might work well but they take you away from buffing on the car)
  • You can wash your pads in a bucket of water
  • You can wash your pads in a sink under running water
How to clean your pad with a nylon brush
Here's how to clean a pad with a nylon brush.

NOTE: you do this with the polisher turned OFF.

1967_Mustang_Fastback_Autogeek_Mike_Phillips_056.jpg


How to clean your pad on the fly using a terry cloth hand towel

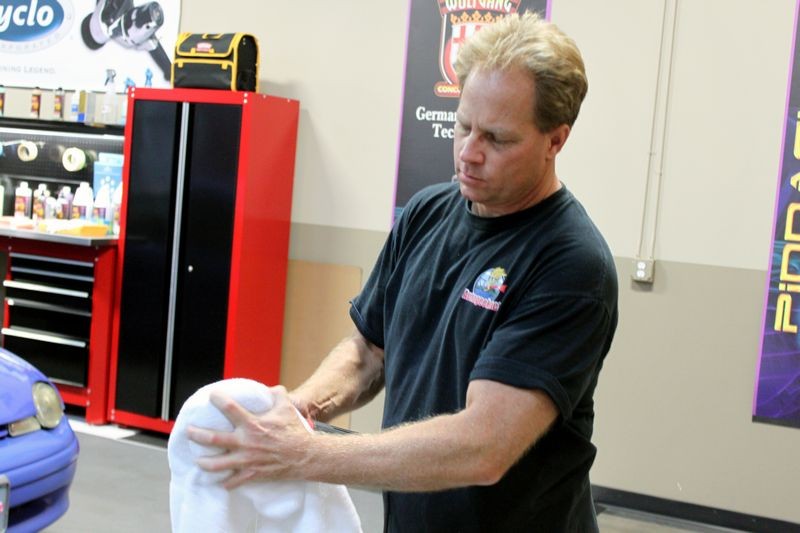
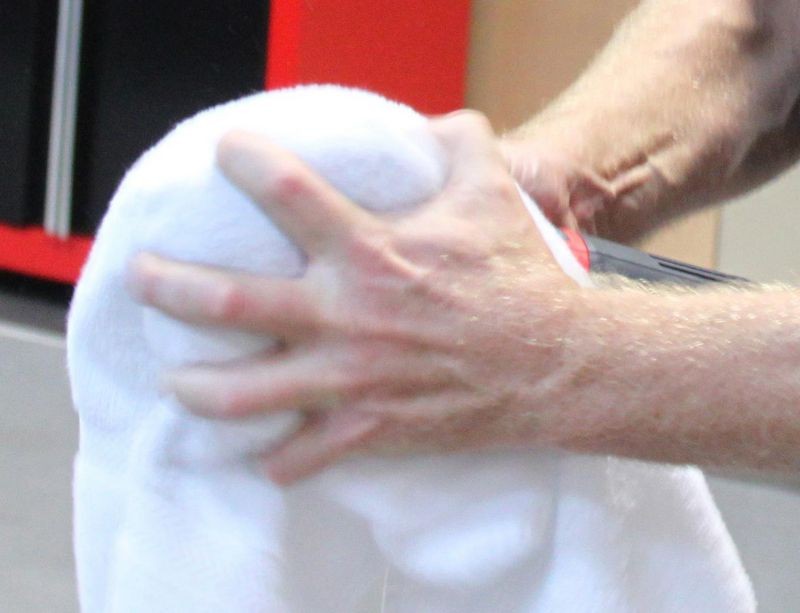
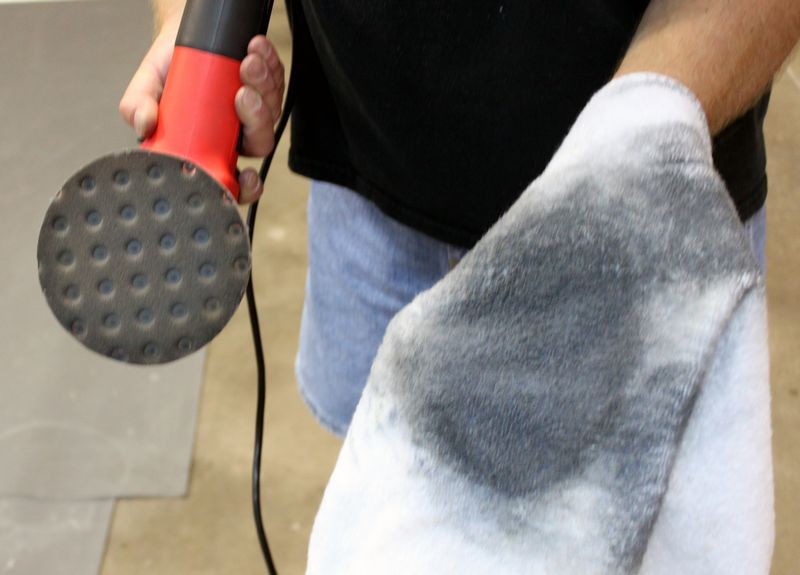
Cleaning your pad on the fly is where you take a terry cloth towel, usually a medium size hand towel works best, you fold it in two and then simply hold the towel against the face of the pad and then turn the polisher on and use your hand that’s holding the towel to push the towel into the foam. This will act to draw any excess liquid out of the foam and any excess residue off of the face of the pad.


This is me using the Clean your Pad on the Fly Technique to clean my pad on the fly as I'm working around a car buffing it out.

EODodgeNeon010.jpg


EODodgeNeon011.jpg


EODodgeNeon012.jpg


EODodgeNeon013.jpg


This video explains the above technique in detail and shows you exactly how to use this technique to clean your pads.


How to clean your pad on the fly


[ame="<div align="center">
<table class="tborder" cellpadding="6" cellspacing="1" border="0" width="400" style="margin:10px 0">
<thead>
<tr>
<td class="tcat" colspan="2" style="text-align:center">
<a href="" title="You Tube" target="_blank">You Tube</a>
</td>
</tr>
</thead>
<tbody>
<tr>
<td class="panelsurround" align="center"><object width="425" height="350"><param name="movie" value="http://www.youtube.com/v/NuyrBrqz_YU"></param><embed src="http://www.youtube.com/v/NuyrBrqz_YU" type="application/x-shockwave-flash" width="425" height="350" wmode="transparent"></embed></object></td>
</tr>
</tbody>
</table></div>"]How to clean your pad on..." target="_blank">How to clean your pad on...[/video]​


:)
 
Wow incredible information. I'll have to try that product and I think investing into a Compressor would be the best bet for me. It's in the 50s this weekend so i'll wash then try to get this done. I'll take pictures of my results.

Sent from my XT1254 using Tapatalk
 
Back
Top