Navigation
Install the app
How to install the app on iOS
Follow along with the video below to see how to install our site as a web app on your home screen.
Note: This feature may not be available in some browsers.
More options
Style variation
You are using an out of date browser. It may not display this or other websites correctly.
You should upgrade or use an alternative browser.
You should upgrade or use an alternative browser.
Corvette swirl free finish estimate.
- Thread starter jonn127
- Start date
Extreme Radiance
New member
- Nov 20, 2013
- 140
- 0
I have a blk 2001C5. I use a pc7424xp with LC psds. Yes u can have swirl free paint. It takes time. I use meguiars m105/m205. Once i have paint where i want it i do a jeweling step using ultim polish. Then apply NXT2.0 followex by GC carnauba
Sent from my SPH-L710 using AG Online
Sent from my SPH-L710 using AG Online
FUNX650
New member
- Dec 1, 2010
- 21,057
- 1
Most 3M compounds/polishes are best used with a rotary.Ok, so say I have nothing but a portercable and some 3m compound, is it possible to achieve a swirl free finish n a corvette, and about how much time am I looking at.
Look at the directions for use on this product's label to be sure.
You may have to use products that are more DA friendly.
If you can: Don't rush this, or any other detailing job.
Do it right the first time.
Bob
Mike lambert
New member
- Aug 16, 2011
- 1,128
- 0
I second the advice to wait, get the right products for the job. You may not need the compound anyway?
Mike Phillips
Active member
- Dec 5, 2022
- 51,004
- 7
Ok, so say I have nothing but a portercable and some 3m compound, is it possible to achieve a swirl free finish n a corvette,
I'm so glad you asked before you acted....
As others have said, the abrasive technology in any 3M compound might work great with a rotary buffer but it's gonig to haze the hell out of your rock hard Covertte clear coat and if you use it you're going to spend at least another day re-abrading the already THIN clear coat to remove the haze.
I wrote this article recently becuase so many people think they can use any old compound or polish with a dual action polisher.
Here you go...
For Use with Rotary Buffer Only - Read the Directions
A common question I get asked via e-mail, a thread posted to the forum, a question posted to one of our YouTube videos or PM and also on my Facebook page will go like this,
Hi Mike,
I've read a lot of articles and watched a lot of videos but I'm still getting holograms or haze left in the paint, especially on darker colored cars? What am I doing wrong?
Usually the first thing I'll ask the person what they are using, as in, whatI've read a lot of articles and watched a lot of videos but I'm still getting holograms or haze left in the paint, especially on darker colored cars? What am I doing wrong?
- Tools
- Pads
- Products
There’s always a segment of these queries where the person is using a dual action polisher with foam pads, so they're good to go in this area but they're using products that are intended for, formulated for and designed for use with a rotary buffer.
Now I'm not a chemist and never claim to be but I like to give reputable manufactures the benefit of the doubt when they state right on the labels of their products what type of tool the product is recommended to be used with.
There are a lot of different types of abrasive technology on the market and some of this abrasive technology is intended specifically to be used with a rotary buffer and almost always in the refinishing industry.
The normal tool used in the refinishing industry is the rotary buffer. After cars are painted, IF they are go be sanded, after sanding a rotary buffer is used with a compound, polish and sometimes even a glaze to buff the paint before the car is returned to the customer.
This almost always leaves holograms in the paint but that's how this industry operates. Most "customers" don't know the difference between swirls and squirrels so for most body shop it's not an issue.
Big picture is this...
Products designed for use with rotary buffers and targeted at the refinishing industry doesn't mean the same products when used with any type of dual action polisher will create a customer pleasing finish no matter what pad is used nor the skill of the person doing the work.
The reason why is because it's the wrong abrasive technology for a tool that rotates and oscillates and the results when a person uses the wrong abrasive technology looks like this...
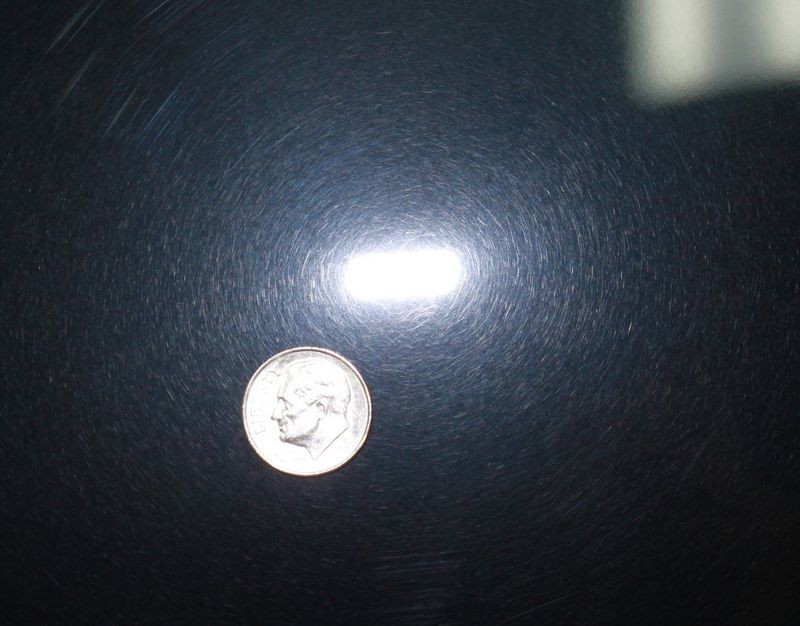
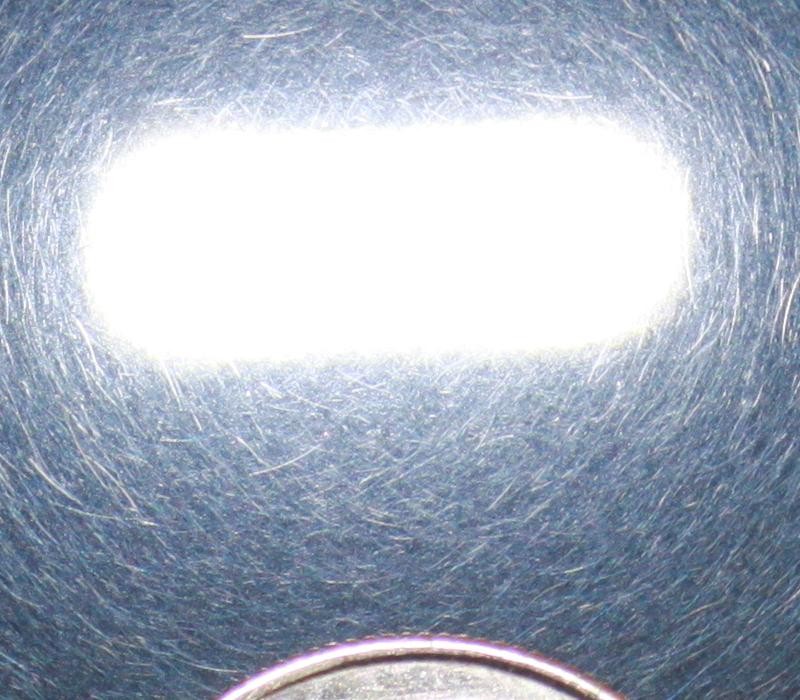
Holograms from a Dual Action Polisher?
Sometimes a person will describe the above DA Haze as holograms when referring to how the paint they just buffed looks.
While you can leave DA Haze trails or Patterns in a panel that follow the path the buffer was moved over the paint, these are not the same as the cuts in the paint called holograms left by the use of a rotary buffer.
In the last few weeks this topic has come up a number of times and in each case the person having problems leaving a haze-free finish is using a compound or polish that is not only intended for use with a rotary buffer but the label on the product actually states this little tidbit.
As we all know... us guys never read the directions to anything and so it goes with compounds and polishes. So when these questions are posted the various media touch points and specifically when I'm asked these types of questions, the first thing I do is ask the person, what are you using? What,
- Tool
- Pad
- Product
And when the tools is a dual action polisher, 9 times out of 10 the problem is the person. That is the person is using the wrong product.
You see, the products work great when used the right way, but when used the wrong way... well what do you expect?
So as my norm, when a topic continues to come up over and over again, I'll do my best to write an article to address the issue and then in the future, (as I always type for the future on forums), when the topic comes up, instead of typing out a reply explaining all of the above I can just post the link to the article that explains it.
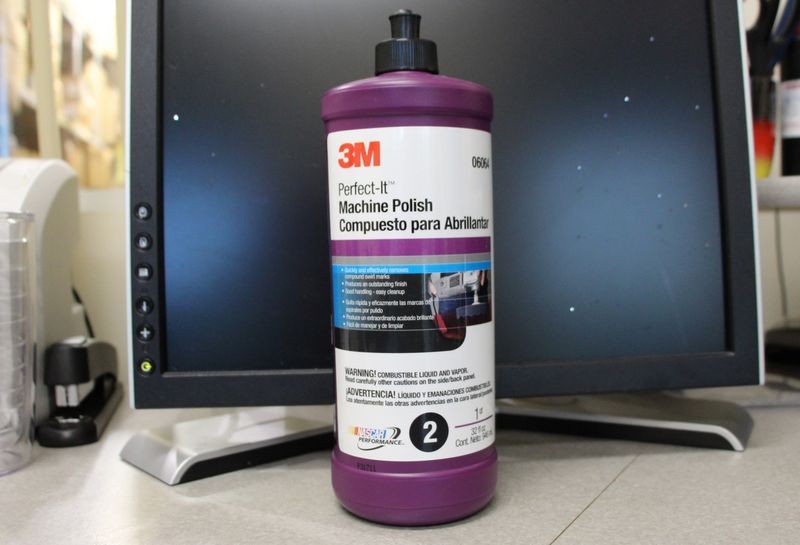
Because a good picture can speak a thousand words, below are a few products we carry at Autogeek that are GREAT products. That is they are great products when used correctly with the right TOOL. Used in-correctly doesn't make them bad products, it usually means the person having the problems didn't read the directions.
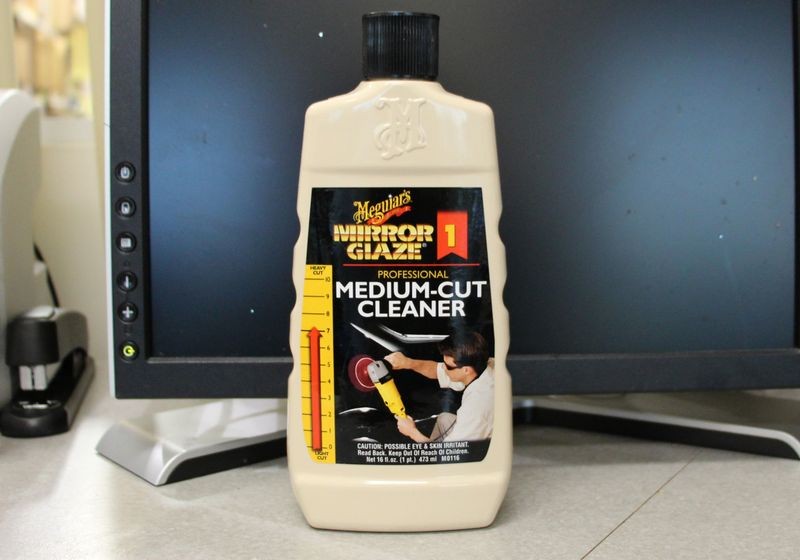
Professional Line
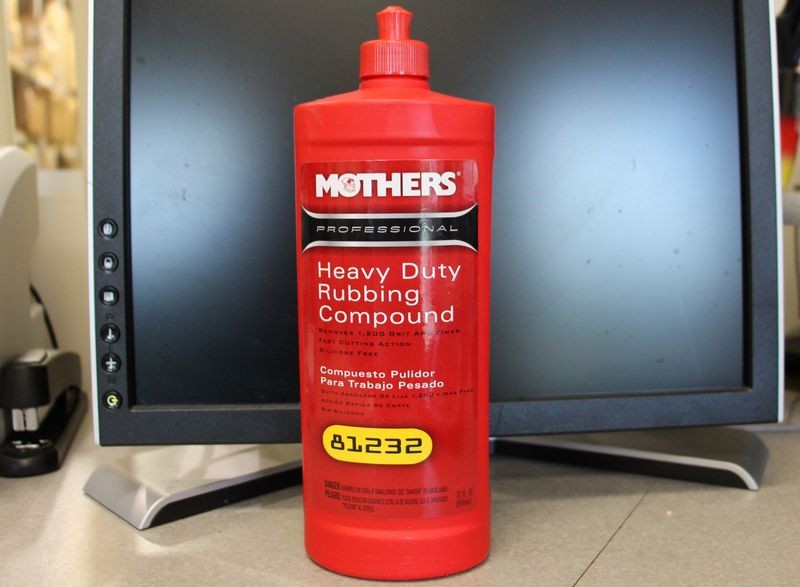
The products show below are of products that are part of a company's offering to the refinishing industry. Refinishing industry in simple terms means body shops, the place you would take your car to have it painted after an accident or to get a custom paint job in the case of someone fixing up an older car. Most companies in the car appearance industry that offer a professional line also offer a consumer line. If you look at the directions for the products in their consumer line you'll find they are often a lot more versatile in that they can be used by hand, dual action polishers and rotary buffers.
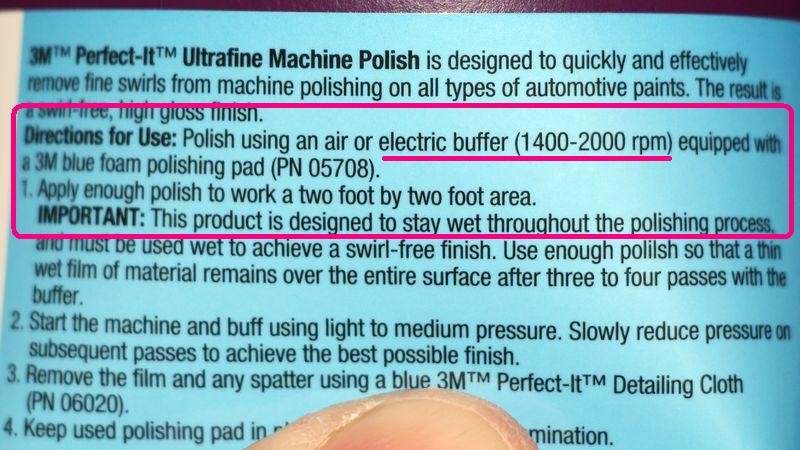
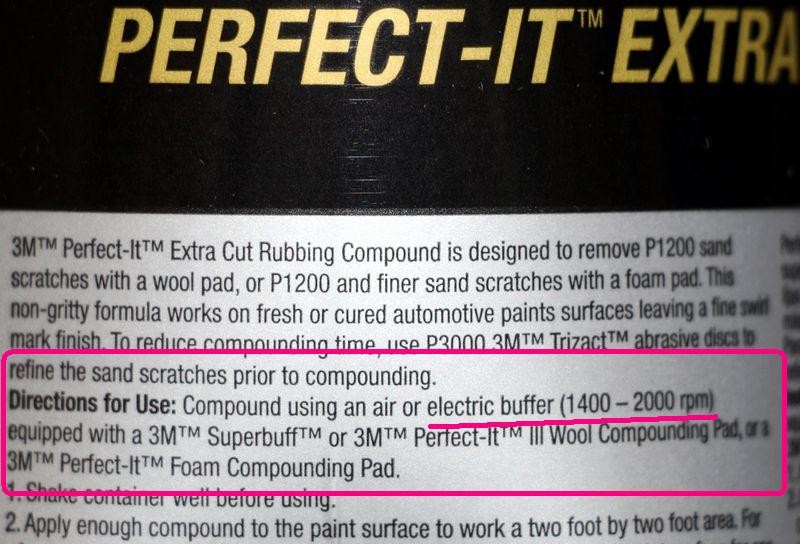
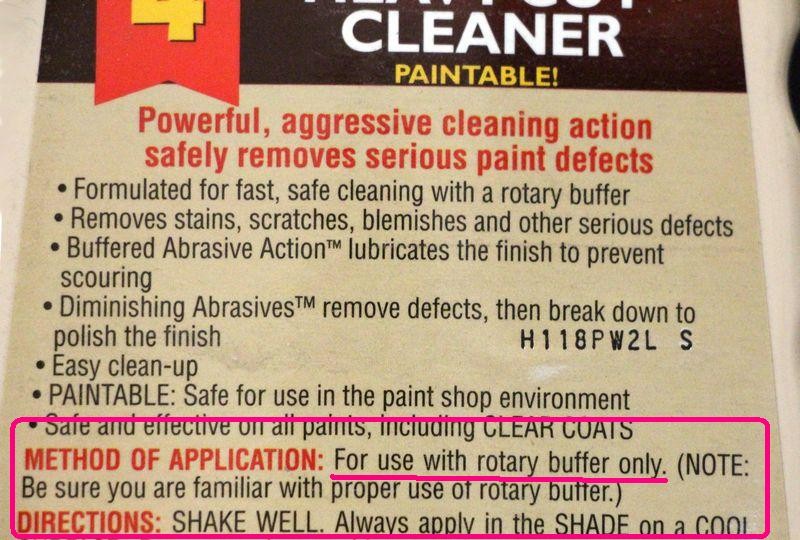
In the below pictures, the first picture will be of a product followed by a second picture of the directions on how to use the product.
Note that when a product label states to use a buffer at a specific RPM even if the term BUFFER is kind of vague, the reference to RPMs and in the context of what the product is and the market it is formulated and targeted at means the term BUFFER is being used to describe a rotary buffer.


Mike Phillips
Active member
- Dec 5, 2022
- 51,004
- 7
and about how much time am I looking at.
If you have plenty of dry, clean foam pads, like the 5.5" Lake Country Flat pads and some really good abrasive technology okay for use with a dual action polisher, from start to finish NOT counting washing and drying the car and claying if the paint fails the baggie test, it will take you about 6-8 hours to de-swirls a Corvette using a Porter Cable.
6 hours if you're good at this and don't take a lot of breaks.
8 hours if you're new to this and don't keep the polisher turned on against the paint all the time except when cleaning your pad on the fly or taking a drink of water.
Have you ever used a Porter Cable dual action polisher before?
If not, take a read through this... while most people think you would read a troubleshooting guide AFTER you run into trouble, it's better to read through this guide before you start to avoid trouble from the very start.
DA Polisher Trouble Shooting Guide
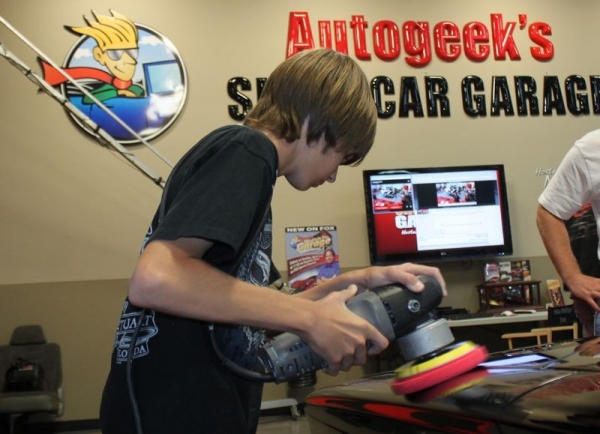
Tyler, age 15 removing swirls using a Porter Cable 7424XP Dual Action Polisher

When you're first starting out machine polishing and learning to use a DA Polisher it's common to have questions about your results and your results are directly tied to your technique.
Here's a list of the most common problems,
1. Trying to work too large of an area at one time.
2. Moving the polisher too fast over the surface.
3. Using too low of speed setting for removing swirls.
4. Using too little downward pressure on the head of the polisher.
5. Using too much downward pressure on the head of the polisher so the pad quits rotating.
6. Not holding the polisher in a way to keep the pad flat while working your compound or polish.
7. Using too much product or using too little product.
8. Not cleaning the pad often enough.
Here's a list of the solutions in matching order, 2. Moving the polisher too fast over the surface.
3. Using too low of speed setting for removing swirls.
4. Using too little downward pressure on the head of the polisher.
5. Using too much downward pressure on the head of the polisher so the pad quits rotating.
6. Not holding the polisher in a way to keep the pad flat while working your compound or polish.
7. Using too much product or using too little product.
8. Not cleaning the pad often enough.
1. Trying to work too large of an area at one time.
Shrink the size of your work area down. You can't tackle to large of an area at one time. The average size work area should be around 20" by 20". Most generic recommendations say to work an area 2' by 2' but for the correction step, that's too large. You have to do some experimenting, (called a Test Spot), to find out how easy or how hard the defects are coming out of your car's paint system and then adjust your work area to the results of your Test Spot. The harder the paint the smaller the area you want to work.
2. Moving the polisher too fast over the surface.
For removing defects out of the paint you want to use what we call a Slow Arm Speed. It's easy and actually natural for most people new to machine polishing to move the polisher quickly over the paint but that's the wrong technique. One reason I think people move the polisher too quickly over the paint is because they hear the sound of the motor spinning fast and this has psychological effect which causes them to match their arm movement to the perceived fast speed of the polisher's motor.
Another reason people move the polisher too quickly over the paint is because they think like this,
"If I move the polisher quickly, I'll get done faster"
But it doesn't work that way. Anytime you're trying to remove swirls, scratches, water spots or oxidation using a DA Polisher you need to move the polisher s-l-o-w-l-y over the paint.
3. Using too low of speed setting for removing swirls.
When first starting out many people are scared of burning or swirling their paint, so they take the safe route of running the polisher at too low of a speed setting but this won't work. The action of the polisher is already g-e-n-t-l-e, you need the speed and specifically the pad oscillating and rotating over the paint as well as the combination of time, (slow arm speed), together with the abrasives, the pad aggressiveness, and the downward pressure to remove small particles of paint which is how your remove below surface defects like swirls or scratches.
Removing below surface defects is a leveling process where you need the abrasives to take little bites out of the paint and to get the abrasives to take these little bites with a tool that uses a Free Floating Spindle Bearing Assembly you need all of the above factors working for you including a high speed setting.
4. Using too little downward pressure on the head of the polisher.
For the same reason as stated in #3, people are scared, or perhaps a better word is apprehensive, to apply too much downward pressure to the polisher and the result of too little pressure is no paint is removed thus no swirls are removed.
5. Using too much downward pressure on the head of the polisher so the pad quits rotating.
If you push too hard you will slow down the rotating movement of the pad and the abrasives won't be effectively worked against the paint. You need to apply firm pressure to engage the abrasives against the paint but no so much that the pad is barely rotating. This is where it's a good idea to use a permanent black marker to make a mark on the back of your backing plate so your eyes can easily see if the pad is rotating or not and this will help you to adjust your downward pressure accordingly.
Correct technique means finding a balance of applying enough downward pressure to remove defects but not too much downward pressure as to stop the rotating movement of the pad.
This balance is affected by a lot of factors like the lubricity of the product you're using, some compounds and polishes provide more lubrication than others and this makes it easier to maintain pad rotation under pressure.
Another factor that can affect pad rotation are raised body lines, edges and curved surfaces as anytime you have uneven pressure on just a portion of the face of the pad it can slow or stop pad rotation. This is where experience comes into play and experience comes from time spent behind the polisher.
6. Not holding the polisher in a way to keep the pad flat while working your compound or polish.
Applying pressure in such a way as to put too much pressure to one edge of the pad will cause it to stop rotating and thus decrease abrading ability.
7. Using too much product or using too little product.
Too much product hyper-lubricates the surface and the result is that abrasives won't effectively bite into the paint but instead will tend to skim over the surface. Overusing product will also accelerate pad saturation as well increase the potential for slinging splatter onto adjacent panels.
Too little product will means too little lubrication and this can interfere with pad rotation.
Again there needs to be a balance between too much product and too little product and finding this balance comes from reading articles like this one, watching videos an most important, going out into the garage and putting in time behind the polisher and as you're buffing with specific product and pad combinations, pay attention to pad rotation.
8. Not cleaning the pad often enough.
Most people simply don't clean their pad often enough to maximize the effectiveness of their DA Polisher. Anytime you're abrading the paint you have two things building up on the face of your buffing pad,
- Removed paint
- Spent product
Pad Cleaning Articles
Why it's important to clean your pads often...
How to clean your foam pad on the fly
How to use the Grit Guard Universal Pad Washer
Tyler, age 15 machine applying a paste wax using a Porter Cable 7424XP Dual Action Polisher

:buffing:
Mike Phillips
Active member
- Dec 5, 2022
- 51,004
- 7
TONS of articles and links to videos on how to use a PC here....
Articles by Mike Phillips
And if you're brand new to machine polishing or detailing in general, the below article will walk you through each step you want to do regardless if your car is brand new or not.
")
Articles by Mike Phillips
And if you're brand new to machine polishing or detailing in general, the below article will walk you through each step you want to do regardless if your car is brand new or not.
Mike Phillips
Active member
- Dec 5, 2022
- 51,004
- 7
Step-by-step what to do....
How To Detail Your Brand New Car by Mike Phillips
I'd start here....
The Baggie Test - How to inspect for above surface bonded contaminants

And here....
Let there be light...
(when inspecting the condition of your car's paint)

How To Detail Your Brand New Car by Mike Phillips
I'd start here....
The Baggie Test - How to inspect for above surface bonded contaminants
And here....
Let there be light...
(when inspecting the condition of your car's paint)
jonn127
New member
- Sep 27, 2010
- 374
- 0
- Thread starter
- #12
Guys, I apologize, the point of my post was to relay some info to a know it all who was claiming he could de swirl his vette with a da and 3m compound and then get mirror results with a glaze on top. More to the point that he think thi I how everyone should do it. If he gets the results he wants, I guess I should let it go, but it just irritates the fire out of me.
Mike Phillips
Active member
- Dec 5, 2022
- 51,004
- 7
Here's the first post...
Here's the follow-up...
Sounds like you're were just trying to help, especially if you share the link to this post to the person, or as a link in a thread where the pertinent conversation is taking place or even print out the first page and let him read it.
I'll guarantee you this though, if he tries to use a dual action polisher with one of the Pro Grade 3M compounds on a black clearcoated Corvette he's going to haze the heck out of the paint.
He can make the hazing disappear my masking it with a glaze and wax but this is hack work.
If he's working on a LIGHT or WHITE clearcoated Corvette the hazing might not show up to his eyes but it's still there regardless.
:dunno:
Ok, so say I have nothing but a portercable and some 3m compound,
is it possible to achieve a swirl free finish n a corvette,
and about how much time am I looking at.
Here's the follow-up...
Guys, I apologize,
the point of my post was to relay some info to a know it all who was claiming he could de swirl his vette with a da and 3m compound and then get mirror results with a glaze on top.
More to the point that he think thi I how everyone should do it.
If he gets the results he wants, I guess I should let it go, but it just irritates the fire out of me.
Sounds like you're were just trying to help, especially if you share the link to this post to the person, or as a link in a thread where the pertinent conversation is taking place or even print out the first page and let him read it.
I'll guarantee you this though, if he tries to use a dual action polisher with one of the Pro Grade 3M compounds on a black clearcoated Corvette he's going to haze the heck out of the paint.
He can make the hazing disappear my masking it with a glaze and wax but this is hack work.
If he's working on a LIGHT or WHITE clearcoated Corvette the hazing might not show up to his eyes but it's still there regardless.
:dunno: