Tato
New member
- Nov 27, 2013
- 2,157
- 0
Good evening,
Today I'm going to share a recent work on a brand new 2014 Black BMW 320i in form of a 'picture follow-up'.
The car ran only ~280km, but came with DISO (Dealer Installed Swirl Option), RIDS and water spots that made it looks much older.
Client called asking for something to protect her finish. Knowing it was a brand new car, I've offered my PBL full coating service and I've thought that would be 'as easy as' cleaning and coating…
I've scheduled by phone without prior seeing the vehicle. When it arrived… ... Please, see for yourself:
I've asked for 1 day and a half, and client promptly agreed.
281km (~120km was the distance between me and the client).

Dealer Installed Swirl Option - The Before Pictures:
Hood DISO:

Roof DISO:

Side back pillar:

Trunk lid swirled and rear glass opaque, full of spots:
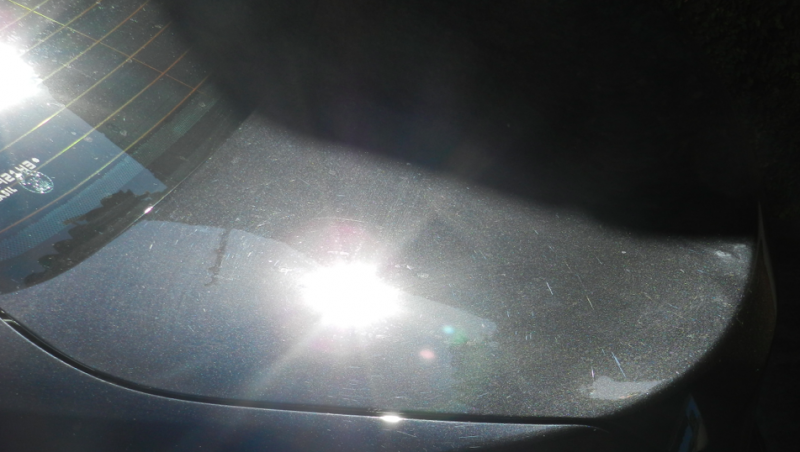
This is not the way your 'Brand New' car should look:

Random deep Scratches:

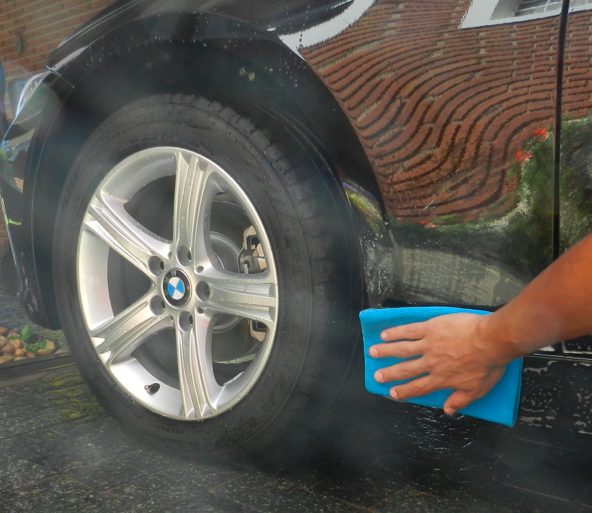
Everything here starts with a solid basement, so let's do the wheels:

Using what I call my 'Soapy APC':

Even after APC, some major contaminants kept stick to the wheels:

Used a claybar to get rid of it (using a back and forth gliding movement and Soapy APC as lube):

Looking almost Good:

Here's the wheel cleaned and coated with PBL Wheel Coating:

After doing the wheels (but before it's coating), I've washed the car using Detailer's Xtreme Foam

The car was Clayed using Fine grade nanoskin wash mitt. Minimum (but existent) contamination had to be removed. No spot missed!:

After Drying, I went after the engine bay. It was not very dirty, so I could clean it entirely and fast using APCs, Degreasers, applied spray wax to the inside painted parts and 303 Aerospace Protectant to plastic parts:

To polish this car, I've 'relied on Menzerna's Shoulder'.
I've used a Flex 3401, and choosing the minimum abrasive method to get the job done I've 'played' with orange, white and gray pads, coupled with 400, 2500 and 4000 Menzerna polishes.
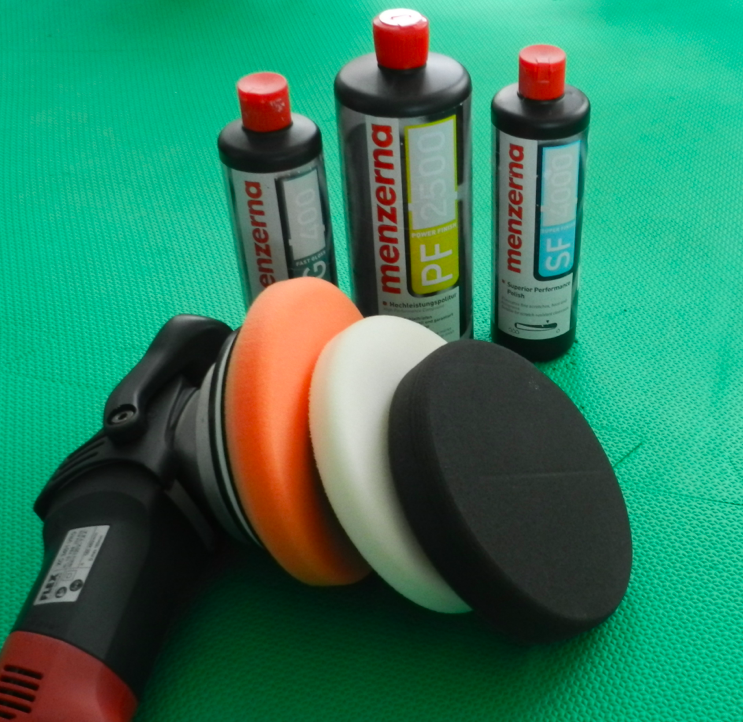
Most of time I've used PF2500 on a white pad.
Polish ongoing, this car design and paint were projected to reflect:

Look at this 'Chameleon like' reflex:

Additional Details:
Glass before / after using Pinnacle Waterspot Remover:
*Pictures are not on good focus, but are the only I had:


Any 'screw' passes without being noticed. Look at the license plate screws before/after picture:

I've cleaned the paint using Pinnacle Black Label Surface Cleansing Polish, and finished applying the PBL Coatings late at night. Finished, I went to sleep.

When I woke up, I've faced the coated car in garage. Paint was reflecting just like glass.

I've then, respecting 12 hours of coating application, lightly washed the car (touch-less wash) to get rid of any dust and/or compounding dust that may be at the gaps. I've joined work with joy and took the opportunity to test the just applied coatings.
Coating: Water Beading, Sheeting, and Considerations.
I've used a very low concentration of Xtreme Foam Soap.

Roof beading shot:

Rear Glass and Trunk Lid, Beading!

Coated wheels, water beading:

Hood, start sheeting to dry the car with minimum touch necessary:

Just run a free flow of water, then...

I could do even better if not in a hurry!

One light towel pass and you're done with what was missing:

SUN shots:
(PS: At this point car was fully corrected and coated with PBL Surface, Paint, Glass and Wheel Coatings).
Hood under the sun:


Roof shot

Roof Closer (notice the flake pops)

Side spot Shot #nomoreswirls:

Trunk and rear glass

Another Spot on trunk

This is so inviting for a ride... Interior was fully cleaned and vacuumed, interior trim was protected with 303 Aerospace Protectant.

This is how a brand new car should look:


Waiting for the owner to pick up her brand new 320i!

It was a great moment, and I'm happy I've met expectations on this job.
Thanks to AG and PBMG I have a respectable business card:

Hope you enjoyed as much as I did, I'm already missing this beauty on my garage.
Questions, comments, critics, suggestions, always, always Welcome!
Thank you very much for watching.
Kind Regards.
Today I'm going to share a recent work on a brand new 2014 Black BMW 320i in form of a 'picture follow-up'.
The car ran only ~280km, but came with DISO (Dealer Installed Swirl Option), RIDS and water spots that made it looks much older.
Client called asking for something to protect her finish. Knowing it was a brand new car, I've offered my PBL full coating service and I've thought that would be 'as easy as' cleaning and coating…
I've scheduled by phone without prior seeing the vehicle. When it arrived… ... Please, see for yourself:
I've asked for 1 day and a half, and client promptly agreed.
281km (~120km was the distance between me and the client).
Dealer Installed Swirl Option - The Before Pictures:
Hood DISO:
Roof DISO:
Side back pillar:
Trunk lid swirled and rear glass opaque, full of spots:
This is not the way your 'Brand New' car should look:
Random deep Scratches:
Everything here starts with a solid basement, so let's do the wheels:
Using what I call my 'Soapy APC':
Even after APC, some major contaminants kept stick to the wheels:
Used a claybar to get rid of it (using a back and forth gliding movement and Soapy APC as lube):
Looking almost Good:
Here's the wheel cleaned and coated with PBL Wheel Coating:
After doing the wheels (but before it's coating), I've washed the car using Detailer's Xtreme Foam
The car was Clayed using Fine grade nanoskin wash mitt. Minimum (but existent) contamination had to be removed. No spot missed!:
After Drying, I went after the engine bay. It was not very dirty, so I could clean it entirely and fast using APCs, Degreasers, applied spray wax to the inside painted parts and 303 Aerospace Protectant to plastic parts:
To polish this car, I've 'relied on Menzerna's Shoulder'.
I've used a Flex 3401, and choosing the minimum abrasive method to get the job done I've 'played' with orange, white and gray pads, coupled with 400, 2500 and 4000 Menzerna polishes.
Most of time I've used PF2500 on a white pad.
Polish ongoing, this car design and paint were projected to reflect:
Look at this 'Chameleon like' reflex:
Additional Details:
Glass before / after using Pinnacle Waterspot Remover:
*Pictures are not on good focus, but are the only I had:
Any 'screw' passes without being noticed. Look at the license plate screws before/after picture:
I've cleaned the paint using Pinnacle Black Label Surface Cleansing Polish, and finished applying the PBL Coatings late at night. Finished, I went to sleep.
When I woke up, I've faced the coated car in garage. Paint was reflecting just like glass.
I've then, respecting 12 hours of coating application, lightly washed the car (touch-less wash) to get rid of any dust and/or compounding dust that may be at the gaps. I've joined work with joy and took the opportunity to test the just applied coatings.
Coating: Water Beading, Sheeting, and Considerations.
I've used a very low concentration of Xtreme Foam Soap.
Roof beading shot:
Rear Glass and Trunk Lid, Beading!
Coated wheels, water beading:
Hood, start sheeting to dry the car with minimum touch necessary:
Just run a free flow of water, then...
I could do even better if not in a hurry!
One light towel pass and you're done with what was missing:
SUN shots:
(PS: At this point car was fully corrected and coated with PBL Surface, Paint, Glass and Wheel Coatings).
Hood under the sun:
Roof shot
Roof Closer (notice the flake pops)
Side spot Shot #nomoreswirls:
Trunk and rear glass
Another Spot on trunk
This is so inviting for a ride... Interior was fully cleaned and vacuumed, interior trim was protected with 303 Aerospace Protectant.
This is how a brand new car should look:
Waiting for the owner to pick up her brand new 320i!
It was a great moment, and I'm happy I've met expectations on this job.
Thanks to AG and PBMG I have a respectable business card:
Hope you enjoyed as much as I did, I'm already missing this beauty on my garage.
Questions, comments, critics, suggestions, always, always Welcome!
Thank you very much for watching.
Kind Regards.
")
 rops:
rops: