Oops, I made a mistake How you can learn from me

I didn't take pictures, but I was detailing a co-workers BMW, and there was lots of grime in the vinyl strip right below the window. I hit it with my CG All Clean+, I didn't think I was wiping that hard but when I pulled the MF applicator up I noticed the grime was gone. I then noticed I had completely rubbed off the texture. It was an older car so he wasn't mad, but I know a lot of people would get really upset here lol. It was a piece about half the size of my thumb, and every time I'm in his car I can't not see it.

I guess the "test on an inconspicuous area first" warnings on a label are actually there for a reason lol.
 
I have a Mytee Firebird

Love it

I use it on anything...anywhere. Carpet, Headliner, Upholstry, Dash, Vents...

On just about everything, the steamer gets it 20% cleaner than a MF and APC. On most cars, I still use APC and a MF or scrub brush 1st, but then I hit it with steam and additional dirt always comes off

The wetness of the steam is adjustable, without decreasing the pressure that it comes out at. That feature is a bonus when cleaning delicate electronics


But, my favorite tool for interiors is still the Cyclo Brush on a DA

I cleaned this with Leather Cleaner and the Cyclo Blue Brush followed by steam and a MF

WP_20141210_12_49_27_Pro_2_.jpg

Nice. I'm using a Mcculloch canister steamer, but I think I could use a little more power. DA upholstery brush is on the list, too. Thanks for the feedback.
 
Wow , that steering wheel looks like you replaced it not cleaned it. Amazing job there . On the burnt edge , what's the chances of this happening with a Finish polish? Is this something that typically is only for aggressive stages ? I haven't had this happen ...yet.. , probably cause you do more cars in a week then I do in a year . But , looks like an easy mistake to make . Awesome thread too , thanks for sharing Allenk4

Daren
 
I have a Mytee Firebird

Love it

I use it on anything...anywhere. Carpet, Headliner, Upholstry, Dash, Vents...

On just about everything, the steamer gets it 20% cleaner than a MF and APC. On most cars, I still use APC and a MF or scrub brush 1st, but then I hit it with steam and additional dirt always comes off

The wetness of the steam is adjustable, without decreasing the pressure that it comes out at. That feature is a bonus when cleaning delicate electronics


But, my favorite tool for interiors is still the Cyclo Brush on a DA

I cleaned this with Leather Cleaner and the Cyclo Blue Brush followed by steam and a MF

WP_20141210_12_49_27_Pro_2_.jpg


nice! are these the brushes you are talking about?

2 Pack Cyclo Polisher Aqua Soft Carpet Brush

are the just 3/8" threaded and will attached to my 7424?
 
Mine was a BMW, can't remember year or model, it's been a few years back. I saw a scratch on the hood and tried some light wet sanding...disaster. The paint was not original and was a poor respray. I examined the rest of the car very carefully, I saw where other detailers burned the paint. I took it down to a quality paint shop who resprayed the entire hood the way it should have been done.
The owner knew I was starting out and that I was looking for some cars to "learn on". He asked me what I learned from doing his car and I told him I learned his paint was not original and that the respray probably wasn't done at a BMW approved facility. Then I showed him where other detailers left their "mark". He was a real decent guy about the whole thing, he sold the car within 6 months.
 
"The Line"

After I had removed all of the Orange Peel from my Yukon with the CarPro Denim Pads and wet sanding in some areas, there was still a little remaining OP adjacent to the pin stripe

The CarPro Denim Pads are affected by tape, much more than a foam or DAMF pad used for compounding and therefore there is always a little bit of OP near anything that is taped off

So I did the logical thing, at least in the mind of an AGO...I removes the pin stripe. Steam and a plastic razor blade took it off pretty quick with minor marring


WP_20140723_15_04_30_Pro.jpg


After removing the pin stripe, I could see that the area where the stripe had been was actually lower compared.to the adjacent paint. I have not been able to locate any information on the phenomenon and it runs counter to logic as the area under the pin stripe has never been polished and should be higher than the adjacent paint


I wanted to document the removal of the OP as well as the depression in the paint where the PS had been; so, I laid down a nice vertical tape line and polished right over it, as I had done many times with 50/50's when polishing

Here is the result:

WP_20140802_09_18_15_Pro.jpg


You can only see it from a very obtuse angle that no one but me would ever look....but, I know it's there

Don't attempt a "hard" tape line 50/50 she sanding or using OP removal pads

I wish I had read and taken this to heart:

http://www.autogeekonline.net/forum...-mike-phillips/59265-line-how-avoid-line.html
 
Wow , that steering wheel looks like you replaced it not cleaned it. Amazing job there . On the burnt edge , what's the chances of this happening with a Finish polish? Is this something that typically is only for aggressive stages ? I haven't had this happen ...yet.. , probably cause you do more cars in a week then I do in a year . But , looks like an easy mistake to make . Awesome thread too , thanks for sharing Allenk4

Daren

The thing to remember is that it is all cumulative

Each step removes CC. The Denim/OP Removal step probably got it most of the way there, but the compounding step is what actually broke thru

There was normal CC on this area, but the BC appears to have been very thin

Live and learn

Glad it was my own car


If you are just polishing a new car with a DA, soft polishing pad and a fine polish....it would take some effort to burn a body line like the one pictured
 
No, no, no, don't use the carpet brushes on leather, way to hard.

For leather, you want to used the much softer upholstery brushes.

2 Pack Cyclo Polisher Grey Ultra Soft Upholstery Brush

And yes they are threaded. I use them on my GG 3", don't have a PC, but I think they are the same thread size.

I have both the Blue and the Grey

In my experience, the blue brush was not too stiff for coated leather. I do not put much if any downward pressure on the machine when using these brushes
 
Mine was a BMW, can't remember year or model, it's been a few years back. I saw a scratch on the hood and tried some light wet sanding...disaster. The paint was not original and was a poor respray. I examined the rest of the car very carefully, I saw where other detailers burned the paint. I took it down to a quality paint shop who resprayed the entire hood the way it should have been done.
The owner knew I was starting out and that I was looking for some cars to "learn on". He asked me what I learned from doing his car and I told him I learned his paint was not original and that the respray probably wasn't done at a BMW approved facility. Then I showed him where other detailers left their "mark". He was a real decent guy about the whole thing, he sold the car within 6 months.

Nice One!

Thanks for sharing
 
I had 3 BIG mess ups in 2014:
- the first was on a 2011 Lexus SUV (Japanese spec), while trying to lightly remove some finger prints on the inside of the B pillar (white interior) the fabric just tore. I told the customer I'd take care of it and to just give me the bill. He never got back to me.
- second was a polyurathane bumper I started to compound (BAD idea) it hazed up really bad - I hit it with some blacklight on a MF polishing pad and it brought the shine back quick but I was seriously sweating it.
- 3rd was on an early 90's MR2 that was partially wrapped, I thought I had taped it off enough but I missed a couple of spots and got compound on some of the wrap. Note - compound does NOT come out of wrap!!
 
UGH, I hate to have to post in here but I want everyone else to learn and hopefully never be as dumb as I just was today!

I was vacuuming out a trunk with my $200+ Metro Vac n Blo, I decided to put the vacuum hose down outside the car and mess with mounting the jack and accessories properly for the customer. I didnt look where I set the hose down...I set it right in a shallow puddle of water. Didnt notice any weird noises until suddenly the vac shut itself down. I went over and checked things out. I noticed the GFCI was tripped and thought that was weird. Reset it and tried to turn vac on again, no luck and I felt the motor try and turn but couldnt. Took the vac bag out and some water came out. When I went back to look at the hose I noticed what I had done.

I have it inside hopefully DRYING out. Anyone have any experience with these? Maybe I can just buy another motor if this one wont dry out.

THIS SUCKS!!! I havent even vacuumed the rest of the car yet.
 
Just wanna share on what happened to me with a car that was sent to me for CarPro CquartzUK. The car was a new car and the owner had the car for only a week.

The car has a bodykit add-on which came from the dealer as an optional extra. Being a new car I assumed the paint on it is thick and could stand a little bit abuse from my makita(there were massive dealer induced buffer trails and a few RIDS).

The oops

I only tape the rubber parts as I didont want my polish to stain it. However the edges of the bodykit I did not bother.

I was using my makita, approx 1200rpm with LC white pad. I accidentally touched the edge with the side of my pad while doing the fender. touched twice and its like an accidental touch.

Look what happened...
IMAG1788_zpssyu0fiay.jpg


I was devasted. You know the feeling that your gf has left you for someone esle? yea, exactly the same feeling.

To avoid this

TAPE IS YOUR BEST FRIEND!!! now I do not assume and just tape whatever bodykit add-ons or any painted bodykits.

luckily I could save this by using some touch-up paint and it looked good as new.
 
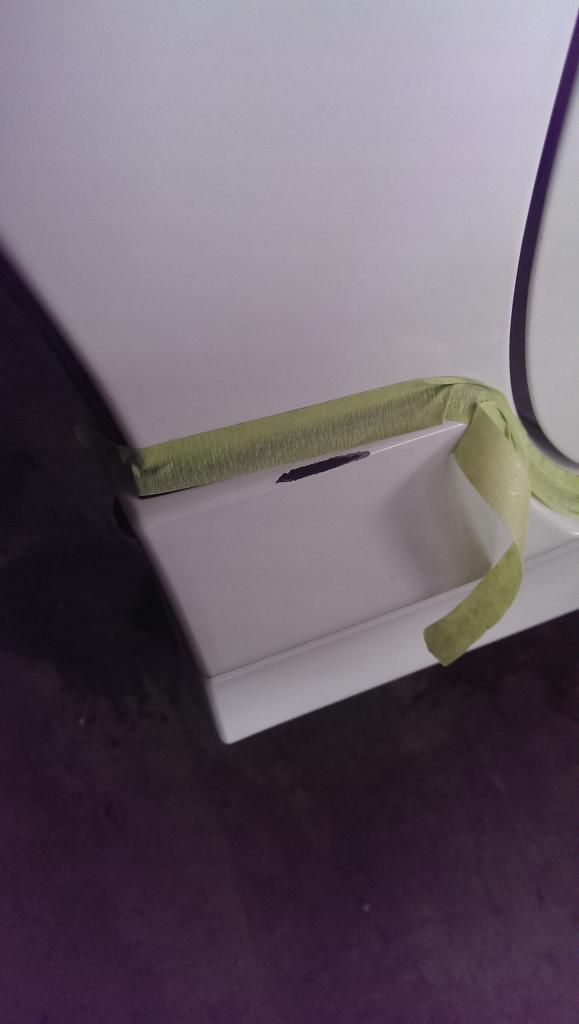
As promised Clear Coat Burn thru

As a Bonus....Base Coat Removal

WP_20140707_17_38_22_Pro.jpg


WP_20140707_17_38_40_Pro.jpg


The Oops:

The raised line on the fender bit me

The truck had been compounded twice by me and then a year later, I addressed the Orange Peel using the CarPro Denim 5.3" pads with my Flex and M100. Not much downward pressure, because you are "chopping the peaks", speed 5

I was very careful in the beginning, taping off every bodyline with 3M 1/8" vinyl tape, trim with 3M 233+

Things were going so well and I was so pleased with the results that I let my guard down on the last panel and didn't tape this body line, but that is not where the burn became apparent. But, I had laid the foundation for the "Oops"

Everything still looked fine after the Denim Stage so I proceeded to compounding with my confidence high. This is where the final damage was done.

Using M100, Flex, LC Orange 5 1/2", speed 4.5-5. Medium downward pressure....I blew right thru, exposing the grey primer

Sick to stomach, immediately inspecting the rest of the vehicle for.any other mistakes

In the end a smart repair will cost $178. This includes blending the BC and re-clearing the entire fender. The vendor was recommended by Quinn the Eskimo, who is a respected touch-up king in the area

I got off lightly, it was my own car and won't be too expensive to repair

To Avoid This:
Clear Coat is Thin

Keep your guard up the entire time

During aggressive polishing use the right sized pad. Avoid the temptation to hang part of the pad over an edge or body line

Tape is your friend

This is how I tape now when removing Orange Peel

WP_20140704_08_09_43_Pro_1_.jpg


Was this with the Flex rotary or DA?

Thanks.
 
I'm brand new to detailing (never used a polisher before), this thread probably saved me hours of trouble.
 
We all make mistakes, this is actually a great thread that I had missed out on so thanks for bringing it back.

One of the first weeks we had the Jetta 18 months ago or so I dropped a spray bottle right on the hood, of course the trigger landed right on it leaving a perfect rock chip sized gouge.

And just a last week while doing a paint correction on the BRZ I was getting ready to do some spot polishing with my 7424XP on a 3" pad. Dumb mistake but had my finger on the trigger and with the pad face up I tripped over the cord and as I caught myself I clicked it on. Polish EVERYWHERE, seriously if they made it that difficult to remove all the time we would all quit. But you live you learn, just like a gun don't put your finger on the trigger until you're ready to go.
 
I've screwed up enough stuff in my time - believe me. I had a bucket fall on my car (fixed by PDR), burned paint with a PC, and have lowered the garage door on my bumper.

But, I'd like to offer: this is the reason I NEVER use APC on leather. Use products designed for leather. Most APCs are in the pH 11+ range, which is too aggressive for leather IMHO.
Almost all leathers have a coating on them, don't they? So you really aren't cleaning LEATHER, you're cleaning the coating.
 
Back
Top