Close Up Images on the Finished Product

bwatereagleman

New member
Joined
Sep 17, 2012
Messages
34
Reaction score
0
First of all, this is no way intended to call anyone out nor to question the integrity of anyone's work, because the results that many of you produce are to envy.

Mike Phillips, you possess a wealth of information and document your work wonderfully with excellent write ups as well as great before and after photos, but I wonder why "after" close up images are sometimes not included?

Again, my inquiry is not to question the level of perfection you achieve with each paint correction, or to challenge your work ethic and level of skill. I simply desire a bit more transparency in what you deem to be acceptable given the amount of time, the products and tools you have chosen to complete the job.

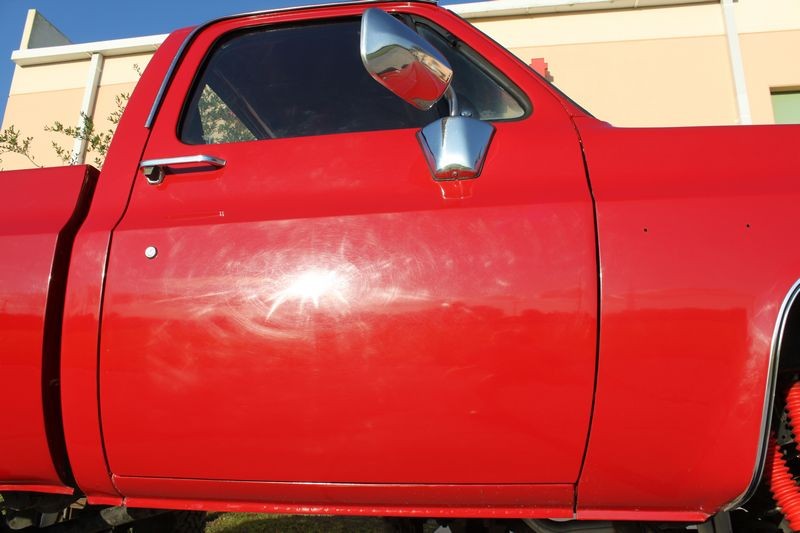
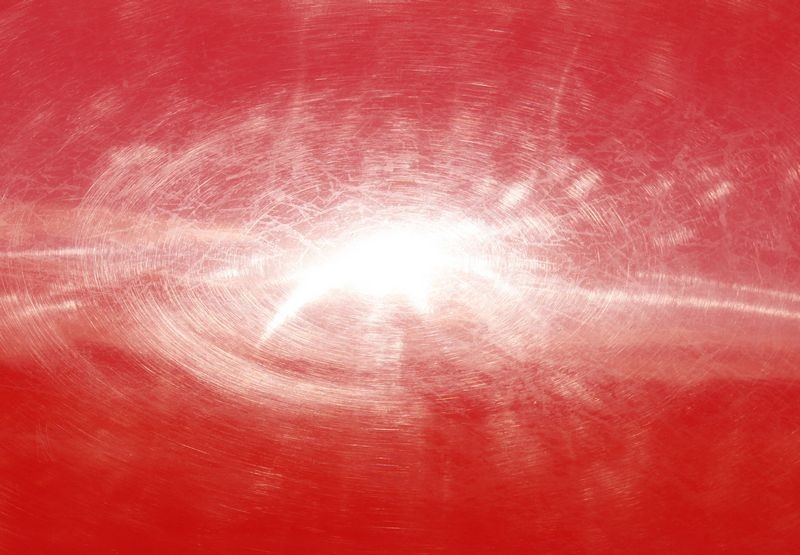
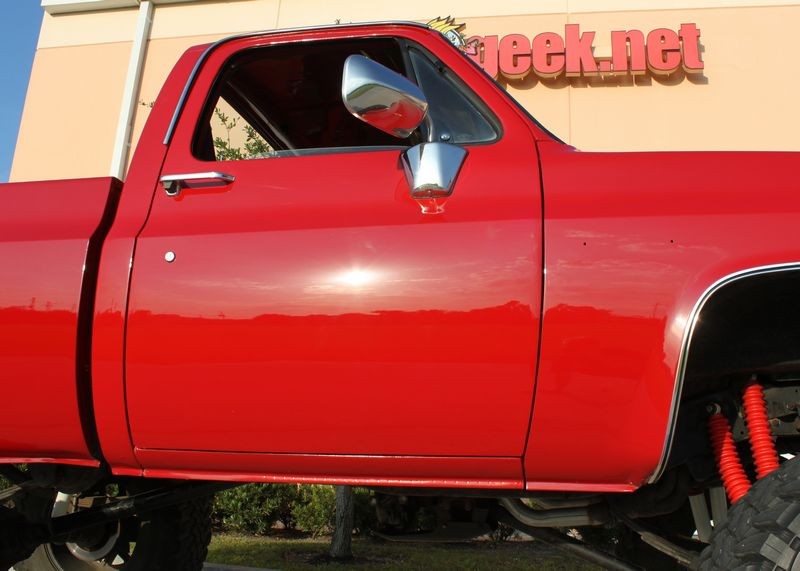
There are many times that I get vehicles similar in condition, and it seems that I can work on them for hours upon hours. When it is all said and done the results are good, but there is never perfection. The results, I see in the photos from write-ups look like you have achieved perfection. Assuming you have achieved flawless or near flawless results it would be great to show that, so that we as mere mortals can strive for similar results. If there are still imperfections would it be worth an extra photo or two to show us that no matter how much we try, what is acceptable based on your expertise?

Here are a couple of photos I refer to:


picture.php


picture.php


picture.php


picture.php


picture.php


picture.php


picture.php


picture.php


picture.php


picture.php


picture.php
 
Photos are a great indicator but can't really tell the whole story.

Photos do not do justice for how nice a pristine vehicle really looks. On the other hand, a mediocre vehicle can look just as nice as the pristine vehicle in a photo.
 
In my opinion, if you are going to claim paint correction was done; you must include close-ups, 50/50's and if possible sun shots
 
First of all, this is no way intended to call anyone out nor to question the integrity of anyone's work, because the results that many of you produce are to envy.

Mike Phillips, you possess a wealth of information and document your work wonderfully with excellent write ups as well as great before and after photos, but I wonder why "after" close up images are sometimes not included?

I think if anyone wants to look through my posting history on any forum you'll find not only do I document before, during and after I do it thoroughly. I also do it in a way that my pictures never disappear. I can't say that for others as too often, all that's left of their pictures are red x's or some type of graphic like this,


redX.jpg
Photobucket.jpg
Photobucket2.jpg


Here are a couple of photos I refer to:


And not only am I fairly confident that these represent the extreme exception to the rule, (that is I fully document my work and have been since the software you're reading and typing on was invented), but there's a perfectly good answer as to why there's no,

1. Full write-ups for these cars.
Think for a minute, For this Ferrari, all you can find a a few pictures of the before condition and one or two of the after condition but NO WRITE-UP? Isn't that contrary to my normal protocol? Don't I normally always post a full write-up for my work? Including steps, products used, full before, during and after shots?

2. No "after" close-ups are available for these cars.
Again, why are there no other pictures for the Ferrari and the Trans-Am?


You as a great question bwatereagleman... and allow me to answer your question with a question?

Has anyone noticed any new additions to my signature line?


:)
 
In my opinion, if you are going to claim paint correction was done; you must include close-ups, 50/50's and if possible sun shots


Most of my life I've invested the time to,

  • Stop what I'm doing, (buffing), to take pictures.
  • Taken the time to go through hundreds of pictures.
  • Pick out the best (in focus).
  • Crop out the fluff.
  • Resize to 800 pixels wide.
  • Upload to the gallery.
  • Insert into a thread
  • Add copy that describes the action, tools, pads, products.
And then no discussion. Or very little. Kind of takes away the incentive to do all of the above work.


On a related note...
One time while reading another forum I saw where one forum member called out another forum member because of the lack of taking "proper" pictures. Upon doing a quick search of the member doing the calling out I could not find a single thread they created showing pictures they took of their work. :laughing:


:)
 
Here's a typical Mike Phillips thread with not only full documentation of,

  1. Before
  2. During
  3. After
But it's also a guide as to how to position a car in the same direction for capturing before and after pictures in FULL SUN.

:Picture: :props:


I think there's OVER 100 pictures in this thread. I don't know if I've ever seen anyone one else fully document a car project as fully picture documented as this thread.

NEW! Meguiar’s Foam Buffing Discs


watermark.php


watermark.php


watermark.php


watermark.php


watermark.php


:)
 
Thank you Mike for your response, and again this was not meant to take a shot at you at all. After reading your response post, I realized the thread I was reading was not the actual write up and documentation of these particular vehicles. They were however used as a reference, and I apologize if I came off as sounding as it never done. It was totally not my intent to offend.

My intent was only to say these cars were in bad shape to start, and after they look great. Even if these photos were used as reference, I was just looking for that close up to see what might or might not have been left behind. Undoubtedly, your full write ups include these. Again, it was never intended to sound like it was never done.

Yes, I have noticed the additions to your signature, and I get it. Your time is split in so many areas to help us become more knowledgeable in this industry. Your passion for your craft helps fuel this desire to do so. I appreciate your willingness to educate, and to respond to something as simple a forum post.
 
Most of my life I've invested the time to,

  • Stop what I'm doing, (buffing), to take pictures.
  • Taken the time to go through hundreds of pictures.
  • Pick out the best (in focus).
  • Crop out the fluff.
  • Resize to 800 pixels wide.
  • Upload to the gallery.
  • Insert into a thread
  • Add copy that describes the action, tools, pads, products.
And then no discussion. Or very little. Kind of takes away the incentive to do all of the above work.


On a related note...
One time while reading another forum I saw where one forum member called out another forum member because of the lack of taking "proper" pictures. Upon doing a quick search of the member doing the calling out I could not find a single thread they created showing pictures they took of their work. :laughing:


:)


I read your articles word for word. I even gave a shout out to you on Instagram and Facebook for you sharing your single stage restoration technique. I believe it was the pic which is currently my avatar. Anyways I typically don't comment on the older articles because they're a few years old and I don't want to be that guy who dredges up old stuff, and I figure that everything has already been said.
Thanks for all the info you post.
 
Dang I never seen a Ferrari so so neglected what ashame.
 
I was speaking in general and not regarding MIke Phillips, who does by far the best write ups and photography

I am focused on the guys who claim 90% correction, but only show 5 footers in their afters and jockey with the raw image to increase saturation, etc.
 
mike Phillips of course.He is the man I have worked with mike on so many restorations the past 4 years I've been doing this since 1989 and mike has so much knowledge I was blown away.
 
Thank you Mike for your response, and again this was not meant to take a shot at you at all. After reading your response post, I realized the thread I was reading was not the actual write up and documentation of these particular vehicles.


Here's why there's no full write-up for those pictures. It's because the "links" to the full write-ups for FIVE cars used as teaching examples are shared in this new book and this new book is not available till SEMA starts because it includes pictures and information on the brand new RUPES tools being introduced.

This is a small picture of the book cover but if you look closely you'll see 3 of the cars I did complete details on using the RUPES Paint Polishing System on the cover.

One is the blue Ferrari. Another is the black 1978 Trans-Am.

SigLine_Books_0041.jpg


It's all good but be assured, if nothing else... I'm consistent. When I detail a car and document it... I document it.

:)
 
First of all, this is no way intended to call anyone out nor to question the integrity of anyone's work, because the results that many of you produce are to envy.

Mike Phillips, you possess a wealth of information and document your work wonderfully with excellent write ups as well as great before and after photos, but I wonder why "after" close up images are sometimes not included?


Like I posted previously to your question, the two cars you highlighted are inside my new how-to book and when the book is released the full write-ups for those cars will be moved to the public forum. (They are in a private forum right now).


Ironic how out of the thousands of write-ups I share you focused in on those two cars before the book came out. Fear not... I have the pictures. :D


Until then... if you want to see another full write-up which represents my normal style for sharing write-ups check this out... plenty of before and after shots and close-ups of the after results AND more to come.


Buffing curved panels with NEW RUPES Mark II BigFoot 21 & 15 Polishers

Over 100 pictures.


:Picture::xyxthumbs:
 
Mike, and the hole autogeek staff are remarkable, there is no company at this level, in the detail industry. I love the autogeek.net team and looking so much excited for the next 3 day boot camp. Thank yo . Just amazzing group to live life during those 3 days
 
Like I posted previously to your question, the two cars you highlighted are inside my new how-to book and when the book is released the full write-ups for those cars will be moved to the public forum. (They are in a private forum right now).
Ironic how out of the thousands of write-ups I share you focused in on those two cars before the book came out. Fear not... I have the pictures. :D

When they come available, I will be sure to check them out. As I mentioned in the original post, we face these paint conditions quite regularly, and I certainly want understand the standard you set in order for you to consider a vehicle to be completed.

Until then... if you want to see another full write-up which represents my normal style for sharing write-ups check this out... plenty of before and after shots and close-ups of the after results AND more to come.
Buffing curved panels with NEW RUPES Mark II BigFoot 21 & 15 Polishers

I reviewed this post as well, and it is definitely well documented (never intended to make it sound that I was questioning this aspect). :) To maybe ask my original question in a better way… based on the Merc’s paint condition, and using the New Rupes Mark II polisher, and the Rupes products/pads, were there some defects you just couldn’t remove using the your chosen process? For example, were there some heaver/deeper swirls that your process just couldn’t eliminate to your satisfaction? If so, what did you do correct them? What time frame did it take you to complete this project?

Again, the paint condition in the before photos of the Trans Am and the Ferrari seem to be so similar to what we face. We also face some similarly swirled out paint like the Merc, so these are great write ups for me to review. We are often faced with needing to perform compounding and polishing steps, but even after these steps are completed, there just seems to be a few defects that we couldn’t remove without resorting to using a rotary. I wonder if you face the same issue.

One other post comes to mind “High Quality Production Detailing by Mike Phillips,“ you wrote some time ago. This post completely changed the way I go about a One Step, and perhaps this should be a question under that thread… but to what level of correction did you achieve? If I recall correctly you focused on the hood as it is a main gloss panel, so the level of defect removal was undoubtedly greater than the rest of vehicle. Also, I know you clearly stated the vehicle was not swirl and scratch free at completion, but to what extent would you estimate? Given the 4 hours it took you to complete the job, which is extraordinary by the way, do you ever say to yourself, “Well, that is best it’s going to get,” keeping in mind what level of service the customer is choosing? I have to admit it’s come into my mind more than a few times. :D

Hopefully this clears up my intent, and please know that it’s your standard that I am trying to emulate, not only for my own personal satisfaction, but also my employer’s and our customers’.
 
Back
Top