I'm detailing tomorrow in the morning so any tidbits would help a lot as its getting close to crunch time.
Avoid t-shirts or any cloth with a flat sheen. They don't offer any cushion and the flat sheen means if any abrasive particles gets stuck between your paint and your t-shirt you will grind a scratch or scratches right into the paint.
If you're going to depend upon what you can find at the average auto parts store then stick with foam and microfiber applicator pads, nothing funky, just normal soft foam and cross your fingers you can find some normal, good quality microfiber applicator pads.
I use to find round 100% cotton applicator pads I think under the name brand Detailer's Pride, but don't quote me on that, anyway they worked well for aggressive cleaning but you usually have to follow them with foam or microfiber as the fibers can instill fine scratches if you're rubbing hard.
As far as using foam or microfiber, assuming they're good quality, (soft foam, good quality microfiber), then either will work for anything you want to apply.
These ones I'm using in the picture are thick and dense and help spread the pressure from your hand out over the entire surface of the applicator pad, the thin round foam pads don't do this and you have to be careful you don't use just your fingertips or you'll put finger marks in the paint.
I'll try to get an extreme photo of fingermarks up tomorrow, they look like the paint has Leopard Spots.
In this thread here,
2008 Lexus IS 250 - Pinnacle Detail - August 14th, 2009
There's a tip about how to hold your hand and fingers when using soft, gushy applicator pads, here's the excerpt.
Test Spot by Hand
For this first Test Spot by hand we're going to use a non-abrasive paint cleaner with a clean, soft
foam applicator pad and then check our results. I've never worked on this car before so I don't know if the paint is hard or soft, or a better way to describe the paint is actually
workable or
polishable.
For this step we're going to test
Pinnacle Paintwork Cleansing Lotion by applying it to a small section of a panel we can look down on to inspect our results like the hood.
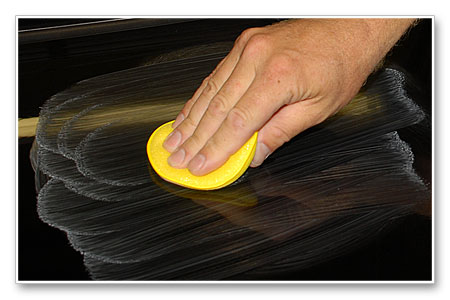
Pour a quarter size dollop of product onto the face of your applicator pad.
Then sandwiching the applicator pad between your 4 fingers and your thumb, spread the product out over a section about a foot squared and after first spreading it out, (so you have a uniform layer of the paint cleanser on the surface), then begin working the product using firm, even pressure. You want to try to hold the pad as flat as you can against the paint and then try to use as much of the
face of your fingers as you can to apply pressure,
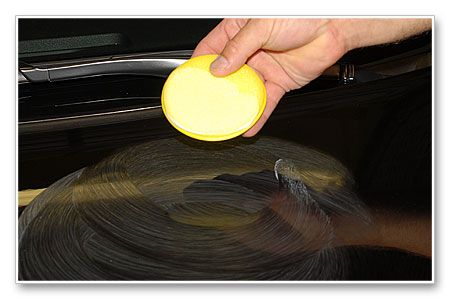
not just your fingertips or you can accidentally induce what's called
fingermarks.
Correct Technique - Hand flat to the panel, helps to spread pressure over the entire face of your fingers.
Wrong Technique - Hand to high, places too much pressure on your fingertips, this can lead to fingermarks.
This is also a way you can inspect to see if a car has a clearcoat finish, a single stage finish or even a tinted clearcoat finish. You can't see from this picture any pigment on the pad but in fact there was some very light black pigment on the pad and that leads us to believe this is a tinted clear coat finish. Had it been a single stage finish we would have see a lot of black pigment on the pad.
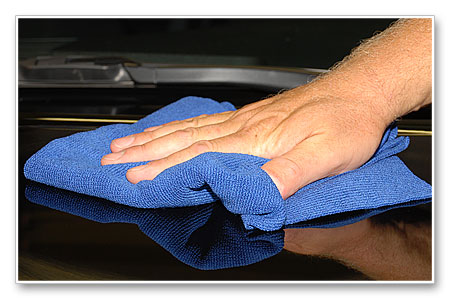
After working the product for 45 seconds to a minute, wipe the residue off and inspect to see if the product is working fast enough and effectively enough to meet your expectation. In this case, there was much improvement but we could tell that in order to get the paint to our level of satisfaction we were going to want to use a machine for the cleaning step.
Machine cleaning and polishing will work faster and more effectively to remove below surface defects and restore a clear, high gloss finish.
Hope that helps...
")