Meg's SoloCut #86

IID

Well-known member
Joined
Sep 11, 2010
Messages
2,207
Reaction score
25
Has anyone used Meg's #86 and finishing with a wax or sealant, instead of a AIO for customer detail's?
How would the #86 correcting abilities measure up to XMT360 or DoDo's NfS,for production work using Flex(3401 or 3403)?

Using same pad combination for #86 and the AIO's.
 
Is anyone using the Meg's#86 for production work?
Can anyone chime in on this?

Would be appreciated,Much.Feed back please
 
Is anyone using the Meg's#86 for production work?
Can anyone chime in on this?

Would be appreciated,Much.Feed back please

Meguiar's M86 So1o Cut & Polish Cream has got to be THE most underrated product in the Meguiar's lineup. Although not touted for use with a random orbital or for factory paint, I have used it with a random orbital for what is likely hundreds of hours on all sorts of paint types, with great success.

It is a very capable defect remover.

I have even used it to remove HEAVY sanding marks with a random orbital. It is very low dusting polish.

It can leave an incredible finish!
Certainly it surpasses most liquids available in its price range. It can definitely leave a finish ready for wax. There's always going to be quirky or hard to dial in paints, but overall, M86 is very capable of leaving a beautiful finish.

The devil is in the details, so for best results, use proper pad priming and when applying via random orbital, use ample but not overdone pressure. Keep your pads CLEAN. For final finishing, use a clean finishing pad. Once the pad has been primed, allow it to soak for a few minutes. Then remove excess product by running the pad atop a microfiber towel for a few seconds. Afterwards, apply a bit more product, and use a slow machine speed setting that still allows the pad to rotate, but at very low speed. Move the buffer at about an inch per second, and use enough pressure so that the pad face is fully contoured to the surface. Do not lift up at the end of the polishing cycle. KEEP THE PAD CLEAN, otherwise, at this level of refinement, you will encounter light scouring of the surface due to the abraded paint residue. typically, it mixes in with the buffing liquid, and attaches itself to the buffing pad.

For all aspects of the buffing process, prime the pad as shown below (view the original thread here: A look into Pad Priming - The Kevin Brown Method - Car Care Forums: Meguiar's Online

A look into Pad Priming - The Kevin Brown Method

Hey everyone,
I thought I would give you guys a little sample of Kevin's paper. One of the most important topics covered is pad priming. Although it may seem simple, I wanted to clear up some confusion.

When I refer to pad priming, I am referring to the liquid that will be used in polishing - not a spray detailer.

M105, M205, M86, D151, SwirlX, ScratchX 2.0, and Ultimate Compound use abrasives that are uniform and non-diminishing (SMAT). That means that they are very different than most products that use abrasives that break down. These products that use non-diminishing abrasives rely heavily on the lubricant. If there is too much lubricant, then the cut will be reduced because the abrasive is floating in lubricant. If there is too little lubricant, then the product will "flash" very quickly and you will need to reapply product.

The best way to utilize the products listed above (non-diminishing or SMAT) is to prime the pad. To do so, take the product and pour some on the pad. Then, rub it in. You are not trying to spread butter on toast! Aggressively rub the product into the pad until the entire surface is covered.

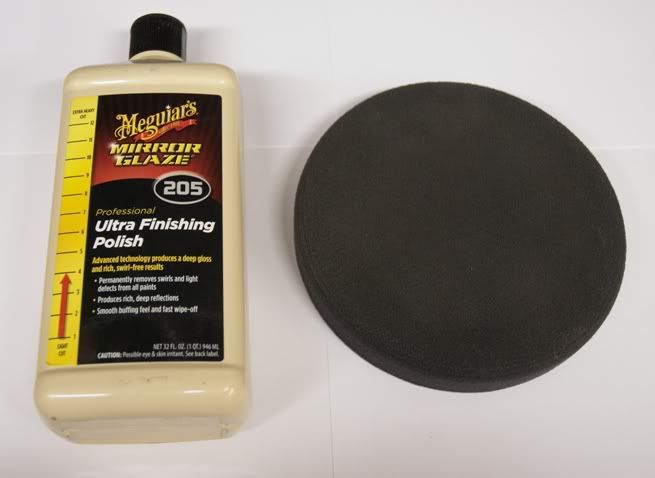
To show the method, I chose M205 and a W9207 finishing pad.
StandardPad.jpg


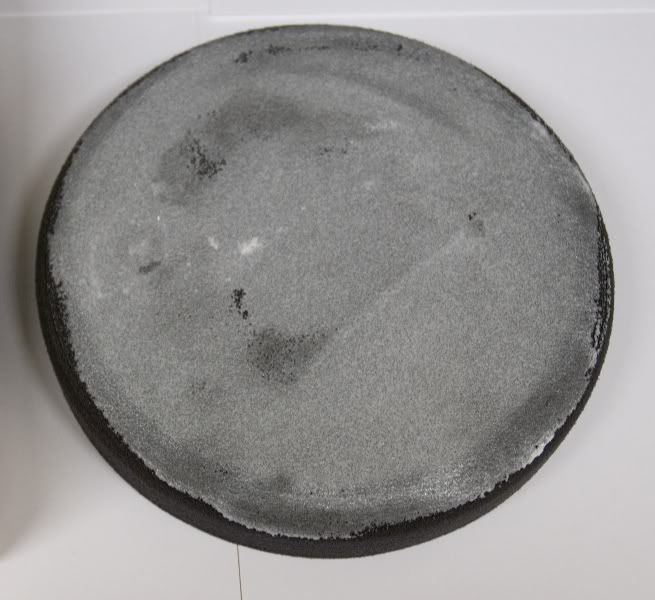
Below is an example of a poorly primed pad. As you can see, the product has completely filled in each of the pores. This will waste product and reduce the cut.

Oversaturated.jpg


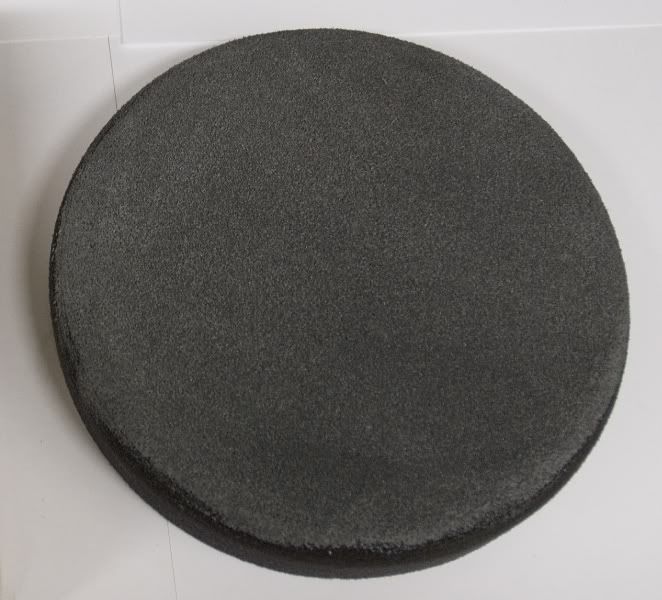
Here is what a properly primed pad should look like. The pores are not filled with product, but there is still product available in the pores.

Primed.jpg


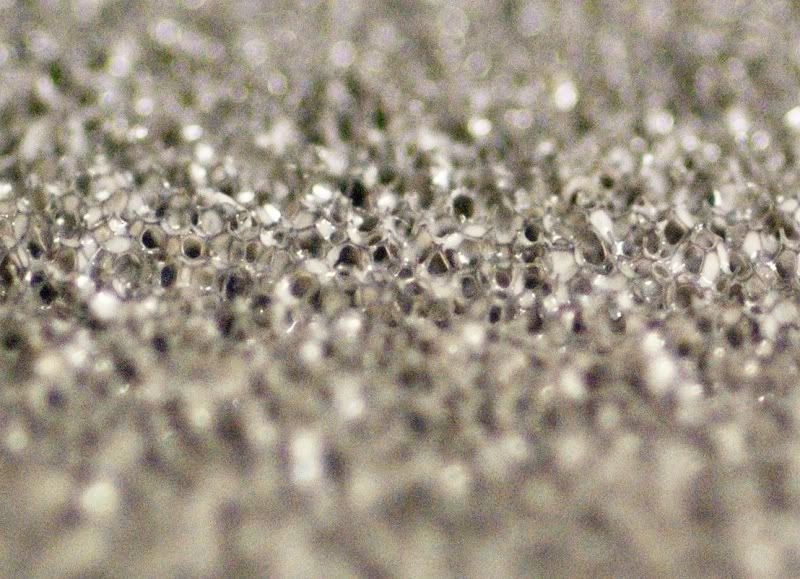
To give you a better idea of what the pores look like, I took a macro shot of the above pad properly primed with M205.

Macro.jpg


Hope that helps!
 
Another product you should consider is Meguiar's D151 Paint Reconditioning Cream. In answer to a guy that said he wasn't seeing a high level of cutting power using this product via rotary, I posted this (a copy of the thread can be found here: Priming a Pad - Car Care Forums: Meguiar's Online)

A quick call to Jason Rose of Meguiar's verified some thoughts I had about PRC. It was primarily designed to remove light to moderate defects with a rotary polisher. It had to leave the surface in very good condition while providing protection. It had to have a long application cycle but not sling, stick to the surface, or create lots of dust. It had to be easy to wipe away and not leave a white haze on textured plastics. If the shop using the product wanted to do a one-step application, it had to leave the paint looking pretty good once the protection went away. Finally, if a shop wanted to do a follow-up application with PRC, it had to further polish the surface, leaving no micro marring. A lot to consider, but overall, it seems that D151 comes pretty close to hitting the mark.

Now, just because Jason and the R&D team tailored this product for a specific type of detailing doesn't mean we shouldn't expect even more out of PRC, right?

I have some experience using D151 Paint Reconditioning Cream (PRC) but it's not my 'go-to' liquid. Therefore, I don't have the depth of knowledge that comes from using a product on a regular basis. However- I've used it a few times and I did test PRC prior to its release. I've found that increased downforce delivers impressive results. For defect removal I tend to use lower rpm and increased downforce when polishing with a rotary. The exception to this rule is when I'm using a compound to cut paint immediately after wet-sanding. To aid in leveling the paint, I run the rotary at around 1,800 prm and then back it down to 1,000-1,200 rpm to finish. Of course settings vary from car to car, but this is the norm for me.

When removing defects with the random-orbital, I use high OPM and a LOT of downforce. For final polishing, I drop the speed and continue to use a LOT of downforce (not as much as the defect-removal step, but quite a bit). I know that this is not the way things are normally done, but the most recent Meguiar's products to hit the market are using very different technologies (as compared to the older traditional style compounds and polishes). In the case of Meguiar's products, this technique has worked well for me with M86, M105, and D151.

I specifically asked about use of this product with Lake Country's Foamed Wool Pad (FWP). As I've only used the FWP a very limited amount, I cannot claim to know all of its idiosyncrasies. So- I just used it, and it seems to be a very capable pad.

I did a quick but thorough test on the fender of my 1994 Mazda pickup (original paint). I hardly ever polish or wax the thing- I just drive the wheels off it and wash it every couple weeks. Many times, I just hit it with de-ionized water and wipe it with a cotton towel (if there's time).

I took some pics- I know they're not the best, and the lighting is not ideal. The main thing is- I was able to easily remove moderate defects and leave the paint looking pretty good. Here we go:

Not great shots, but the fender is covered with light defects, and a few moderate scratches. I scuffed each side with Abralon 2000 and water.

IMG_0419.jpg


IMG_0420.jpg


IMG_0421.jpg


IMG_0422.jpg


IMG_0423.jpg


Left side, shows paint as-is and the Abralon scuffing.
IMG_0424.jpg


Right side, shows paint as-is and the Abralon scuffing.
IMG_0425.jpg


Rotary, foamed wool, D151 PRC.
IMG_0427.jpg


Prime the pad. Rub the PRC in by hand.
IMG_0428.jpg


Have to add more... still some dry areas.
IMG_0429.jpg


I think I use a bit more product to prime the pad than most guys. It's like priming a lawnmower that's run out of gas- pour some gas in the throat of the carb, pull the string until it starts. Whatever gas it doesn't use, it spits out the exhaust! Same thing with a pad prime- what the pad doesn't use for priming will sling off the pad... I'm just kidding a bit here, but there was actually very little sling (if any).

I think this is one area that is overlooked as not so important. Well, it is very important, and really makes a difference to overall performance.

Apply a bead and buff. Left side: Lake Country Purple Foamed Wool Pad / 1,800 rpm / application time- 62 seconds.
IMG_0430.jpg


Wipe clean, stripped 3x with Meguiar's Detailer Glass Cleaner (5:1 dilution)
IMG_0434.jpg


Close-up shots.
IMG_0436.jpg


IMG_0440.jpg


Meguiar's W5000 Double-Sided Wool Cutting Pad. It's listed as an 8-inch pad, but edge-to-edge it's more like 10 inches. I guessed that I'd be using the pad effectively to the 8-inch diameter point.
IMG_0441.jpg


Lake Country Purple Foamed Wool Pad. Looks like it's almost 8 inches (Lake Country's site shows a 7 or 7-1/2 inch pad. I guessed that I'd be using the pad effectively to the 6-inch diameter point.
IMG_0442.jpg


Prime the pad. Rub the PRC in by hand.
IMG_0443.jpg


Have to add more... still some dry areas.
IMG_0444.jpg


A proper prime-job. This is a much bigger pad than the PFW pad.
IMG_0445.jpg


At this point I wanted to adjusted my polishing speed. To be fair, I figured that I should drop my speed when using the larger diameter W5000 pad. This was to adjust the velocity of the pad closer to the velocity of the PFW pad.

I used the PFW pad at 1,800 rpm. Usable area was estimated to be 6 inches. Using this formula:

RPM * C = V
where
RPM = Revolutions per minute
C = circumference <- Notice this is 2*π*r
V = velocity

I came up with: 1,800 (rpm) x 18.84 (6 x 3.14) (6" diameter times pi) = 33,912.

So, using the same formula, and a problem of: X(unknown rpm) x 25.12 (8 x 3.14) (8" diameter times pi) = 33,912 (same as the total of the PFW pad). Then, 33,912 / 25.12 = 1,350 rpm. My buffer had a speed-setting of 1,400 rpm available, so I used it. The velocity wasn't exactly the same, but close enough considering I was only guessing the diameter of the pad actually being used.

Forgot to show the bead of product applied, but it was a little more than the PFW side because the area being polished was a bit larger (needed the space for the larger pad).
IMG_0447.jpg


Wiped clean, stripped 3x with Meguiar's Detailer Glass Cleaner (5:1 dilution). Sun shot of the PFW side. Noticeable swirl, but not quite as bad as it looks in the pics... Some of the 'swirl' is light refraction.
IMG_0448.jpg


Sun shot of the W5000 side, stripped 3x with glass cleaner. Noticeable swirl, and it's obvious that the swirling is worse on this side.
IMG_0449.jpg


Shot of the left, masked, and right. Swirls are noticeable, but pretty fine.
IMG_0451.jpg


IMG_0453.jpg
 
Time to fire up the random-orbital. I'm going to use a Meguiar's W8207 SoftBuff 2.0 Foam Polishing Pad.
IMG_0454.jpg


Prime the pad. Rub the PRC in with your hands.
IMG_0455.jpg


IMG_0456.jpg


IMG_0457.jpg


More PRC to polish with.
IMG_0458.jpg


I polished the entire area (working time approximately 1 minute). Residue shot.
IMG_0459.jpg


Wiped clean, stripped 3x with Meguiar's Detailer Glass Cleaner (5:1 dilution).
IMG_0460.jpg


IMG_0462.jpg


I felt that I could get a better polishing result. So, I used a specially-sized Lake Country pad that my friend ZoranC had built for his personal use. ZoranC readily admits that the foam and sizing is nothing new, but not all levels of aggressiveness were available in this diameter and thickness. So, he ordered them up! He's actually got six foam variations. I like them (so far I've only used three of the six). I think he had to order more than he can actually use, so maybe he would sell some if the demand was there.
IMG_0463.jpg


IMG_0464.jpg


I primed the pad, and worked the entire area again. Working time was approximately one minute.
Picture shows a stripped surface, wiped clean, stripped 3x with Meguiar's Detailer Glass Cleaner (5:1 dilution).
IMG_0465.jpg


IMG_0466.jpg


IMG_0467.jpg


Now, I know that I've basically done a three-step polishing job. But!- I could really bear down on this pad, comfortably. Looking back on it, I should have heeded my own advice and PUSHED a lot harder when using the W8207 pad. The main point of the final application was to show how well the PRC performed. Impressive defect removal and a pretty darn good finish. I used a variety of machines and pads- You can choose how you wish to apply PRC. The best advice I can give is super-prime the pad, and increase downward pressure when polishing. Hope this helps.


I don't see anywhere near the cutting power going from any string-style pad (wool, foamed wool, twisted, tufted, etc) to foam.

When removing defects with foam, I drop the speed to the 1,000-1,200 rpm range (to minimize a rapid increase in temperature due to pad velocity). Then, I increase applied downforce. This heats the paint more than light pressure, but it helps the pad to better remove the defect. Otherwise, the pad will not 'force' the abrasive onto the paint surface. The additional pressure better contours the pad to the surface, too. Think in terms of how a backing supports a piece of wet-sanding paper, helping the paper (and abrasive) better contour to the surface.

Remember- PRC uses a very refined abrasive particle, and it contains a very slippery lubrication and polymer (for protection).
 
As always,Very Informative info Kevin.Thank You.
Not only am I now interested in the #86,I'm also interested in looking into D151 as well.

AG should have a "Kevin Brown sticky" for proper technique in applying Meguiar's compounds and polishes.

Thank You again Kevin.

Chris
 
Great post Kevin sir!:dblthumb2:

I wonder how'll SoloCut and PRC behave with a surbuf pad! :D
 
Back
Top