Wills.WindowsAndWheels
New member
- Oct 31, 2009
- 1,682
- 0
Whats up everyone. One of our clients who had us do her accura TL a couple months back http://www.autogeekonline.net/forum/show-n-shine/34431-pearl-accura-tl-single-pass-pics.html gave us a call and asked if we could do her husbands pick-up as well...OF COURSE we could!
We went and bid it out for them...exterior was a little rough...some paint transfer and LOTS of lighter swirls/haze all over. The bed of the truck was pretty dry looking. The interior had the usual Arizona dusted look going on...gray cloth seats that looked tan. The ENGINE...however...the engine was special....Ive done a few bad engines....including my first one that had gone through a radiator going out, water pump leak, tranny leak, oil leak, power steering pump leak...and they leaked for quite a while...but even that didn't compare to THIS engine. GREASE galore my people! Anyone whos done engines knows dust, even light grease you can deal with...but when it is THICK...oooooh thats not so fun!
So real quick here is a run down on what we used:
The usual exterior:
Dawn soap wash
Megs. APC 4:1 for tires
Megs Hyperdressing 2:1 to dress tires
Megs Ultimate Protectant on all plastic surfaces
Megs Blue clay with ONR clay lube
Megs D151 on 5.5" LC low profile polishing pad
Megs #20 Sealant (my sis calls it the banana wax cause of its smell..mmmm)
My precious GG polisher
Steam cleaner for engine bay which is this jobs' MVP for sure
Megs Degreaser 4:1....shoulda just used it straight!
The interior:
Steam cleaner AGAIN for seats and basically everything else!
Little Green Extractor
Megs APC+ for carpets
Megs APC for vinyl and seats
Megs Ultimate Protectant
So lets get the pics rollin shall we?
Ill start out first with the engine since it was the first thing we did...and also a huge freakin disaster!

Please note the HOOD...i don't know how you get that much oil on the underside of the hood...but it happened...and it was THICK
Here is a closer look at the bay:

Here I am steaming the hood...if you look closely you can see the left half is already clean....that took a LONGGGGG time..especially to do it without jacking up the paint.

Here is the under of the hood finished:

Drum roll please.....I present to you the engine bay...

I forgot to mention we dressed it with Megs HD 2:1 also
here are a couple more before and afters of it


Can i get a 'damnnnnnnn' ?


There she is
So next lets take a look at the big part of the job...the outside:

So yes, we can all see its dirty.......tires were in bad shape

They turned out good though

Like i said before, the truck bed was very dry and dirty...

Not that it really mattered hahaha....we pressure washed it down and then used a LOT of HD on it to blacken it back up...heres the after:

And of course we have to have sunshots to see what we were working with. Let me tell you i was ALMOST blind after taking these damn pictures...its SO hard to see swirls on light colored paint...and IMPOSSIBLE to see on the camera if the pictures turned out good or not....on top of that my sunglasses make LCD screens look about the same as if i was on an acid trip or something...they turn all funny rainbow colors...so yeah...the pictures took FOREVER BUTTTTTT....they showed the swirls
Here is the hood:

And again

And here is the quarter panel up front:

*grits teeth* yeah we can't have that up in here!
So, we got to work...washed it down...the wheel wells i THOUGHT were black........till i hit them with the pressure washer:
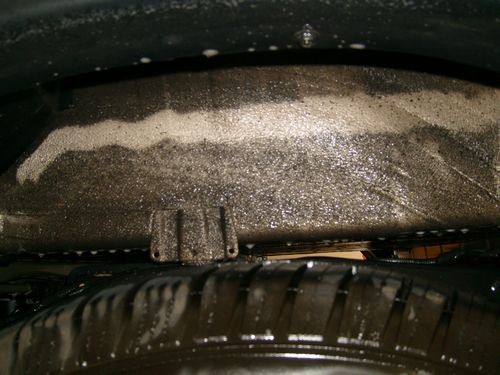
Jumpin' frog feet batman, its gold! I discovered gold!

Came out pretty nice with a little work.
Then came the clay bar...luckily there wasnt a lot of paint overspray on his truck like his wife's car had (thanks to the house painters who sprayed the garage door WITH the car still inside...uncovered)
But we did have a little paint transfer:

But that was nothing a little patience and clay couldn't take care of

So after getting it all prepped and ready it was time for the polishing to begin...brinkman light shot time!

Here is the after shot:

Here is a before shot of the hood:

But that cleaned up real nice

Here is a full shot before hand....help i can't see where I'm going!!!

That was a first...driving a truck with a sheet over the windshield lol...luckily i only have about 15 feet to go. Here is the after:

Here it is from the other side before...

and after....

Andddddd remember those swirls all over the hood?
They got the boot:

We went and bid it out for them...exterior was a little rough...some paint transfer and LOTS of lighter swirls/haze all over. The bed of the truck was pretty dry looking. The interior had the usual Arizona dusted look going on...gray cloth seats that looked tan. The ENGINE...however...the engine was special....Ive done a few bad engines....including my first one that had gone through a radiator going out, water pump leak, tranny leak, oil leak, power steering pump leak...and they leaked for quite a while...but even that didn't compare to THIS engine. GREASE galore my people! Anyone whos done engines knows dust, even light grease you can deal with...but when it is THICK...oooooh thats not so fun!
So real quick here is a run down on what we used:
The usual exterior:
Dawn soap wash
Megs. APC 4:1 for tires
Megs Hyperdressing 2:1 to dress tires
Megs Ultimate Protectant on all plastic surfaces
Megs Blue clay with ONR clay lube
Megs D151 on 5.5" LC low profile polishing pad
Megs #20 Sealant (my sis calls it the banana wax cause of its smell..mmmm)
My precious GG polisher
Steam cleaner for engine bay which is this jobs' MVP for sure
Megs Degreaser 4:1....shoulda just used it straight!
The interior:
Steam cleaner AGAIN for seats and basically everything else!
Little Green Extractor
Megs APC+ for carpets
Megs APC for vinyl and seats
Megs Ultimate Protectant
So lets get the pics rollin shall we?
Ill start out first with the engine since it was the first thing we did...and also a huge freakin disaster!
Please note the HOOD...i don't know how you get that much oil on the underside of the hood...but it happened...and it was THICK
Here is a closer look at the bay:
Here I am steaming the hood...if you look closely you can see the left half is already clean....that took a LONGGGGG time..especially to do it without jacking up the paint.
Here is the under of the hood finished:
Drum roll please.....I present to you the engine bay...
I forgot to mention we dressed it with Megs HD 2:1 also
here are a couple more before and afters of it
Can i get a 'damnnnnnnn' ?
There she is
So next lets take a look at the big part of the job...the outside:
So yes, we can all see its dirty.......tires were in bad shape
They turned out good though
Like i said before, the truck bed was very dry and dirty...
Not that it really mattered hahaha....we pressure washed it down and then used a LOT of HD on it to blacken it back up...heres the after:
And of course we have to have sunshots to see what we were working with. Let me tell you i was ALMOST blind after taking these damn pictures...its SO hard to see swirls on light colored paint...and IMPOSSIBLE to see on the camera if the pictures turned out good or not....on top of that my sunglasses make LCD screens look about the same as if i was on an acid trip or something...they turn all funny rainbow colors...so yeah...the pictures took FOREVER BUTTTTTT....they showed the swirls
Here is the hood:
And again
And here is the quarter panel up front:
*grits teeth* yeah we can't have that up in here!
So, we got to work...washed it down...the wheel wells i THOUGHT were black........till i hit them with the pressure washer:
Jumpin' frog feet batman, its gold! I discovered gold!
Came out pretty nice with a little work.
Then came the clay bar...luckily there wasnt a lot of paint overspray on his truck like his wife's car had (thanks to the house painters who sprayed the garage door WITH the car still inside...uncovered)
But we did have a little paint transfer:
But that was nothing a little patience and clay couldn't take care of
So after getting it all prepped and ready it was time for the polishing to begin...brinkman light shot time!
Here is the after shot:
Here is a before shot of the hood:
But that cleaned up real nice
Here is a full shot before hand....help i can't see where I'm going!!!
That was a first...driving a truck with a sheet over the windshield lol...luckily i only have about 15 feet to go. Here is the after:
Here it is from the other side before...
and after....
Andddddd remember those swirls all over the hood?
They got the boot:
 icture:


")


") . What a mess it makes, specially on a overhead cam lmao. That is a really great turn around bud! :xyxthumbs:
. What a mess it makes, specially on a overhead cam lmao. That is a really great turn around bud! :xyxthumbs: