wet sanding help?

RLucky82

New member
Joined
Jan 3, 2013
Messages
249
Reaction score
0
reading through all of these wonderful articles is making my head spin and I am having difficulty addressing my specific problem.

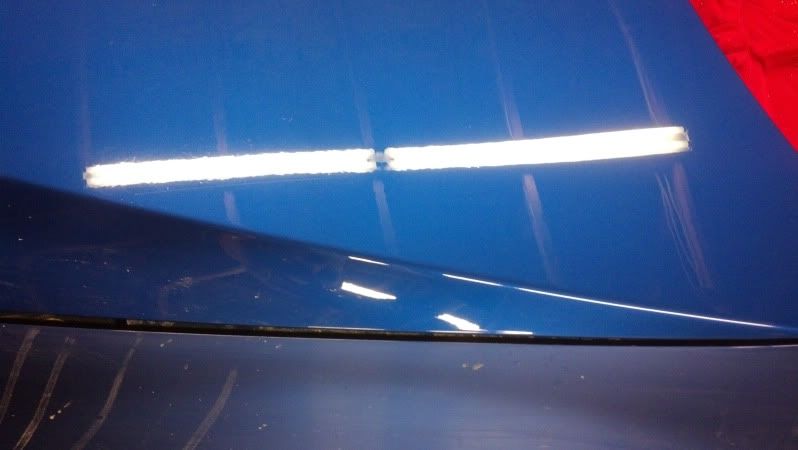
Im having trouble removing these scratches , i resulted to wet sanding but created different scratches of lesser value using, 1500, 2000 then 3000 grit followed by severe swirl remover + green pad , swirl and haze remover + orange, white Adams polish. Is M105 more aggressive then Adam's green severe swirl and haze remover?
or do I just need to find better technique?

2013-01-10_13-39-48_762.jpg


2013-01-10_15-07-06_957.jpg


the scratches in the pictures are after I did 3 applications with severe swirl remover before moving on. So I decided since there are plenty of rock chips and more scratches that if I mess up with wet sanding it wont be the end of the world. After I used 1500, 2000, 3000 grit wet paper I still have similar roughness as what is seen in the top picture. I am using the Porter Cable to buff.


Thanks
 
Heavy swirl remover with a green pad seems like an unbalanced pair to use. Heavy swirl remover with a cutting pad is what you need in your process.

Looks to me like you sanded by hand based on striations in the first pic. If that is indeed the case you would need to sand down some more, preferably with a DA rather than by hand. If you have to do it by hand then you need to apply more pressure and perform each pass in alternating directions.

Until those scratch marks are reduced more or eliminated, there is little reason to go to a compound or polish.

I assume you know the tradeoffs to sanding down the paint so much so I won't go into it.
 
Do you have M105 and a yellow pad? If so then I would step up to that then step down to swirl remover with a orange pad and finally a glaze with a white pad.
 
When ever I wet sand I start with a rotary and a wool pad and usually 3M's heavy cutting compound (ie:rocks in a bottle). That combination gets me 95% of the way in a minimum amount of time. Then if needed you can go to a DA. If your going to use a DA for the whole process it will take a lot longer with assorted pads and compounds.

Dave
 
Due to film thickness these days it's sometimes impossible to completely remove a defect without breaking through the clear. When this situation presents itself the goal is to "improve" the defect and make it much less noticeable...:props:

Be careful.....
 
Due to film thickness these days it's sometimes impossible to completely remove a defect without breaking through the clear. When this situation presents itself the goal is to "improve" the defect and make it much less noticeable...:props:

Be careful.....

What Bobby said is very true. Once you break though there is no going back. Unfortunately no one can tell you the thickness of your coatings. You can buy some meters that give you overall readings but you would have to find a spot that does not have clear on it to guesstimate the different readings and it would still be a guess. Under the hood or in the trunk may be like this but then you have to assume the primer and color is all the same thickness. If you take the readings before you start and during the process at least you would know how much your removing. Whether that helps or not I do not know.

Dave
+2
 
Heavy swirl remover with a green pad seems like an unbalanced pair to use. Heavy swirl remover with a cutting pad is what you need in your process.

Looks to me like you sanded by hand based on striations in the first pic. If that is indeed the case you would need to sand down some more, preferably with a DA rather than by hand. If you have to do it by hand then you need to apply more pressure and perform each pass in alternating directions.

Until those scratch marks are reduced more or eliminated, there is little reason to go to a compound or polish.

I assume you know the tradeoffs to sanding down the paint so much so I won't go into it.
....^^^ :goodpost:^^^....

Bob
 
Looks to me like you sanded by hand based on striations in the first pic. If that is indeed the case you would need to sand down some more, preferably with a DA rather than by hand. If you have to do it by hand then you need to apply more pressure and perform each pass in alternating directions. OK this is the information I was looking for, Thanks.

Until those scratch marks are reduced more or eliminated, there is little reason to go to a compound or polish. at first I was going to live with them but ocd took over. The first pic is how the paint was when I got the car. I tried hand sanding another part of the hood but made similar scratches.

I assume you know the tradeoffs to sanding down the paint so much so I won't go into it.
Yes I am aware, there are many rock chips that need repaired so a repaint is not a big deal. If I get the scratches out I will live with the chips. Or Until I build a garage with a paint booth ... :-)
Adams heavy swirl remover with Adams green pad is correct combination. sorry for the confusion.
 
Do you have M105 and a yellow pad? If so then I would step up to that then step down to swirl remover with a orange pad and finally a glaze with a white pad.
I picked up some 105 today, I will give this a try next before I buy a dedicated da sander.
 
When ever I wet sand I start with a rotary and a wool pad and usually 3M's heavy cutting compound (ie:rocks in a bottle). That combination gets me 95% of the way in a minimum amount of time...

Dave

So this is what I need to learn.


After hand sanding to 3000 grit and polishing with m105 on a 3" orange pad on a drill (cuz that's all I have on hand) I could still see sanding marks. So i went back to 3000 on the PC speed 4 - 3.5" backplate. then repeated m105 and things look a heck of alot better. I can still see some 3000 hand marks but its at a point of "good enough". Then went severe, swirl, polish.

Cellphone pics,
In this pick you can see where I stopped polishing on the second rafter in the reflection from the right and on the far left was not sanded.
2013-01-14_14-54-31_472.jpg


The fender on the right was sanded and polished as stated above. The hood was only polished.
2013-01-14_14-58-51_769.jpg


That process takes way too long. I need to get from 2000 to severe swirlremover much faster.
 
So this is what I need to learn.

That process takes way too long. I need to get from 2000 to severe swirlremover much faster.

Sounds like you learned THE lesson....wet sanding right takes TIME.

BTW I think with the tools you have you did an outstanding job. As others have said be careful not to go too far. Sometimes it's best just to live with some scratches because getting them out means reducing your clear coat protection too far to the point it will fail much earlier than normal.

A paint guage is the "Mother of All Necessity" when sanding, right behind her is having a quality RB with wool pads and the skill to use it.

Like I said outstanding job. 3000 grit made a big difference between the sanded and unsanded side.
 
wet sanding help

If you have a lot of wet sanding and buffing to do wet sand the ride then pull it out in the sun for at least a couple of hours remember UV light and heat flow solvents. When you are ready to buff pull the ride in and let the metal cool to room temperature before you begin buffing. This will literally change/flow a 1200 grit scratch to a 1400 or 1500 grit scratch which obviously means less buffing. If you only have a 1/4 panel to do with say a nasty color like black you can put a heat lamp on the panel for 15-20 minutes 24". Once again let it cool then buff it.
 
What everyone is saying is accurate. I'm thinking though, I wetsand everyday This is done by hand. It looks like your surface, the water, sandpaper, or sanding block got some contaminate on it creating deeper sanding marks that were not removed by compounding steps. At this point if this is the case well then...u most likely will not remove those by compounding. Maybe by sanding but how much clear coat is now left after your initial attempts. This is dangerous territory and u should definetly use caution from this point on if u plan to correct your error.
 
Sounds like you learned THE lesson....wet sanding right takes TIME.

BTW I think with the tools you have you did an outstanding job. As others have said be careful not to go too far. Sometimes it's best just to live with some scratches because getting them out means reducing your clear coat protection too far to the point it will fail much earlier than normal.

A paint guage is the "Mother of All Necessity" when sanding, right behind her is having a quality RB with wool pads and the skill to use it.

Like I said outstanding job. 3000 grit made a big difference between the sanded and unsanded side.
Thanks for the compliments, since then I have picked up a rotary buffer, but the weather has been too cold :(

If you have a lot of wet sanding and buffing to do wet sand the ride then pull it out in the sun for at least a couple of hours remember UV light and heat flow solvents. When you are ready to buff pull the ride in and let the metal cool to room temperature before you begin buffing. This will literally change/flow a 1200 grit scratch to a 1400 or 1500 grit scratch which obviously means less buffing. If you only have a 1/4 panel to do with say a nasty color like black you can put a heat lamp on the panel for 15-20 minutes 24". Once again let it cool then buff it.
excellent - thanks for that tip!

What everyone is saying is accurate. I'm thinking though, I wetsand everyday This is done by hand. It looks like your surface, the water, sandpaper, or sanding block got some contaminate on it creating deeper sanding marks that were not removed by compounding steps. At this point if this is the case well then...u most likely will not remove those by compounding. Maybe by sanding but how much clear coat is now left after your initial attempts. This is dangerous territory and u should definetly use caution from this point on if u plan to correct your error.

since I didn't clarify in the first post, the first two pictures are the way the car was when I received the car. since then I noticed that those look just like 1000 grit sanding marks I have made then polished over with out finishing properly. also there are some areas that need resprayed so I am not afraid to push the limits and learn as I go. Thanks for the input lots to think about until I get some heat :dig:
 
So this is what I need to learn.


After hand sanding to 3000 grit and polishing with m105 on a 3" orange pad on a drill (cuz that's all I have on hand) I could still see sanding marks. So i went back to 3000 on the PC speed 4 - 3.5" backplate. then repeated m105 and things look a heck of alot better. I can still see some 3000 hand marks but its at a point of "good enough". Then went severe, swirl, polish.

Cellphone pics,
In this pick you can see where I stopped polishing on the second rafter in the reflection from the right and on the far left was not sanded.
2013-01-14_14-54-31_472.jpg


The fender on the right was sanded and polished as stated above. The hood was only polished.
2013-01-14_14-58-51_769.jpg


That process takes way too long. I need to get from 2000 to severe swirlremover much faster.

U've got very good results buddy.:xyxthumbs: It'll only get better with more practice.

this is what i can share with you (learned here itself)
When you wetsand, don't put a lot of pressure on the sanding pad, else the sanding marks will be hard to remove
Suppose you are sanding with a 1500 grit paper horizontally, when you sand with a finer grit, sand vertically, make sure you remove the previous horizontal sanding marks from the coarser grit. Apply same process with
When you are done with sanding, work in small areas for compounding, inspect your work, make sure that tracers are gone
During polishing and finishing you will remove the buffer swirls

it takes time, a lot of time, I finished a hood in only 8 hours :props:

Another alternative is to consider the carpro pads for wetsanding

hope it helps


cheers
 
Back
Top