Mike Phillips
Active member
- Dec 5, 2022
- 51,004
- 7
Bouncers Capture the Rapture Monster Truck Detail
Did some product, tool and pad testing today... took a few pictures during the process...
Wipe Clean
First thing is to wipe my truck clean. I wipe her down almost every day with "something", usually a spray detailer or even a spray wax, she's always clean. I chose Optimum Opti Clean Cleaner & Protectant for two reasons,


Decontaminate Paint
As a reminder, this truck was put through an extreme makeover on May 16th, 2013, here's the write up for that project.
1987 Chevy 4x4 Monster Truck "Before & After" Pictures
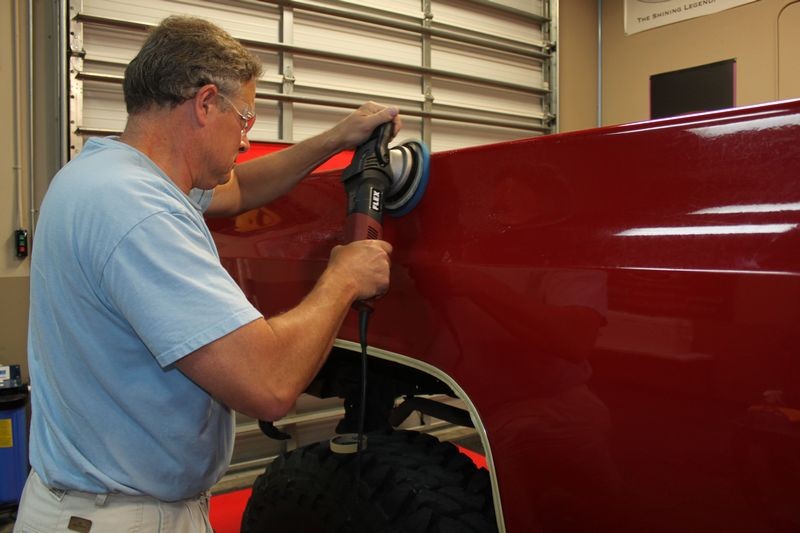
At that time it was decontaminated using Nanoskin Autoscrub Pads. Here's a picture of this process from the above write-up.
And then of course we machine polished and waxed the entire truck.
Fast forward to July 4th, I wanted to test out a couple tools and products but my truck is parked outside 24 hours a day, 7 days a week as it won't fit inside a conventional garage. This means the paint is continually being bombarded with air-borne contaminants.
So I know the horizontal surfaces, roof and hood are going to have "something" on them.
Decontaminating Paint using Detailing Clay
I felt the paint with my hand and it felt smooth and clean. So next I did the Baggie Test. You can read about the baggie test here.

As I suspected, the paint is contaminated with "something" because I can feel little bumps sporadically placed over the finish. I figured this would be the case, there's just too much junk in the air including tree sap mist here in Southern Florida. So I'm going to clay the hood and roof. The sides felt smooth so I'm not going to clay the sides.

Capturing the spray coming out of the bottle shot
This is one of the hardest shots to capture, that is the spray actually exiting the nozzle. I think I took 5 pictures and caught it in this one.

Yep, that's my hand claying the hood....
I'm using Pinnacle Ultra Poly Clay and Pinnacle Clay Lube because Pinnacle Ultra Poly Clay is an Ultra Fine Grade Clay and that's what I wanted and that's all the paint needed.

Claying the roof
If you look at the perspective of this shot... that's me claying the roof.

Light Contamination
The truck was buffed out just 49 days ago and religiously wiped clean, including the roof, (I use a Werner aluminum work stand to get into the truck bed), so it's not going to be super contaminated. BUT there was some kind of gunk on both the roof and the hood and mechanically removing contaminants is a lot more effective then hoping they'll buff off by machine. Foam pads tend to glide over contaminants while the abrasives in the clay will abrade the contaminants off.
Here's the obligatory dirty clay shot...

Light Polishing
I'm firmly in the camp that if you're going to do ANY type of mechanical decontaminating, including claying, then you should plan on doing at least one machine polishing step just to ensure any accidental marring is removed but also for another good reason.
The other good reason
If you vehicle's paint has bonded contaminants, that's a sign that it probably has some level of staining, oxidation, or embedded dirt. You cannot see dirt staining easily on an color other than white.
Here's an example of what dirt staining looks like on white paint.
Here's the point,
If dirt staining is happening, (and it is if your car is a daily driver like mine), you probably can't see it but that doesn't mean its not there. It is.
So you need to do "something" to remove the dirt staining and embedded dirt off of and out of the paint. You can use a simple paint cleaner, a fine cut polish like I'm doing here, or even a quality "cleaner/wax" or AIO type product.
I wanted to use the Sonax Perfect Finish or PF in detailing lingo with a Rupes Polisher and a polishing pad. So I did. And since you, the reader is not here with me to see what I could see I'll tell you what I saw.
It works damn good.
The roof has some residual haze left over from the buffing we did back in May, the roof was wetsanded and compounded but there was always a little haze in the paint. The haze is gone now and it's absolutely clear. Maybe I'll jump up in my truck and take a picture to show you today.
Now here's yet another point
If the PF with a yellow polishing pad on the Rupes cleared up the haze on the roof, you know it left the hood clear too, it's just there wasn't any clearing up that was needed on the hood so no dramatic visual change in my eyes and I did the buffing but I know it's absolutely clear. Keep in mind, when you're working on a clearcoated car, the goal is to make the paint as smooth as possible and as CLEAR as possible so your eyes can see the color underneath.
Anyways... here's what I'm using...
Sonax Perfect Finish
Rupes Bigfoot 21 with a 5" Rupes Backing Plate
Rupes Yellow 6" Polishing Pad

This is me holding the camera with my left hand taking a picture of my right hand using the Rupes 21 Bigfoot to pick up my bead of product using the 10 @ 10 Technique. Speed setting is on 6 but you can pick up your bead of product at a slower speed if you like or do like most and just place some product on the face of the pad. I'm a real 10 @ 10 kind of machine guy...

Fast forward to the LSP part...
For my LSP I wanted to try out the Bouncer's Capture the Rapture paste wax. I pretty much always do every step by machine so here's a white Rupes 4" Finishing pad on the Rupes LHR15 Pneumatic Random Orbital Polisher.

That looks cool...

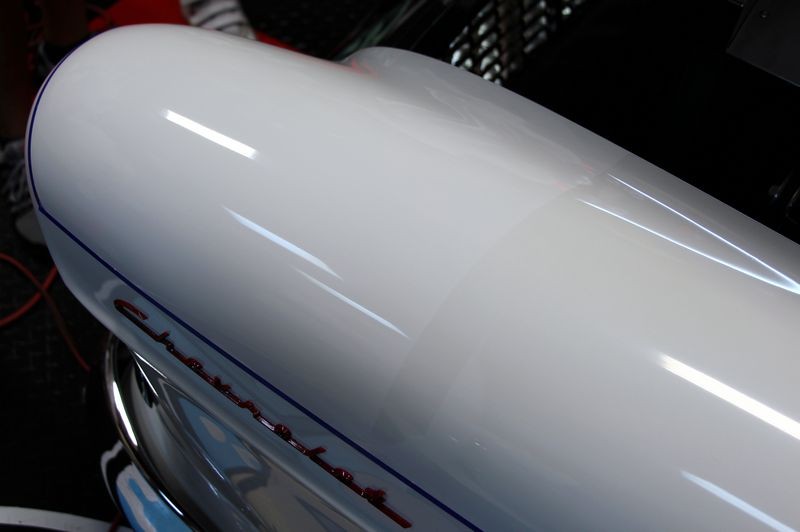
Beauty Shots...
I only did the roof and the hood, ran out of time to do the sides so they're next, but here's a shot of my truck just because....


Here's everything I used...

See, sides were untouched except for wiping them down but remember, I've been wiping the paint and wheels down on this religiously since it was buffed out 49 days ago and always using either a spray detailer or a spray wax.
Just goes to show, if you find something you like and actually use it often, your car's finish can always look this nice.

I'll add some more pictures of the processes performed later and hopefully a beauty shot of the hood to show you the depth and reflection after the Bouncer's Capture the Rapture wax.

Did some product, tool and pad testing today... took a few pictures during the process...
Wipe Clean
First thing is to wipe my truck clean. I wipe her down almost every day with "something", usually a spray detailer or even a spray wax, she's always clean. I chose Optimum Opti Clean Cleaner & Protectant for two reasons,
1. I don't think I'm going to be able to get to the sides today as we're only working half day and I want my paint to look clean and shiny.
2. It was the spray detailer closest to my hand as I walked down the hallway towards the garage.
2. It was the spray detailer closest to my hand as I walked down the hallway towards the garage.
Decontaminate Paint
As a reminder, this truck was put through an extreme makeover on May 16th, 2013, here's the write up for that project.
1987 Chevy 4x4 Monster Truck "Before & After" Pictures
At that time it was decontaminated using Nanoskin Autoscrub Pads. Here's a picture of this process from the above write-up.
Mike Phillips said:Here's Craig decontaminated the paint with a Nanoskin Autoscrub Fine Pad on a Flex 3401.
And then of course we machine polished and waxed the entire truck.
Fast forward to July 4th, I wanted to test out a couple tools and products but my truck is parked outside 24 hours a day, 7 days a week as it won't fit inside a conventional garage. This means the paint is continually being bombarded with air-borne contaminants.
So I know the horizontal surfaces, roof and hood are going to have "something" on them.
Decontaminating Paint using Detailing Clay
I felt the paint with my hand and it felt smooth and clean. So next I did the Baggie Test. You can read about the baggie test here.
As I suspected, the paint is contaminated with "something" because I can feel little bumps sporadically placed over the finish. I figured this would be the case, there's just too much junk in the air including tree sap mist here in Southern Florida. So I'm going to clay the hood and roof. The sides felt smooth so I'm not going to clay the sides.
Capturing the spray coming out of the bottle shot
This is one of the hardest shots to capture, that is the spray actually exiting the nozzle. I think I took 5 pictures and caught it in this one.
Yep, that's my hand claying the hood....
I'm using Pinnacle Ultra Poly Clay and Pinnacle Clay Lube because Pinnacle Ultra Poly Clay is an Ultra Fine Grade Clay and that's what I wanted and that's all the paint needed.
Claying the roof
If you look at the perspective of this shot... that's me claying the roof.
Light Contamination
The truck was buffed out just 49 days ago and religiously wiped clean, including the roof, (I use a Werner aluminum work stand to get into the truck bed), so it's not going to be super contaminated. BUT there was some kind of gunk on both the roof and the hood and mechanically removing contaminants is a lot more effective then hoping they'll buff off by machine. Foam pads tend to glide over contaminants while the abrasives in the clay will abrade the contaminants off.
Here's the obligatory dirty clay shot...
Light Polishing
I'm firmly in the camp that if you're going to do ANY type of mechanical decontaminating, including claying, then you should plan on doing at least one machine polishing step just to ensure any accidental marring is removed but also for another good reason.
The other good reason
If you vehicle's paint has bonded contaminants, that's a sign that it probably has some level of staining, oxidation, or embedded dirt. You cannot see dirt staining easily on an color other than white.
Here's an example of what dirt staining looks like on white paint.
Here's the point,
If dirt staining is happening, (and it is if your car is a daily driver like mine), you probably can't see it but that doesn't mean its not there. It is.
So you need to do "something" to remove the dirt staining and embedded dirt off of and out of the paint. You can use a simple paint cleaner, a fine cut polish like I'm doing here, or even a quality "cleaner/wax" or AIO type product.
I wanted to use the Sonax Perfect Finish or PF in detailing lingo with a Rupes Polisher and a polishing pad. So I did. And since you, the reader is not here with me to see what I could see I'll tell you what I saw.
It works damn good.
The roof has some residual haze left over from the buffing we did back in May, the roof was wetsanded and compounded but there was always a little haze in the paint. The haze is gone now and it's absolutely clear. Maybe I'll jump up in my truck and take a picture to show you today.
Now here's yet another point
If the PF with a yellow polishing pad on the Rupes cleared up the haze on the roof, you know it left the hood clear too, it's just there wasn't any clearing up that was needed on the hood so no dramatic visual change in my eyes and I did the buffing but I know it's absolutely clear. Keep in mind, when you're working on a clearcoated car, the goal is to make the paint as smooth as possible and as CLEAR as possible so your eyes can see the color underneath.
Anyways... here's what I'm using...
Sonax Perfect Finish
Rupes Bigfoot 21 with a 5" Rupes Backing Plate
Rupes Yellow 6" Polishing Pad
This is me holding the camera with my left hand taking a picture of my right hand using the Rupes 21 Bigfoot to pick up my bead of product using the 10 @ 10 Technique. Speed setting is on 6 but you can pick up your bead of product at a slower speed if you like or do like most and just place some product on the face of the pad. I'm a real 10 @ 10 kind of machine guy...
Fast forward to the LSP part...
For my LSP I wanted to try out the Bouncer's Capture the Rapture paste wax. I pretty much always do every step by machine so here's a white Rupes 4" Finishing pad on the Rupes LHR15 Pneumatic Random Orbital Polisher.
That looks cool...
Beauty Shots...
I only did the roof and the hood, ran out of time to do the sides so they're next, but here's a shot of my truck just because....
Here's everything I used...
See, sides were untouched except for wiping them down but remember, I've been wiping the paint and wheels down on this religiously since it was buffed out 49 days ago and always using either a spray detailer or a spray wax.
Just goes to show, if you find something you like and actually use it often, your car's finish can always look this nice.
I'll add some more pictures of the processes performed later and hopefully a beauty shot of the hood to show you the depth and reflection after the Bouncer's Capture the Rapture wax.


")
