cardaddy
New member
- Nov 20, 2012
- 3,937
- 0
2015 Corvette C7 3LT - Z51 – Laguna Blue - Pinnacle Black Label and Detailed Reflection
This one y’all might find as a surprise. It’s no big secret that I’m generally not one to put up S&S threads and stand in the middle of the room awaiting praise whilst everyone ooohs and ahhhhs and hands out virtual pats on the back. :laughing: I’d rather just contribute in a meaningful way, hopefully helping/teaching along the way but MUCH MORE importantly to me is.... learning something from our very own ‘collective’ in the process. Without learning, and sharing knowledge, what are we here for? :dunno:
That aside, this vehicle was a special project, and an absolutely stunning example (or maybe it’s that this particular example is my favorite color, Laguna Blue.") I will not however do as we’ve seen from some, (although thankfully it isn’t something that true AGO aficionados have a habit of) where they’ll put up S&S threads then when someone is GENUINELY INTERESTED in how/what was done to achieve the results we’ve seen and asks questions, there is either no reply to the questions, or replies saying that they’d rather not divulge. Say WHAT? As if along the way there was some sort of top secret methodology, machines, products, pads and magic involved. Magic that only detailers to the Gods are capable of understanding and performing. Oh boy….. What are the rest of us kiddies to do? But as my friends here already know…. That’s just not me, and as always, I’ll be more than happy to share how we ended up getting to the finishing line, right or wrong.
I will not however do as we’ve seen from some, (although thankfully it isn’t something that true AGO aficionados have a habit of) where they’ll put up S&S threads then when someone is GENUINELY INTERESTED in how/what was done to achieve the results we’ve seen and asks questions, there is either no reply to the questions, or replies saying that they’d rather not divulge. Say WHAT? As if along the way there was some sort of top secret methodology, machines, products, pads and magic involved. Magic that only detailers to the Gods are capable of understanding and performing. Oh boy….. What are the rest of us kiddies to do? But as my friends here already know…. That’s just not me, and as always, I’ll be more than happy to share how we ended up getting to the finishing line, right or wrong.
In any event, this story started on a cold rainy day. It was a Friday, with Christmas just six days away. Let’s go back there shall we.
Late last December a friend contacted me, one that I’ve spoken of before. This one has quite a car collection, including everything from 60’s & 70’s muscle cars to newer ones from this and the last decade, to include a GT500, C6 Z06, a 2014 Viper in black with gold stripes (I posted a few photos of it a while back and he did have a 2009 red Viper that I did as well), is on his second C7 in the last year, and just recently gave up on waiting on his lime green Hellcat (ordered since September) when the dealership called and said they had a black one, (so he went and got it for the time being).
Knowing him as I do however, I suspect when the lime green one with the blacked out hood shows up he’ll go and trade in the black one, (he’s just that kind of guy). He also said they are only building 3 a day at the Ontario Canada plant, hence the INSANELY long wait time(s). Then when at Landmark recently I was speaking with a sales manager and he said that they are having problems with the (black) hoods. Guess that’s why that one never showed up.
None the less, he told me his neighbor had a brand new 2015 Laguna Blue Z51 LT3 that he’d ordered about the same time as his (original) Hellcat back in September. And… he said his neighbor was going to call me for paint correction.
Tuesday before Christmas I was contacted by the proud new owner. He had the car for only 2 weeks but had to leave the country for a while right after Christmas (he was getting called up by his office to go work in an Ebola camp in Africa for a few weeks), but would have his son(s) contact me and arrange to work with my schedule to have the car brought up in his absence. Considering he’s some 57 miles away, and his son has a hectic schedule, just making that happen took several weeks of planning.
The owner had wanted his youngest son (in his early 20’s) to come up and spend some time with me, (training or at least learning) in an effort to best be able to take care of his new, absolutely STUNNING C7. That didn’t happen btw, but we did finally work out a day to get it here, (I’d needed it a week earlier, but better late than never I reckon). The good part was that I could keep it as long as I wanted, (with him being out of the country till the end of January).
When the boys brought it up, it had already been driven in the rain, (only once I’m told), and because it had to be taken back to the dealership on the day he picked it up none the less! It was a beauty to behold, sitting there with only 751 miles on it (and to them) looking perfect. Far from that to my eyes, as they soon discovered. After a quick inspection it was clear that it was going to be a bit of work. Although during that initial inspection and my pointing out the things I could see, even before it was washed, the boys just kept telling me I had better eyes then they did. (Makes an old guy feel young again. )
The overall condition was better than most, (especially over what you see with the run of the mill vehicles that have long train rides, then ship on open trucks to their final destination) with a few swirls here and there. But it was the severity of the RIDS (albeit not high in numbers) that were there you did not expect.
One in particular was running directly across the right front fender behind the headlight and was VERY deep, running directly across the sharp body line in the top of the fender!!! That one was as bad as you’d see when someone had been freehand cutting PPF, yet there was no PPF on the vehicle. That one took some work with my old faithful friend and companion, my decades old Meguiar’s 3000 grit sanding block. Along of course with judicially placed 3M vinyl tape along those raised body lines so as to avoid any potential irrecoverable clear coat damage after correction and buffing.
Most all the rest were just RIDS here or there, or swirls, and a weird area on the hood that was likely caused from a suction cup at the factory. It was egg shaped about 2½”x4½” and was obviously caused from handling of some sort, with swirls and scratches going in all directions. You honestly couldn’t see it from the front, back, or left side. You had to have light coming from overhead and/or the left side and look at it from an angle low from the right side.
There was one place however that gives me serious doubts about the quality control at the Bowling Green plant. The back of the spoiler, (towards the right side) had been rubbed up against whilst the basecoat was wet, causing horrific smudging and smearing all the way from top to bottom, in several places, and along the bottom edge the basecoat was wiped totally clean, all the way to the black primer! THEN THE WHOLE THING WAS CLEARED OVER! Now I understand in an automated factory environment that things like this happen, (and not before it would be cleared) but it should have been caught afterwards! Worse yet, it wasn’t, was then installed on the bumper cover, THEN the entire assembly was installed on the darned car! SERIOUSLY?!?!?!!!! The only way to fix it anywhere NEAR right is to remove the bumper cover, remove the spoiler, and start all over.
All that however means that they’ll scratch up the paint all over the rear of the vehicle and it’ll have to be corrected, (and coated) again. Of course I’ll work in any way possible to provide whatever estimates to the owner to provide the dealership for total reimbursement before, during and after.
That wasn’t the only thing that slipped away from quality control either. The reason it was driven in the rain (that first day) was that after bringing it home the owner noticed the plastic cover (lens) over the HUD in the dash was broken all the way across. Not wanting to let it slide he took it back (in the rain). They had to pull the dash out and order a new part for it, taking a week before it was finished. WOW, how can all this be happening at what is supposed to be a white glove assembly plant?
Also, the seats, along the seams on the seating surface, showed white glue from the inside. All this was on a vehicle that the dealership DID in fact do “dealer prep” on. Can’t imagine what they’d do with a basic little car that the rest of us drive. Pfffftttt!
Picture ordering the most expensive C7 package they have (besides Z06), the LT3 Z51 with a few options, coming in at just under $77,000.00. Then had he paid full boat for the factory tour, splurged for museum delivery on of that… to find himself standing there finding the cracked HUD and trashed out spoiler then and there, that day, in the middle of the hallowed ground known as the Corvette Museum, right there in front of God and everybody? Good thing that didn’t happen, knowing what I know now.
I can see someone raising total HE_ _ double hockey sticks! Holy CRAP!!! I’m afraid I’d have surely gotten escorted from the premises, if not arrested! :laughing:
BTW…. Neither the dealer nor the owner had noticed the trashed spoiler. (Or at least the dealer chose to NOT say anything about it if they did…. Imagine that.)
Enough of that. So what did I actually do along the way you’re wondering?
First day, (being as it didn’t show up till mid-afternoon, yet I needed it EARLY) was spent washing and prepping till after dark. I was outside with halogen and LED lights with foam still a flyin’. As is typical, I’ll do the wheels first, doing decon on them to whatever degree is necessary. Then moving to the body I’ll IRON-X/Snow Foam and let it dwell (although if it’s an older vehicle that is dirty I’ll foam/wash first THEN IRON-X/foam afterwards in an attempt to remove any larger foreign matter before doing the IROX-X treatment).
Anyhow, did the wash, then IRON-X (snow foam) just to check for any industrial fallout/rail dust although I didn’t expect anything big. Being as they are shipped in a closed truck they really don’t have any rail dust to speak of. Did get an ever so slight reaction, but it was more for my peace of mind than anything else. Followed that of course with Nanoskin pads, both hand held and via machine. Finally I’ll always go back and do final foam wash on it to remove any IRON-X that may remain along with a thorough rinse.
Then the last part of wash day was getting the glass Nanoskinned with a red/coarse hand held sponge, cleaned well, and then prepped with panel wipe.
Day 2 was inspection and taping day (along with photo documentation). Inspection was done both inside (under my 5000K overhead LED’s, portable LED square work flood and 3 halogen floods) as well as outside in sunlight. The taping alone can take 3+ hours and inspection (especially if photos are involved) can take another 2~3.
Day 3 the real fun began. After that… it was all somewhat of a blur.
Anywho…. Some 7 days and 37 hours later it was all finished. (Although they did not come to pick it up for another 3 days, and the owner didn’t come home till the next weekend.) I’ll be the first to admit that a younger man with a healthy back and neck (one that can turn more than a few degrees to the left), and a right knee that doesn’t make you yelp like a dog being run over by the mailman when you kneel down on it :laughing: would have done it in 27~30 hours. Especially with my back being the way it is as of late!
Actually, just found out yesterday that the surgery that I’ve been waiting on (approval for) for 3 weeks now was denied by BCBS. Seems they’d rather keep you on pain pills till you have liver and kidney failure than actually do something to make you better. (That’s a story for a different time I fear.)
For me however doing this IS NOT about watching a clock. I’ll spend as much time as it takes, doing things the way I’d do it no matter what type of vehicle, with total and complete OCDand as if every - single - vehicle - were my own. Recently there was a thread where a guy said someone told him he was taking too long. When I showed that to CarMomma and said that the guy said he was told he should be moving faster, she simply said this “It takes as long as it takes. If the owner isn’t going to do it for himself, then what does it matter how long you take to do it, as long as it’s done right.” Ah the woes of not doing production work.
Or more simply put… If I’d spend an hour cleaning wheels, then 3 hours washing my car, you can bet I’ll spend that much time washing someone else’s. Time is irrelevant in the grand scheme of things. Always under promise and over deliver…. Can’t go back and over deliver after you’ve already delivered it.
As for that ‘Top Secret, highly guarded, proprietary process……
The entire vehicle was compounded with the Flex 3401, white pad & D300. Then some of the worst spots were done with the GG6 with Meguiar’s Microfiber pads & D300. This may seem counter intuitive, but by and large the white pad/D300 combo did the bulk of the work. Always going in "least aggressive" works for me.
So after that was completed it was easy to see where there were places that needed a bit of extra attention. After that process I got jiggy with it with 4” pads (orange and white) and FG400 on the GG6 in a few spots just for snits-n-giggles (also to make sure there wasn’t any micro-marring from the microfiber pad). Final polish was done with the Flex, a blue pad and D301, as well as the GG6 with a 4” blue pad. Nothing else was needed.
Prior to coating, everything was gone over twice with panel wipe made with D114. First @ 128:1 and 15% alcohol then at 192:1 with a 28% alcohol solution. Next was a red pad via DA with PBL Surface Cleansing Polish, top to bottom front to back. Everything was coated with PBL, dedicated coatings. I’ve used several, from popular manufacturers, and it’s easier, looks as good, has great durability, and is as slick as anything out there.
All rubber and vinyl was hit with WG protectant 3 times. Hard vinyl/plastic with WG Exterior Trim Sealant twice over. Door jambs of course were all coated with PBL. Hatch, hinges, and trunk jambs with BF WOWA sealant. All interior plastics with 303 spf40. Leather didn’t so much need a thorough cleaning as much as it needed the glue removed from around the seams. Were it in dire need of cleaning/conditioning Leatherique (or Leather Masters) would be in order.
Wheels were removed, repaired/buffed, and coated with Pinnacle Black Label Wheel Coating. I love the look of the black wheels, especially as the trim on the car is black, but BOY is that paint BEYOUND SOFT! They were already scratched up from the dealership washing them, but the front ones had some sort of (what looked like) epoxy based concrete/cement on them. No doubt he’d ran over something, a puddle of it actually, and it ended up being slung outwards from the rotors and hardened in a fashion that was literally harder than the paint! It took quite a bit of scraping, hand digging with plastic tools/blades (breaking fingernails etc.), and 3 different pads and compounds plus 1.7 additional hours just on the front wheels to get them straightened out. Thank GOD the back ones didn’t have that substance on them!
That aside, they really were scratched up for a car with only 751 miles on it. For the life of me I don’t understand why they don’t powder coat them. They charge $595 for colored calipers (red or yellow generally, with black and cyber gray coming standard on various option packages) and they certainly seem to be powder coated. At least (if it is paint) it's a lot harder than the black painted wheels.
The black (painted) wheels are a $495 option, yet why not go up to $995 or something similar and just powder coat them? It it’s good enough (read safe enough) for racing wheels, it should be good enough for OEM duty. I can tell you, if you end up with a set of them, and you DON’T scratch them washing them, you’re being unbelievably careful along the way. Any “Daytona” brush is too hard for that paint! Wheel Woolies are the only way to go there, and even then you must take great caution. ") I suggested in no uncertain terms that the owner invest in a set of Wheel Woolies. In fact, I provide a 2-page document with suggested products starting with 3 buckets and grit guards, (1 just for wheels, and with it’s own grit guard), to various wash mitts, different types of microfiber towels, all the way to LSP products.
I suggested in no uncertain terms that the owner invest in a set of Wheel Woolies. In fact, I provide a 2-page document with suggested products starting with 3 buckets and grit guards, (1 just for wheels, and with it’s own grit guard), to various wash mitts, different types of microfiber towels, all the way to LSP products.
Thanks for taking the time to read my meanderings…. Hopefully the photos will speak for themselves.
THIS POST WILL HAVE THE "BEFORE" SHOTS AND PREP WORK.


BACK EDGE OF DRIVERS DOOR

SPOILER SNAFU - HOW CAN YOU MISS THIS?


RIGHT FRONT FENDER - BEHIND HEADLIGHT


MIDDLE OF THE HOOD


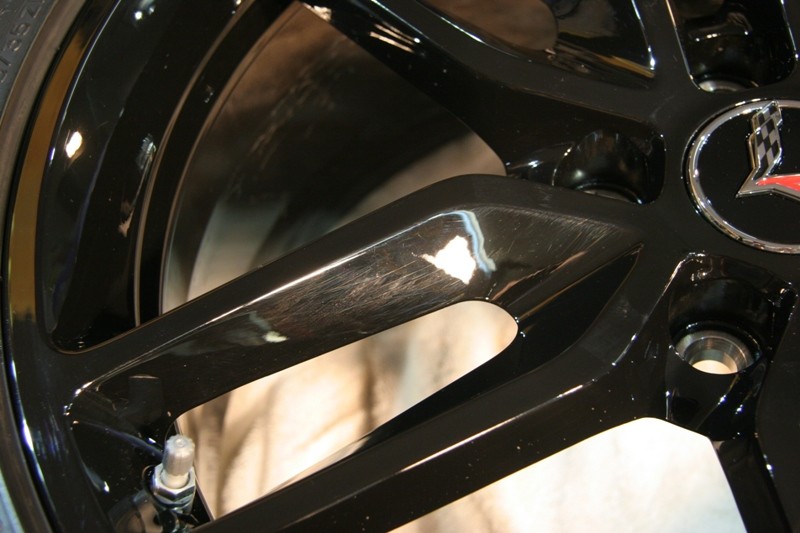
PAINTED WHEELS - BEFORE - OOOPS


PAINTED WHEELS - AFTER - OH YEAH....


This one y’all might find as a surprise. It’s no big secret that I’m generally not one to put up S&S threads and stand in the middle of the room awaiting praise whilst everyone ooohs and ahhhhs and hands out virtual pats on the back. :laughing: I’d rather just contribute in a meaningful way, hopefully helping/teaching along the way but MUCH MORE importantly to me is.... learning something from our very own ‘collective’ in the process. Without learning, and sharing knowledge, what are we here for? :dunno:
That aside, this vehicle was a special project, and an absolutely stunning example (or maybe it’s that this particular example is my favorite color, Laguna Blue.
I will not however do as we’ve seen from some, (although thankfully it isn’t something that true AGO aficionados have a habit of) where they’ll put up S&S threads then when someone is GENUINELY INTERESTED in how/what was done to achieve the results we’ve seen and asks questions, there is either no reply to the questions, or replies saying that they’d rather not divulge. Say WHAT? As if along the way there was some sort of top secret methodology, machines, products, pads and magic involved. Magic that only detailers to the Gods are capable of understanding and performing. Oh boy….. What are the rest of us kiddies to do? But as my friends here already know…. That’s just not me, and as always, I’ll be more than happy to share how we ended up getting to the finishing line, right or wrong. In any event, this story started on a cold rainy day. It was a Friday, with Christmas just six days away. Let’s go back there shall we.
Late last December a friend contacted me, one that I’ve spoken of before. This one has quite a car collection, including everything from 60’s & 70’s muscle cars to newer ones from this and the last decade, to include a GT500, C6 Z06, a 2014 Viper in black with gold stripes (I posted a few photos of it a while back and he did have a 2009 red Viper that I did as well), is on his second C7 in the last year, and just recently gave up on waiting on his lime green Hellcat (ordered since September) when the dealership called and said they had a black one, (so he went and got it for the time being).
Knowing him as I do however, I suspect when the lime green one with the blacked out hood shows up he’ll go and trade in the black one, (he’s just that kind of guy). He also said they are only building 3 a day at the Ontario Canada plant, hence the INSANELY long wait time(s). Then when at Landmark recently I was speaking with a sales manager and he said that they are having problems with the (black) hoods. Guess that’s why that one never showed up.
None the less, he told me his neighbor had a brand new 2015 Laguna Blue Z51 LT3 that he’d ordered about the same time as his (original) Hellcat back in September. And… he said his neighbor was going to call me for paint correction.
Tuesday before Christmas I was contacted by the proud new owner. He had the car for only 2 weeks but had to leave the country for a while right after Christmas (he was getting called up by his office to go work in an Ebola camp in Africa for a few weeks), but would have his son(s) contact me and arrange to work with my schedule to have the car brought up in his absence. Considering he’s some 57 miles away, and his son has a hectic schedule, just making that happen took several weeks of planning.
The owner had wanted his youngest son (in his early 20’s) to come up and spend some time with me, (training or at least learning) in an effort to best be able to take care of his new, absolutely STUNNING C7. That didn’t happen btw, but we did finally work out a day to get it here, (I’d needed it a week earlier, but better late than never I reckon). The good part was that I could keep it as long as I wanted, (with him being out of the country till the end of January).
When the boys brought it up, it had already been driven in the rain, (only once I’m told), and because it had to be taken back to the dealership on the day he picked it up none the less! It was a beauty to behold, sitting there with only 751 miles on it (and to them) looking perfect. Far from that to my eyes, as they soon discovered. After a quick inspection it was clear that it was going to be a bit of work. Although during that initial inspection and my pointing out the things I could see, even before it was washed, the boys just kept telling me I had better eyes then they did. (Makes an old guy feel young again. )
The overall condition was better than most, (especially over what you see with the run of the mill vehicles that have long train rides, then ship on open trucks to their final destination) with a few swirls here and there. But it was the severity of the RIDS (albeit not high in numbers) that were there you did not expect.
One in particular was running directly across the right front fender behind the headlight and was VERY deep, running directly across the sharp body line in the top of the fender!!! That one was as bad as you’d see when someone had been freehand cutting PPF, yet there was no PPF on the vehicle.
That one took some work with my old faithful friend and companion, my decades old Meguiar’s 3000 grit sanding block. Along of course with judicially placed 3M vinyl tape along those raised body lines so as to avoid any potential irrecoverable clear coat damage after correction and buffing.Most all the rest were just RIDS here or there, or swirls, and a weird area on the hood that was likely caused from a suction cup at the factory. It was egg shaped about 2½”x4½” and was obviously caused from handling of some sort, with swirls and scratches going in all directions. You honestly couldn’t see it from the front, back, or left side. You had to have light coming from overhead and/or the left side and look at it from an angle low from the right side.
There was one place however that gives me serious doubts about the quality control at the Bowling Green plant. The back of the spoiler, (towards the right side) had been rubbed up against whilst the basecoat was wet, causing horrific smudging and smearing all the way from top to bottom, in several places, and along the bottom edge the basecoat was wiped totally clean, all the way to the black primer! THEN THE WHOLE THING WAS CLEARED OVER! Now I understand in an automated factory environment that things like this happen, (and not before it would be cleared) but it should have been caught afterwards! Worse yet, it wasn’t, was then installed on the bumper cover, THEN the entire assembly was installed on the darned car!
SERIOUSLY?!?!?!!!! The only way to fix it anywhere NEAR right is to remove the bumper cover, remove the spoiler, and start all over.All that however means that they’ll scratch up the paint all over the rear of the vehicle and it’ll have to be corrected, (and coated) again. Of course I’ll work in any way possible to provide whatever estimates to the owner to provide the dealership for total reimbursement before, during and after.
That wasn’t the only thing that slipped away from quality control either. The reason it was driven in the rain (that first day) was that after bringing it home the owner noticed the plastic cover (lens) over the HUD in the dash was broken all the way across. Not wanting to let it slide he took it back (in the rain). They had to pull the dash out and order a new part for it, taking a week before it was finished. WOW, how can all this be happening at what is supposed to be a white glove assembly plant?
Also, the seats, along the seams on the seating surface, showed white glue from the inside. All this was on a vehicle that the dealership DID in fact do “dealer prep” on. Can’t imagine what they’d do with a basic little car that the rest of us drive. Pfffftttt!
Picture ordering the most expensive C7 package they have (besides Z06), the LT3 Z51 with a few options, coming in at just under $77,000.00. Then had he paid full boat for the factory tour, splurged for museum delivery on of that… to find himself standing there finding the cracked HUD and trashed out spoiler then and there, that day, in the middle of the hallowed ground known as the Corvette Museum, right there in front of God and everybody?
Good thing that didn’t happen, knowing what I know now.I can see someone raising total HE_ _ double hockey sticks! Holy CRAP!!! I’m afraid I’d have surely gotten escorted from the premises, if not arrested! :laughing:
BTW…. Neither the dealer nor the owner had noticed the trashed spoiler. (Or at least the dealer chose to NOT say anything about it if they did…. Imagine that.)
Enough of that. So what did I actually do along the way you’re wondering?
First day, (being as it didn’t show up till mid-afternoon, yet I needed it EARLY) was spent washing and prepping till after dark. I was outside with halogen and LED lights with foam still a flyin’. As is typical, I’ll do the wheels first, doing decon on them to whatever degree is necessary. Then moving to the body I’ll IRON-X/Snow Foam and let it dwell (although if it’s an older vehicle that is dirty I’ll foam/wash first THEN IRON-X/foam afterwards in an attempt to remove any larger foreign matter before doing the IROX-X treatment).
Anyhow, did the wash, then IRON-X (snow foam) just to check for any industrial fallout/rail dust although I didn’t expect anything big. Being as they are shipped in a closed truck they really don’t have any rail dust to speak of. Did get an ever so slight reaction, but it was more for my peace of mind than anything else. Followed that of course with Nanoskin pads, both hand held and via machine. Finally I’ll always go back and do final foam wash on it to remove any IRON-X that may remain along with a thorough rinse.
Then the last part of wash day was getting the glass Nanoskinned with a red/coarse hand held sponge, cleaned well, and then prepped with panel wipe.
Day 2 was inspection and taping day (along with photo documentation). Inspection was done both inside (under my 5000K overhead LED’s, portable LED square work flood and 3 halogen floods) as well as outside in sunlight. The taping alone can take 3+ hours and inspection (especially if photos are involved) can take another 2~3.
Day 3 the real fun began. After that… it was all somewhat of a blur.
Anywho…. Some 7 days and 37 hours later it was all finished. (Although they did not come to pick it up for another 3 days, and the owner didn’t come home till the next weekend.) I’ll be the first to admit that a younger man with a healthy back and neck (one that can turn more than a few degrees to the left), and a right knee that doesn’t make you yelp like a dog being run over by the mailman when you kneel down on it :laughing: would have done it in 27~30 hours. Especially with my back being the way it is as of late!
Actually, just found out yesterday that the surgery that I’ve been waiting on (approval for) for 3 weeks now was denied by BCBS. Seems they’d rather keep you on pain pills till you have liver and kidney failure than actually do something to make you better. (That’s a story for a different time I fear.)
For me however doing this IS NOT about watching a clock. I’ll spend as much time as it takes, doing things the way I’d do it no matter what type of vehicle, with total and complete OCD
and as if every - single - vehicle - were my own. Recently there was a thread where a guy said someone told him he was taking too long. When I showed that to CarMomma and said that the guy said he was told he should be moving faster, she simply said this “It takes as long as it takes. If the owner isn’t going to do it for himself, then what does it matter how long you take to do it, as long as it’s done right.” Ah the woes of not doing production work. Or more simply put… If I’d spend an hour cleaning wheels, then 3 hours washing my car, you can bet I’ll spend that much time washing someone else’s. Time is irrelevant in the grand scheme of things. Always under promise and over deliver…. Can’t go back and over deliver after you’ve already delivered it.
As for that ‘Top Secret, highly guarded, proprietary process……
The entire vehicle was compounded with the Flex 3401, white pad & D300. Then some of the worst spots were done with the GG6 with Meguiar’s Microfiber pads & D300. This may seem counter intuitive, but by and large the white pad/D300 combo did the bulk of the work. Always going in "least aggressive" works for me.
So after that was completed it was easy to see where there were places that needed a bit of extra attention. After that process I got jiggy with it with 4” pads (orange and white) and FG400 on the GG6 in a few spots just for snits-n-giggles (also to make sure there wasn’t any micro-marring from the microfiber pad). Final polish was done with the Flex, a blue pad and D301, as well as the GG6 with a 4” blue pad. Nothing else was needed.
Prior to coating, everything was gone over twice with panel wipe made with D114. First @ 128:1 and 15% alcohol then at 192:1 with a 28% alcohol solution. Next was a red pad via DA with PBL Surface Cleansing Polish, top to bottom front to back. Everything was coated with PBL, dedicated coatings. I’ve used several, from popular manufacturers, and it’s easier, looks as good, has great durability, and is as slick as anything out there.
All rubber and vinyl was hit with WG protectant 3 times. Hard vinyl/plastic with WG Exterior Trim Sealant twice over. Door jambs of course were all coated with PBL. Hatch, hinges, and trunk jambs with BF WOWA sealant. All interior plastics with 303 spf40. Leather didn’t so much need a thorough cleaning as much as it needed the glue removed from around the seams. Were it in dire need of cleaning/conditioning Leatherique (or Leather Masters) would be in order.
Wheels were removed, repaired/buffed, and coated with Pinnacle Black Label Wheel Coating. I love the look of the black wheels, especially as the trim on the car is black, but BOY is that paint BEYOUND SOFT! They were already scratched up from the dealership washing them, but the front ones had some sort of (what looked like) epoxy based concrete/cement on them. No doubt he’d ran over something, a puddle of it actually, and it ended up being slung outwards from the rotors and hardened in a fashion that was literally harder than the paint! It took quite a bit of scraping, hand digging with plastic tools/blades (breaking fingernails etc.), and 3 different pads and compounds plus 1.7 additional hours just on the front wheels to get them straightened out. Thank GOD the back ones didn’t have that substance on them!
That aside, they really were scratched up for a car with only 751 miles on it.
For the life of me I don’t understand why they don’t powder coat them. They charge $595 for colored calipers (red or yellow generally, with black and cyber gray coming standard on various option packages) and they certainly seem to be powder coated. At least (if it is paint) it's a lot harder than the black painted wheels.The black (painted) wheels are a $495 option, yet why not go up to $995 or something similar and just powder coat them? It it’s good enough (read safe enough) for racing wheels, it should be good enough for OEM duty. I can tell you, if you end up with a set of them, and you DON’T scratch them washing them, you’re being unbelievably careful along the way.
Any “Daytona” brush is too hard for that paint! Wheel Woolies are the only way to go there, and even then you must take great caution. I suggested in no uncertain terms that the owner invest in a set of Wheel Woolies. In fact, I provide a 2-page document with suggested products starting with 3 buckets and grit guards, (1 just for wheels, and with it’s own grit guard), to various wash mitts, different types of microfiber towels, all the way to LSP products.Thanks for taking the time to read my meanderings…. Hopefully the photos will speak for themselves.
THIS POST WILL HAVE THE "BEFORE" SHOTS AND PREP WORK.
BACK EDGE OF DRIVERS DOOR
SPOILER SNAFU - HOW CAN YOU MISS THIS?
RIGHT FRONT FENDER - BEHIND HEADLIGHT
MIDDLE OF THE HOOD
PAINTED WHEELS - BEFORE - OOOPS
PAINTED WHEELS - AFTER - OH YEAH....
 rops: I'll get a bunch of finished photos up tonight.


