XLNTShine
New member
- May 19, 2010
- 368
- 0
Vehicle Info:
2004 Chevy Cavalier 2.0L Ecotec 5-speed Manual
107,384 Miles
Plugs and plug boots were changed at 103,000 miles as well as oil and air filter. The car runs Mobil 1 synthetic oil just for those that care. To make sure that the test was accurate I elected not to change the engine oil and filter until I go through one tank of fuel after using the 3M kit.I also did not clean/change the air filter nor did I check or change tire pressure. I wanted the car to be the same before the kit and after to evaluate any benefits of the kit in MPG. Prior to the kit the car was filled with Exxon 87 octane and the MPG was 22.7 !!! The car in the past has gotten over 32MPG so even the tune-up at 103K miles did not improve fuel MPG.
Tools Used:
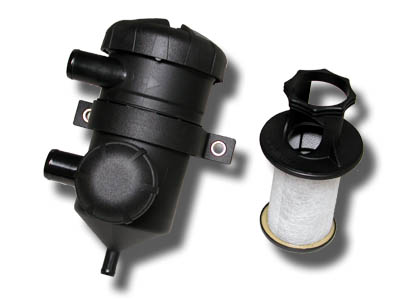
3M Fuel System Tune-Up Kit
Screw Drive - flat head
Vise Grips - Needle nose as well as Std
Black Electrical Tape
Shop Towels

Using the kit:
This is the engine before I started.

First locate the throttle body, here is the clamp holding the air box to the TB. (On the Ecotec it is under the black air box you see in the pic above)

Remove the clamp holding the air box to the TB.

Next using the regular vise grips remove the crank case vacuum hose from the valve/cam cover. I prefer to use vise grips with the spring steel clamps found on most newer vehicles. There is a tool made just for these clamps but a vise grip plier works well. Be careful not to grip the clamp so hard you bent the travel limiting tab.

After removing the intake hoses, unplugging the IAT sensor and the vacuum line to the fuel pressure regulator remove the air box from the TB. Here is the TB before cleaning.

Next unpack the kit, it includes three products instructions on paper and a DVD showing how to use the product.

This is the intake system cleaner. Note the hose attached to the can, this is not removable.

The directions tell you to un-coil the hose and then place the end of the hose 1/4" in front of the TB blade. The directions say to place the hose end at the 12 o'clock position. I chose the 6 o'clock position to keep the liquid from being pulled into the IAC port and servo. The instructions also tell you not to trim to much off the end of the hose to make clearance in-front of the TB blades. I elected to bend the hose into a smaller U-bend and hold the bend with black electrical tape. I also used black electrical take to hold the hose in position in on the TB. The instructions say the intake boot can be used to do this but not on this application. (The pink you see on the TB blade is the cleaning solution after doing this step)

After the cleaner hose is is place, reinstall all the intake hoses, plug in sensors, and connect lines.

Next Start the car and allow it to reach operating temperature. ( I did this by driving the car before starting) Using the needle nose vise grips clamp the throttle body shaft/cable/fuel pedal to raise the engine RPMs by 500 above normal idle. Instructions say to increase to 1000RPM but this engine idles higher then 500RPM so I set the RPM to 1200 RPM. (This is to move product through the intake manifold as well as ensure the product has room to be pulled past the TB blade and not pool or be pulled into the IAC servo motor and port.

Here is the car with the RPM set.

Next you want to depress the locking tab on the cleaner can and run the car until the can is empty. This should take approx. 15 minutes. (MAKE SURE THE A/C AND HEAT ARE TURNED OFF)
Then the can is empty shut off the car and remove all the intake boots, hoses, connectors, and lines to gain access to the TB. Remove the cleaner hose from the TB. Here again is the after pic from the intake cleaner. Also remove the clamp or vise grips you used to hold the engine at RPM.
Next get the can of TB cleaner.

Prep the can by removing the blue locking tab and inserting the red straw into the spray head.

Spray the cleaner into the TB opening. Spray the face of the blade, some into the IAC port, and the pivot points for the shaft.

Next use the needle nose vise grips to hold the TB blade wide open and spray cleaner on the back side of the blade.

Next work the TB blade open and closed while spraying the cleaner on the shaft going through the TB. Do this for 10-15 seconds and then continue to work the TB blade open and closed for 1 min.

Take a rag or shop towel and spray some cleaner into the TB while holding the blades wide open. Make sure you spray all the way around the TB housing and hit the blade for good measure. Then take a towel or soft brush and wipe away the carbon and oil. I did this until the towel was coming out clean. (Here is the towel after)

Here is the TB after cleaning.

Reassemble the intake system, and be sure to hook everything back up and plug in all the sensors. Make sure all the clamps are tight!

All put back together...

Next grab the fuel cleaning additive.

The additive treats up to 20 gallons at a ration of 1:20. Additional additive is available at most NAPA stores. Add this to the tank. Then drive the car for 10-15 minutes.

Keep in mind that when starting the car for the first time after cleaning the TB it may be hard to start. If you can not get the car to start after cranking for 10 seconds wait 5 minutes for the starter to cool off and then start the car using the flooded process. Press the throttle all the way to the floor and crank the engine. This shuts off the fuel injectors in an attempt to clear out excess raw fuel. Be ready to back off the throttle after the engine starts!!
Initial Results:
The engine feels like it is running smoother. Part throttle tip in seems to be improved as well. Stay tuned for a MPG update after running the fuel additive in this tank of fuel. We will see if I gain any MPG from the cleaning kit.
Impressions:
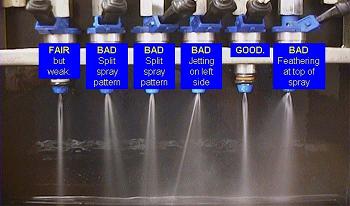
Overall this system is pretty easy to use. I would say of you can change your own spark plugs, its thougher then oil, or you have a repair manual for your car our should be able to use this kit with out any issues. The intake system cleaner is an unknown as you could not get a visual before and after due to the position of the TB and I also do not own a bore scope. (Anyone have one they want to loan out and I will do this on another vehicle.) The TB cleaner spray is effective but the can is not full. They say you don't need much and they are correct! The fuel system additive is a tough one as well. With out putting the injectors on a test stand a looking at spray pattern and flow before and after there is no real way to tell.
The Seat Of your Pants test tells me the car idles smoother and accelerates smother. Sorry for the lack of live engine data, someone took home the laptop with Autoenginuity installed on it Friday and didn't tell me. I will attempt to use this kit on another vehicle and capture that data.
ALSO ON SOME VEHICLES YOU WILL SEE A STICKER THAT SAYS NOT TO CLEAN THE TB!! DO NOT USE THIS KIT ON THOSE VEHICLES!!! The TB is coated and removing this will cause excess build up in the future. I have seen this most often on Ford and Mazda vehicles. This kit does not warn you about this!
CATALYTIC CONVERTER ISSUES: Also some catalytic converters are not compatible with some intake system cleaners. I know certain Toyota vehicles are not, and they will melt down and spew molten material from the seams (HOW DO I KNOW?? LOL) . This kit did not say anything about compatibility issues.
2004 Chevy Cavalier 2.0L Ecotec 5-speed Manual
107,384 Miles
Plugs and plug boots were changed at 103,000 miles as well as oil and air filter. The car runs Mobil 1 synthetic oil just for those that care. To make sure that the test was accurate I elected not to change the engine oil and filter until I go through one tank of fuel after using the 3M kit.I also did not clean/change the air filter nor did I check or change tire pressure. I wanted the car to be the same before the kit and after to evaluate any benefits of the kit in MPG. Prior to the kit the car was filled with Exxon 87 octane and the MPG was 22.7 !!! The car in the past has gotten over 32MPG so even the tune-up at 103K miles did not improve fuel MPG.
Tools Used:
3M Fuel System Tune-Up Kit
Screw Drive - flat head
Vise Grips - Needle nose as well as Std
Black Electrical Tape
Shop Towels
Using the kit:
This is the engine before I started.
First locate the throttle body, here is the clamp holding the air box to the TB. (On the Ecotec it is under the black air box you see in the pic above)
Remove the clamp holding the air box to the TB.
Next using the regular vise grips remove the crank case vacuum hose from the valve/cam cover. I prefer to use vise grips with the spring steel clamps found on most newer vehicles. There is a tool made just for these clamps but a vise grip plier works well. Be careful not to grip the clamp so hard you bent the travel limiting tab.
After removing the intake hoses, unplugging the IAT sensor and the vacuum line to the fuel pressure regulator remove the air box from the TB. Here is the TB before cleaning.
Next unpack the kit, it includes three products instructions on paper and a DVD showing how to use the product.
This is the intake system cleaner. Note the hose attached to the can, this is not removable.
The directions tell you to un-coil the hose and then place the end of the hose 1/4" in front of the TB blade. The directions say to place the hose end at the 12 o'clock position. I chose the 6 o'clock position to keep the liquid from being pulled into the IAC port and servo. The instructions also tell you not to trim to much off the end of the hose to make clearance in-front of the TB blades. I elected to bend the hose into a smaller U-bend and hold the bend with black electrical tape. I also used black electrical take to hold the hose in position in on the TB. The instructions say the intake boot can be used to do this but not on this application. (The pink you see on the TB blade is the cleaning solution after doing this step)
After the cleaner hose is is place, reinstall all the intake hoses, plug in sensors, and connect lines.
Next Start the car and allow it to reach operating temperature. ( I did this by driving the car before starting) Using the needle nose vise grips clamp the throttle body shaft/cable/fuel pedal to raise the engine RPMs by 500 above normal idle. Instructions say to increase to 1000RPM but this engine idles higher then 500RPM so I set the RPM to 1200 RPM. (This is to move product through the intake manifold as well as ensure the product has room to be pulled past the TB blade and not pool or be pulled into the IAC servo motor and port.
Here is the car with the RPM set.
Next you want to depress the locking tab on the cleaner can and run the car until the can is empty. This should take approx. 15 minutes. (MAKE SURE THE A/C AND HEAT ARE TURNED OFF)
Then the can is empty shut off the car and remove all the intake boots, hoses, connectors, and lines to gain access to the TB. Remove the cleaner hose from the TB. Here again is the after pic from the intake cleaner. Also remove the clamp or vise grips you used to hold the engine at RPM.
Next get the can of TB cleaner.
Prep the can by removing the blue locking tab and inserting the red straw into the spray head.
Spray the cleaner into the TB opening. Spray the face of the blade, some into the IAC port, and the pivot points for the shaft.
Next use the needle nose vise grips to hold the TB blade wide open and spray cleaner on the back side of the blade.
Next work the TB blade open and closed while spraying the cleaner on the shaft going through the TB. Do this for 10-15 seconds and then continue to work the TB blade open and closed for 1 min.
Take a rag or shop towel and spray some cleaner into the TB while holding the blades wide open. Make sure you spray all the way around the TB housing and hit the blade for good measure. Then take a towel or soft brush and wipe away the carbon and oil. I did this until the towel was coming out clean. (Here is the towel after)
Here is the TB after cleaning.
Reassemble the intake system, and be sure to hook everything back up and plug in all the sensors. Make sure all the clamps are tight!
All put back together...
Next grab the fuel cleaning additive.
The additive treats up to 20 gallons at a ration of 1:20. Additional additive is available at most NAPA stores. Add this to the tank. Then drive the car for 10-15 minutes.
Keep in mind that when starting the car for the first time after cleaning the TB it may be hard to start. If you can not get the car to start after cranking for 10 seconds wait 5 minutes for the starter to cool off and then start the car using the flooded process. Press the throttle all the way to the floor and crank the engine. This shuts off the fuel injectors in an attempt to clear out excess raw fuel. Be ready to back off the throttle after the engine starts!!
Initial Results:
The engine feels like it is running smoother. Part throttle tip in seems to be improved as well. Stay tuned for a MPG update after running the fuel additive in this tank of fuel. We will see if I gain any MPG from the cleaning kit.
Impressions:
Overall this system is pretty easy to use. I would say of you can change your own spark plugs, its thougher then oil, or you have a repair manual for your car our should be able to use this kit with out any issues. The intake system cleaner is an unknown as you could not get a visual before and after due to the position of the TB and I also do not own a bore scope. (Anyone have one they want to loan out and I will do this on another vehicle.) The TB cleaner spray is effective but the can is not full. They say you don't need much and they are correct! The fuel system additive is a tough one as well. With out putting the injectors on a test stand a looking at spray pattern and flow before and after there is no real way to tell.
The Seat Of your Pants test tells me the car idles smoother and accelerates smother. Sorry for the lack of live engine data, someone took home the laptop with Autoenginuity installed on it Friday and didn't tell me. I will attempt to use this kit on another vehicle and capture that data.
ALSO ON SOME VEHICLES YOU WILL SEE A STICKER THAT SAYS NOT TO CLEAN THE TB!! DO NOT USE THIS KIT ON THOSE VEHICLES!!! The TB is coated and removing this will cause excess build up in the future. I have seen this most often on Ford and Mazda vehicles. This kit does not warn you about this!
CATALYTIC CONVERTER ISSUES: Also some catalytic converters are not compatible with some intake system cleaners. I know certain Toyota vehicles are not, and they will melt down and spew molten material from the seams (HOW DO I KNOW?? LOL) . This kit did not say anything about compatibility issues.


 rops: WOW I know there must be some other variable causing these results to be as extreme as they are. Did the calculation and that is a 28% increase. Temperatures this week have been hotter than the previous week, but the humidity has been down from the 70% range to the mid to low 50% range. I will update this again after I run another 1/2 tank of fuel and see if the results stay the same. My driving distance, and habits did not change from week to week.