Mike Phillips
Active member
- Dec 5, 2022
- 51,004
- 6
All about the Defelsko Paint Thickness Gauge by Mike Phillips
LOTS of interest in paint thickness gauges! And for good reasons!
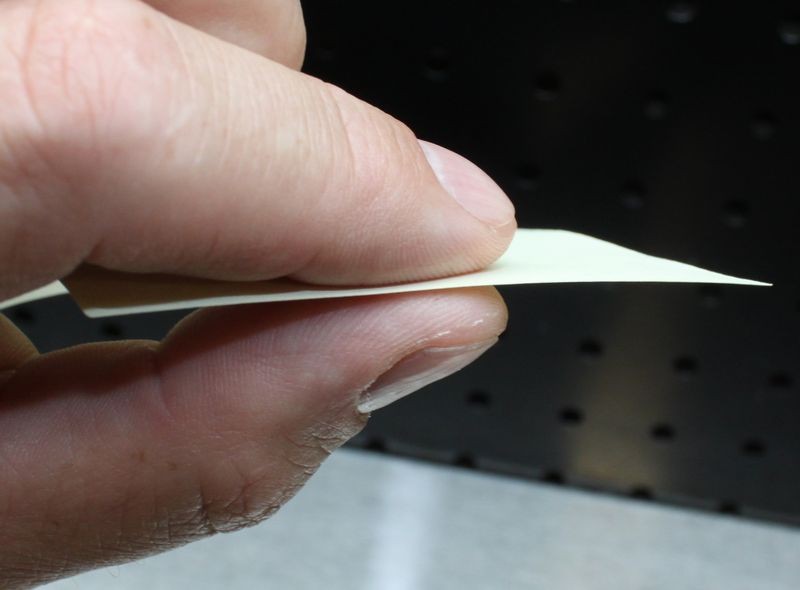
PAINT IS THIN!
That's right, the factory clearcoat on a new car is around 2 mils thin. A post-it note is around 3 mills thin. So if you want to get scared... feel a post-it note between your thumb and your forefinger and the thin feeling you feel will be transmitted to your brain and cause you to say...
Wow! that's thin!
Relax...
If you're working on a brand new car that no one has ever worked on before and you know what you're doing and you only use high quality abrasive technology, then you have nothing to worry about.
Be worried...
If you're working on an older car 2, 3 4 years old or older, and you DON'T know who worked on the car before, how many times it's been buffed and what they used for tools and abrasive technology, then you're treading in uncharted waters or to be more detail specific - you could be buffing on very thin paint.
Paint thinness is just one reason to own a quality paint thickness gauge like the Defelsko PosiTest DFT Combo Electronic Paint Thickness Gauge. This is one of the most accurate paint thickness gauges money can buy PLUS it's incredibly user friendly. These are the two aspects that set it apart from less expensive brands.
Super accurate
The Defelsko PosiTest DFT Combo Electronic Paint Thickness Gauge is what is called a 3% gauge. What this means is that reading is accurate within 3% of the measured film. Less expensive gauges don't offer this type of accuracy and when you're measuring something that's thin to start with it makes a huge difference.
To learn more about all the cool benefits and features about this gauge, click the link below as they are already laid out very clearly on the Autogeek.com website.
Defelsko PosiTest DFT Combo Electronic Paint Thickness Gauge
This article isn't to try to sell or convince you to invest in a quality tool. Each person can determine this for themselves. This article is for those that have already made the decision to purchase the Defelsko PosiTest DFT Combo Electronic Paint Thickness Gauge and show you how to use correctly.
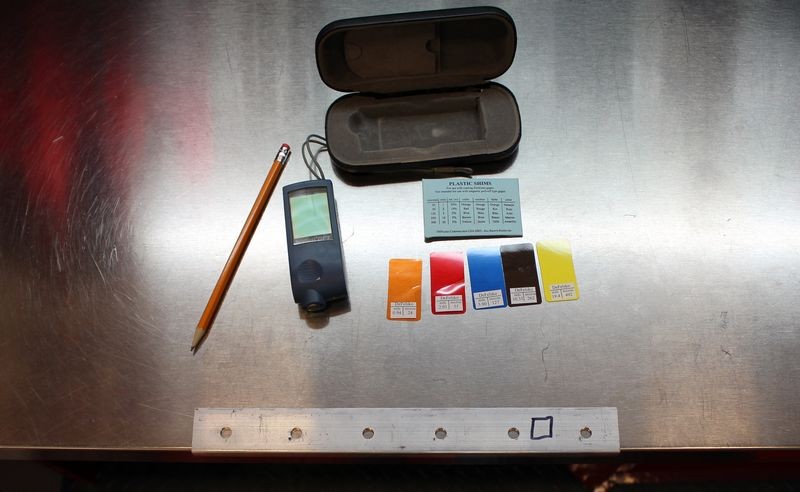
What's in the case?
Inside the protective carrying case you'll find,
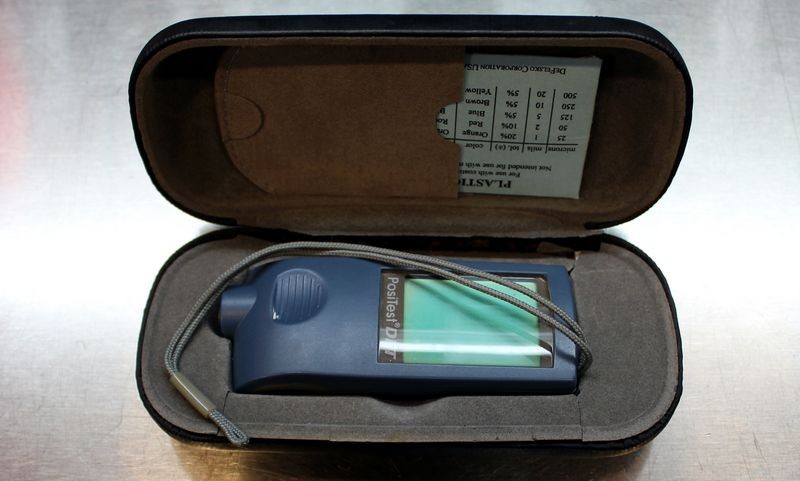
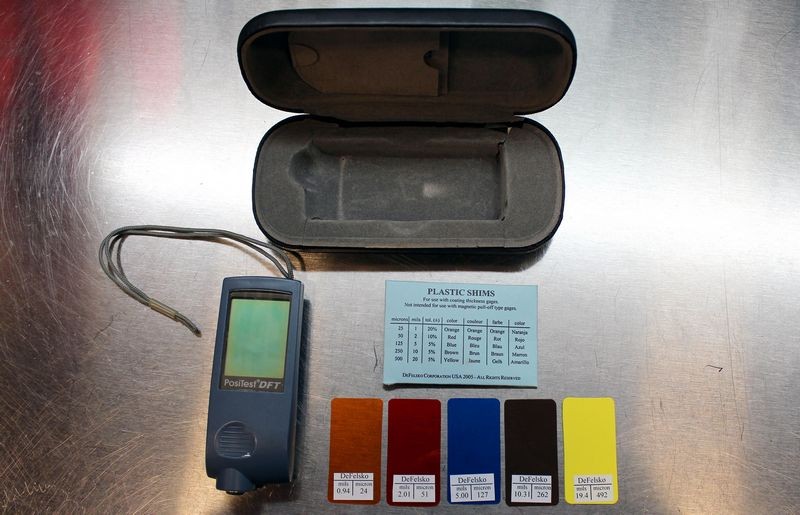
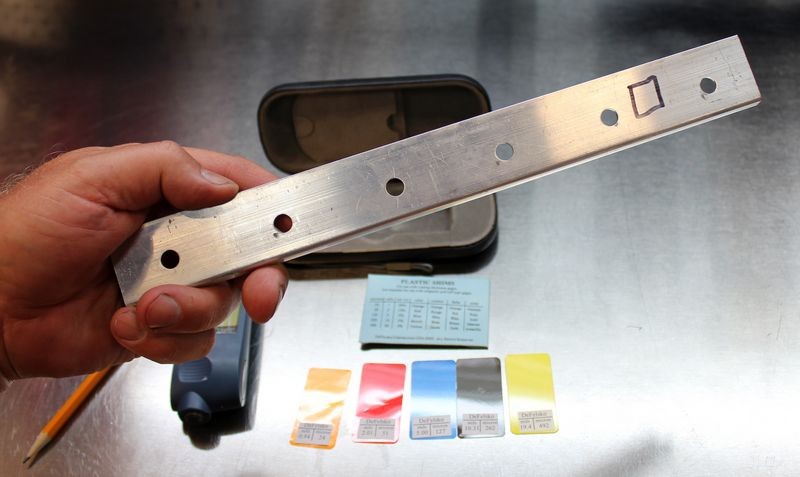
The paper sleeve that hold the plastic shims also includes specific information about the shims. Each shim also has a sticker to identify it.

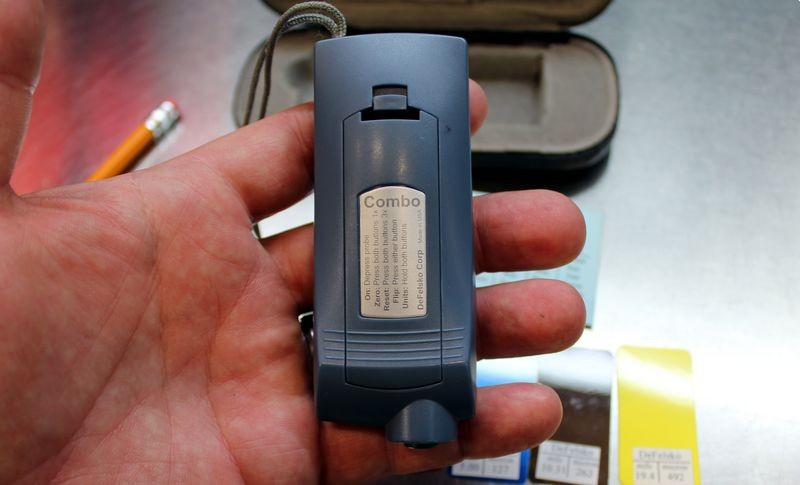
The front of the gauge includes the large LCD screen and a serrated grip for your thumb or forefinger.

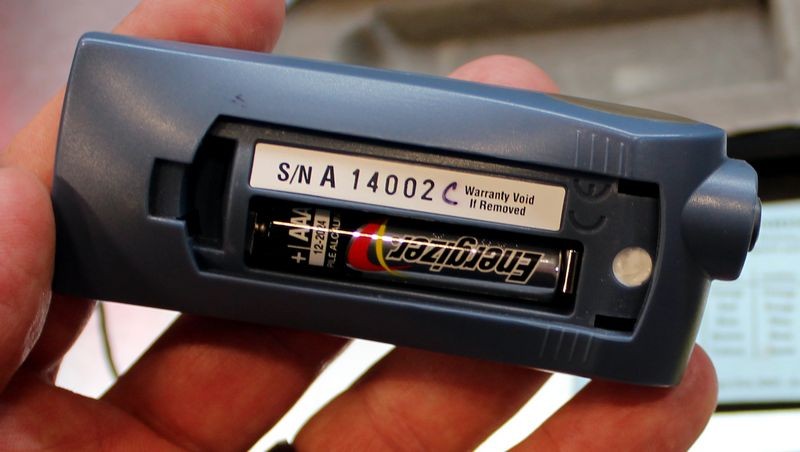
The back of the gauge has a removable panel to access and replace the AAA battery. There are also serrations on the bottom backside to enable your thumb or forefinger to grip the gauge.
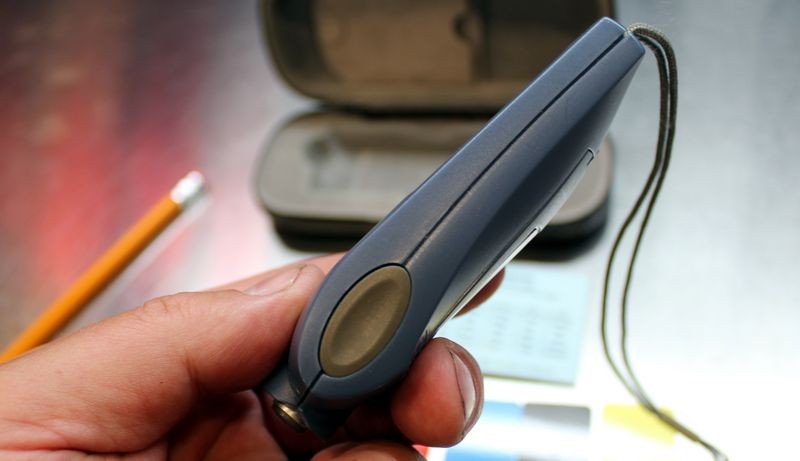
There is a spring loaded button at the bottom of both sides of the gauge. These are used to switch between functions, display options and calibration.

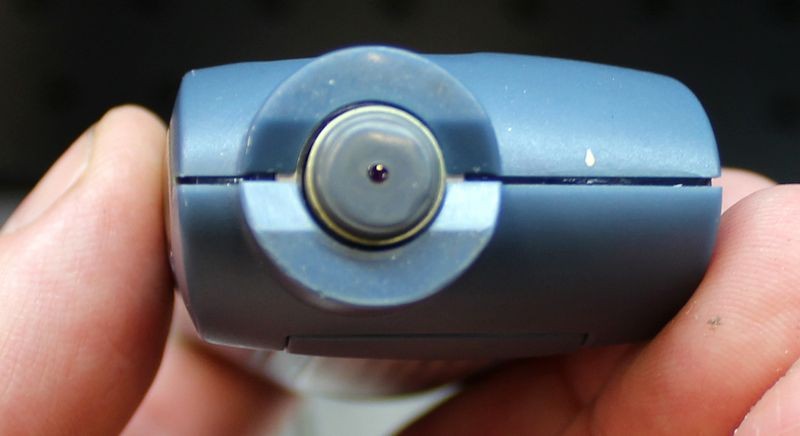
The bottom of the gauge houses the ruby tipped probe. This probe is rounded, not sharp so it won't damage surfaces.
Factory calibrated
The Defelsko PosiTest DFT Combo Electronic Paint Thickness Gauge is calibrated from the factory and ready to use right out of the case. There's no need for you to do anything. Immediately after removing it from the case you can begin using it.
How to turn the gauge on
There is no on-switch. The gauge turns on automatically when you press the probe against a metal surface.
How to re-calibrate the gaugeI
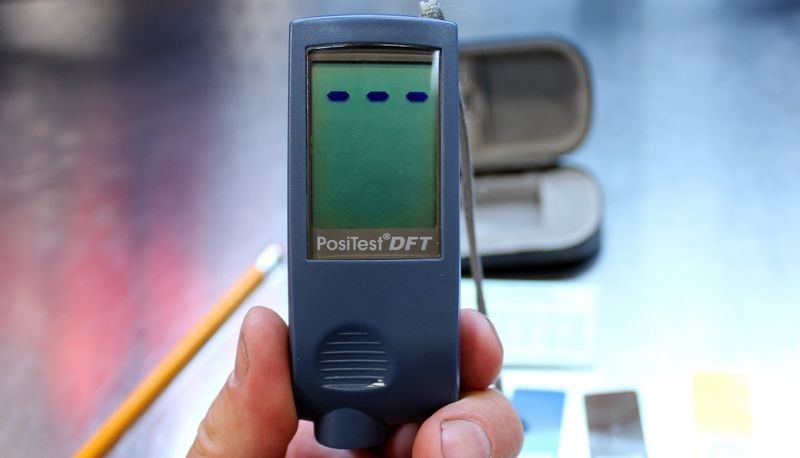
If for some reason you want to re-calibrate the gauge yourself it's SUPER EASY - simply press the two side buttons at the same time 3 times fast. This will make the gauge do its own self test, calibration and reset. In the two pictures below you can see my thumb and forefinger on the buttons. I press them at the same time- three times fast and then you'll see a set of three lines or dashes flash as they move up and down the display. After the calibration the gauge will read 0.0 - The gauge is now re-calibrated and read to use or if you like, you can test the accuracy of the gauge using the shims.

Mike's comment...
Because it's fast and easy to re-calibrate the gauge I make it habit to re-calibrate the gauge before using it.
How to check calibration accuracy
If you want to verify the accuracy then here's how to do it.
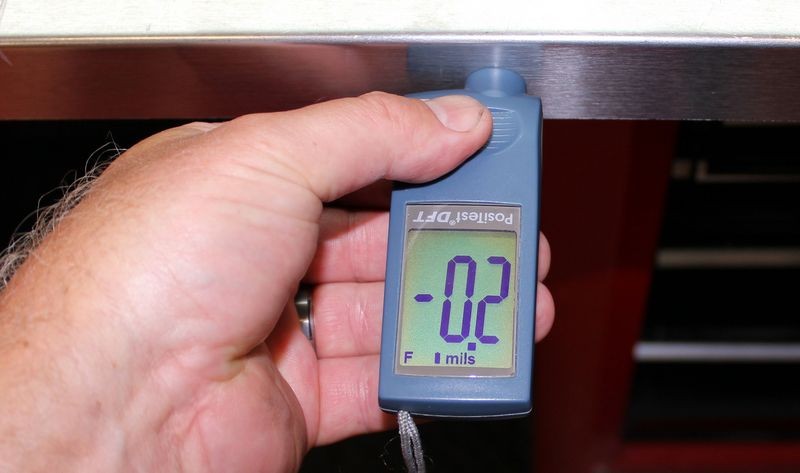
First, you need a completely flat metal surface. Interestingly enough, the stainless steel bench top you see in the pictures is not perfectly flat. So I can't use it for my control. I found a chunk of aluminum with a smooth surface and my testing shows that it measures to be completely flat. By this I mean, when I measure the surface of the metal I get a 0.0 reading. This is what you need in order measure the shims and verify accuracy.
I checked and double checked the area where I've drawn a box using a Sharpie marker and it consistently reads 0.0
Here you can see the area I'm measuring is completely flat. This is important when checking for accuracy with the shims.

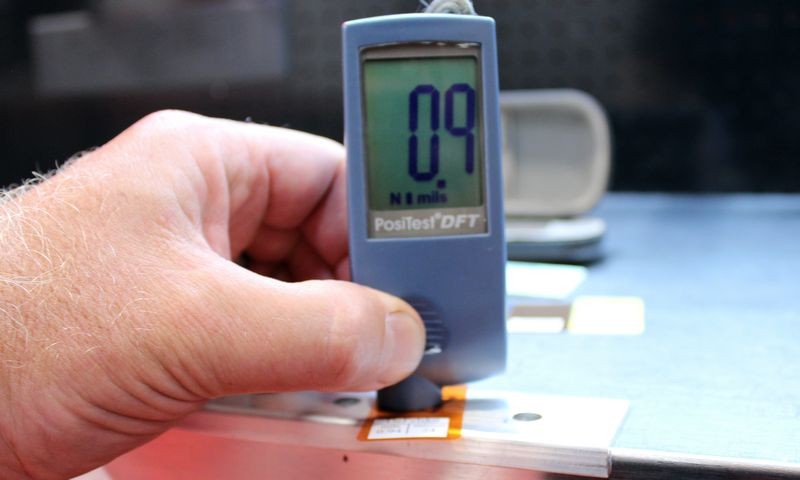
Next, place one of the shims on your control area and measure the shim. In the below picture I'm measuring the 9.4 mil shim. The 0.9 reading is within 3% accuracy.
Next I measure the 2.01 mil shim and the 2.0 mil reading is within 3% accuracy.

Next I measure the 5.0 mil shim and the 5.1 mil reading again, is within 3% accuracy.

Up next is the 10.31 mil ship and the 10.0 mil reading is within 3% accuracy.

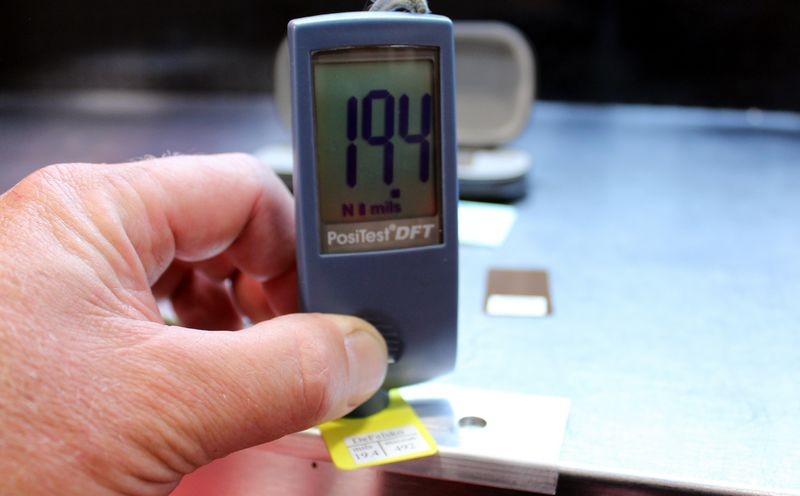
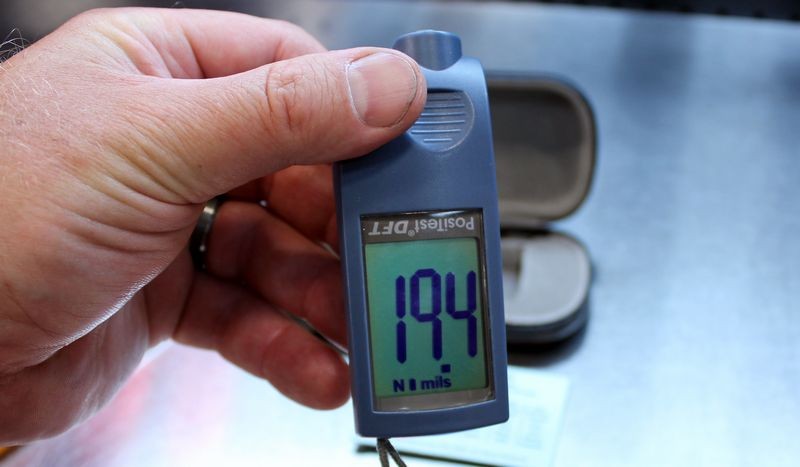
And last, the 19.4 mil shim and the reading is 19.4 mil
How to switch between mils and microns
To switch between mils and microns press the two side buttons and hold them till you see the measurement indicator on the screen change.

How to flip the screen vertically
To flip the screen to read the opposite direction simply press either of the side buttons one time and you'll see the display flip.
Flipping the screen can make it easier to read depending on the panel you're measuring.
Measuring a vertical panel
Measuring a horizontal panel

Not only is the Defelsko PosiTest DFT Comb Electronic Paint Thickness Gauge accurate right out of the box and easy to calibrate it also retains its accuracy regardless of external temperatures. For example our garage is 78 degrees as I did the testing while the outside temperature is 91 degrees. If I were to do the same test outside I would get the same measurements. That's the kind of quality you get when you purchase a high quality paint thickness gauge.
On Autogeek.com
Defelsko PosiTest DFT Combo Electronic Paint Thickness Gauge
Remember...
Quality doesn't cost money... it makes money...
")
LOTS of interest in paint thickness gauges! And for good reasons!
PAINT IS THIN!
That's right, the factory clearcoat on a new car is around 2 mils thin. A post-it note is around 3 mills thin. So if you want to get scared... feel a post-it note between your thumb and your forefinger and the thin feeling you feel will be transmitted to your brain and cause you to say...
Wow! that's thin!
Relax...
If you're working on a brand new car that no one has ever worked on before and you know what you're doing and you only use high quality abrasive technology, then you have nothing to worry about.
Be worried...
If you're working on an older car 2, 3 4 years old or older, and you DON'T know who worked on the car before, how many times it's been buffed and what they used for tools and abrasive technology, then you're treading in uncharted waters or to be more detail specific - you could be buffing on very thin paint.
Paint thinness is just one reason to own a quality paint thickness gauge like the Defelsko PosiTest DFT Combo Electronic Paint Thickness Gauge. This is one of the most accurate paint thickness gauges money can buy PLUS it's incredibly user friendly. These are the two aspects that set it apart from less expensive brands.
Super accurate
The Defelsko PosiTest DFT Combo Electronic Paint Thickness Gauge is what is called a 3% gauge. What this means is that reading is accurate within 3% of the measured film. Less expensive gauges don't offer this type of accuracy and when you're measuring something that's thin to start with it makes a huge difference.
To learn more about all the cool benefits and features about this gauge, click the link below as they are already laid out very clearly on the Autogeek.com website.
Defelsko PosiTest DFT Combo Electronic Paint Thickness Gauge
This article isn't to try to sell or convince you to invest in a quality tool. Each person can determine this for themselves. This article is for those that have already made the decision to purchase the Defelsko PosiTest DFT Combo Electronic Paint Thickness Gauge and show you how to use correctly.
What's in the case?
Inside the protective carrying case you'll find,
- The Defelsko PosiTest DFT Combo Electronic Paint Thickness Gauge.
- Directions for use.
- Five plastic shims for measuring and testing accuracy.
The paper sleeve that hold the plastic shims also includes specific information about the shims. Each shim also has a sticker to identify it.
The front of the gauge includes the large LCD screen and a serrated grip for your thumb or forefinger.
The back of the gauge has a removable panel to access and replace the AAA battery. There are also serrations on the bottom backside to enable your thumb or forefinger to grip the gauge.
There is a spring loaded button at the bottom of both sides of the gauge. These are used to switch between functions, display options and calibration.
The bottom of the gauge houses the ruby tipped probe. This probe is rounded, not sharp so it won't damage surfaces.
Factory calibrated
The Defelsko PosiTest DFT Combo Electronic Paint Thickness Gauge is calibrated from the factory and ready to use right out of the case. There's no need for you to do anything. Immediately after removing it from the case you can begin using it.
How to turn the gauge on
There is no on-switch. The gauge turns on automatically when you press the probe against a metal surface.
How to re-calibrate the gaugeI
If for some reason you want to re-calibrate the gauge yourself it's SUPER EASY - simply press the two side buttons at the same time 3 times fast. This will make the gauge do its own self test, calibration and reset. In the two pictures below you can see my thumb and forefinger on the buttons. I press them at the same time- three times fast and then you'll see a set of three lines or dashes flash as they move up and down the display. After the calibration the gauge will read 0.0 - The gauge is now re-calibrated and read to use or if you like, you can test the accuracy of the gauge using the shims.
Mike's comment...
Because it's fast and easy to re-calibrate the gauge I make it habit to re-calibrate the gauge before using it.
How to check calibration accuracy
If you want to verify the accuracy then here's how to do it.
First, you need a completely flat metal surface. Interestingly enough, the stainless steel bench top you see in the pictures is not perfectly flat. So I can't use it for my control. I found a chunk of aluminum with a smooth surface and my testing shows that it measures to be completely flat. By this I mean, when I measure the surface of the metal I get a 0.0 reading. This is what you need in order measure the shims and verify accuracy.
I checked and double checked the area where I've drawn a box using a Sharpie marker and it consistently reads 0.0
Here you can see the area I'm measuring is completely flat. This is important when checking for accuracy with the shims.
Next, place one of the shims on your control area and measure the shim. In the below picture I'm measuring the 9.4 mil shim. The 0.9 reading is within 3% accuracy.
Next I measure the 2.01 mil shim and the 2.0 mil reading is within 3% accuracy.
Next I measure the 5.0 mil shim and the 5.1 mil reading again, is within 3% accuracy.
Up next is the 10.31 mil ship and the 10.0 mil reading is within 3% accuracy.
And last, the 19.4 mil shim and the reading is 19.4 mil
How to switch between mils and microns
To switch between mils and microns press the two side buttons and hold them till you see the measurement indicator on the screen change.
How to flip the screen vertically
To flip the screen to read the opposite direction simply press either of the side buttons one time and you'll see the display flip.
Flipping the screen can make it easier to read depending on the panel you're measuring.
Measuring a vertical panel
Measuring a horizontal panel
Not only is the Defelsko PosiTest DFT Comb Electronic Paint Thickness Gauge accurate right out of the box and easy to calibrate it also retains its accuracy regardless of external temperatures. For example our garage is 78 degrees as I did the testing while the outside temperature is 91 degrees. If I were to do the same test outside I would get the same measurements. That's the kind of quality you get when you purchase a high quality paint thickness gauge.
On Autogeek.com
Defelsko PosiTest DFT Combo Electronic Paint Thickness Gauge
Remember...
Quality doesn't cost money... it makes money...