Bad Overspray on '07 Buick

richy

New member
Joined
Mar 27, 2007
Messages
5,158
Reaction score
0
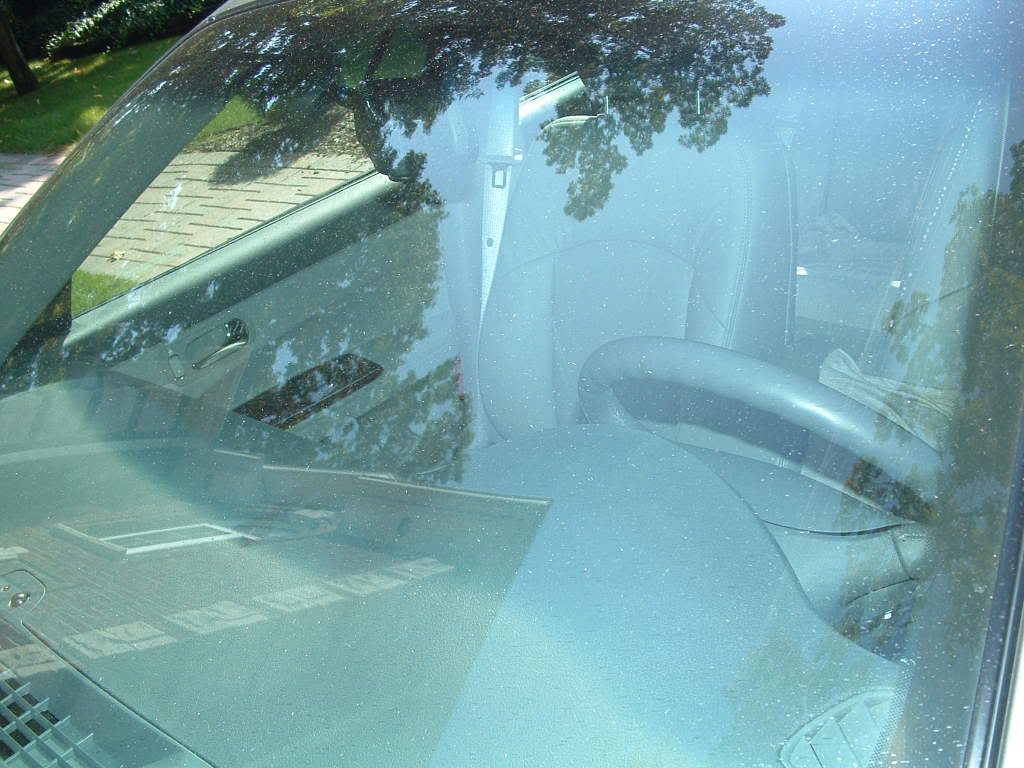
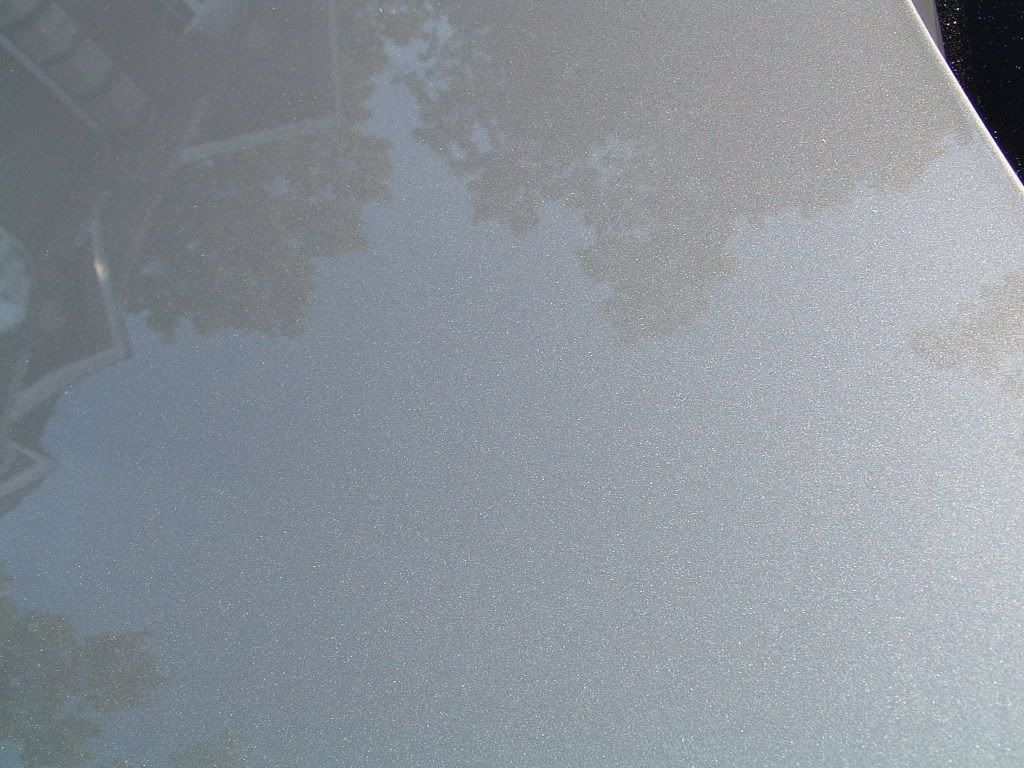
I got this job because the owner had parked his car behind his business while a very smart, considerate and otherwise genius neighbour decided to spray paint (!) his porch. (Almost as bad as "hey mister..did the job, but it's a Ferrari and not a porch!") Anyway, there are only a few pics, both before and after, but the pics of the glass really show the spray on the car. It was everywhere!! I thought "no problem- I'll clay it" when I booked the job. It's a brand new car (5000km). First I tried Riccardo clay and wasn't surprised when it didn't work as it's pretty mild stuff so I switched to my purple, very, very aggressive clay and IT DIDN'T EVEN TOUCH IT! It was like I never did it..no effect whatsoever..that's when my foul language began:D. The side surfaces actually weren't too bad. I was able to correct them using a white pad with my rotary and DG 501, followed by 601 and 105. The top surfaces, including the glass were terrible. I kept upping the ante. 1st I tried SIP with an orange pad..nothing. Next I tried SIP with wool and my rotary..nothing. Finally I tried Presta Ultra Cutting Creme (it's very gritty stuff) with an orange pad and it worked..I didn't need to use the wool with it. Every top surface including glass got the following: UCL, 501, 601 and 105. All surfaces were followed up with AW. I just vacuumed inside..this was primarily an outside job. Every edge was done by hand for safety..I didn't tape anything off on this one.

Process:

Wash
Clay with aggressive purple clay (useless)
UCL with orange pad via rotary at 5 to 6
501 with white pad via UDM @ 6.
601 applied by hand
105 applied/removed by hand
AW entire

Interior:

Vacuum

BEFORES:
10-08-200732.jpg

10-08-200733.jpg

10-08-200734.jpg


AFTERS:
10-08-200789.jpg

10-08-200790.jpg

10-08-200788.jpg

10-08-200787.jpg


Great work there bro! I have always wondered what would be the process if clay was unable to get the job done. You do absolutely incredible work with the rotary. You know some of us newbies to the rotary would really benefit from guys like you and Toto. If you ever get a detail and have the time to get really specific about all your steps with the rotary I know I would love to read it. I know it would be a little time consuming to write but it would be a very beneficial "study guide" for us really wanting to master the rotary.

Meghan should get you and Toto together and make a "How to rotary" video. I know I would be first in line for it. I would also like to know how you went through the decision process of polish/pad combos once the clay didn't work. Again some very impressive work. But I must say I'm disappointed not to see those stripes in the carpet.:D
 
What a mess. Good job saving his bacon. Did the neighbor pay for it?
 
Sweet job there Richy! Thanks for the heads up on those products used. I gotta overspray job to do whenever I get a blip in my schedule and feel like tackling it.
 
This is how I got into detailing, lovely work Richy!!!
 
taillamps and badges suggest a Lacrosse. I find the Clay, Menzerna 106FF, and a good paint sealant like DP Shield Shine works well on these rides.
 
Great work there bro! I have always wondered what would be the process if clay was unable to get the job done. You do absolutely incredible work with the rotary. You know some of us newbies to the rotary would really benefit from guys like you and Toto. If you ever get a detail and have the time to get really specific about all your steps with the rotary I know I would love to read it. I know it would be a little time consuming to write but it would be a very beneficial "study guide" for us really wanting to master the rotary.

Meghan should get you and Toto together and make a "How to rotary" video. I know I would be first in line for it. I would also like to know how you went through the decision process of polish/pad combos once the clay didn't work. Again some very impressive work. But I must say I'm disappointed not to see those stripes in the carpet.:D
The Wolfmeister..you, sir, are too kind!! I was very fortunate to be trained from the guys from RM Restorations in Chatham, Ontario (they do multi-million$$ car restoration work). I try to be specific with details (no pun intended) with my write-ups but if you ever have a question on a specific that was not covered, please do ask! The rotaries I use are actually not expensive units. One is an old fixed speed (2300 rpm) and the other is an inexpensive unit although it has a trigger lock (both do) which is one feature that I cannot live without. My point is that method is more important than equipment.
As to the decision process..it was just trial and error. I kept trying a more aggressive approach and each one didn't do the job. The ultimate step which I did not have to use is the UCL with wool.
As far as the stripes..I know!! I was kinda disappointed that no interior work was needed. I did try with the dry vac, but the carpets need to get wet to imprint the stripes.
Thanks again.

quote=HighEndDetail;142768]Glad you were able to get the overspray off.[/quote]
HighEnd..thank you..it had me worried for a bit:eek:

What a mess. Good job saving his bacon. Did the neighbor pay for it?
No he didn't. My father in law and his partner are 2 older Italian men who don't like making waves. The neighbour keeps an eye on their store when they're not there, so they didn't want to piss him off.

Sweet job there Richy! Thanks for the heads up on those products used. I gotta overspray job to do whenever I get a blip in my schedule and feel like tackling it.
You're welcome on the heads up. I have learned so much from AG, I try to add to the knowledge base when I have an opportunity. Especially in this case where different products worked on the sides vs the top.

Very well done.
Thank you for the compliment Bulla.

This is how I got into detailing, lovely work Richy!!!
P1et..thanks a lot. Not that I would ever give up my day job, but I do really enjoy how rewarding this is. First you find out on your own ride, then you branch out. I very much enjoy seeing the looks on the owners' face when they see the completed job.

taillamps and badges suggest a Lacrosse. I find the Clay, Menzerna 106FF, and a good paint sealant like DP Shield Shine works well on these rides.
That's funny you say LaCrosse. Our 2 countries are so very similiar in some respects, yet so different in others. Buick decided not to use the name LaCrosse here b/c in Quebec it is a slang for oral sex IIRC. It's called the Allure here. The clay (my most aggressive) didn't do a bloody thing in this case, neither would 106. A wool pad with SIP was also ineffective..it only got about 60-70% out. I have a yellow foam on order..this would have been the car to try it on. I chewed up my orange pad on this job.:(
 
just a question,what about using laquer thinner to wipe the top down and if that doesnt get it you ever think of wet sanding it with 1500 grit then useing a microfinishing compound with a high speed dewalt 849buffer at 1000rpm with a wool pad then to finish it of use a slotted pad to remove swirl marks with compound then an orbital with a pre cleaning lotion and orbital again to wax it... hmmm just a thought wonder how much time thinner would have saved not mention cleaning all those pads....
 
just a question,what about using laquer thinner to wipe the top down and if that doesnt get it you ever think of wet sanding it with 1500 grit then useing a microfinishing compound with a high speed dewalt 849buffer at 1000rpm with a wool pad then to finish it of use a slotted pad to remove swirl marks with compound then an orbital with a pre cleaning lotion and orbital again to wax it... hmmm just a thought wonder how much time thinner would have saved not mention cleaning all those pads....

Style..thanks for mentioning that. Yes, after clay wasn't working, I also tried solvents to no avail. Since I had to do the entire car, including glass, I did not want to get into wet sanding. The compound route did work well in this case. Plus the DG will give it great protection and looks!
 
Back
Top