Bought a PC & Wolfgang Twins Need Help Choosing Right Pads

Macleod52

New member
Joined
Mar 31, 2014
Messages
9
Reaction score
0
I finally had the money/guts to buy a 7424XP. I bought the Wolfgang Twins as that is what was used in one of the instructional video's I watched and I figured it saves me the trouble of having to research all the various options. I bought the following Kit from Autogeek

Porter Cable 5.5 x 7/8 Inch CCS Foam Pad Kit, buffing pads, foam pads, Porter Cable dual action polisher

My question is what pads do I need to use with the Wolfgang system? I saw in a different post that the gray pads were recommended for the Finishing Glaze. My kit only comes with Orange, White, and Blue.

Should I use the White or Blue for the Finishing glaze?

As for the swirl remover I believe I need to use the orange. I have a corvette who has various swirls and some blemishes on the front bumper.

Are three pads going to be enough to do each step on an entire car in one sitting or do I need to do half the car one day, wash and try the pads, and do the other half the next day?
 
Also, is it possible to use the 5.5" pads in small area's where a 4" pad would be ideal? I spent a small fortune on this kit and all new microfiber and don't have the money to by additional pads/backing plate.
 
First thing, do a test spot. You may not need really aggressive pads and products. Second, yeah it sucks, but make sure you have PLENTY of pads. Work clean, it's beneficial
 
What are you working on?


:)

I will be working on a 2001 corvette first and eventually a 2009 Malibu.

The Corvette's paint is in fairly decent shape for the age/mileage (85k). It has various swirl marks but not horrible. The front bumper seems to be "hazy" It's not as vibrant and shiny as the rest of the paint. It's mainly right around the front emblem. I don't think it was repainted.

The Malibu is in pretty decent shape as I've had it since new. I just have minor swirling due to the dealership putting it through their car wash (even after I told them not to) and from drying/sealant application.

I think the white pad with the swirl remover will be sufficient on the Malibu but I think I may need the orange pad for the Vette. I will try getting some pictures of the Vette later today.
 
I will be working on a 2001 corvette first and eventually a 2009 Malibu.

The Corvette's paint is in fairly decent shape for the age/mileage (85k). It has various swirl marks but not horrible.

Modern Corvettes have a known reputation and history of having very hard clear coats.

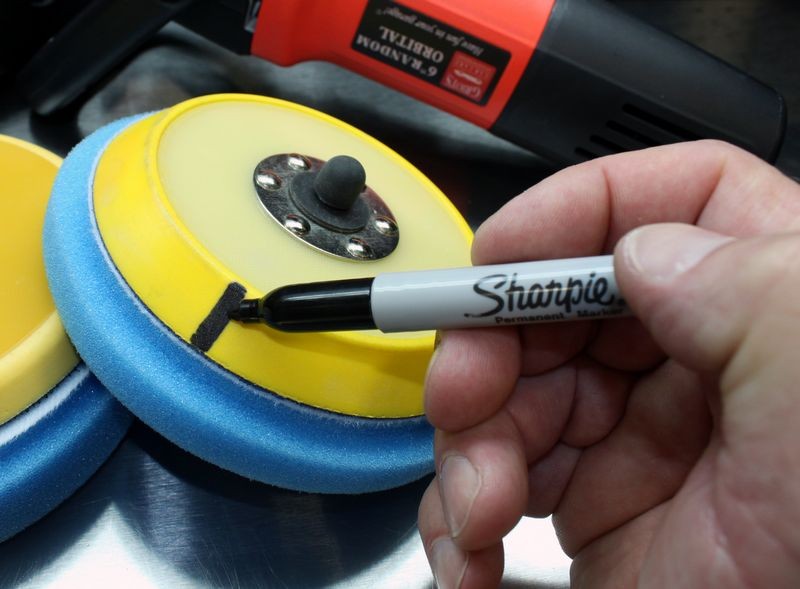
So use the Wolfgang Total Swirl Remover with the Orange pads on speed 6.0, you want to be full out on a Porter Cable. Mark your backing plate like I show in the below article and be sure to hold the pad flat, press down firmly but monitor and make sure via the black mark that the pad is rotating. Move the polisher very slowly and only work small sections at a time, a little bigger than the average microfiber towel spread out on a panel.

2' by 2' is TOO BIG.


Use the Wolfgang Finishing Glaze with the white polishing pad. Do same as above but you can move the polisher a little faster, tackle a larger area and you don't have to press down as much.


The front bumper seems to be "hazy" It's not as vibrant and shiny as the rest of the paint. It's mainly right around the front emblem. I don't think it was repainted.

All the urethane body parts are painted with paint that has more flex agent in it and these parts on Corvettes historically fade and become duller than the rest of the body panels.


I think the white pad with the swirl remover will be sufficient on the Malibu


Probably.

I'd recommend getting more pads. It's faster time wise to switch to a clean, dry pad and buff the car out than it is to try to chug along with a pad that WILL become wet and saturated with product as you try to work around an entire car.

That or only buff out a panel or two at a time and then hand wash and dry your pads for the next detailing session.


:)
 
Video: Mark your backing plate to make it easy to see pad rotation


MarkYourBackingPlate01.jpg


Here's a quick video that show how and why to mark your backing plate to see and monitor pad rotation while doing any correction or polishing steps.


[video=youtube_share;QM8PnDooZP8&hd=1"]How To Check Pad Rotation on a DA Polisher -...[/video]​


It's also important to maintain pad rotation with PC style tools when using a one-step cleaner/wax or AIO type product on neglected paint.

It's not vital to maintain pad rotating when applying a finishing wax or finishing paint sealant to a finish that you've just buffed out.

:xyxthumbs:
 
How To Do a Test Spot


A Test Spot
TestSpot03.jpg


A Test Spot is where you take the products, pads, tools and your best technique and buff one small section, usually on a horizontal panel, to test out these things to see if they'll create the results you want, hope for and dream about in some cases.

If your choice of products, pads, tools and technique works to remove the defects and restore the finish to your expectations, then theoretically you should be able to duplicate the same process to the rest of the vehicle and create the same results.

If your choice of products, pads, tools and your technique doesn't create the results you want, hope for and dream about then you can come to the forum and post what you're seeing and we'll do our best to help you tweak your technique, substitute different products, pads and/or tools to see you through to success.


:xyxthumbs:
 
Thanks, Mike. Here are the pictures of the paint. The hazing can be found on the headlight covers and hood too. It almost looks like water spot/soap damage.

IMG1_zps2a539318.jpg


IMG2_zps6ac3c217.jpg


IMG3_zps3a8a34d1.jpg


IMG4_zpsc0d93654.jpg


IMG5_zps51a9feb5.jpg


IMG6_zpse5142874.jpg
 
Also, she was clayed back in August/September when I got her, but I will be claying again prior polishing. I'll also be following up with Zaino after I'm done.

Is there a trick to get close to the edge of the emblem without damaging the pad? Do I just push up against it as the foam will conform to the shape or will that tear up the pad?
 
You could tape the emblem up or you can get the pad just close enough without touching it. IMO if u bring the pad just close enough that will be fine. It's to small of an area to stick out like a sore thumb without polishing that cm of paint that the pad didn't touch.

Sent from my HTC6435LVW using AG Online
 
I certainly don't have better-more experience-wisdom as Mike, and many others here, but it is probably wise to stay away from any-all emblems with the DA's pads for the reason you state, and that if these emblems are not in any way simply removable without damage, or a huge hassle, then you'll have to finish out those areas near-next to the emblems by hand.

It is always wise to mask any, and all emblems and trim pieces, keeps them cleaner for one, and will eliminate any possible damage to those emblems from polishes, and heat.

As for your limited quantity of pads on hand, Mike does show in his tutorial vids how to clean pads on the fly, but even this aid is still only a stopgap measure, that no matter what, the pads will not only load up with spent-tired polishes, but also dirts-contaminants and removed paint.

To continue on with just one pad will not only place lots of wear and tear on a pad, but also lessen the quality of your polishing processes.

But, there is no harm, and no foul of not doing the entire vehicle in one session-go. You can for say just concentrate on the Hood, get that fully corrected, and after, you may seal that area with the Zaino, or whatever other finishing protectant product you choose. Probably then best to mask the edges of the hood as you then continue on to then polish the fenders, nose, etc.

It means fully washing cleaning pads, then the wait for each to fully dry.

Yes, the costs do add up, products, pads, towels, machines, etc. If you feel that your arsenal lacks, and that you might be going at such a job under-complimented, then it might be wiser waiting until you can afford to purchase such, rather than going at the correction ill equipped, then having later regrets.
Mark
 
Thanks for all the responses. I went ahead and purchased three more orange and white pads along with a 3.5 backing plate with three orange and white pads. I'd rather get the car done in one day if I can.
 
To continue on with just one pad will not only place lots of wear and tear on a pad, but also lessen the quality of your polishing processes.

I have three pads of each color but I also have an air compressor. I am curious if using the air compressor to blow off the dried dusty product is quick and sufficient to keep going with one pad for the whole car after each section?
 
I have three pads of each color but I also have an air compressor. I am curious if using the air compressor to blow off the dried dusty product is quick and sufficient to keep going with one pad for the whole car after each section?

Usually the pros won't do such. Even on very small cars. Compressed air can also bring along some other problems, if your air supply is not filtered. What can come out of a regular run of the mill unfiltered compressor's air lines, can be particles of dust, small particles-shards of rust from the tank, filthy moisture, etc.

Some use pad washers as a tool. I'm unsure how many use one of these, then continue on with a correction? Just another shortcut, and perhaps not an optimum one?
 
Thanks for all the responses. I went ahead and purchased three more orange and white pads along with a 3.5 backing plate with three orange and white pads. I'd rather get the car done in one day if I can.

I think it was wise. Virtually all will tell you, better to have more than what you need on hand, than not enough.

For sure, a garage is a great aid. One can go at it with less than optimum conditions or lighting (getting dark outside) that a garage is a great thing to have, and something I myself don't have here.

In 9 months, I retire. One of my dreams-aspirations, would be to again have myself another Corvette. I've once owned a 1967 Ragtop, but without a Garage here, and a cherry Corvette just sitting under a carport, and with the wind storms we have here (we're having one today here in fact) I think I would go totally insane! LOL

I always liked that 50th Anniversary 2003 Vette, and would love finding a low mileage example. That pretty dark red metallic they had that year just wows me immensely!
 
Thanks, Mike. Here are the pictures of the paint. The hazing can be found on the headlight covers and hood too. It almost looks like water spot/soap damage.

The Wolfgang Total Swirl Remover should take care of all the defects shown in your pictures, just be sure to move the polisher slowly over the paint when buffing a section.

Is there a trick to get close to the edge of the emblem without damaging the pad?

Do I just push up against it as the foam will conform to the shape or will that tear up the pad?

Just have a steady hand and move the polisher slowly around the emblem. I'd recommend taping it off too like you see Louie doing here with some 3M Blue Vinyl Tape.

1990_Corvette_Autogeek_Mike_Phillips_024.jpg


If you buff too long on the black plastic that the Corvette emblems are made of you'll burn through the black layer of plastic and expose white plastic.

One of the first things I do when I inspect any Corvette with plastic emblems is look for signs of damage from all the detailers that have gone before me.


:)
 
I bet that thing looks awesome when its finished! I have found, at least on hydro tech pads, I can use it for a while, spray pad cleaner on it, rinse it, wring it out, put it in a towel and wring it out again and keep on buffing. That may be due to the closed cell structure of the foam, however it worked fine for me on my last detail.
 
So I made my first attempt on Tuesday. The car turned out pretty good although there are still some swirl marks left. I started off with a small area but as I made my passes I unintentionally made the working area larger. I'll have to give it another go and either tape off my sections or try to keep it in a small working area.

One thing I noticed is that the hood/front bumpers look like they were sandblasted. What I mean is that the paint/clear coat looks as if it has been dimpled by rocks/sand and it looks like tons of tiny little dents. I'm not sure I can correct these. Has anyone seen anything like this before?
 
Back
Top