Navigation
Install the app
How to install the app on iOS
Follow along with the video below to see how to install our site as a web app on your home screen.
Note: This feature may not be available in some browsers.
More options
Style variation
You are using an out of date browser. It may not display this or other websites correctly.
You should upgrade or use an alternative browser.
You should upgrade or use an alternative browser.
Controlling pigment removal using Mirror Glaze #7 - 1953 MG
- Thread starter johnnyO
- Start date
2black1s
New member
- Jan 23, 2015
- 1,783
- 1
JohnnyO...
Keep it simple. Do the #7 often. As much as 6 - 8 times. (since yours is thin--rub gently. Wipe off gently, repeat 24 hours apart. Stop if megs #7 wipes off wet).
Then get Meguire's yellow wax....Seal it.
Done....
Tom
Tom, johnnyO, and BrokenHero
I don't think the yellow wax is a good choice in this situation. You are talking #26, right?
My reasoning... The #26 dries to a cloudy haze. Anything that dries to a cloudy haze (#26, or other traditional LSPs) will penetrate the porous/irregular finish and cloud it up as it dries. I've experienced this over and over on old compromised paint over the years.
To illustrate this point, I just applied a thin coat of #26 and Ultimate Wax to my benchtop that is finished with an automotive acrylic enamel (semi-gloss black). The #26 is on the right, the Ultimate on the left. Both have flashed for about 10-15 minutes in the photo. Notice how white, cloudy, hazy the #26 is? That is what happens when it penetrates the compromised paint and then dries. Now that haziness is embedded into the compromised paint and the only way to get rid of it is to re-saturate the area.
To the left of the #26 is the Ultimate Wax. Notice how much clearer the Ultimate is than the #26? That is why I recommended that particular product as something to try. I don't think it will produce the same level of cloudiness as I'd expect of the #26 or most other LSPs. Will it work ultimately (no pun intended)? I don't know. But I think it has a much better chance than anything that dries to a chalky appearing haze.
View attachment 73090
The multiple applications of #7 is a good recommendation but it gets expensive and time consuming. That's where my "protectant" recommendation comes into play. It's cheap, easy, and takes no more time than a quick detailer would take if performed often. Once the paint is saturated with the #7, the protectant is a good way to maintain it and keep the paint saturated.
Regardless of how you process old paint in this condition, it is never done. Paint in this condition takes constant care and maintenance. For me, the "protectant" is a very efficient way to provide that on-going care.
Of course, all of my suggestions are based on my own logic and experience. Yours may differ. And keep in mind, none of the products suggested by anyone in these threads are, or were, designed for the paint conditions discussed here. It's all an experiment at this point.
johnnyO
New member
- Mar 31, 2021
- 19
- 0
- Thread starter
- #23
JohnnyO...
Keep it simple. Do the #7 often. As much as 6 - 8 times. (since yours is thin--rub gently. Wipe off gently, repeat 24 hours apart. Stop if megs #7 wipes off wet).
Then get Meguire's yellow wax....Seal it.
Done....
Tom
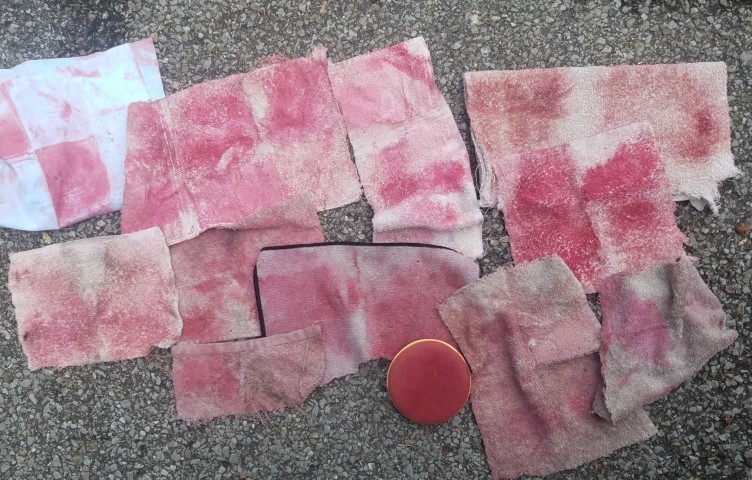
As far as saturating the paint, have YOU found that after multiple applications of #7 with a clean towel that the amount of pigment transferring to the towel becomes less with each layer? (Assuming there is still substantial color on the car.) Mike talks about reusing the application towel because it filters the pigment removed, but in my case I think it spreads the loose stuff around.
When I formerly used a similar Griot's product, the paint absorbed so much that I would just spread it with a gloved hand. I was not doing the overnight soak at the time, but I'm now learning from you and others that it really helps.

TMQ
Active member
- Mar 4, 2015
- 2,243
- 0
I use a clean Terry cloth towel each time.
In your case, you probably need to stop after a couple 24 hour soaks. I don't know if the Griots sealant used over the years made the paint different, softer or unstable. I don't know.
Maybe just go straight to the wax Mike gave you. Let us know if that helps or not.
Your MG paint is something I have not tried and I am following your process.
Tom
2black1s
New member
- Jan 23, 2015
- 1,783
- 1
An old time trick was to use kerosene on single stage paint. I'm not sure how long that would last. Fluid film is lanolin and I'm sure it would leave a sticky film. Not good on the top side but beneficial on the underside.
I vaguely remember kerosene as a car care product being mentioned somewhere on this forum and if I recall correctly it was not well received. In most cases that is justifiably so.
But in this case I think it's a very reasonable recommendation. The oils in the kerosene would penetrate, protect, and brighten what is left of the original paint in a similar way to my "protectant" recommendation, although I don't think it would last as long.
I've never used kerosene on any car of mine but I definitely remember my father telling me about it... Primarily as a rust preventative during the Midwestern winters.
johnnyO
New member
- Mar 31, 2021
- 19
- 0
- Thread starter
- #27
My reasoning... The #26 dries to a cloudy haze. Anything that dries to a cloudy haze (#26, or other traditional LSPs) will penetrate the porous/irregular finish and cloud it up as it dries. I've experienced this over and over on old compromised paint over the years.
To illustrate this point, I just applied a thin coat of #26 and Ultimate Wax to my benchtop that is finished with an automotive acrylic enamel (semi-gloss black). The #26 is on the right, the Ultimate on the left. Both have flashed for about 10-15 minutes in the photo. Notice how white, cloudy, hazy the #26 is? That is what happens when it penetrates the compromised paint and then dries. Now that haziness is embedded into the compromised paint and the only way to get rid of it is to re-saturate the area.
To the left of the #26 is the Ultimate Wax. Notice how much clearer the Ultimate is than the #26? That is why I recommended that particular product as something to try. I don't think it will produce the same level of cloudiness as I'd expect of the #26 or most other LSPs. Will it work ultimately (no pun intended)? I don't know. But I think it has a much better chance than anything that dries to a chalky appearing haze.
I'm starting to think Cloudy Haze from LSP over #7 and compromised paint would be a good topic for Mike to address. You show a preference for Ultimate Wax, so I wonder what ingredients in an LSP are prone to ghosting or hazing over single stage. My guess is that manufacturers only care how their product performs on clear cloats sice that's where their profit centers are focused. Any benefits to vintage car owners would be secondary.
Eastwood has a Patina Preserver product that is parafin based spray that needs masking and frequent reapplication. Probably better suited for a museum car not a driver.
I tried a small test on my car with Fluid Film, let it dry for a few hours then buffed it off. There is barely any change in appearance, but it is clear and probably offers an invisible layer of protection. A real test would be to treat several panels with sealants and LSP options, then subject them to a water spray for hours. This would be a great science fair project for a student! BUT, as this forum attests, the stability, age and type of single stage makes all the difference.
Another matter regarding LSP for vintage car owners with compromised paint is whether enhanced appearance or protection from the elements is a priority.
I still like the idea of sealing with #20 as it has some cleaners to remove stray pigment left on top from #7 feeding. Are there any proven DA techniques for sealing in the sealant? Then would you hand apply some after every couple hundred miles of road use? Or maybe a light coat of #7? Lots to consider.... Gotta go now and do more Comet and #7.
Thanks for all the input.
John
2black1s
New member
- Jan 23, 2015
- 1,783
- 1
Like I said earlier... "It's all an experiment at this point".
While I haven't worked with paint in this condition in a long time, my previous experimenting with such is where my "protectant" suggestion comes from. At the time, I found the protectant to provide the best results with the least amount of effort of everything I tried.
I also found that anything that dries to a cloudy haze should be avoided.
It would be nice if I had something in your condition to play with now. While my baseline to start would be #7 and various protectants, I MIGHT try some other products as a sealer over the #7/protectant, although my inclination is that the "protectant" applied regularly would suffice for my own expectations.
Of the things I might try, one that comes to mind is a clear acrylic liquid floor coating. I remember using that on tires well before there were any tire dressings... not even Armor-All was around yet. Another is Meguiar's Ultimate Black Trim Restorer.
While these may not provide the desired result, it's this kind of thinking outside of the norm where you might find the product/process that meets your expectations. Your own imagination, logic, and willingness to try various approaches and products, even those outside of the prevailing auto care world, are the key. Try something, anything that meets your "logic" sense on a small inconspicuous spot and see what it does.
Keep in mind, most major car care product manufacturers don't have products designed specifically for these situations. I don't think the market is big enough and there could be too many liability issues related to consumer "unrealistic" expectations and usage.
I've pretty much exhausted all I have to offer. But if anything else comes to mind I'll be sure to let you know.
If you are using number 7 and want to top it, I'd stay in the Meguiars line. Their products contain mineral oils and are compatible. Other product lines might work different and as the number 7 oils sweat in the sun might make for blotchiness. Number 26 might be a good choice.
Mike Phillips
Active member
- Dec 5, 2022
- 51,004
- 8
I'm starting to think Cloudy Haze from LSP over #7 and compromised paint would be a good topic for Mike to address.
My guess is - it's the solvents in any liquid or paste wax or synthetic sealant that are dulling down the results created by the #7.
What this is showing you is how SENSITIVE the paint is when it is this OLD, fragile and also unstable.
I still like the idea of sealing with #20 as it has some cleaners to remove stray pigment left on top from #7 feeding.
If the #20 is leaving an acceptable finish - all things considered - I would go with it.
Are there any proven DA techniques for sealing in the sealant? Then would you hand apply some after every couple hundred miles of road use?
Or maybe a light coat of #7?
Lots to consider....
If the #20 is leaving an acceptable finish, then after all your #7 work, apply the #20, allow it to fully dry, wipe it off and then stick a fork in this project and call it done.
Periodically, try just re-applying the #20 and if this restores the crisp look previously achieved then go with it. IF not - you're back to #7
I truly think that most of the issues you're dealing with are (in no particular order),
- Age of paint.
- Quality of paint when new and now.
- Frailty of paint.
- Unstable pigments in what's left of the resin.
You simply don't have much to work with but myself and I'm sure everyone else reading this thread and following along appreciate all your hard work and passion. And I'm also confident the work you've shared here and especially the updates and results will help others that find this thread in the future working on something similar.
")
johnnyO
New member
- Mar 31, 2021
- 19
- 0
- Thread starter
- #31
My research and spot testing phases are complete and now I'm off to the races! Here are the before and after photos of the left rear fender following the second overnight saturation of #7. There was minimal pigment removal at this stage compared with the first application and I've very pleased.
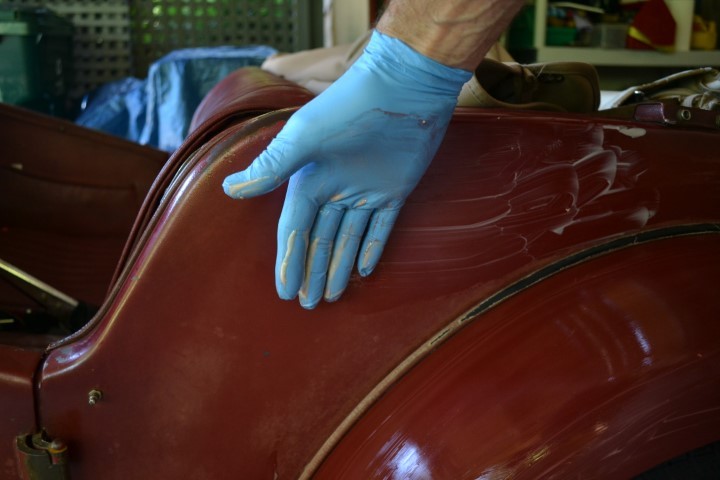
The sensation when wiping down a saturated panel with terry cloth is strange compared to other detailing tasks. It's greasy, but wipes off with some resistance. Then flip the towel and buff to an even sheen. It's like massaging shoe polish into leather. I'm looking forward to another application to see if more pigment is removed. I doubt the color will get any deeper.
Obviously I want to keep the primer show-through to a minimum. The Comet rubdown with a kitchen sponge was gentle and initially did not remove pigment because of the oils remaining from the Griot's product. Once some red showed in the suds, I knew to stop. On future panels, I'll go even easier on areas where the grey primer is already showing through. There are some areas of bare steel with zero surface rust and I'm anxious to see how the #7 is absorbed into the pores there.
The small light patches near the fender bolt holes are remnants of tbe Rexine (impregnated cloth) welting that are stuck to the panel and I saw no reason to go after it.
If the #20 is leaving an acceptable finish, then after all your #7 work, apply the #20, allow it to fully dry, wipe it off and then stick a fork in this project and call it done.
Periodically, try just re-applying the #20 and if this restores the crisp look previously achieved then go with it. IF not - you're back to #7
I truly think that most of the issues you're dealing with are (in no particular order),
- Age of paint.
- Quality of paint when new and now.
- Frailty of paint.
- Unstable pigments in what's left of the resin.
WristyManchego
New member
- Sep 8, 2018
- 282
- 0
For 0 pigment/material removal, use Owartol Polytrol. It will restore, seal, and protect just about anything.
johnnyO
New member
- Mar 31, 2021
- 19
- 0
- Thread starter
- #33
For 0 pigment/material removal, use Owartol Polytrol. It will restore, seal, and protect just about anything.
Sounds kind of like Penetrol, which I think may leave a surface film when dry. I'm already into the #7 procedure, but appreciate about learning something new.
WristyManchego
New member
- Sep 8, 2018
- 282
- 0
Sounds kind of like Penetrol, which I think may leave a surface film when dry. I'm already into the #7 procedure, but appreciate about learning something new.
Penetrol is a surface prep product, completely different to Polytrol.
johnnyO
New member
- Mar 31, 2021
- 19
- 0
- Thread starter
- #35
Penetrol is a surface prep product, completely different to Polytrol.
OK, so no surface film. Perhaps more like Fluid Film or Gibbs Brand in that it is wiped off. I see rave reviews online about using on plastics and vinyls. but not so much on oxidized single stage paint. Can you refer me to any success stories. I'm always game for using a product "off label" as the drug companies call it, which is actually what the #7 overnight soak is.
WristyManchego
New member
- Sep 8, 2018
- 282
- 0
OK, so no surface film. Perhaps more like Fluid Film or Gibbs Brand in that it is wiped off. I see rave reviews online about using on plastics and vinyls. but not so much on oxidized single stage paint. Can you refer me to any success stories. I'm always game for using a product "off label" as the drug companies call it, which is actually what the #7 overnight soak is.
If you’re in the resto game, I’d test it yourself to see how it works and if the finish is for you.
I’m in the process of testing its polish-ability after curing on severely oxidised gelcoat.
johnnyO
New member
- Mar 31, 2021
- 19
- 0
- Thread starter
- #37
Mike & Tom,
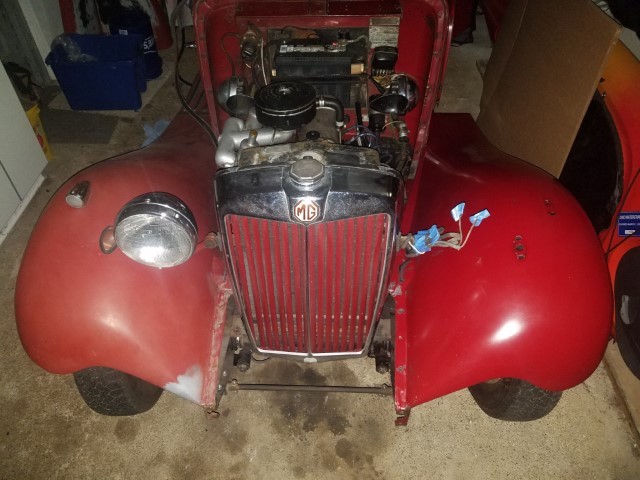
Just when I'm making steady process... I took a panel outdoors and noticed some streaking that became more apparent after waxing. (Remember that on my car, the fenders, running boards, fuel tank and hood have been removed from the body tub for this project.) This photo shows an area about 6" across. My guess is that I need to do much better than the 90% removal guideline of the #7 and not rely on the hand applied sealant clearing up any residual loose pigment. I can kick myself for not noticing this earlier, but lighting and angle make all the difference.

As I proceed, one option is to machine apply the #20 sealant, which I assume would correct any uneven #7 appearance. Would a spray detailer help locate ay missed areas?
Another is to gorge all areas with #7 until 100% even saturation, which I see is Tom's preference.
Tom, when you say "wipes off wet", does that indicate saturation to the point there is no drag on the towel when removing a heavy layer of #7? After an hour or so of dry time?
Mike, now that this panel is nicely sealed and waxed, I've just rubbed in a heavy coat of #7 but I question whether it will penetrate down to the pigment. Is it best to do a gentle Coment cleanse until I see some pigment coming off, then resume the #7 rubdown ? Or is there a spray prep that will effectively strip off the protection?
Oh, I've been using a new kitchen sponge for the Comet rubdown. I'm thinking a folded terry towel about 8" square would do a better job. What's your preference?
BTW, at the rate I'm going, it's going to take about 5-6 bottles of #7 to do the entire car.
Just when I'm making steady process... I took a panel outdoors and noticed some streaking that became more apparent after waxing. (Remember that on my car, the fenders, running boards, fuel tank and hood have been removed from the body tub for this project.) This photo shows an area about 6" across. My guess is that I need to do much better than the 90% removal guideline of the #7 and not rely on the hand applied sealant clearing up any residual loose pigment. I can kick myself for not noticing this earlier, but lighting and angle make all the difference.
As I proceed, one option is to machine apply the #20 sealant, which I assume would correct any uneven #7 appearance. Would a spray detailer help locate ay missed areas?
Another is to gorge all areas with #7 until 100% even saturation, which I see is Tom's preference.
JohnnyO...
Keep it simple. Do the #7 often. As much as 6 - 8 times. (since yours is thin--rub gently. Wipe off gently, repeat 24 hours apart. Stop if megs #7 wipes off wet).
Tom, when you say "wipes off wet", does that indicate saturation to the point there is no drag on the towel when removing a heavy layer of #7? After an hour or so of dry time?
My guess is - it's the solvents in any liquid or paste wax or synthetic sealant that are dulling down the results created by the #7.
What this is showing you is how SENSITIVE the paint is when it is this OLD, fragile and also unstable.
Mike, now that this panel is nicely sealed and waxed, I've just rubbed in a heavy coat of #7 but I question whether it will penetrate down to the pigment. Is it best to do a gentle Coment cleanse until I see some pigment coming off, then resume the #7 rubdown ? Or is there a spray prep that will effectively strip off the protection?
Oh, I've been using a new kitchen sponge for the Comet rubdown. I'm thinking a folded terry towel about 8" square would do a better job. What's your preference?
BTW, at the rate I'm going, it's going to take about 5-6 bottles of #7 to do the entire car.
Mike Phillips
Active member
- Dec 5, 2022
- 51,004
- 8
My research and spot testing phases are complete and now I'm off to the races!
Here are the before and after photos of the left rear fender following the second overnight saturation of #7.
There was minimal pigment removal at this stage compared with the first application and I've very pleased.
Looks GREAT!
:dblthumb2:
Mike Phillips
Active member
- Dec 5, 2022
- 51,004
- 8
Mike, now that this panel is nicely sealed and waxed, I've just rubbed in a heavy coat of #7 but I question whether it will penetrate down to the pigment.
It will.
Is it best to do a gentle Coment cleanse until I see some pigment coming off, then resume the #7 rubdown ? Or is there a spray prep that will effectively strip off the protection?
Anyone doing the Comet Technique should do it once and call it good.
Oh, I've been using a new kitchen sponge for the Comet rubdown. I'm thinking a folded terry towel about 8" square would do a better job. What's your preference?
I'd use Terry Cloth.
BTW, at the rate I'm going, it's going to take about 5-6 bottles of #7 to do the entire car.
Next time anyone at Meguair's gets a pay check they can thank you and also me.
:dunno:
johnnyO
New member
- Mar 31, 2021
- 19
- 0
- Thread starter
- #40
Comparing before and after
While some faded finishes can be revived with a wonder potion in a single afternoon, this 68-year-old "compromised" paint requires lots of potion plus lots of patience... and finesse... and optimism... and rags!
Here's what seems to work, keeping in mind that swirls (not the scratch kind) and streaks can appear after product removal anywhere throughout the process. This requires reapplication and some massaging to correct.
Comet wash. Go lightly with a wet terry cloth rag, using even palm pressure plenty. Keep going until you see color coming off on the rag. Knowing when to stop comes with experience. I see some areas now on a completed fender where it appears there is still some hazy red oxidation. Or is that primer showing?? I chose to leave as is, remembering that it's the patina of a vintage car as a whole that matters. (For detailers who agonize over a bitty paint chip or flaw, working on a survivor requires a totally different perspective and expectations.)
Meguiars #7 Show Car Glaze. Several rubdowns and overnight soaks. Every panel on my car reacts differently. At the factory, the body tub was sprayed separately from the fenders and other bolt-on parts. Primers varied and the paint mix likely did also. It was of no concern how the finish would weather over a period of a half-century or more. The #7 does an amazing job penetrating the paint and eventually resulting in a shiny film over the surface. That "Show Car Glaze" is remarkably luxurious on single stage paint, but for whatever reasons it tones down after a few days. Mike Phillips writes that only 90% of the product needs to be removed because the next product application will even it out. Not so on my fragile pigment. It requires additional thin coats rubbed in with a cloth followed by a light buff. Note that at each stage of this process, less and less pigment comes off on the towel (with still sufficent color on the car).
Sealant or wax? I found that the saturated shiny appearance can preserved by applying old-fashioned Meguiar's #16 Carnauba (thanks, Mike) at this point. I tried Gold Class Carnauba, thinking the modern technology might give greater protection, but it messed with the pigment. I also experimented with #20 and #21 sealants, deciding that #21 was more compatible.... except that both clouded the finish as previously mentioned. There's maybe a 15-20% reduction in clarity, but if you had never seen the ultra-rich #7 shine, you would find the sealant to look just fine. If gloss is your thing and you like to baby your car, then you're done at this point!


Meguiars #21 Synthetic Sealant.
Because my MG is driven regularly (except when in pieces while receiving a spa treatment), I decided that a modern sealant would be beneficial. Also, because the rear fenders and fuel tank are a lighter red, the muted red on the front and sides from the sealant helps the overall appearance of the car. The first coat was rubbed on with a pad and was absorbed into the finish. I followed with a second coat a few hours later, which stayed on the surface (as Meguiars intended).
Meguiars #16 Professional Paste Wax (discontinued). After a few light coats and a micro fiber buff, there's now a bit of gloss to the warm red sheen. Time will tell how long this treatment will last. I'm hoping an occasional rewax with #16 when I see a change in water beading is all that will be needed.
Road car or show car?? an editorial
Preservation vs restoration.... When a car has no rust, dents or respray, it could be considered a survivor that's worthy of 100+ hours of paint preservation as detailed here. Original paint has become a rarity on old British sports cars (pre-1970) and I think if more owners knew that a drab finish can be respectfully restored without harmful compounding, there would be more vintage cars on the road that proudly show their age.
MGs, from the 1920s through the T-Series that ended with the TF in 1955, were true sports cars, historically known for their reliability and proficiency at hill climbs, rallies, gymkhanas, trials and other club events. Just like Jeeps look cool after a dirty off-road adventure, so do vintage sports cars with running boards. Cars with character are cool!
Classic MG hill climb
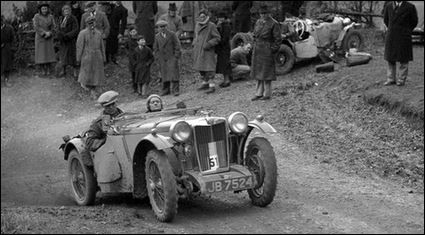
2019 Bellefontaine Hill Climb Revival (J. Loewe photo)

While some faded finishes can be revived with a wonder potion in a single afternoon, this 68-year-old "compromised" paint requires lots of potion plus lots of patience... and finesse... and optimism... and rags!
Here's what seems to work, keeping in mind that swirls (not the scratch kind) and streaks can appear after product removal anywhere throughout the process. This requires reapplication and some massaging to correct.
Comet wash. Go lightly with a wet terry cloth rag, using even palm pressure plenty. Keep going until you see color coming off on the rag. Knowing when to stop comes with experience. I see some areas now on a completed fender where it appears there is still some hazy red oxidation. Or is that primer showing?? I chose to leave as is, remembering that it's the patina of a vintage car as a whole that matters. (For detailers who agonize over a bitty paint chip or flaw, working on a survivor requires a totally different perspective and expectations.)
Meguiars #7 Show Car Glaze. Several rubdowns and overnight soaks. Every panel on my car reacts differently. At the factory, the body tub was sprayed separately from the fenders and other bolt-on parts. Primers varied and the paint mix likely did also. It was of no concern how the finish would weather over a period of a half-century or more. The #7 does an amazing job penetrating the paint and eventually resulting in a shiny film over the surface. That "Show Car Glaze" is remarkably luxurious on single stage paint, but for whatever reasons it tones down after a few days. Mike Phillips writes that only 90% of the product needs to be removed because the next product application will even it out. Not so on my fragile pigment. It requires additional thin coats rubbed in with a cloth followed by a light buff. Note that at each stage of this process, less and less pigment comes off on the towel (with still sufficent color on the car).
Sealant or wax? I found that the saturated shiny appearance can preserved by applying old-fashioned Meguiar's #16 Carnauba (thanks, Mike) at this point. I tried Gold Class Carnauba, thinking the modern technology might give greater protection, but it messed with the pigment. I also experimented with #20 and #21 sealants, deciding that #21 was more compatible.... except that both clouded the finish as previously mentioned. There's maybe a 15-20% reduction in clarity, but if you had never seen the ultra-rich #7 shine, you would find the sealant to look just fine. If gloss is your thing and you like to baby your car, then you're done at this point!
Meguiars #21 Synthetic Sealant.
Because my MG is driven regularly (except when in pieces while receiving a spa treatment), I decided that a modern sealant would be beneficial. Also, because the rear fenders and fuel tank are a lighter red, the muted red on the front and sides from the sealant helps the overall appearance of the car. The first coat was rubbed on with a pad and was absorbed into the finish. I followed with a second coat a few hours later, which stayed on the surface (as Meguiars intended).
Meguiars #16 Professional Paste Wax (discontinued). After a few light coats and a micro fiber buff, there's now a bit of gloss to the warm red sheen. Time will tell how long this treatment will last. I'm hoping an occasional rewax with #16 when I see a change in water beading is all that will be needed.
Road car or show car?? an editorial
Preservation vs restoration.... When a car has no rust, dents or respray, it could be considered a survivor that's worthy of 100+ hours of paint preservation as detailed here. Original paint has become a rarity on old British sports cars (pre-1970) and I think if more owners knew that a drab finish can be respectfully restored without harmful compounding, there would be more vintage cars on the road that proudly show their age.
MGs, from the 1920s through the T-Series that ended with the TF in 1955, were true sports cars, historically known for their reliability and proficiency at hill climbs, rallies, gymkhanas, trials and other club events. Just like Jeeps look cool after a dirty off-road adventure, so do vintage sports cars with running boards. Cars with character are cool!
Classic MG hill climb
2019 Bellefontaine Hill Climb Revival (J. Loewe photo)